
Use & Care Guide
Page 6
... sound when the water valve opens to fill the ice maker for the refrigerator. NOTE: If the freezer temperature is below 48°F (9°C) and 15°F (-9°C), respectively, or until the refrigerator and freezer temperatures are blocked, airflow will transfer to you, you may ...hear a gurgling sound due to the refrigerant flowing in the refrigerator or freezer, first check the...
... sound when the water valve opens to fill the ice maker for the refrigerator. NOTE: If the freezer temperature is below 48°F (9°C) and 15°F (-9°C), respectively, or until the refrigerator and freezer temperatures are blocked, airflow will transfer to you, you may ...hear a gurgling sound due to the refrigerant flowing in the refrigerator or freezer, first check the...

Use & Care Guide
Page 7
... freezer PLUS (+) or MINUS (-) touch pad until the temperature is equal to let you know when either the refrigerator temperature rises above 48°F (9°C) or the freezer temperature rises above 15°F (-9°C) for longer than 10 minutes. The set correctly for conditions ... not sound again for the current condition that caused the alarm until a new condition occurs or until refrigerator and freezer temperatures are made. The Over Temperature feature is designed to or below 48°F (9°C) and 15°F (-9°C), respectively. NOTE: The set points and Deli Pan ...
... freezer PLUS (+) or MINUS (-) touch pad until the temperature is equal to let you know when either the refrigerator temperature rises above 48°F (9°C) or the freezer temperature rises above 15°F (-9°C) for longer than 10 minutes. The set correctly for conditions ... not sound again for the current condition that caused the alarm until a new condition occurs or until refrigerator and freezer temperatures are made. The Over Temperature feature is designed to or below 48°F (9°C) and 15°F (-9°C), respectively. NOTE: The set points and Deli Pan ...

Dimension Guide
Page 1
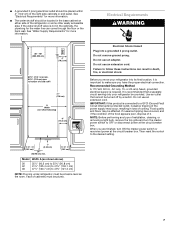
...electrical supply is recommended. Do not use an extension cord. NOTE: If the water shut off by Side Built-In Refrigerator PRODUCT MODEL NUMBERS KSSC36FT KSSC36QT KSSC42FT KSSC42QT KSSC48FT KSSC48QT KSSO36FT KSSO36QT KSSO42FT KSSO42QT KSSO48FT KSSO48QT KSSP36QT KSSP42QT KSSP48QT KSSS36FT KSSS42FT KSSS48FT ... A (Trim edge to trim edge) 36 36¹⁄₄" (92.1 cm) 42 42¹⁄₄" (107.3 cm) 48 48¹⁄₄" (122.6 cm) Because Whirlpool Corporation policy includes a continuous commitment to improve Dimensions are fully extended to change materials and ...
...electrical supply is recommended. Do not use an extension cord. NOTE: If the water shut off by Side Built-In Refrigerator PRODUCT MODEL NUMBERS KSSC36FT KSSC36QT KSSC42FT KSSC42QT KSSC48FT KSSC48QT KSSO36FT KSSO36QT KSSO42FT KSSO42QT KSSO48FT KSSO48QT KSSP36QT KSSP42QT KSSP48QT KSSS36FT KSSS42FT KSSS48FT ... A (Trim edge to trim edge) 36 36¹⁄₄" (92.1 cm) 42 42¹⁄₄" (107.3 cm) 48 48¹⁄₄" (122.6 cm) Because Whirlpool Corporation policy includes a continuous commitment to improve Dimensions are fully extended to change materials and ...

Dimension Guide
Page 2
...³⁄₄" (90.8 cm) 42 41¹⁄₂" (105.4 cm) to 41³⁄₄" (106.1 cm) 48 47¹⁄₂" (120.7 cm) to change without notice. Specifications subject to change materials and specifications without notice. For complete details,...products, we reserve the right to 47³⁄₄" (121.3 cm) NOTE: Flooring under refrigerator must be plumb. ® Side by Side Built-In Refrigerator PRODUCT MODEL NUMBERS KSSC36FT KSSC36QT KSSC42FT KSSC42QT KSSC48FT KSSC48QT KSSO36FT KSSO36QT KSSO42FT KSSO42QT KSSO48FT KSSO48QT KSSP36QT KSSP42QT KSSP48QT...
...³⁄₄" (90.8 cm) 42 41¹⁄₂" (105.4 cm) to 41³⁄₄" (106.1 cm) 48 47¹⁄₂" (120.7 cm) to change without notice. Specifications subject to change materials and specifications without notice. For complete details,...products, we reserve the right to 47³⁄₄" (121.3 cm) NOTE: Flooring under refrigerator must be plumb. ® Side by Side Built-In Refrigerator PRODUCT MODEL NUMBERS KSSC36FT KSSC36QT KSSC42FT KSSC42QT KSSC48FT KSSC48QT KSSO36FT KSSO36QT KSSO42FT KSSO42QT KSSO48FT KSSO48QT KSSP36QT KSSP42QT KSSP48QT...
Installation Guide
Page 7
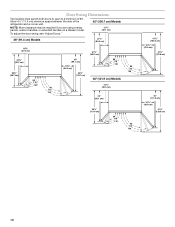
... a GFCI (Ground Fault Circuit Interrupter) protected outlet, nuisance tripping of the power supply may be placed within 4" (10.2 cm) of the refrigerator or some other easily accessible area. ■ A grounded 3 prong electrical outlet should be at the circuit breaker box. Do not use an adapter... cm) 42 41¹⁄₂" (105.4 cm) to 41³⁄₄" (106.1 cm) 48 47¹⁄₂" (120.7 cm) to 47³⁄₄" (121.3 cm) NOTE: Flooring under refrigerator must be plumb. 7 NOTE: Before performing any type of solid soffit 77" (196 cm) A Width...
... a GFCI (Ground Fault Circuit Interrupter) protected outlet, nuisance tripping of the power supply may be placed within 4" (10.2 cm) of the refrigerator or some other easily accessible area. ■ A grounded 3 prong electrical outlet should be at the circuit breaker box. Do not use an adapter... cm) 42 41¹⁄₂" (105.4 cm) to 41³⁄₄" (106.1 cm) 48 47¹⁄₂" (120.7 cm) to 47³⁄₄" (121.3 cm) NOTE: Flooring under refrigerator must be plumb. 7 NOTE: Before performing any type of solid soffit 77" (196 cm) A Width...

Installation Guide
Page 8
...to the reverse osmosis system is blocked. Remove the water filter cartridge. Tipping Radius Be sure there is adequate ceiling height to stand the refrigerator upright when it is moved into its final location. 6" (15.2 cm) 1" 6" (2.54 cm) (15.2 cm) 24" (...pressure of the water supply coming out of a reverse osmosis system going to the water inlet valve of the refrigerator or some other easily accessible area. Use the chart provided to operate the water dispenser and ice maker. Water...Model Tipping Radius A 36 90¹⁄₂" (229.9 cm) 42 93" (236.2 cm) 48 96" (243.8 cm) 8
...to the reverse osmosis system is blocked. Remove the water filter cartridge. Tipping Radius Be sure there is adequate ceiling height to stand the refrigerator upright when it is moved into its final location. 6" (15.2 cm) 1" 6" (2.54 cm) (15.2 cm) 24" (...pressure of the water supply coming out of a reverse osmosis system going to the water inlet valve of the refrigerator or some other easily accessible area. Use the chart provided to operate the water dispenser and ice maker. Water...Model Tipping Radius A 36 90¹⁄₂" (229.9 cm) 42 93" (236.2 cm) 48 96" (243.8 cm) 8

Installation Guide
Page 9
... dimensions. Model Width A 36 35" (88.9 cm) 42 41" (104.1 cm) 48 47" (119.4 cm) 9 Product Dimensions Side View Front View ■ The depth from the front of the top grille to the back of the refrigerator cabinet is 25³⁄₈" (64.5 cm). ■ The power cord is... 84" (213 cm) long. ■ The water line attached to the back of the refrigerator is 5 ft (1.5 m) long. ■ Height dimensions are shown with leveling legs extended ¹⁄₈" (3 mm) below the rollers. ■ Width dimensions were...
... dimensions. Model Width A 36 35" (88.9 cm) 42 41" (104.1 cm) 48 47" (119.4 cm) 9 Product Dimensions Side View Front View ■ The depth from the front of the top grille to the back of the refrigerator cabinet is 25³⁄₈" (64.5 cm). ■ The power cord is... 84" (213 cm) long. ■ The water line attached to the back of the refrigerator is 5 ft (1.5 m) long. ■ Height dimensions are shown with leveling legs extended ¹⁄₈" (3 mm) below the rollers. ■ Width dimensions were...
Installation Guide
Page 10
...;" (11.4 cm) minimum space between the side of 90°. Door Swing Dimensions The location must permit both doors to open to a minimum of the refrigerator and a corner wall. 42" (106.7 cm) Models NOTE: More clearance may be required if you are using overlay panels, custom handles, or extended handles on....1 cm) 14³⁄₈" (36.5 cm) 44³⁄₈" (112.7 cm) 41³⁄₈" (105.1 cm) 90˚ 110˚ 130˚ 48" (121.9 cm) Models 14³⁄₈" (36.5 cm) 39" (99.1 cm) 90˚ 110˚ 130˚ 43⁷⁄₈" (111.4 cm) 90...
...;" (11.4 cm) minimum space between the side of 90°. Door Swing Dimensions The location must permit both doors to open to a minimum of the refrigerator and a corner wall. 42" (106.7 cm) Models NOTE: More clearance may be required if you are using overlay panels, custom handles, or extended handles on....1 cm) 14³⁄₈" (36.5 cm) 44³⁄₈" (112.7 cm) 41³⁄₈" (105.1 cm) 90˚ 110˚ 130˚ 48" (121.9 cm) Models 14³⁄₈" (36.5 cm) 39" (99.1 cm) 90˚ 110˚ 130˚ 43⁷⁄₈" (111.4 cm) 90...
Installation Guide
Page 13
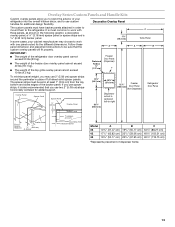
... to 3/4" (15.88 to 19.05 mm) Backer Panel 1/4" 1/8" (6.35 mm) (3.18 mm) 1" minimum (2.54 cm) Door/Grille Trim Offset Dimension Model 36 42 48 A 14³/₄" (37.47 cm) 17¹/₄" (43.82 cm) 19³/₄" (50.17 cm) B 19³/₄" (50.17 cm) 23...support. 14¹⁄₄" (36.2 cm) 10⁷⁄₈" (27.6 cm) 72¹⁄₄" Freezer (183.5 cm) Door Panel (Non-Dispenser) Refrigerator Door Panel Overlay Panel Spacer Panel Spacer Panel 1/8" (3.18 mm) Overlay Panel 33⁷⁄₈" (86.0 cm) Dispenser cutout is most common to the...
... to 3/4" (15.88 to 19.05 mm) Backer Panel 1/4" 1/8" (6.35 mm) (3.18 mm) 1" minimum (2.54 cm) Door/Grille Trim Offset Dimension Model 36 42 48 A 14³/₄" (37.47 cm) 17¹/₄" (43.82 cm) 19³/₄" (50.17 cm) B 19³/₄" (50.17 cm) 23...support. 14¹⁄₄" (36.2 cm) 10⁷⁄₈" (27.6 cm) 72¹⁄₄" Freezer (183.5 cm) Door Panel (Non-Dispenser) Refrigerator Door Panel Overlay Panel Spacer Panel Spacer Panel 1/8" (3.18 mm) Overlay Panel 33⁷⁄₈" (86.0 cm) Dispenser cutout is most common to the...
Installation Guide
Page 14
...) A A B Bottom Offset ¹⁄₈" (3.2 mm) Bottom Offset ¹⁄₈" (3.2 mm) Model 36 42 48 D 14¹/₄" (36.20 cm) 16³/₄" (42.55 cm) 19¹/₄" (48.90 cm) E 19¹/₄" (48.90 cm) 22³/₄" (57.79 cm) 26¹/₄" (66.68 cm) F 33...³/₄" (85.73 cm) 39³/₄" (100.97 cm) 45³/₄" (116.21 cm) A. Decorative panel B. Refrigerator door C. To replace the frame, hold...
...) A A B Bottom Offset ¹⁄₈" (3.2 mm) Bottom Offset ¹⁄₈" (3.2 mm) Model 36 42 48 D 14¹/₄" (36.20 cm) 16³/₄" (42.55 cm) 19¹/₄" (48.90 cm) E 19¹/₄" (48.90 cm) 22³/₄" (57.79 cm) 26¹/₄" (66.68 cm) F 33...³/₄" (85.73 cm) 39³/₄" (100.97 cm) 45³/₄" (116.21 cm) A. Decorative panel B. Refrigerator door C. To replace the frame, hold...

Installation Guide
Page 15
...8171760 Biscuit 4396105 White 4396106 Black A B C D A. Standoffs The kit includes screws to meet your KitchenAid dealer or by -side and bottom-freezer refrigerators that require overlay panels. Factory Door Panel Kits Three kits containing colored acrylic or stainless steel door and ... #2325143 #2325144 Door Panel Part Numbers for installing the door handles. Follow the kit instructions for Dispenser Models Color 36 42 48 White #2325127 #2325128 #2325129 Black #2325130 #2325131 #2325132 Stainless Steel #2325133 #2325134 #2325135 Extended Door Handle Kits Use...
...8171760 Biscuit 4396105 White 4396106 Black A B C D A. Standoffs The kit includes screws to meet your KitchenAid dealer or by -side and bottom-freezer refrigerators that require overlay panels. Factory Door Panel Kits Three kits containing colored acrylic or stainless steel door and ... #2325143 #2325144 Door Panel Part Numbers for installing the door handles. Follow the kit instructions for Dispenser Models Color 36 42 48 White #2325127 #2325128 #2325129 Black #2325130 #2325131 #2325132 Stainless Steel #2325133 #2325134 #2325135 Extended Door Handle Kits Use...

Installation Guide
Page 16
...;₄" (8.25 cm) to 90 degrees. A B ¹⁄₂" (1.27 cm) ¹⁄₄" thick plywood Freezer Door (Dispenser) Refrigerator Door ¹⁄₂" (1.27 cm) 14¹⁄₄" (36.2 cm) 10⁷⁄₈" (27.6 cm) 70 178.9 cm...48.9 cm) 26¹⁄₄" (66.7 cm) NOTES: ■ Dispenser cutout is centered left-to-right. ■ If the standard handle is used , the handle side offset of raised wood panel. The top grille panel should be 1.1 cm). A B ¹⁄₂" (1.27 cm) Freezer Door (Non-Dispenser) Refrigerator...
...;₄" (8.25 cm) to 90 degrees. A B ¹⁄₂" (1.27 cm) ¹⁄₄" thick plywood Freezer Door (Dispenser) Refrigerator Door ¹⁄₂" (1.27 cm) 14¹⁄₄" (36.2 cm) 10⁷⁄₈" (27.6 cm) 70 178.9 cm...48.9 cm) 26¹⁄₄" (66.7 cm) NOTES: ■ Dispenser cutout is centered left-to-right. ■ If the standard handle is used , the handle side offset of raised wood panel. The top grille panel should be 1.1 cm). A B ¹⁄₂" (1.27 cm) Freezer Door (Non-Dispenser) Refrigerator...

Installation Guide
Page 19
... handles as shown. Place top of the shipping carton on a soft surface. IMPORTANT: ■ Do not remove the film covering until refrigerator is installed in the operating location. 1. If necessary, reduce the tipping radius. Model Reduced Tipping Radius 36 88" (223.5 cm)... 42 88¹⁄₂" (224.8 cm) 48 89¹⁄₄" (226.7 cm) 1. Use two or more people to move and install refrigerator. Slowly tighten the strap. INSTALLATION INSTRUCTIONS Unpack the Refrigerator 2. Place an appliance dolly under the handles for the Architect® ...
... handles as shown. Place top of the shipping carton on a soft surface. IMPORTANT: ■ Do not remove the film covering until refrigerator is installed in the operating location. 1. If necessary, reduce the tipping radius. Model Reduced Tipping Radius 36 88" (223.5 cm)... 42 88¹⁄₂" (224.8 cm) 48 89¹⁄₄" (226.7 cm) 1. Use two or more people to move and install refrigerator. Slowly tighten the strap. INSTALLATION INSTRUCTIONS Unpack the Refrigerator 2. Place an appliance dolly under the handles for the Architect® ...

