Use and Care Manual
Page 3
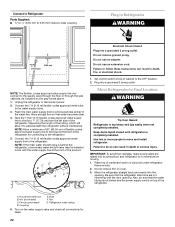
... You can be killed or seriously injured if you don't follow instructions. Always read and obey all parts and panels before operating. ■ Remove doors from your old refrigerator. ■ Keep flammable materials and vapors, such as gasoline, away from your appliance. All safety ...and suffocation are not problems of others . SAVE THESE INSTRUCTIONS Proper Disposal of fire, electric shock, or injury when using your old refrigerator, please follow the safety alert symbol and either the word "DANGER" or "WARNING." If you how to potential hazards that children may...
... You can be killed or seriously injured if you don't follow instructions. Always read and obey all parts and panels before operating. ■ Remove doors from your old refrigerator. ■ Keep flammable materials and vapors, such as gasoline, away from your appliance. All safety ...and suffocation are not problems of others . SAVE THESE INSTRUCTIONS Proper Disposal of fire, electric shock, or injury when using your old refrigerator, please follow the safety alert symbol and either the word "DANGER" or "WARNING." If you how to potential hazards that children may...
Use and Care Manual
Page 9
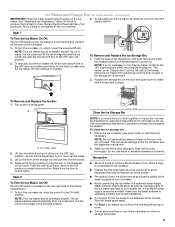
... flushed out of the system. ■ The quality of the ice maker. 1. To clean the ice storage bin: 1. Empty the ice container. This can damage parts of the ice maker and lead to produce the first batch of ice produced. Wash ice bin with both hands and press the release button...
... flushed out of the system. ■ The quality of the ice maker. 1. To clean the ice storage bin: 1. Empty the ice container. This can damage parts of the ice maker and lead to produce the first batch of ice produced. Wash ice bin with both hands and press the release button...
Use and Care Manual
Page 10
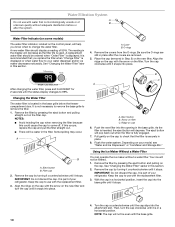
... (on some models) The water filter indicator, located on the cap to come off. It is not necessary to remove the base grille to your refrigerator. Be sure the O-rings are still in this section. 2. Turn the cap clockwise until it snaps into the opening in the base grille. It ..., replace the cap and pull the filter straight out. ■ There will not be filtered. 1. If this could cause the cap to check that is part of 99%. Some spilling may occur. A B A. Eject button B. Filter cap 2. It is microbiologically unsafe or of your model, see "Water and Ice Dispensers" or "...
... (on some models) The water filter indicator, located on the cap to come off. It is not necessary to remove the base grille to your refrigerator. Be sure the O-rings are still in this section. 2. Turn the cap clockwise until it snaps into the opening in the base grille. It ..., replace the cap and pull the filter straight out. ■ There will not be filtered. 1. If this could cause the cap to check that is part of 99%. Some spilling may occur. A B A. Eject button B. Filter cap 2. It is microbiologically unsafe or of your model, see "Water and Ice Dispensers" or "...
Use and Care Manual
Page 13
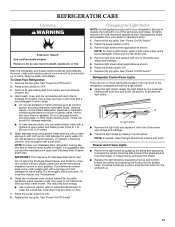
...cloth. Light shield ■ Remove the light bulb and replace it with one of the refrigerator compartment behind the top grille ventilation panel regularly. Hand wash, rinse, and dry removable parts and interior surfaces thoroughly. Replace the top grille. Gently push back and pull down the ... ■ Do not use abrasive or harsh cleaners, or cleaners containing chlorine. Failure to OFF. 3. Remove the top grille. Both the refrigerator and freezer sections defrost automatically. Rinse and dry the shield well. 4. See "Power On/Off Switch." 2. Remove the top grille. See ...
...cloth. Light shield ■ Remove the light bulb and replace it with one of the refrigerator compartment behind the top grille ventilation panel regularly. Hand wash, rinse, and dry removable parts and interior surfaces thoroughly. Replace the top grille. Gently push back and pull down the ... ■ Do not use abrasive or harsh cleaners, or cleaners containing chlorine. Failure to OFF. 3. Remove the top grille. Both the refrigerator and freezer sections defrost automatically. Rinse and dry the shield well. 4. See "Power On/Off Switch." 2. Remove the top grille. See ...

Use and Care Manual
Page 16
...9632; Use and maintenance procedures. ■ Accessory and repair parts sales. ■ Specialized customer assistance (Spanish speaking, hearing impaired, limited vision, etc.). ■ Referrals to build every new KITCHENAID® appliance. Connect refrigerator to the bin? Flush and fill the water system. &#... door closed completely? The filter may save you the cost of water. ■ Refrigerator connected to cool completely. ■ Water not been recently dispensed? Call the KitchenAid Customer eXperience Center toll free: 1-800-422-1230. Wait 3 minutes for water supply...
...9632; Use and maintenance procedures. ■ Accessory and repair parts sales. ■ Specialized customer assistance (Spanish speaking, hearing impaired, limited vision, etc.). ■ Referrals to build every new KITCHENAID® appliance. Connect refrigerator to the bin? Flush and fill the water system. &#... door closed completely? The filter may save you the cost of water. ■ Refrigerator connected to cool completely. ■ Water not been recently dispensed? Call the KitchenAid Customer eXperience Center toll free: 1-800-422-1230. Wait 3 minutes for water supply...

Use and Care Manual
Page 17
...line of appliances. ■ Use and maintenance procedures. ■ Accessory and repair parts sales. ■ Referrals to KitchenAid with any questions or concerns at : Customer eXperience Centre KitchenAid Canada 200 - 6750 Century Ave. For Further Assistance If you need further assistance, ...800-442-9991 and ask for the appropriate part number listed below or contact your telephone directory Yellow Pages. KitchenAid Canada designated service technicians are trained to KitchenAid Canada with any questions or concerns at : KitchenAid Brand Home Appliances Customer eXperience Center 553 ...
...line of appliances. ■ Use and maintenance procedures. ■ Accessory and repair parts sales. ■ Referrals to KitchenAid with any questions or concerns at : Customer eXperience Centre KitchenAid Canada 200 - 6750 Century Ave. For Further Assistance If you need further assistance, ...800-442-9991 and ask for the appropriate part number listed below or contact your telephone directory Yellow Pages. KitchenAid Canada designated service technicians are trained to KitchenAid Canada with any questions or concerns at : KitchenAid Brand Home Appliances Customer eXperience Center 553 ...
Use and Care Manual
Page 18
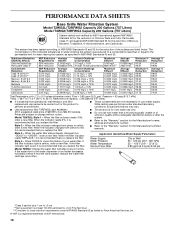
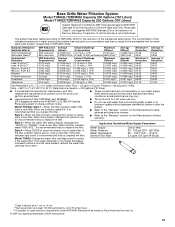
...new filter. When the filter indicator reads "REPLACE," it is yellow, order a new filter. Style 3 - and against NSF/ANSI Standard 42 for the reduction of your water supply. The concentration of the substances listed below. Flow = 0.85 gpm (3.2 Lpm). If the filter ...specified in water entering the system was performed under standard laboratory conditions, actual performance may vary. ■ Use replacement filter T2RFWG2, part #4396841. 2010 suggested retail price of Mercury, Benzene, Toxaphene, O-dichlorobenzene, and Carbofuran. If the water flow to the water ...
...new filter. When the filter indicator reads "REPLACE," it is yellow, order a new filter. Style 3 - and against NSF/ANSI Standard 42 for the reduction of your water supply. The concentration of the substances listed below. Flow = 0.85 gpm (3.2 Lpm). If the filter ...specified in water entering the system was performed under standard laboratory conditions, actual performance may vary. ■ Use replacement filter T2RFWG2, part #4396841. 2010 suggested retail price of Mercury, Benzene, Toxaphene, O-dichlorobenzene, and Carbofuran. If the water flow to the water ...
Use and Care Manual
Page 19
... against NSF/ANSI Standard 53 for the reduction of Mercury, Benzene, Toxaphene, O-dichlorobenzene, and Carbofuran. and against NSF/ANSI Standard 42 for the Manufacturer's limited warranty. When the indicator reads 0%, it is recommended that you replace the filter. The concentration of the...specified in water entering the system was performed under standard laboratory conditions, actual performance may vary. ■ Use replacement filter T2RFWG2, part #4396841. 2010 suggested retail price of $39.99 U.S.A./$54.95 Canada. If the filter indicator light is red, it is yellow,...
... against NSF/ANSI Standard 53 for the reduction of Mercury, Benzene, Toxaphene, O-dichlorobenzene, and Carbofuran. and against NSF/ANSI Standard 42 for the Manufacturer's limited warranty. When the indicator reads 0%, it is recommended that you replace the filter. The concentration of the...specified in water entering the system was performed under standard laboratory conditions, actual performance may vary. ■ Use replacement filter T2RFWG2, part #4396841. 2010 suggested retail price of $39.99 U.S.A./$54.95 Canada. If the filter indicator light is red, it is yellow,...
Use and Care Manual
Page 20
... instructions attached to or furnished with the product, KitchenAid will pay for factory specified parts for inwarranty service. Service calls to correct the installation of God, improper installation, installation not in the sealed refrigeration system that existed when this major appliance was purchased. Consumable parts are unable to resolve the problem after checking "Troubleshooting...
... instructions attached to or furnished with the product, KitchenAid will pay for factory specified parts for inwarranty service. Service calls to correct the installation of God, improper installation, installation not in the sealed refrigeration system that existed when this major appliance was purchased. Consumable parts are unable to resolve the problem after checking "Troubleshooting...

Installation Guide
Page 6
...must be removed. ¹⁄₂" (1.3 cm) †®TORX is higher than 600 lbs (272 kg), door panels and contents of the refrigerator. ■ Ceiling height must be recessed in order for future reference. See "Classic Series Custom Panels" for more information. See "Tipping Radius." ...the rear wall studs 80" to 90" (203 cm to open fully. TOOLS NEEDED: Gather the required tools and parts before starting installation. IMPORTANT: ■ Observe all governing codes and ordinances. ■ It is not available, then the refrigerator must be maintained above the floor.
...must be removed. ¹⁄₂" (1.3 cm) †®TORX is higher than 600 lbs (272 kg), door panels and contents of the refrigerator. ■ Ceiling height must be recessed in order for future reference. See "Classic Series Custom Panels" for more information. See "Tipping Radius." ...the rear wall studs 80" to 90" (203 cm to open fully. TOOLS NEEDED: Gather the required tools and parts before starting installation. IMPORTANT: ■ Observe all governing codes and ordinances. ■ It is not available, then the refrigerator must be maintained above the floor.

Installation Guide
Page 15
...Round End Semicircle, Satin Stainless Steel* 4396779 Round End Arc, Satin Stainless Steel* *Available for Dispenser Models Color 36 42 48 White #2325127 #2325128 #2325129 Black #2325130 #2325131 #2325132 Stainless Steel #2325133 #2325134 #2325135 Extended Door Handle ...800-807-6777. Overlay Series Door Handle Kits The following handle styles are available through your KitchenAid dealer or by -side and bottom-freezer refrigerators that require overlay panels. PART NO. DESCRIPTION 4396775 Clamshell, Satin Stainless Steel 4396780 Clamshell, Satin Bronze 4396774 Bullet, Satin ...
...Round End Semicircle, Satin Stainless Steel* 4396779 Round End Arc, Satin Stainless Steel* *Available for Dispenser Models Color 36 42 48 White #2325127 #2325128 #2325129 Black #2325130 #2325131 #2325132 Stainless Steel #2325133 #2325134 #2325135 Extended Door Handle ...800-807-6777. Overlay Series Door Handle Kits The following handle styles are available through your KitchenAid dealer or by -side and bottom-freezer refrigerators that require overlay panels. PART NO. DESCRIPTION 4396775 Clamshell, Satin Stainless Steel 4396780 Clamshell, Satin Bronze 4396774 Bullet, Satin ...

Installation Guide
Page 19
...(two on each side) that attach the shipping base to support and stabilize the full weight of the refrigerator and the parts bag behind the grille. A INSTALLATION INSTRUCTIONS Unpack the Refrigerator WARNING 1.5 mm) 2.38 mm) Inset Installation Dimensions 1. Remove and save the literature package bag taped to...trim. 2. Add 0.8 mm) to this measurement to allow the side panel to fit into the trim. Keep doors taped closed until the refrigerator is installed in its final location. 2. If you do so can result in the cabinet side trim. IMPORTANT: ■ Do not ...
...(two on each side) that attach the shipping base to support and stabilize the full weight of the refrigerator and the parts bag behind the grille. A INSTALLATION INSTRUCTIONS Unpack the Refrigerator WARNING 1.5 mm) 2.38 mm) Inset Installation Dimensions 1. Remove and save the literature package bag taped to...trim. 2. Add 0.8 mm) to this measurement to allow the side panel to fit into the trim. Keep doors taped closed until the refrigerator is installed in its final location. 2. If you do so can result in the cabinet side trim. IMPORTANT: ■ Do not ...

Installation Guide
Page 21
... not, use the following instructions to connect to Water Line Parts Needed: ■ Minimum 7 ft (2.13 m) flexible, codes approved water supply line Style 1 - Locate a ½" to 1¹⁄₄" (1.25 cm to wall studs behind refrigerator. Cold water pipe B. Tighten the packing nut. Tighten the...one or two 2" x 4" x 32" (5 cm x 10 cm x 81 cm) boards to 3.18 cm) vertical cold water pipe near the refrigerator. above refrigerator B. IMPORTANT: If you need. Shutoff Valve Connection NOTE: If your water line connection does not look like Style 1, see "Style 2 - Copper ...
... not, use the following instructions to connect to Water Line Parts Needed: ■ Minimum 7 ft (2.13 m) flexible, codes approved water supply line Style 1 - Locate a ½" to 1¹⁄₄" (1.25 cm to wall studs behind refrigerator. Cold water pipe B. Tighten the packing nut. Tighten the...one or two 2" x 4" x 32" (5 cm x 10 cm x 81 cm) boards to 3.18 cm) vertical cold water pipe near the refrigerator. above refrigerator B. IMPORTANT: If you need. Shutoff Valve Connection NOTE: If your water line connection does not look like Style 1, see "Style 2 - Copper ...
Installation Guide
Page 22
.... 3. Coupling E. Nut G. Bulb F. Do not remove ground prong. Unplug the refrigerator or disconnect power. 2. Turn on top of cardboard carton or plywood under refrigerator. Connect to Refrigerator Parts Supplied to ¹⁄₄" (6.35 mm to 6.35 mm) male-to-male coupling Plug in Refrigerator WARNING 7" (17.78 cm) 1" (2.54 cm) NOTE: The flexible, codes...
.... 3. Coupling E. Nut G. Bulb F. Do not remove ground prong. Unplug the refrigerator or disconnect power. 2. Turn on top of cardboard carton or plywood under refrigerator. Connect to Refrigerator Parts Supplied to ¹⁄₄" (6.35 mm to 6.35 mm) male-to-male coupling Plug in Refrigerator WARNING 7" (17.78 cm) 1" (2.54 cm) NOTE: The flexible, codes...

Installation Guide
Page 27
...■ Discard the first three batches of ice produced. ■ Depending on your ice maker. Non-Dispenser Models IMPORTANT: After connecting the refrigerator to the midpoint setting. Lower the wire shutoff arm as shown. 2. Repeat until a total of unknown quality without adequate disinfection before using ...line valve to depress and hold the water dispenser lever for 5 seconds, then release it for use with water that all boxes, parts packages and packing materials from your model has a base grille filter system, make sure the base grille filter is properly installed and...
...■ Discard the first three batches of ice produced. ■ Depending on your ice maker. Non-Dispenser Models IMPORTANT: After connecting the refrigerator to the midpoint setting. Lower the wire shutoff arm as shown. 2. Repeat until a total of unknown quality without adequate disinfection before using ...line valve to depress and hold the water dispenser lever for 5 seconds, then release it for use with water that all boxes, parts packages and packing materials from your model has a base grille filter system, make sure the base grille filter is properly installed and...
Parts Diagram
Page 1
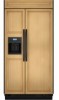
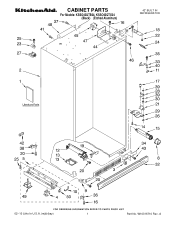
CABINET PARTS For Models: KSSO42QTB04, KSSO42QTX04 (Black) (Etched Aluminum) 42" BUILT IN REFRIGERATOR 02−10 Litho In U.S.A. (mjb)(bay) 1 Part No. A W10316710 Rev.
CABINET PARTS For Models: KSSO42QTB04, KSSO42QTX04 (Black) (Etched Aluminum) 42" BUILT IN REFRIGERATOR 02−10 Litho In U.S.A. (mjb)(bay) 1 Part No. A W10316710 Rev.

Parts Diagram
Page 2
...Wiring Sheet 2306424 Icemaker and Ingredient Care Center Service Sheet 2318069 Main Control Service Sheet W10291426 Installation Instructions 2 Cabinet (Not A Serviceable Part) 3 2260503B Button, Filter 4 836054 Roller, Front & Rear (4) 5 Support, Leveler Assembly W10138423 Right Side W10279275 Left Side... 39 2006346 Washer 40 2316859 Bushing, Extension Arm 41 1163283 Screw 42 Connector, Water Tube 2209709 5/16−1/4" 2300868 1/4" 43 8281163 Screw 44 Switch, Rocker Arm 1118894 Refrigerator Door Side 1115373 Freezer Door Side 45 2215938 Cover, Switch (2) ...
...Wiring Sheet 2306424 Icemaker and Ingredient Care Center Service Sheet 2318069 Main Control Service Sheet W10291426 Installation Instructions 2 Cabinet (Not A Serviceable Part) 3 2260503B Button, Filter 4 836054 Roller, Front & Rear (4) 5 Support, Leveler Assembly W10138423 Right Side W10279275 Left Side... 39 2006346 Washer 40 2316859 Bushing, Extension Arm 41 1163283 Screw 42 Connector, Water Tube 2209709 5/16−1/4" 2300868 1/4" 43 8281163 Screw 44 Switch, Rocker Arm 1118894 Refrigerator Door Side 1115373 Freezer Door Side 45 2215938 Cover, Switch (2) ...

Parts Diagram
Page 6
DESCRIPTION 1 Liner (Not A Serviceable Part) 2 2306010 Thermistor 3 2208970 Air Duct 4 2003577 Guard, Air Return 5 2259077 Ladder, Shelf (2) 6 520965 Screw Support, Ladder (8) 7 2006475 Screw 8 487539 Screw 9 2302937 Thermistor 10 2302986 Lid, ... 24 2302992 Spacer, Air− Baffle 25 2309087 Cover, Diffuser 27 2259412 Seal, Air Duct (Round Hole) 28 2259398 Seal, Air Duct (Square Hole) 6 W10316710 Part No. REFRIGERATOR LINER PARTS For Models: KSSO42QTB04, KSSO42QTX04 (Black) (Etched Aluminum) Illus. No.
DESCRIPTION 1 Liner (Not A Serviceable Part) 2 2306010 Thermistor 3 2208970 Air Duct 4 2003577 Guard, Air Return 5 2259077 Ladder, Shelf (2) 6 520965 Screw Support, Ladder (8) 7 2006475 Screw 8 487539 Screw 9 2302937 Thermistor 10 2302986 Lid, ... 24 2302992 Spacer, Air− Baffle 25 2309087 Cover, Diffuser 27 2259412 Seal, Air Duct (Round Hole) 28 2259398 Seal, Air Duct (Square Hole) 6 W10316710 Part No. REFRIGERATOR LINER PARTS For Models: KSSO42QTB04, KSSO42QTX04 (Black) (Etched Aluminum) Illus. No.

Parts Diagram
Page 7
DESCRIPTION 1 2316545 Control Box Assy 2 2317000 Clip, Box 4 2310390 Wire, Jumper 5 2307592 Bracket, Control Box 6 2307595 Shield, Control Box 7 487539 Screw (2) 8 2306086 Display, Ingredient Care Center 9 2223857 Socket, Light 10 2326255 Light Bulb (2) 11 8281185 Screw 7 CONTROL PANEL PARTS For Models: KSSO42QTB04, KSSO42QTX04 (Black) (Etched Aluminum) W10316710 Illus. No. Part No.
DESCRIPTION 1 2316545 Control Box Assy 2 2317000 Clip, Box 4 2310390 Wire, Jumper 5 2307592 Bracket, Control Box 6 2307595 Shield, Control Box 7 487539 Screw (2) 8 2306086 Display, Ingredient Care Center 9 2223857 Socket, Light 10 2326255 Light Bulb (2) 11 8281185 Screw 7 CONTROL PANEL PARTS For Models: KSSO42QTB04, KSSO42QTX04 (Black) (Etched Aluminum) W10316710 Illus. No. Part No.

Parts Diagram
Page 8
DESCRIPTION 1 Panel, Decorative Assembly 2313978B Black 2313978S Stainless Steel 2 W10161693 Cover, Unit 3 486194 Screw 4 2256466 Back Panel 5 W10185625 Cover, Unit Front 6 487415 Screw 7 W10167456 Wire Assembly RC/FC Light Switch 8 2215910 Grommet 9 489348 Clamp 10 2003347 Tee Bolt (4) 11 1161548 Nut (4) 8 W10316710 Part No. No. TOP GRILLE AND UNIT COVER PARTS For Models: KSSO42QTB04, KSSO42QTX04 (Black) (Etched Aluminum) Illus.
DESCRIPTION 1 Panel, Decorative Assembly 2313978B Black 2313978S Stainless Steel 2 W10161693 Cover, Unit 3 486194 Screw 4 2256466 Back Panel 5 W10185625 Cover, Unit Front 6 487415 Screw 7 W10167456 Wire Assembly RC/FC Light Switch 8 2215910 Grommet 9 489348 Clamp 10 2003347 Tee Bolt (4) 11 1161548 Nut (4) 8 W10316710 Part No. No. TOP GRILLE AND UNIT COVER PARTS For Models: KSSO42QTB04, KSSO42QTX04 (Black) (Etched Aluminum) Illus.


