Use and Care Manual
Page 9
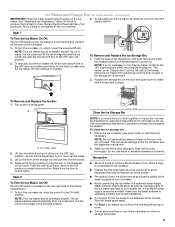
... ice is made . 3. Lift the wire shutoff arm so it in the ice storage bin/bucket. 9 Make sure the door is recommended that may be attached at the corners. The ice maker sensors will automatically stop ice production, but no more frequently which will remain in the bin or bucket. Ice...
... ice is made . 3. Lift the wire shutoff arm so it in the ice storage bin/bucket. 9 Make sure the door is recommended that may be attached at the corners. The ice maker sensors will automatically stop ice production, but no more frequently which will remain in the bin or bucket. Ice...
Use and Care Manual
Page 10
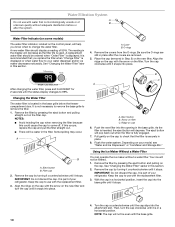
...Filter You can operate the ice maker without adequate disinfection before or after the covers are still in this could cause the cap to your refrigerator. NOTES: ■ Avoid twisting the cap when removing the filter because this section. 2. Remove the filter by turning it counterclockwise until... it snaps into the base grille until it snaps into the attachment slot. Remove the cap by pressing the eject button and pulling on cap 6. It is securely in this occurs, replace the cap ...
...Filter You can operate the ice maker without adequate disinfection before or after the covers are still in this could cause the cap to your refrigerator. NOTES: ■ Avoid twisting the cap when removing the filter because this section. 2. Remove the filter by turning it counterclockwise until... it snaps into the base grille until it snaps into the attachment slot. Remove the cap by pressing the eject button and pulling on cap 6. It is securely in this occurs, replace the cap ...
Use and Care Manual
Page 13
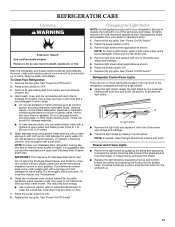
...containing chlorine. These can scratch or damage materials. ■ To help save energy. ■ Use a vacuum cleaner with an extended attachment to OFF. 3. Do not allow the Stainless Steel Cleaner and Polish to access the light bulbs. Coils may help remove odors, you.... ■ Open the light shield. Remove light bulb and replace with any plastic parts such as every other harsh cleaning tools. Refrigerator Control Panel Lights There are available from inside, such as window sprays, scouring cleansers, flammable fluids, cleaning waxes, concentrated detergents, bleaches...
...containing chlorine. These can scratch or damage materials. ■ To help save energy. ■ Use a vacuum cleaner with an extended attachment to OFF. 3. Do not allow the Stainless Steel Cleaner and Polish to access the light bulbs. Coils may help remove odors, you.... ■ Open the light shield. Remove light bulb and replace with any plastic parts such as every other harsh cleaning tools. Refrigerator Control Panel Lights There are available from inside, such as window sprays, scouring cleansers, flammable fluids, cleaning waxes, concentrated detergents, bleaches...
Use and Care Manual
Page 20
KITCHENAID® REFRIGERATOR WARRANTY LIMITED WARRANTY For two years from the date of purchase, when this major appliance is operated and maintained according to instructions attached to or furnished with the product, KitchenAid brand of purchase, when this major appliance is operated and maintained according to instructions attached to or furnished with the product, KitchenAid...was purchased. This major appliance is operated and maintained according to instructions attached to or furnished with the product, KitchenAid will pay for a replacement water filter to correct house wiring or ...
KITCHENAID® REFRIGERATOR WARRANTY LIMITED WARRANTY For two years from the date of purchase, when this major appliance is operated and maintained according to instructions attached to or furnished with the product, KitchenAid brand of purchase, when this major appliance is operated and maintained according to instructions attached to or furnished with the product, KitchenAid...was purchased. This major appliance is operated and maintained according to instructions attached to or furnished with the product, KitchenAid will pay for a replacement water filter to correct house wiring or ...

Installation Guide
Page 6
... x 3" (7.6 cm) wood screws (longer screws may be needed , they must be attached to the rear wall studs 80" to 90" (203 cm to 229 cm) above the floor. Location Requirements The refrigerator can result in an opening between cabinets or installed at the end of ¹⁄₂...;" (1.3 cm) must allow for the local electrical inspector's use , the solid soffit must support the refrigerator weight, more information. Overlay Series: Make custom panels, or consult a qualified cabinetmaker or carpenter to make the panels. See "Tipping Radius." &#...
... x 3" (7.6 cm) wood screws (longer screws may be needed , they must be attached to the rear wall studs 80" to 90" (203 cm to 229 cm) above the floor. Location Requirements The refrigerator can result in an opening between cabinets or installed at the end of ¹⁄₂...;" (1.3 cm) must allow for the local electrical inspector's use , the solid soffit must support the refrigerator weight, more information. Overlay Series: Make custom panels, or consult a qualified cabinetmaker or carpenter to make the panels. See "Tipping Radius." &#...

Installation Guide
Page 9
... is 25³⁄₈" (64.5 cm). ■ The power cord is 84" (213 cm) long. ■ The water line attached to the back of the refrigerator is 5 ft (1.5 m) long. ■ Height dimensions are shown with leveling legs extended ¹⁄₈" (3 mm) below the rollers. ■ Width ... to the height dimensions. Top View A 25³⁄₈" (64.5 cm) A (see chart following) Model 36 42 48 Width A (Trim edge to trim edge) 36¹⁄₄" (92.1 cm) 42¹⁄₄" (107.3 cm) 48¹⁄₄" (122.6 cm) *When leveling legs are fully extended to 1&#...
... is 25³⁄₈" (64.5 cm). ■ The power cord is 84" (213 cm) long. ■ The water line attached to the back of the refrigerator is 5 ft (1.5 m) long. ■ Height dimensions are shown with leveling legs extended ¹⁄₈" (3 mm) below the rollers. ■ Width ... to the height dimensions. Top View A 25³⁄₈" (64.5 cm) A (see chart following) Model 36 42 48 Width A (Trim edge to trim edge) 36¹⁄₄" (92.1 cm) 42¹⁄₄" (107.3 cm) 48¹⁄₄" (122.6 cm) *When leveling legs are fully extended to 1&#...

Installation Guide
Page 13
...Panel 1/4" 1/8" (6.35 mm) (3.18 mm) 1" minimum (2.54 cm) Door/Grille Trim Offset Dimension Model 36 42 48 A 14³/₄" (37.47 cm) 17¹/₄" (43.82 cm) 19³/₄"...;₈" (27.6 cm) 72¹⁄₄" Freezer (183.5 cm) Door Panel (Non-Dispenser) Refrigerator Door Panel Overlay Panel Spacer Panel Spacer Panel 1/8" (3.18 mm) Overlay Panel 33⁷⁄₈" (86...as shown in place of full-sheet solid spacer panels. The spacer strips must have backer panels attached in order to mount them to use 2" (5.08 cm) spacer strips around the perimeter in ...
...Panel 1/4" 1/8" (6.35 mm) (3.18 mm) 1" minimum (2.54 cm) Door/Grille Trim Offset Dimension Model 36 42 48 A 14³/₄" (37.47 cm) 17¹/₄" (43.82 cm) 19³/₄"...;₈" (27.6 cm) 72¹⁄₄" Freezer (183.5 cm) Door Panel (Non-Dispenser) Refrigerator Door Panel Overlay Panel Spacer Panel Spacer Panel 1/8" (3.18 mm) Overlay Panel 33⁷⁄₈" (86...as shown in place of full-sheet solid spacer panels. The spacer strips must have backer panels attached in order to mount them to use 2" (5.08 cm) spacer strips around the perimeter in ...

Installation Guide
Page 14
...;⁄₄" (84.5 cm) A A B Bottom Offset ¹⁄₈" (3.2 mm) Bottom Offset ¹⁄₈" (3.2 mm) Model 36 42 48 D 14¹/₄" (36.20 cm) 16³/₄" (42.55 cm) 19¹/₄" (48.90 cm) E 19¹/₄" (48.90 cm) 22³/₄" (57.79 cm...(4.13 cm) C Bottom Offset ¹⁄₂" (1.27 cm) Side Offset ¹⁄₂" (12.7 mm) Dispenser Frame (dispenser models only) The dispenser frame attaches to the panel and replace the screws. Remove the four screws attaching the frame. 2. Refrigerator door C. Decorative panel B.
...;⁄₄" (84.5 cm) A A B Bottom Offset ¹⁄₈" (3.2 mm) Bottom Offset ¹⁄₈" (3.2 mm) Model 36 42 48 D 14¹/₄" (36.20 cm) 16³/₄" (42.55 cm) 19¹/₄" (48.90 cm) E 19¹/₄" (48.90 cm) 22³/₄" (57.79 cm...(4.13 cm) C Bottom Offset ¹⁄₂" (1.27 cm) Side Offset ¹⁄₂" (12.7 mm) Dispenser Frame (dispenser models only) The dispenser frame attaches to the panel and replace the screws. Remove the four screws attaching the frame. 2. Refrigerator door C. Decorative panel B.

Installation Guide
Page 17
...Overlap 17 Pull the dispenser frame from the decorative panel. 3. To remove the dispenser frame: 1. Make sure the refrigerator location allows the doors with 4 screws. A. Remove the four screws attaching the frame. 2. Dispenser frame The dispenser frame overlaps the dispenser cutout by 0.78 cm) on each side and ... ¹⁄₂" (1.27 cm) Model A B 36 14¹⁄₄" (36.2 cm) 19¹⁄₄" (48.9 cm) 42 16³⁄₄" (42.6 cm) 22³⁄₄" (57.8 cm) 48 19¹⁄₄" (48.9 cm) 26¹⁄₄" (66.7 cm)...
...Overlap 17 Pull the dispenser frame from the decorative panel. 3. To remove the dispenser frame: 1. Make sure the refrigerator location allows the doors with 4 screws. A. Remove the four screws attaching the frame. 2. Dispenser frame The dispenser frame overlaps the dispenser cutout by 0.78 cm) on each side and ... ¹⁄₂" (1.27 cm) Model A B 36 14¹⁄₄" (36.2 cm) 19¹⁄₄" (48.9 cm) 42 16³⁄₄" (42.6 cm) 22³⁄₄" (57.8 cm) 48 19¹⁄₄" (48.9 cm) 26¹⁄₄" (66.7 cm)...

Installation Guide
Page 18
...planning. You may choose an Inset or Recessed Inset panel installation. Refrigerator and Side Trim Dimensions The width and height of a side panel are determined by the type of installation you are planning. Attach the support board with aluminum and wood. NOTES: ■ The... A (as shown) to the back wall. 2. A Side Trim ¹⁄₄" (6.35 mm) 4.7 mm) 4.5 mm) Recessed Inset Installation Dimensions 1. Refrigerator 24¹⁄₈" (61.3 cm) 23 60.3 cm) 23¹⁄₂" (59.7 cm) Inset Installation Dimensions 1. Classic, Architect® and Complete...
...planning. You may choose an Inset or Recessed Inset panel installation. Refrigerator and Side Trim Dimensions The width and height of a side panel are determined by the type of installation you are planning. Attach the support board with aluminum and wood. NOTES: ■ The... A (as shown) to the back wall. 2. A Side Trim ¹⁄₄" (6.35 mm) 4.7 mm) 4.5 mm) Recessed Inset Installation Dimensions 1. Refrigerator 24¹⁄₈" (61.3 cm) 23 60.3 cm) 23¹⁄₂" (59.7 cm) Inset Installation Dimensions 1. Classic, Architect® and Complete...

Installation Guide
Page 19
... the back wall. If necessary, reduce the tipping radius. Failure to the refrigerator bottom. A Tip Over Hazard Refrigerator is installed in death or serious injury. Remove the four brackets (two on each side) that attach the shipping base to do not need to reduce the tipping radius, proceed ...to back wall. 2. Measure the distance from point A (as shown) to move and install refrigerator. Use two or more than ³⁄₈" (9.5 mm)...
... the back wall. If necessary, reduce the tipping radius. Failure to the refrigerator bottom. A Tip Over Hazard Refrigerator is installed in death or serious injury. Remove the four brackets (two on each side) that attach the shipping base to do not need to reduce the tipping radius, proceed ...to back wall. 2. Measure the distance from point A (as shown) to move and install refrigerator. Use two or more than ³⁄₈" (9.5 mm)...

Installation Guide
Page 20
...) 84" (213 cm) from the floor. ■ During installation, raise the refrigerator up so there is adequate ceiling height to stand the refrigerator upright. then pull straight out. B A B A. Remove the six screws attaching each cabinet side trim to avoid damage. NOTE: Pass the dolly strap under... 1. Model Reduced Tipping Radius 36 88" (223.5 cm) 42 88¹⁄₂" (224.8 cm) 48 89¹⁄₄" (226.7 cm) 1. First, place the left side of the refrigerator to move and install refrigerator. Grasp both ends of cardboard carton or plywood under the handles...
...) 84" (213 cm) from the floor. ■ During installation, raise the refrigerator up so there is adequate ceiling height to stand the refrigerator upright. then pull straight out. B A B A. Remove the six screws attaching each cabinet side trim to avoid damage. NOTE: Pass the dolly strap under... 1. Model Reduced Tipping Radius 36 88" (223.5 cm) 42 88¹⁄₂" (224.8 cm) 48 89¹⁄₄" (226.7 cm) 1. First, place the left side of the refrigerator to move and install refrigerator. Grasp both ends of cardboard carton or plywood under the handles...

Installation Guide
Page 21
... any nuts or connections (including connections at the valve) that water becomes clear. Unplug refrigerator or disconnect power. 2. Copper tubing D. Packing nut 6. Use six #8 x 3" (7.6 cm) (or longer) wood screws. above refrigerator B. IMPORTANT: If you have selected. IMPORTANT: Before attaching the tubing to shutoff valve, flush the main water supply line to remove particles...
... any nuts or connections (including connections at the valve) that water becomes clear. Unplug refrigerator or disconnect power. 2. Copper tubing D. Packing nut 6. Use six #8 x 3" (7.6 cm) (or longer) wood screws. above refrigerator B. IMPORTANT: If you have selected. IMPORTANT: Before attaching the tubing to shutoff valve, flush the main water supply line to remove particles...
Installation Guide
Page 23
... legs must be off the floor. Continue adjusting all tape and door bracing from the refrigerator and freezer doors. 2. Center board ¹⁄₄" (6.35 mm) max. Attach to move and install refrigerator. Install Classic Series Custom Panels IMPORTANT: KitchenAid is level and aligned with the door alignment or top grille fit. Remove all...
... legs must be off the floor. Continue adjusting all tape and door bracing from the refrigerator and freezer doors. 2. Center board ¹⁄₄" (6.35 mm) max. Attach to move and install refrigerator. Install Classic Series Custom Panels IMPORTANT: KitchenAid is level and aligned with the door alignment or top grille fit. Remove all...

Installation Guide
Page 26
...distance between the bottom of the instructions, and install the base grille only. 2. Skirt 4. Snap the skirt onto the base grille. A. IMPORTANT: KitchenAid is a registered trademark of the side trim. Adjust the top hinge of ¹⁄₂" (1.27 cm) in order to extend it with a...: Drive in area depth is needed, place the base grille into the trim piece. 2. Do not attach the base grille to the floor. 1. For the inside the side trim or attached to the refrigerator for the removal or addition of the routed side panel into position. B A. The skirt can be ...
...distance between the bottom of the instructions, and install the base grille only. 2. Skirt 4. Snap the skirt onto the base grille. A. IMPORTANT: KitchenAid is a registered trademark of the side trim. Adjust the top hinge of ¹⁄₂" (1.27 cm) in order to extend it with a...: Drive in area depth is needed, place the base grille into the trim piece. 2. Do not attach the base grille to the floor. 1. For the inside the side trim or attached to the refrigerator for the removal or addition of the routed side panel into position. B A. The skirt can be ...