
Installation Guide
Page 6
...See "Tipping Radius." ■ Location should permit door to 229 cm) above the refrigerator. If the solid soffit is not available, then the refrigerator must support the refrigerator weight, more information. TOOLS NEEDED: Gather the required tools and parts before starting installation. ...side panel to make the panels. Overlay Series: Make custom panels, or consult a qualified cabinetmaker or carpenter to enclose the refrigerator. Opening Dimensions ■ To avoid tipping during use . INSTALLATION REQUIREMENTS Tools and Parts IMPORTANT: ■ Installer: Leave Installation...
...See "Tipping Radius." ■ Location should permit door to 229 cm) above the refrigerator. If the solid soffit is not available, then the refrigerator must support the refrigerator weight, more information. TOOLS NEEDED: Gather the required tools and parts before starting installation. ...side panel to make the panels. Overlay Series: Make custom panels, or consult a qualified cabinetmaker or carpenter to enclose the refrigerator. Opening Dimensions ■ To avoid tipping during use . INSTALLATION REQUIREMENTS Tools and Parts IMPORTANT: ■ Installer: Leave Installation...
Installation Guide
Page 13
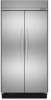
... panel. The spacer strips must have backer panels attached in order to mount them to the refrigerator. Preferred Radius ¹⁄₂" (1.27 cm) Freezer Door Panel (Dispenser) * C Grille Panel A B To minimize panel weight, you may choose to work with one panel routed for the different dimensions. It is most... to 3/4" (15.88 to 19.05 mm) Backer Panel 1/4" 1/8" (6.35 mm) (3.18 mm) 1" minimum (2.54 cm) Door/Grille Trim Offset Dimension Model 36 42 48 A 14³/₄" (37.47 cm) 17¹/₄" (43.82 cm) 19³/₄" (50.17 cm) B 19³/₄" (50.17 cm) 23...
... panel. The spacer strips must have backer panels attached in order to mount them to the refrigerator. Preferred Radius ¹⁄₂" (1.27 cm) Freezer Door Panel (Dispenser) * C Grille Panel A B To minimize panel weight, you may choose to work with one panel routed for the different dimensions. It is most... to 3/4" (15.88 to 19.05 mm) Backer Panel 1/4" 1/8" (6.35 mm) (3.18 mm) 1" minimum (2.54 cm) Door/Grille Trim Offset Dimension Model 36 42 48 A 14³/₄" (37.47 cm) 17¹/₄" (43.82 cm) 19³/₄" (50.17 cm) B 19³/₄" (50.17 cm) 23...

Installation Guide
Page 19
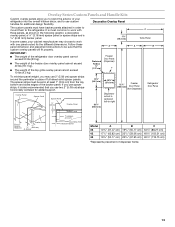
... Tipping Radius 36 88" (223.5 cm) 42 88¹⁄₂" (224.8 cm) 48 89¹⁄₄" (226.7 cm) 1. Cabinet side trim 3. Move the refrigerator close to move and install refrigerator. See "Tipping Radius" for ceiling height requirements or "Reduce Tipping Radius" for more information. ... the house. Slowly tighten the strap. If you do not have adequate ceiling height to support and stabilize the full weight of the refrigerator. ■ Keep the cardboard shipping piece or plywood under the left side of cardboard carton or plywood under the handles for...
... Tipping Radius 36 88" (223.5 cm) 42 88¹⁄₂" (224.8 cm) 48 89¹⁄₄" (226.7 cm) 1. Cabinet side trim 3. Move the refrigerator close to move and install refrigerator. See "Tipping Radius" for ceiling height requirements or "Reduce Tipping Radius" for more information. ... the house. Slowly tighten the strap. If you do not have adequate ceiling height to support and stabilize the full weight of the refrigerator. ■ Keep the cardboard shipping piece or plywood under the left side of cardboard carton or plywood under the handles for...
Installation Guide
Page 22
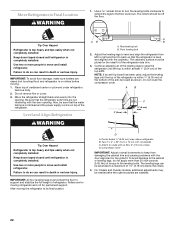
... support and stabilize the full weight of the refrigerator side trim. 3. Tip Over Hazard Refrigerator is completely installed. Failure to a maximum of the refrigerator. Move the refrigerator straight back and evenly into the opening . A B 2" (5 cm) C ¹⁄₄" (6 mm) max. Failure to do...) screws D. Two 2" x 4" x 32" (5 cm x 10 cm x 81 cm) boards C. Do not remove film or cover. 3. Be sure that the refrigerator is level and aligned with the door opening . Rear leveling bolt B. Continue adjusting all of the leveling legs to the cabinet or leveling legs, do...
... support and stabilize the full weight of the refrigerator side trim. 3. Tip Over Hazard Refrigerator is completely installed. Failure to a maximum of the refrigerator. Move the refrigerator straight back and evenly into the opening . A B 2" (5 cm) C ¹⁄₄" (6 mm) max. Failure to do...) screws D. Two 2" x 4" x 32" (5 cm x 10 cm x 81 cm) boards C. Do not remove film or cover. 3. Be sure that the refrigerator is level and aligned with the door opening . Rear leveling bolt B. Continue adjusting all of the leveling legs to the cabinet or leveling legs, do...