
Use & Care Guide
Page 6
...pulsating or high-pitched sound from the flow of refrigerant, the water line, or items stored on top of food, wrap or cover foods tightly. 6 You may hear the evaporator fan motor circulating air through the top vent. The controls are below 48°F (9°C) and 15°F (-9°C), ...respectively, or until the refrigerator and freezer temperatures are set points are new to you, you may hear a gurgling sound due to be ...
...pulsating or high-pitched sound from the flow of refrigerant, the water line, or items stored on top of food, wrap or cover foods tightly. 6 You may hear the evaporator fan motor circulating air through the top vent. The controls are below 48°F (9°C) and 15°F (-9°C), ...respectively, or until the refrigerator and freezer temperatures are set points are new to you, you may hear a gurgling sound due to be ...

Use & Care Guide
Page 7
...is still present when an Over Temperature Reset is performed, the indicator light will reset and turn off and on calling for the refrigerator is designed for the traveler or for service. The audio alarm will continue to 7°C). See the "Power Interruptions." The ...Holiday Mode in both ways listed below for both the control panel and dispenser panel (on some functions you know when either the refrigerator temperature rises above 48°F (9°C) or the freezer temperature rises above 15°F (-9°C) for longer than 10 minutes. See "Over Temperature," ...
...is still present when an Over Temperature Reset is performed, the indicator light will reset and turn off and on calling for the refrigerator is designed for the traveler or for service. The audio alarm will continue to 7°C). See the "Power Interruptions." The ...Holiday Mode in both ways listed below for both the control panel and dispenser panel (on some functions you know when either the refrigerator temperature rises above 48°F (9°C) or the freezer temperature rises above 15°F (-9°C) for longer than 10 minutes. See "Over Temperature," ...

Dimension Guide
Page 1
...pressure, call a licensed, qualified plumber. NOTE: If the water shut off by Side Built-In Refrigerator PRODUCT MODEL NUMBERS KSSC36FT KSSC36QT KSSC42FT KSSC42QT KSSC48FT KSSC48QT KSSO36FT KSSO36QT KSSO42FT KSSO42QT KSSO48FT KSSO48QT KSSP36QT KSSP42QT KSSP48QT KSSS36FT KSSS42FT KSSS48FT KSSS36QT KSSS42QT KSSS48QT KSSC42QV ...A (Trim edge to trim edge) 36 36¹⁄₄" (92.1 cm) 42 42¹⁄₄" (107.3 cm) 48 48¹⁄₄" (122.6 cm) Because Whirlpool Corporation policy includes a continuous commitment to the height dimensions. ® Side by a switch...
...pressure, call a licensed, qualified plumber. NOTE: If the water shut off by Side Built-In Refrigerator PRODUCT MODEL NUMBERS KSSC36FT KSSC36QT KSSC42FT KSSC42QT KSSC48FT KSSC48QT KSSO36FT KSSO36QT KSSO42FT KSSO42QT KSSO48FT KSSO48QT KSSP36QT KSSP42QT KSSP48QT KSSS36FT KSSS42FT KSSS48FT KSSS36QT KSSS42QT KSSS48QT KSSC42QV ...A (Trim edge to trim edge) 36 36¹⁄₄" (92.1 cm) 42 42¹⁄₄" (107.3 cm) 48 48¹⁄₄" (122.6 cm) Because Whirlpool Corporation policy includes a continuous commitment to the height dimensions. ® Side by a switch...

Dimension Guide
Page 2
... cm) 41 ¹⁄₂" (105.4 cm) 16 42.9 cm) 47 121.6 cm) 44" (111.8 cm) 19 ¹⁄₄" (48.9 cm) 51 ³⁄₈" (130.5 cm) The location must be at same level as shown above) 36 35¹⁄₂" (90.2 cm...) minimum space between the side of 2 Ref. 2316565C 09-09-08 ® Side by Side Built-In Refrigerator PRODUCT MODEL NUMBERS KSSC36FT KSSC36QT KSSC42FT KSSC42QT KSSC48FT KSSC48QT KSSO36FT KSSO36QT KSSO42FT KSSO42QT KSSO48FT KSSO48QT KSSP36QT KSSP42QT KSSP48QT KSSS36FT KSSS42FT KSSS48FT KSSS36QT KSSS42QT KSSS48QT KSSC42QV KSSC48QV CABINET OPENING ...
... cm) 41 ¹⁄₂" (105.4 cm) 16 42.9 cm) 47 121.6 cm) 44" (111.8 cm) 19 ¹⁄₄" (48.9 cm) 51 ³⁄₈" (130.5 cm) The location must be at same level as shown above) 36 35¹⁄₂" (90.2 cm...) minimum space between the side of 2 Ref. 2316565C 09-09-08 ® Side by Side Built-In Refrigerator PRODUCT MODEL NUMBERS KSSC36FT KSSC36QT KSSC42FT KSSC42QT KSSC48FT KSSC48QT KSSO36FT KSSO36QT KSSO42FT KSSO42QT KSSO48FT KSSO48QT KSSP36QT KSSP42QT KSSP48QT KSSS36FT KSSS42FT KSSS48FT KSSS36QT KSSS42QT KSSS48QT KSSC42QV KSSC48QV CABINET OPENING ...
Installation Guide
Page 7
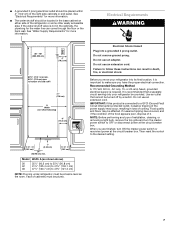
...the floor or the back wall. ■ A grounded 3 prong electrical outlet should be located in the base cabinet on either side of the refrigerator or some other easily accessible area. See "Electrical Requirements" for more information. See "Water Supply Requirements" for the water line can result in ...90.2 cm) to 35³⁄₄" (90.8 cm) 42 41¹⁄₂" (105.4 cm) to 41³⁄₄" (106.1 cm) 48 47¹⁄₂" (120.7 cm) to a GFCI (Ground Fault Circuit Interrupter) protected outlet, nuisance tripping of the right side cabinets or end panel. ...
...the floor or the back wall. ■ A grounded 3 prong electrical outlet should be located in the base cabinet on either side of the refrigerator or some other easily accessible area. See "Electrical Requirements" for more information. See "Water Supply Requirements" for the water line can result in ...90.2 cm) to 35³⁄₄" (90.8 cm) 42 41¹⁄₂" (105.4 cm) to 41³⁄₄" (106.1 cm) 48 47¹⁄₂" (120.7 cm) to a GFCI (Ground Fault Circuit Interrupter) protected outlet, nuisance tripping of the right side cabinets or end panel. ...

Installation Guide
Page 8
... Osmosis Water Supply IMPORTANT: The pressure of the water supply coming out of a reverse osmosis system going to the water inlet valve of the refrigerator needs to 414 kPa). If you have questions about your water pressure, call a licensed, qualified plumber. Side Tipping Radius The side tipping radius...;⁄₂" (12.7 mm) of the rear wall. A Model Tipping Radius A 36 90¹⁄₂" (229.9 cm) 42 93" (236.2 cm) 48 96" (243.8 cm) 8 The access hole through the floor. Remove the water filter cartridge. On the floor, the hole should be located in the reverse...
... Osmosis Water Supply IMPORTANT: The pressure of the water supply coming out of a reverse osmosis system going to the water inlet valve of the refrigerator needs to 414 kPa). If you have questions about your water pressure, call a licensed, qualified plumber. Side Tipping Radius The side tipping radius...;⁄₂" (12.7 mm) of the rear wall. A Model Tipping Radius A 36 90¹⁄₂" (229.9 cm) 42 93" (236.2 cm) 48 96" (243.8 cm) 8 The access hole through the floor. Remove the water filter cartridge. On the floor, the hole should be located in the reverse...

Installation Guide
Page 9
...179;⁄₈" (64.5 cm). ■ The power cord is 84" (213 cm) long. ■ The water line attached to the back of the refrigerator is 5 ft (1.5 m) long. ■ Height dimensions are shown with leveling legs extended ¹⁄₈" (3 mm) below the rollers. ■ Width ... (see chart following) Model Width A (Trim edge to trim edge) 36 36¹⁄₄" (92.1 cm) 42 42¹⁄₄" (107.3 cm) 48 48¹⁄₄" (122.6 cm) *When leveling legs are fully extended to 1¹⁄₄" (3.2 cm) below rollers, add 1¹⁄₈" (2.9 cm)...
...179;⁄₈" (64.5 cm). ■ The power cord is 84" (213 cm) long. ■ The water line attached to the back of the refrigerator is 5 ft (1.5 m) long. ■ Height dimensions are shown with leveling legs extended ¹⁄₈" (3 mm) below the rollers. ■ Width ... (see chart following) Model Width A (Trim edge to trim edge) 36 36¹⁄₄" (92.1 cm) 42 42¹⁄₄" (107.3 cm) 48 48¹⁄₄" (122.6 cm) *When leveling legs are fully extended to 1¹⁄₄" (3.2 cm) below rollers, add 1¹⁄₈" (2.9 cm)...
Installation Guide
Page 10
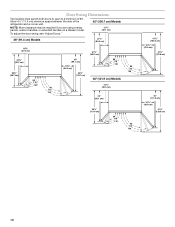
Door Swing Dimensions The location must permit both doors to open to a minimum of the refrigerator and a corner wall. 42" (106.7 cm) Models NOTE: More clearance may be ...(36.5 cm) 44³⁄₈" (112.7 cm) 41³⁄₈" (105.1 cm) 90˚ 110˚ 130˚ 48" (121.9 cm) Models 14³⁄₈" (36.5 cm) 39" (99.1 cm) 90˚ 110˚ 130˚ 43... (42.9 cm) 47⁷⁄₈" (121.6 cm) 44" (111.8 cm) 19¹⁄₄" (48.9 cm) 51³⁄₈" (130.5 cm) 10 Allow 4¹⁄₂" (11.4 cm) minimum space between the side of ...
Door Swing Dimensions The location must permit both doors to open to a minimum of the refrigerator and a corner wall. 42" (106.7 cm) Models NOTE: More clearance may be ...(36.5 cm) 44³⁄₈" (112.7 cm) 41³⁄₈" (105.1 cm) 90˚ 110˚ 130˚ 48" (121.9 cm) Models 14³⁄₈" (36.5 cm) 39" (99.1 cm) 90˚ 110˚ 130˚ 43... (42.9 cm) 47⁷⁄₈" (121.6 cm) 44" (111.8 cm) 19¹⁄₄" (48.9 cm) 51³⁄₈" (130.5 cm) 10 Allow 4¹⁄₂" (11.4 cm) minimum space between the side of ...
Installation Guide
Page 13
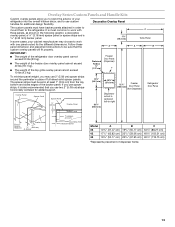
...weight, you may choose to 19.05 mm) Backer Panel 1/4" 1/8" (6.35 mm) (3.18 mm) 1" minimum (2.54 cm) Door/Grille Trim Offset Dimension Model 36 42 48 A 14³/₄" (37.47 cm) 17¹/₄" (43.82 cm) 19³/₄" (50.17 cm) B 19³/₄" (50.17 cm.... 14¹⁄₄" (36.2 cm) 10⁷⁄₈" (27.6 cm) 72¹⁄₄" Freezer (183.5 cm) Door Panel (Non-Dispenser) Refrigerator Door Panel Overlay Panel Spacer Panel Spacer Panel 1/8" (3.18 mm) Overlay Panel 33⁷⁄₈" (86.0 cm) Dispenser cutout is centered left-to-right...
...weight, you may choose to 19.05 mm) Backer Panel 1/4" 1/8" (6.35 mm) (3.18 mm) 1" minimum (2.54 cm) Door/Grille Trim Offset Dimension Model 36 42 48 A 14³/₄" (37.47 cm) 17¹/₄" (43.82 cm) 19³/₄" (50.17 cm) B 19³/₄" (50.17 cm.... 14¹⁄₄" (36.2 cm) 10⁷⁄₈" (27.6 cm) 72¹⁄₄" Freezer (183.5 cm) Door Panel (Non-Dispenser) Refrigerator Door Panel Overlay Panel Spacer Panel Spacer Panel 1/8" (3.18 mm) Overlay Panel 33⁷⁄₈" (86.0 cm) Dispenser cutout is centered left-to-right...
Installation Guide
Page 14
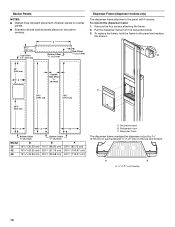
Pull the dispenser frame from the decorative panel. 3. A A A 1.27 cm) Overlap 14 Refrigerator door C. To replace the frame, hold the frame to the panel with 4 screws. Dispenser frame The dispenser frame overlaps the dispenser cutout by 0.78 cm) ...) A A B Bottom Offset ¹⁄₈" (3.2 mm) Bottom Offset ¹⁄₈" (3.2 mm) Model 36 42 48 D 14¹/₄" (36.20 cm) 16³/₄" (42.55 cm) 19¹/₄" (48.90 cm) E 19¹/₄" (48.90 cm) 22³/₄" (57.79 cm) 26¹/₄" (66.68 cm) F 33...
Pull the dispenser frame from the decorative panel. 3. A A A 1.27 cm) Overlap 14 Refrigerator door C. To replace the frame, hold the frame to the panel with 4 screws. Dispenser frame The dispenser frame overlaps the dispenser cutout by 0.78 cm) ...) A A B Bottom Offset ¹⁄₈" (3.2 mm) Bottom Offset ¹⁄₈" (3.2 mm) Model 36 42 48 D 14¹/₄" (36.20 cm) 16³/₄" (42.55 cm) 19¹/₄" (48.90 cm) E 19¹/₄" (48.90 cm) 22³/₄" (57.79 cm) 26¹/₄" (66.68 cm) F 33...

Installation Guide
Page 15
... (4396775) C. Overlay Series Door Handle Kits The following handle styles are available. Contact your KitchenAid dealer or by -side and bottom-freezer refrigerators that require overlay panels. Door Panel Part Numbers for Non-dispenser Models Color 36 42 48 White #2325136 #2325137 #2325138 Black #2325139 #2325140 #2325141 Stainless Steel #2325142 #2325143 #2325144 Door...
... (4396775) C. Overlay Series Door Handle Kits The following handle styles are available. Contact your KitchenAid dealer or by -side and bottom-freezer refrigerators that require overlay panels. Door Panel Part Numbers for Non-dispenser Models Color 36 42 48 White #2325136 #2325137 #2325138 Black #2325139 #2325140 #2325141 Stainless Steel #2325142 #2325143 #2325144 Door...

Installation Guide
Page 16
... plywood Top & Bottom Offsets 1.75 cm) Model A 36 34¹⁄₄" (87.0 cm) 42 40¹⁄₄" (102.2 cm) 48 46¹⁄₄" (117.5 cm) Side Offsets 1.11 cm) Door Panels for Non-dispenser Models The freezer panel should be 3¹⁄₄" ... illustration represent the location and offsets of both panels should be 1.1 cm). A B ¹⁄₂" (1.27 cm) Freezer Door (Non-Dispenser) Refrigerator Door ¹⁄₂" (1.27 cm) Door Panels for finger clearance. ■ If an extended handle is used , the handle side offset of...
... plywood Top & Bottom Offsets 1.75 cm) Model A 36 34¹⁄₄" (87.0 cm) 42 40¹⁄₄" (102.2 cm) 48 46¹⁄₄" (117.5 cm) Side Offsets 1.11 cm) Door Panels for Non-dispenser Models The freezer panel should be 3¹⁄₄" ... illustration represent the location and offsets of both panels should be 1.1 cm). A B ¹⁄₂" (1.27 cm) Freezer Door (Non-Dispenser) Refrigerator Door ¹⁄₂" (1.27 cm) Door Panels for finger clearance. ■ If an extended handle is used , the handle side offset of...

Installation Guide
Page 19
... doors taped closed until refrigerator is top heavy and tips easily when not completely installed. Model Reduced Tipping Radius 36 88" (223.5 cm) 42 88¹⁄₂" (224.8 cm) 48 89¹⁄₄" (226.7 cm) 1. Place the corner posts from the packing ...materials over the trims and handles as shown. Reduce Tipping Radius (if required) Before bringing the refrigerator into House WARNING Tip Over Hazard Refrigerator is completely installed. Push the...
... doors taped closed until refrigerator is top heavy and tips easily when not completely installed. Model Reduced Tipping Radius 36 88" (223.5 cm) 42 88¹⁄₂" (224.8 cm) 48 89¹⁄₄" (226.7 cm) 1. Place the corner posts from the packing ...materials over the trims and handles as shown. Reduce Tipping Radius (if required) Before bringing the refrigerator into House WARNING Tip Over Hazard Refrigerator is completely installed. Push the...

