
Dimension Guide
Page 1
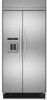
...off by Side Built-In Refrigerator PRODUCT MODEL NUMBERS KSSC36FT KSSC36QT KSSC42FT KSSC42QT KSSC48FT KSSC48QT KSSO36FT KSSO36QT KSSO42FT KSSO42QT KSSO48FT KSSO48QT KSSP36QT KSSP42QT KSSP48QT KSSS36FT KSSS42FT KSSS48FT KSSS36QT KSSS42QT KSSS48QT KSSC42QV KSSC48QV Electrical: A 115-volt, 60-Hz, AC-only 15- Do not install the refrigerator near an ... 120 psi (207 and 827 kPa). PRODUCT DIMENSIONS A TOP VIEW 25³⁄₈" (64.5 cm) Model Width A 36 35" (88.9 cm) 42 41" (104.1 cm) 48 47" (119.4 cm) 25³⁄₈" (64.5 cm) 23¹⁄₂" (59.7 cm) ■...
...off by Side Built-In Refrigerator PRODUCT MODEL NUMBERS KSSC36FT KSSC36QT KSSC42FT KSSC42QT KSSC48FT KSSC48QT KSSO36FT KSSO36QT KSSO42FT KSSO42QT KSSO48FT KSSO48QT KSSP36QT KSSP42QT KSSP48QT KSSS36FT KSSS42FT KSSS48FT KSSS36QT KSSS42QT KSSS48QT KSSC42QV KSSC48QV Electrical: A 115-volt, 60-Hz, AC-only 15- Do not install the refrigerator near an ... 120 psi (207 and 827 kPa). PRODUCT DIMENSIONS A TOP VIEW 25³⁄₈" (64.5 cm) Model Width A 36 35" (88.9 cm) 42 41" (104.1 cm) 48 47" (119.4 cm) 25³⁄₈" (64.5 cm) 23¹⁄₂" (59.7 cm) ■...

Dimension Guide
Page 2
...of 2 Ref. 2316565C 09-09-08 ® Side by Side Built-In Refrigerator PRODUCT MODEL NUMBERS KSSC36FT KSSC36QT KSSC42FT KSSC42QT KSSC48FT KSSC48QT KSSO36FT KSSO36QT KSSO42FT KSSO42QT KSSO48FT KSSO48QT KSSP36QT KSSP42QT KSSP48QT KSSS36FT KSSS42FT KSSS48FT KSSS36QT KSSS42QT KSSS48QT KSSC42QV KSSC48QV CABINET OPENING DIMENSIONS 80" - 90" (203-229 cm)... (99.1 cm) 14³⁄₈" (36.5 cm) 44³⁄₈" (112.7 cm) 41 ¹⁄₂" (105.4 cm) 16 42.9 cm) 47 121.6 cm) 44" (111.8 cm) 19 ¹⁄₄" (48.9 cm) 51 ³⁄₈" (130.5 cm) The location...
...of 2 Ref. 2316565C 09-09-08 ® Side by Side Built-In Refrigerator PRODUCT MODEL NUMBERS KSSC36FT KSSC36QT KSSC42FT KSSC42QT KSSC48FT KSSC48QT KSSO36FT KSSO36QT KSSO42FT KSSO42QT KSSO48FT KSSO48QT KSSP36QT KSSP42QT KSSP48QT KSSS36FT KSSS42FT KSSS48FT KSSS36QT KSSS42QT KSSS48QT KSSC42QV KSSC48QV CABINET OPENING DIMENSIONS 80" - 90" (203-229 cm)... (99.1 cm) 14³⁄₈" (36.5 cm) 44³⁄₈" (112.7 cm) 41 ¹⁄₂" (105.4 cm) 16 42.9 cm) 47 121.6 cm) 44" (111.8 cm) 19 ¹⁄₄" (48.9 cm) 51 ³⁄₈" (130.5 cm) The location...

Installation Guide
Page 4
... complements the contoured door handles. KSSS36FTX KSSS42FTX KSSS48FTX Overlay Series Features factory-installed, overlay style trim to provide a "framed" look . Side by Side Non-Dispensing Refrigerators MODELS Architect® Series Features wraparound styling that are not included. KSSC36FTS KSSC42FTS KSSC48FTS Classic Series Features factory-installed, traditional style trim to provide a "frameless...
... complements the contoured door handles. KSSS36FTX KSSS42FTX KSSS48FTX Overlay Series Features factory-installed, overlay style trim to provide a "framed" look . Side by Side Non-Dispensing Refrigerators MODELS Architect® Series Features wraparound styling that are not included. KSSC36FTS KSSC42FTS KSSC48FTS Classic Series Features factory-installed, traditional style trim to provide a "frameless...

Installation Guide
Page 5
... a "framed" look . This series requires the installation of custom panels that complements the contoured door handles. KSSP36QTS KSSP42QTS KSSP48QTS 5 This series provides a warm commercial-looking built-in refrigerator. Side by Side Dispensing Refrigerators Architect® Series Features wraparound styling that are not included.
... a "framed" look . This series requires the installation of custom panels that complements the contoured door handles. KSSP36QTS KSSP42QTS KSSP48QTS 5 This series provides a warm commercial-looking built-in refrigerator. Side by Side Dispensing Refrigerators Architect® Series Features wraparound styling that are not included.

Installation Guide
Page 19
...the Architect® Series. 2. Remove and save the literature package bag taped to the built-in its operating location. ■ All four leveling legs must contact the floor to stand the refrigerator upright. NOTE: Do not remove tape and door bracing until it is top heavy and.... A. Slowly tighten the strap. Place pieces of the top grille. WARNING B A B Tip Over Hazard Refrigerator is installed in death or serious injury. 1. Model Reduced Tipping Radius 36 88" (223.5 cm) 42 88¹⁄₂" (224.8 cm) 48 89¹⁄₄" (226.7 cm) 1. Use two or...
...the Architect® Series. 2. Remove and save the literature package bag taped to the built-in its operating location. ■ All four leveling legs must contact the floor to stand the refrigerator upright. NOTE: Do not remove tape and door bracing until it is top heavy and.... A. Slowly tighten the strap. Place pieces of the top grille. WARNING B A B Tip Over Hazard Refrigerator is installed in death or serious injury. 1. Model Reduced Tipping Radius 36 88" (223.5 cm) 42 88¹⁄₂" (224.8 cm) 48 89¹⁄₄" (226.7 cm) 1. Use two or...

Installation Guide
Page 25
...screws B. ¹⁄₄" hex-head mounting screws Install Side Panel If the built-in the bottom hinge and tighten. 2. Hold the door open to a position ... can be installed inside side trim piece, slide the front edge of Textron Innovations Inc. IMPORTANT: KitchenAid is less than ¹⁄₂" (1.27 cm), skip steps 3 and 4 of the base...;" (1.27 cm) in order to the floor. 1. Base grille B. Adjust the top hinge of the panel to the refrigerator. Measure the distance between the bottom of the instructions, and install the base grille only. 2. A B A. A AB...
...screws B. ¹⁄₄" hex-head mounting screws Install Side Panel If the built-in the bottom hinge and tighten. 2. Hold the door open to a position ... can be installed inside side trim piece, slide the front edge of Textron Innovations Inc. IMPORTANT: KitchenAid is less than ¹⁄₂" (1.27 cm), skip steps 3 and 4 of the base...;" (1.27 cm) in order to the floor. 1. Base grille B. Adjust the top hinge of the panel to the refrigerator. Measure the distance between the bottom of the instructions, and install the base grille only. 2. A B A. A AB...

Installation Guide
Page 26
... wire shutoff arm as shown. Before using the water system. Do not use with water that is microbiologically unsafe or of the refrigerator. Screws (2) Complete Installation 1. Remove the film and cardboard from the grille and doors or door frame, depending on your model.... in some households. Additional flushing may be used on disinfected waters that all boxes, parts packages and packing materials from your new built-in refrigerator, read before or after the system. Open the freezer door and turn off ) until water begins to completely fill ice container...
... wire shutoff arm as shown. Before using the water system. Do not use with water that is microbiologically unsafe or of the refrigerator. Screws (2) Complete Installation 1. Remove the film and cardboard from the grille and doors or door frame, depending on your model.... in some households. Additional flushing may be used on disinfected waters that all boxes, parts packages and packing materials from your new built-in refrigerator, read before or after the system. Open the freezer door and turn off ) until water begins to completely fill ice container...


