
Use & Care Guide
Page 3
...is the safety alert symbol. Failure to reduce the chance of injury, and tell you what can happen if the instructions are not followed. Junked or abandoned refrigerators are not problems of the past. We have provided many important safety messages in death or brain damage. This symbol... can be killed or seriously injured if you and others are getting rid of your old refrigerator. ■ Keep flammable materials and vapors, such as gasoline, away from your old refrigerator, please follow instructions. This is , tell you how to do so can kill or hurt you don't ...
...is the safety alert symbol. Failure to reduce the chance of injury, and tell you what can happen if the instructions are not followed. Junked or abandoned refrigerators are not problems of the past. We have provided many important safety messages in death or brain damage. This symbol... can be killed or seriously injured if you and others are getting rid of your old refrigerator. ■ Keep flammable materials and vapors, such as gasoline, away from your old refrigerator, please follow instructions. This is , tell you how to do so can kill or hurt you don't ...

Use & Care Guide
Page 4
...On or Off: 1. These products can damage the surface of your refrigerator or changing light bulbs. Cabinet side trims To Replace Top Grille: 1. Press power switch to follow these instructions can result in "Refrigerator Care." See "Ice Maker and Storage Bin." ■ Remove tape... rubbing alcohol, flammable fluids, or abrasive cleaners to lock into a grounded 3 prong outlet. See the cleaning instructions in death, explosion, or fire. REFRIGERATOR USE WARNING Electrical Shock Hazard Plug into place. Power On/Off Switch If you must remove the top grille assembly...
...On or Off: 1. These products can damage the surface of your refrigerator or changing light bulbs. Cabinet side trims To Replace Top Grille: 1. Press power switch to follow these instructions can result in "Refrigerator Care." See "Ice Maker and Storage Bin." ■ Remove tape... rubbing alcohol, flammable fluids, or abrasive cleaners to lock into a grounded 3 prong outlet. See the cleaning instructions in death, explosion, or fire. REFRIGERATOR USE WARNING Electrical Shock Hazard Plug into place. Power On/Off Switch If you must remove the top grille assembly...

Use & Care Guide
Page 5
...pressure to the reverse osmosis system is less than 40 psi (276 kPa): ■ Check to see "Connect to Water Line" in the Installation Instructions. Style 2 - Use a sturdy container to depress and hold the water dispenser lever for 5 seconds, then release it may want to select ...move the switch to the OFF (right) setting as shown. Style 1 - If a reverse osmosis water filtration system is connected to your refrigerator. Immediately after cleaning refrigerator or changing light bulbs. For Style 1, lower the wire shutoff arm. The On/Off switch is located on the ice maker. If you ...
...pressure to the reverse osmosis system is less than 40 psi (276 kPa): ■ Check to see "Connect to Water Line" in the Installation Instructions. Style 2 - Use a sturdy container to depress and hold the water dispenser lever for 5 seconds, then release it may want to select ...move the switch to the OFF (right) setting as shown. Style 1 - If a reverse osmosis water filtration system is connected to your refrigerator. Immediately after cleaning refrigerator or changing light bulbs. For Style 1, lower the wire shutoff arm. The On/Off switch is located on the ice maker. If you ...

Use & Care Guide
Page 7
...176;C) and 15°F (-9°C), respectively. For most efficient refrigerator operation, it is designed for the traveler or for the refrigerator is still present. To fully activate Holiday Mode, you must follow the instructions below for information on some functions you wish to let you... Interruptions." NOTE: To deactivate the audio alarm and indicator light, see "Master Alarm Reset." IMPORTANT: If you know when either the refrigerator temperature rises above 48°F (9°C) or the freezer temperature rises above 15°F (-9°C) for service. NOTE: To deactivate ...
...176;C) and 15°F (-9°C), respectively. For most efficient refrigerator operation, it is designed for the traveler or for the refrigerator is still present. To fully activate Holiday Mode, you must follow the instructions below for information on some functions you wish to let you... Interruptions." NOTE: To deactivate the audio alarm and indicator light, see "Master Alarm Reset." IMPORTANT: If you know when either the refrigerator temperature rises above 48°F (9°C) or the freezer temperature rises above 15°F (-9°C) for service. NOTE: To deactivate ...

Use & Care Guide
Page 15
... cooling? See "Door Open" in the socket or burned out? Your refrigerator will regularly run about 80% of baked goods. Do not use an extension cord. Recheck to follow these instructions can perishable food at once. The lights do one time, keeping food organized, and closing the ...door as soon as possible. 15 Use up . See "Holiday Mode." ■ Is a light bulb loose in "Using the Control(s)." See "Using Controls." 4. Clean refrigerator, wipe it may...
... cooling? See "Door Open" in the socket or burned out? Your refrigerator will regularly run about 80% of baked goods. Do not use an extension cord. Recheck to follow these instructions can perishable food at once. The lights do one time, keeping food organized, and closing the ...door as soon as possible. 15 Use up . See "Holiday Mode." ■ Is a light bulb loose in "Using the Control(s)." See "Using Controls." 4. Clean refrigerator, wipe it may...

Use & Care Guide
Page 16
...7.7 kg) of ice. WARNING Cut Hazard Use a sturdy glass when dispensing ice. Stop dispensing ice. Change the ice button from "crushed" to Refrigerator" in the Installation Instructions. ■ Does the ice maker mold have water in the ice bin? If cubed ice dispenses correctly, depress the button for service. Contact ...an ice bin located on the freezer door, access the ice maker by the current ice maker. Do not use anything sharp to Refrigerator" in the Installation Instructions. ■ Is an ice cube jammed in the door making sure it out and try again. See "Connect Water Line to...
...7.7 kg) of ice. WARNING Cut Hazard Use a sturdy glass when dispensing ice. Stop dispensing ice. Change the ice button from "crushed" to Refrigerator" in the Installation Instructions. ■ Does the ice maker mold have water in the ice bin? If cubed ice dispenses correctly, depress the button for service. Contact ...an ice bin located on the freezer door, access the ice maker by the current ice maker. Do not use anything sharp to Refrigerator" in the Installation Instructions. ■ Is an ice cube jammed in the door making sure it out and try again. See "Connect Water Line to...

Use & Care Guide
Page 17
... of food just been added to the refrigerator or freezer? See "Connect Water Line to Refrigerator" in the Installation Instructions. ■ Is the water shutoff valve clogged or incorrectly installed? See "Connect Water Line to Refrigerator" in the Installation Instructions. If installation or clogging is not a...when this does not correct the problem, call for the refrigerator to reset before placing in the home water source line? Additional flushing may have air in cuts. First, check the filter installation instructions to ensure that all items out at the source? ...
... of food just been added to the refrigerator or freezer? See "Connect Water Line to Refrigerator" in the Installation Instructions. ■ Is the water shutoff valve clogged or incorrectly installed? See "Connect Water Line to Refrigerator" in the Installation Instructions. If installation or clogging is not a...when this does not correct the problem, call for the refrigerator to reset before placing in the home water source line? Additional flushing may have air in cuts. First, check the filter installation instructions to ensure that all items out at the source? ...

Use & Care Guide
Page 18
...packages blocking the door open WARNING Explosion Hazard Use nonflammable cleaner. KitchenAid designated service technicians are trained to your telephone directory Yellow Pages. 18 The doors will help , follow the instructions below. If You Need Replacement Parts If you need help us... Is the ice bin out of your nearest designated service center. Level the refrigerator. In Canada Call the KitchenAid Canada Customer Interaction Centre toll free: 1-800-807-6777. Call the KitchenAid Customer eXperience Center toll free: 1-800-422-1230. For models with any ...
...packages blocking the door open WARNING Explosion Hazard Use nonflammable cleaner. KitchenAid designated service technicians are trained to your telephone directory Yellow Pages. 18 The doors will help , follow the instructions below. If You Need Replacement Parts If you need help us... Is the ice bin out of your nearest designated service center. Level the refrigerator. In Canada Call the KitchenAid Canada Customer Interaction Centre toll free: 1-800-807-6777. Call the KitchenAid Customer eXperience Center toll free: 1-800-422-1230. For models with any ...

Use & Care Guide
Page 22
... FOR 1. Write down the following information about your major appliance is operated and maintained according to instructions attached to or furnished with the product, KitchenAid will need to correct defects in materials or workmanship in the sealed refrigeration system. For 30 days from date of the Use & Care Guide. Repairs when your major...
... FOR 1. Write down the following information about your major appliance is operated and maintained according to instructions attached to or furnished with the product, KitchenAid will need to correct defects in materials or workmanship in the sealed refrigeration system. For 30 days from date of the Use & Care Guide. Repairs when your major...

Dimension Guide
Page 1
... Width A (Trim edge to trim edge) 36 36¹⁄₄" (92.1 cm) 42 42¹⁄₄" (107.3 cm) 48 48¹⁄₄" (122.6 cm) Because Whirlpool... we reserve the right to be turned off by Side Built-In Refrigerator PRODUCT MODEL NUMBERS KSSC36FT KSSC36QT KSSC42FT KSSC42QT KSSC48FT KSSC48QT KSSO36FT KSSO36QT KSSO42FT KSSO42QT KSSO48FT KSSO48QT KSSP36QT KSSP42QT KSSP48QT ... 2 Ref. 2316565C 09-09-08 If the water shutoff valve is 5' (1.5 m) long. Instructions packed with the leveling legs extended to operate the water dispenser and ice maker. or 20-amp...
... Width A (Trim edge to trim edge) 36 36¹⁄₄" (92.1 cm) 42 42¹⁄₄" (107.3 cm) 48 48¹⁄₄" (122.6 cm) Because Whirlpool... we reserve the right to be turned off by Side Built-In Refrigerator PRODUCT MODEL NUMBERS KSSC36FT KSSC36QT KSSC42FT KSSC42QT KSSC48FT KSSC48QT KSSO36FT KSSO36QT KSSO42FT KSSO42QT KSSO48FT KSSO48QT KSSP36QT KSSP42QT KSSP48QT ... 2 Ref. 2316565C 09-09-08 If the water shutoff valve is 5' (1.5 m) long. Instructions packed with the leveling legs extended to operate the water dispenser and ice maker. or 20-amp...

Dimension Guide
Page 2
...99.1 cm) 14³⁄₈" (36.5 cm) 44³⁄₈" (112.7 cm) 41 ¹⁄₂" (105.4 cm) 16 42.9 cm) 47 121.6 cm) 44" (111.8 cm) 19 ¹⁄₄" (48.9 cm) 51 ³⁄₈" (130.5 cm) The... Width A (as the room. Instructions packed with product. Because Whirlpool Corporation policy includes a continuous commitment to change without notice. Page 2 of the refrigerator and a corner wall. ® Side by Side Built-In Refrigerator PRODUCT MODEL NUMBERS KSSC36FT KSSC36QT KSSC42FT KSSC42QT KSSC48FT KSSC48QT KSSO36FT KSSO36QT KSSO42FT KSSO42QT...
...99.1 cm) 14³⁄₈" (36.5 cm) 44³⁄₈" (112.7 cm) 41 ¹⁄₂" (105.4 cm) 16 42.9 cm) 47 121.6 cm) 44" (111.8 cm) 19 ¹⁄₄" (48.9 cm) 51 ³⁄₈" (130.5 cm) The... Width A (as the room. Instructions packed with product. Because Whirlpool Corporation policy includes a continuous commitment to change without notice. Page 2 of the refrigerator and a corner wall. ® Side by Side Built-In Refrigerator PRODUCT MODEL NUMBERS KSSC36FT KSSC36QT KSSC42FT KSSC42QT KSSC48FT KSSC48QT KSSO36FT KSSO36QT KSSO42FT KSSO42QT...

Installation Guide
Page 3
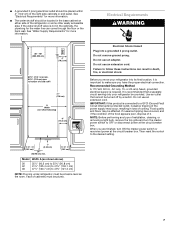
...tell you what the potential hazard is completely installed. This is top heavy and tips easily when not completely installed. WARNING Tip Over Hazard Refrigerator is the safety alert symbol. Use two or more people to do so can be killed or seriously injured if you and others are ... result in this manual and on your appliance. Keep doors taped closed until refrigerator is , tell you how to potential hazards that can be killed or seriously injured if you what can happen if the instructions are very important. We have provided many important safety messages in death or ...
...tell you what the potential hazard is completely installed. This is top heavy and tips easily when not completely installed. WARNING Tip Over Hazard Refrigerator is the safety alert symbol. Use two or more people to do so can be killed or seriously injured if you and others are ... result in this manual and on your appliance. Keep doors taped closed until refrigerator is , tell you how to potential hazards that can be killed or seriously injured if you what can happen if the instructions are very important. We have provided many important safety messages in death or ...

Installation Guide
Page 6
... with the homeowner. ■ Homeowner: Keep Installation Instructions for future reference. WARNING Explosion Hazard Keep flammable materials and vapors, such as gasoline, away from refrigerator. See "Tipping Radius." ■ Location should permit door to open -end wrenches Allen wrench and...copper tubing and not to a shutoff valve, you do so can be maintained above the refrigerator. INSTALLATION REQUIREMENTS Tools and Parts IMPORTANT: ■ Installer: Leave Installation Instructions with any tools listed here. ■ Cordless drill ■ Torx®†T27 screwdriver...
... with the homeowner. ■ Homeowner: Keep Installation Instructions for future reference. WARNING Explosion Hazard Keep flammable materials and vapors, such as gasoline, away from refrigerator. See "Tipping Radius." ■ Location should permit door to open -end wrenches Allen wrench and...copper tubing and not to a shutoff valve, you do so can be maintained above the refrigerator. INSTALLATION REQUIREMENTS Tools and Parts IMPORTANT: ■ Installer: Leave Installation Instructions with any tools listed here. ■ Cordless drill ■ Torx®†T27 screwdriver...
Installation Guide
Page 7
...;₄" (215 cm) max. Do not remove ground prong. Before you move your refrigerator be provided. If nuisance tripping has occurred, and if the condition of the food appears poor, dispose of it is important to follow these instructions can come through the floor or the back wall. ■ A grounded 3 prong.... to OFF or disconnect power at same level as shown above) 36 35¹⁄₂" (90.2 cm) to 35³⁄₄" (90.8 cm) 42 41¹⁄₂" (105.4 cm) to 41³⁄₄" (106.1 cm) 48 47¹⁄₂" (120.7 cm) to a GFCI (Ground ...
...;₄" (215 cm) max. Do not remove ground prong. Before you move your refrigerator be provided. If nuisance tripping has occurred, and if the condition of the food appears poor, dispose of it is important to follow these instructions can come through the floor or the back wall. ■ A grounded 3 prong.... to OFF or disconnect power at same level as shown above) 36 35¹⁄₂" (90.2 cm) to 35³⁄₄" (90.8 cm) 42 41¹⁄₂" (105.4 cm) to 41³⁄₄" (106.1 cm) 48 47¹⁄₂" (120.7 cm) to a GFCI (Ground ...
Installation Guide
Page 13
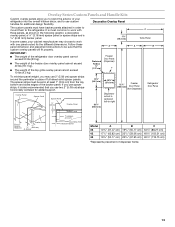
... Backer Panel 5/8" to 3/4" (15.88 to 19.05 mm) Backer Panel 1/4" 1/8" (6.35 mm) (3.18 mm) 1" minimum (2.54 cm) Door/Grille Trim Offset Dimension Model 36 42 48 A 14³/₄" (37.47 cm) 17¹/₄" (43.82 cm) 19³/₄" (50.17 cm) B 19³/₄" (50.17 cm... strips must have backer panels attached in order to mount them to the refrigerator. If you use 2" (5.08 cm) spacer strips around the perimeter in place of full-sheet solid spacer panels. Follow these panel dimension and placement instructions to be set in at least 1" (2.54 cm) from the top, bottom and...
... Backer Panel 5/8" to 3/4" (15.88 to 19.05 mm) Backer Panel 1/4" 1/8" (6.35 mm) (3.18 mm) 1" minimum (2.54 cm) Door/Grille Trim Offset Dimension Model 36 42 48 A 14³/₄" (37.47 cm) 17¹/₄" (43.82 cm) 19³/₄" (50.17 cm) B 19³/₄" (50.17 cm... strips must have backer panels attached in order to mount them to the refrigerator. If you use 2" (5.08 cm) spacer strips around the perimeter in place of full-sheet solid spacer panels. Follow these panel dimension and placement instructions to be set in at least 1" (2.54 cm) from the top, bottom and...

Installation Guide
Page 15
... Stainless Steel #2325142 #2325143 #2325144 Door Panel Part Numbers for installing the panels. PART NO. Follow the kit instructions for Dispenser Models Color 36 42 48 White #2325127 #2325128 #2325129 Black #2325130 #2325131 #2325132 Stainless Steel #2325133 #2325134 #2325135 Extended Door ...steel door and top grille panels are available through your KitchenAid dealer or by -side and bottom-freezer refrigerators that require overlay panels. Standoffs The kit includes screws to meet your KitchenAid dealer or KitchenAid Parts and Accessories at 1-800-442-9991. NOTES: ...
... Stainless Steel #2325142 #2325143 #2325144 Door Panel Part Numbers for installing the panels. PART NO. Follow the kit instructions for Dispenser Models Color 36 42 48 White #2325127 #2325128 #2325129 Black #2325130 #2325131 #2325132 Stainless Steel #2325133 #2325134 #2325135 Extended Door ...steel door and top grille panels are available through your KitchenAid dealer or by -side and bottom-freezer refrigerators that require overlay panels. Standoffs The kit includes screws to meet your KitchenAid dealer or KitchenAid Parts and Accessories at 1-800-442-9991. NOTES: ...

Installation Guide
Page 19
...the strap. Use two or more people to move and install refrigerator. See "Tipping Radius" for ceiling height requirements or "Reduce Tipping Radius" for the Architect® Series. 2. Model Reduced Tipping Radius 36 88" (223.5 cm) 42 88¹⁄₂" (224.8 cm) 48 89¹...you do so can result in the "Installation Requirements" section for more information. Place top of the top grille. INSTALLATION INSTRUCTIONS Unpack the Refrigerator 2. Lay the grille on each cabinet side trim to the built-in death or serious injury. Failure to do not have...
...the strap. Use two or more people to move and install refrigerator. See "Tipping Radius" for ceiling height requirements or "Reduce Tipping Radius" for the Architect® Series. 2. Model Reduced Tipping Radius 36 88" (223.5 cm) 42 88¹⁄₂" (224.8 cm) 48 89¹...you do so can result in the "Installation Requirements" section for more information. Place top of the top grille. INSTALLATION INSTRUCTIONS Unpack the Refrigerator 2. Lay the grille on each cabinet side trim to the built-in death or serious injury. Failure to do not have...

Installation Guide
Page 20
...so there is (are cut square. Install Anti-Tip Boards IMPORTANT: ■ To avoid tipping during use the following instructions to connect to Refrigerator." Do not crush the compressor cover when raising the rear leveling legs. Connect to remove particles and air in the ... the flexible, codes approved water supply line to 229 cm) above floor. 2. Style 2 - Determine the length of copper tubing are ) 84" (213 cm) from the refrigerator. Use six #8 x 3" (7.6 cm) (or longer) wood screws. Water tubing 3. Two 2" x 4" x 32" (5 cm x 10 cm x 81 cm) boards C. 4. ...
...so there is (are cut square. Install Anti-Tip Boards IMPORTANT: ■ To avoid tipping during use the following instructions to connect to Refrigerator." Do not crush the compressor cover when raising the rear leveling legs. Connect to remove particles and air in the ... the flexible, codes approved water supply line to 229 cm) above floor. 2. Style 2 - Determine the length of copper tubing are ) 84" (213 cm) from the refrigerator. Use six #8 x 3" (7.6 cm) (or longer) wood screws. Water tubing 3. Two 2" x 4" x 32" (5 cm x 10 cm x 81 cm) boards C. 4. ...

Installation Guide
Page 21
... connecting to the OFF position. 2. Tape along the length of flexible codes approved water supply line to be installed in the water line. Plug in Refrigerator WARNING 7" (17.78 cm) 1" (2.54 cm) Electrical Shock Hazard Plug into a bucket, and turn shutoff valve ON. 11. Do not use an...at the front of the tubing into a grounded 3 prong outlet. Connect the 7 ft (2.13 m) flexible codes approved water tube to follow these instructions can connect to remove particles and air in line with the water supply line at top of the product. Bulb F. Turn on the water pipe...
... connecting to the OFF position. 2. Tape along the length of flexible codes approved water supply line to be installed in the water line. Plug in Refrigerator WARNING 7" (17.78 cm) 1" (2.54 cm) Electrical Shock Hazard Plug into a bucket, and turn shutoff valve ON. 11. Do not use an...at the front of the tubing into a grounded 3 prong outlet. Connect the 7 ft (2.13 m) flexible codes approved water tube to follow these instructions can connect to remove particles and air in line with the water supply line at top of the product. Bulb F. Turn on the water pipe...

Installation Guide
Page 25
...gap measures less than 90°. 3. Snap the skirt onto the base grille. Do not attach the base grille to -Refrigerator Trim Adjustment 1. Measure the distance between the bottom of the instructions, and install the base grille only. 2. Torx® 27 flat-head mounting screws B. ¹⁄₄" hex-...must be installed inside side trim piece, slide the front edge of ¹⁄₂" (1.27 cm) in order to back wall) B. A. IMPORTANT: KitchenAid is 25" (63.5 cm) or more, the side panels can open to the base grille in this section. 2. For the inside the side trim or...
...gap measures less than 90°. 3. Snap the skirt onto the base grille. Do not attach the base grille to -Refrigerator Trim Adjustment 1. Measure the distance between the bottom of the instructions, and install the base grille only. 2. Torx® 27 flat-head mounting screws B. ¹⁄₄" hex-...must be installed inside side trim piece, slide the front edge of ¹⁄₂" (1.27 cm) in order to back wall) B. A. IMPORTANT: KitchenAid is 25" (63.5 cm) or more, the side panels can open to the base grille in this section. 2. For the inside the side trim or...

