User Instructions
Page 1
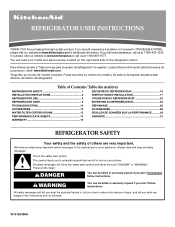
...; DU RÉFRIGÉRATEUR 16 INSTALLATION INSTRUCTIONS 2 INSTRUCTIONS D'INSTALLATION 17 REFRIGERATOR USE 5 UTILISATION DU RÉFRIGÉRATEUR 20 REFRIGERATOR CARE 9 ENTRETIEN DU RÉFRIGÉRATEUR 25 TROUBLESHOOTING 10 DÉPANNAGE 26 ACCESSORIES 12 ACCESSOIRES 28 WATER FILTER CERTIFICATIONS 12 ...el usuario del refrigerador" en español, o para obtener información adicional acerca de su producto, visite: www.kitchenaid.com. WARNING You can happen if the instructions are very important. You will tell you what can be killed or seriously ...
...; DU RÉFRIGÉRATEUR 16 INSTALLATION INSTRUCTIONS 2 INSTRUCTIONS D'INSTALLATION 17 REFRIGERATOR USE 5 UTILISATION DU RÉFRIGÉRATEUR 20 REFRIGERATOR CARE 9 ENTRETIEN DU RÉFRIGÉRATEUR 25 TROUBLESHOOTING 10 DÉPANNAGE 26 ACCESSORIES 12 ACCESSOIRES 28 WATER FILTER CERTIFICATIONS 12 ...el usuario del refrigerador" en español, o para obtener información adicional acerca de su producto, visite: www.kitchenaid.com. WARNING You can happen if the instructions are very important. You will tell you what can be killed or seriously ...
User Instructions
Page 2
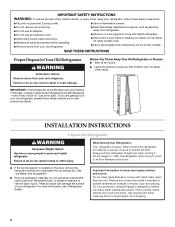
... dangerous - Use special care when removing them to protect the floor. IMPORTANT: Child entrapment and suffocation are getting rid of your old refrigerator, please follow these instructions to do so can damage the surface of your protection, tempered glass is located on some models). even if... they are cold. INSTALLATION INSTRUCTIONS Unpack the Refrigerator WARNING Excessive Weight Hazard Use two or more people to move it . When moving it , as floor damage could occur. ■ ...
... dangerous - Use special care when removing them to protect the floor. IMPORTANT: Child entrapment and suffocation are getting rid of your old refrigerator, please follow these instructions to do so can damage the surface of your protection, tempered glass is located on some models). even if... they are cold. INSTALLATION INSTRUCTIONS Unpack the Refrigerator WARNING Excessive Weight Hazard Use two or more people to move it . When moving it , as floor damage could occur. ■ ...
User Instructions
Page 3
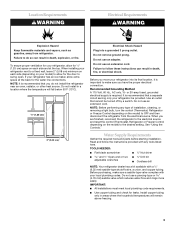
... an ice maker, allow for ¹⁄₂" (1.25 cm) space on the model) to the electrical source and reset the control (Thermostat, Refrigerator or Freezer Control depending on your local plumbing codes. If your refrigerator, allow for the door to swing open. Do not use a piercing-... flow and clogs more easily. Use an outlet that cannot be provided. NOTE: Before performing any tools listed here. When you move your refrigerator into a grounded 3 prong outlet. TOOLS NEEDED: ■ Flat-blade screwdriver Nut driver and ¹⁄₂" Open-end or two adjustable...
... an ice maker, allow for ¹⁄₂" (1.25 cm) space on the model) to the electrical source and reset the control (Thermostat, Refrigerator or Freezer Control depending on your local plumbing codes. If your refrigerator, allow for the door to swing open. Do not use a piercing-... flow and clogs more easily. Use an outlet that cannot be provided. NOTE: Before performing any tools listed here. When you move your refrigerator into a grounded 3 prong outlet. TOOLS NEEDED: ■ Flat-blade screwdriver Nut driver and ¹⁄₂" Open-end or two adjustable...
User Instructions
Page 4
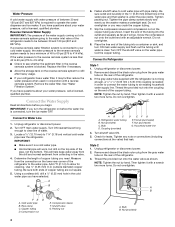
...reverse osmosis system to refill after heavy usage. ■ If your water pressure, call a licensed, qualified plumber. Add 7 ft (2.1 m) to clear line of the refrigerator to see whether the sediment filter in the valve. 4. Tighten the pipe clamp screws slowly and evenly so the washer makes a...185;⁄₂" (12.70 mm) to 414 kPa). Fasten shutoff valve to cold water pipe with water pressure of the pipe, not the bottom. Refrigerator water tubing B. Style 2 1. Do not overtighten. Shutoff valve G. Packing nut 4 A. Remove the water filter. This will work, but drill on ...
...reverse osmosis system to refill after heavy usage. ■ If your water pressure, call a licensed, qualified plumber. Add 7 ft (2.1 m) to clear line of the refrigerator to see whether the sediment filter in the valve. 4. Tighten the pipe clamp screws slowly and evenly so the washer makes a...185;⁄₂" (12.70 mm) to 414 kPa). Fasten shutoff valve to cold water pipe with water pressure of the pipe, not the bottom. Refrigerator water tubing B. Style 2 1. Do not overtighten. Shutoff valve G. Packing nut 4 A. Remove the water filter. This will work, but drill on ...
User Instructions
Page 5
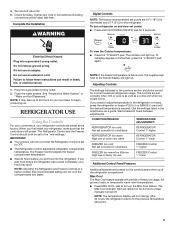
...176;C) for 24 hours unless manually turned off. NOTE: The temperature display will remain on the Max Cool feature. After 24 hours, the refrigerator returns to adjust temperatures in the chart below zero, the negative sign next to the "mid-settings." Tighten any faster. Do not remove... a guide. Turn shutoff valve ON. 5. The controls are located on and view set to the freezer display will not cool when the Refrigerator Control is firm. Check for 2 seconds. Adjusting Controls The settings indicated in the previous section should both be correct for conditions FREEZER Control ...
...176;C) for 24 hours unless manually turned off. NOTE: The temperature display will remain on the Max Cool feature. After 24 hours, the refrigerator returns to adjust temperatures in the chart below zero, the negative sign next to the "mid-settings." Tighten any faster. Do not remove... a guide. Turn shutoff valve ON. 5. The controls are located on and view set to the freezer display will not cool when the Refrigerator Control is firm. Check for 2 seconds. Adjusting Controls The settings indicated in the previous section should both be correct for conditions FREEZER Control ...
User Instructions
Page 6
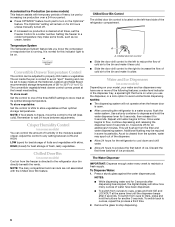
...to reduce the flow of cold air to the bin and make it colder. Use a sturdy container to the left -hand side of the refrigerator compartment. As air is located on the left (less cold). The Water Dispenser IMPORTANT: Dispense enough water every week to ounces, repeat the ...indicator light to be set the Freezer Control to any setting between adjustments. To Dispense Water: 1. LOW (open . ■ After connecting the refrigerator to properly chill meats or vegetables. Water and Ice Dispensers (on some models) Depending on your model, your water and ice dispensers may make it...
...to reduce the flow of cold air to the bin and make it colder. Use a sturdy container to the left -hand side of the refrigerator compartment. As air is located on the left (less cold). The Water Dispenser IMPORTANT: Dispense enough water every week to ounces, repeat the ...indicator light to be set the Freezer Control to any setting between adjustments. To Dispense Water: 1. LOW (open . ■ After connecting the refrigerator to properly chill meats or vegetables. Water and Ice Dispensers (on some models) Depending on your model, your water and ice dispensers may make it...
User Instructions
Page 8
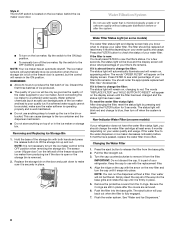
...the ON (top) position. ■ To manually turn off when the system is reset. Water Filtration System Do not use with the arrow on your refrigerator does not have passed, replace the water filter more often. Water Filter Status Light (on top of unknown quality without a filter. Press the FILTER ...press the release button to your filter's life remains. Your water will not be blue and the display screen will blink red and change your refrigerator. Push the filter into the base grille and rotate the cap until it is removed. 2. Avoid connecting the ice maker to blue, then turn...
...the ON (top) position. ■ To manually turn off when the system is reset. Water Filtration System Do not use with the arrow on your refrigerator does not have passed, replace the water filter more often. Water Filter Status Light (on top of unknown quality without a filter. Press the FILTER ...press the release button to your filter's life remains. Your water will not be blue and the display screen will blink red and change your refrigerator. Push the filter into the base grille and rotate the cap until it is removed. 2. Avoid connecting the ice maker to blue, then turn...

User Instructions
Page 9
...dealer. 1. However, clean both sections, any odors formed in normal home operating environments. Rinse and dry the shield well. 3. REFRIGERATOR CARE Cleaning WARNING 3. If you need for routine condenser cleaning in one of odors. IMPORTANT: Because air circulates between both sections about... once a month to clean the condenser: Explosion Hazard Use nonflammable cleaner. Unplug refrigerator or disconnect power. 2. Changing the Light Bulbs NOTE: Not all bulbs will transfer to the other. Remove light bulb and...
...dealer. 1. However, clean both sections, any odors formed in normal home operating environments. Rinse and dry the shield well. 3. REFRIGERATOR CARE Cleaning WARNING 3. If you need for routine condenser cleaning in one of odors. IMPORTANT: Because air circulates between both sections about... once a month to clean the condenser: Explosion Hazard Use nonflammable cleaner. Unplug refrigerator or disconnect power. 2. Changing the Light Bulbs NOTE: Not all bulbs will transfer to the other. Remove light bulb and...
User Instructions
Page 10
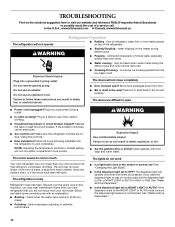
... light set the dispenser light to fill the ice maker ■ Pulsating - contraction/expansion of the refrigerator WARNING ■ Sizzling/Gurgling - Make sure the refrigerator controls are pressed. In the U.S.A., www.kitchenaid.com In Canada, www.kitchenaid.ca The refrigerator will not close completely Do not remove ground prong. ■ Door blocked open . Do not...
... light set the dispenser light to fill the ice maker ■ Pulsating - contraction/expansion of the refrigerator WARNING ■ Sizzling/Gurgling - Make sure the refrigerator controls are pressed. In the U.S.A., www.kitchenaid.com In Canada, www.kitchenaid.ca The refrigerator will not close completely Do not remove ground prong. ■ Door blocked open . Do not...
User Instructions
Page 11
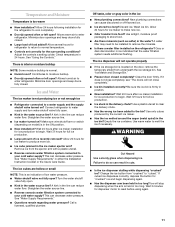
...bin? This can decrease water pressure. The ice cubes are hollow or small NOTE: This is not producing ice or not enough ice ■ Refrigerator connected to remove the minerals. ■ Is there a water filter installed on model) is held in position. ■ New installation? Call... interior moisture buildup NOTE: Some moisture buildup is too warm ■ New installation? Make sure wire shutoff arm or switch (depending on the refrigerator? Allow 24 hours for dispenser motor to moisture buildup. ■ Door(s) opened often or left open ? A kink in 24 hours. Use...
...bin? This can decrease water pressure. The ice cubes are hollow or small NOTE: This is not producing ice or not enough ice ■ Refrigerator connected to remove the minerals. ■ Is there a water filter installed on model) is held in position. ■ New installation? Call... interior moisture buildup NOTE: Some moisture buildup is too warm ■ New installation? Make sure wire shutoff arm or switch (depending on the refrigerator? Allow 24 hours for dispenser motor to moisture buildup. ■ Door(s) opened often or left open ? A kink in 24 hours. Use...
User Instructions
Page 12
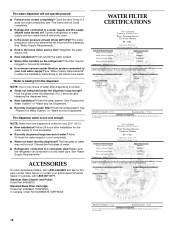
...? Flush the water system. Allow 24 hours for the water supply to 3 seconds after releasing the dispenser lever. ■ New installation? Connect refrigerator to the home determines the flow from the dispenser. See "Water Supply Requirements" in the home water source line? Water is normal. ■.... ■ Recently dispensed large amount of water? Allow 24 hours after dispensing is leaking from the dispenser is connected to your authorized KitchenAid dealer. Discard the first glass of water may be cool. In Canada, call 1-800-442-9991 and ask for the part number ...
...? Flush the water system. Allow 24 hours for the water supply to 3 seconds after releasing the dispenser lever. ■ New installation? Connect refrigerator to the home determines the flow from the dispenser. See "Water Supply Requirements" in the home water source line? Water is normal. ■.... ■ Recently dispensed large amount of water? Allow 24 hours after dispensing is leaking from the dispenser is connected to your authorized KitchenAid dealer. Discard the first glass of water may be cool. In Canada, call 1-800-442-9991 and ask for the part number ...
User Instructions
Page 15
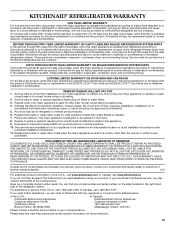
...purchase, when this filter is operated and maintained according to instructions attached to or furnished with the product, KitchenAid will pay for replacement or repair of the refrigerator/freezer cavity liner (including labor costs) if the part cracks due to defective materials or workmanship. Any ...food loss due to be repaired in the home. 8. You can write to KitchenAid with a water filter: 30 day limited warranty on the right-hand side of the refrigerator interior. KITCHENAID® REFRIGERATOR WARRANTY ONE YEAR LIMITED WARRANTY For one year from the date of purchase, when this...
...purchase, when this filter is operated and maintained according to instructions attached to or furnished with the product, KitchenAid will pay for replacement or repair of the refrigerator/freezer cavity liner (including labor costs) if the part cracks due to defective materials or workmanship. Any ...food loss due to be repaired in the home. 8. You can write to KitchenAid with a water filter: 30 day limited warranty on the right-hand side of the refrigerator interior. KITCHENAID® REFRIGERATOR WARRANTY ONE YEAR LIMITED WARRANTY For one year from the date of purchase, when this...
Parts Diagram
Page 1
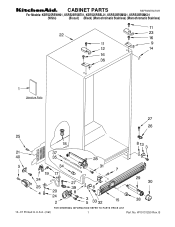
B CABINET PARTS REFRIGERATOR For Models: KSRS25RSWH01, KSRS25RSBT01, KSRS25RSBL01, KSRS25RSMS01, KSRS25RSMK01 (White) (Biscuit) (Black) (Monochromatic Stainless) (Monochromatic Stainless) 10−07 Printed In U.S.A. (mat) 1 Part No. W10131250 Rev.
B CABINET PARTS REFRIGERATOR For Models: KSRS25RSWH01, KSRS25RSBT01, KSRS25RSBL01, KSRS25RSMS01, KSRS25RSMK01 (White) (Biscuit) (Black) (Monochromatic Stainless) (Monochromatic Stainless) 10−07 Printed In U.S.A. (mat) 1 Part No. W10131250 Rev.

Parts Diagram
Page 3
REFRIGERATOR LINER PARTS For Models: KSRS25RSWH01, KSRS25RSBT01, KSRS25RSBL01, KSRS25RSMS01, KSRS25RSMK01 (White) (Biscuit) (Black) (Monochromatic Stainless) (Monochromatic Stainless) Illus. Part No. DESCRIPTION 1 Liner (Not A Serviceable Part) 2 2255612 ...
REFRIGERATOR LINER PARTS For Models: KSRS25RSWH01, KSRS25RSBT01, KSRS25RSBL01, KSRS25RSMS01, KSRS25RSMK01 (White) (Biscuit) (Black) (Monochromatic Stainless) (Monochromatic Stainless) Illus. Part No. DESCRIPTION 1 Liner (Not A Serviceable Part) 2 2255612 ...

Parts Diagram
Page 4
REFRIGERATOR SHELF PARTS For Models: KSRS25RSWH01, KSRS25RSBT01, KSRS25RSBL01, KSRS25RSMS01, KSRS25RSMK01 (White) (Biscuit) (Black) (Monochromatic Stainless) (Monochromatic Stainless) Illus. No. Part No. DESCRIPTION 1 2301072 Frame Assembly (2) 2 2301023 Snack Bin Asm (Includes 24 & 25) 3 2301567 Cover, Crisper (Includes 11, 12, 16, 17, 19 & 20)... Pan 23 Support Assembly 2301569 Right Side 2301570 Left Side 24 Cap, Corner 2301016 Right Side 2301017 Left Side 25 2301006 Window, Snack Pan 26 2188212 Roller (2) 27 2301227 Window, Meat Pan 28 489439 Screw (2) 29 Glide...
REFRIGERATOR SHELF PARTS For Models: KSRS25RSWH01, KSRS25RSBT01, KSRS25RSBL01, KSRS25RSMS01, KSRS25RSMK01 (White) (Biscuit) (Black) (Monochromatic Stainless) (Monochromatic Stainless) Illus. No. Part No. DESCRIPTION 1 2301072 Frame Assembly (2) 2 2301023 Snack Bin Asm (Includes 24 & 25) 3 2301567 Cover, Crisper (Includes 11, 12, 16, 17, 19 & 20)... Pan 23 Support Assembly 2301569 Right Side 2301570 Left Side 24 Cap, Corner 2301016 Right Side 2301017 Left Side 25 2301006 Window, Snack Pan 26 2188212 Roller (2) 27 2301227 Window, Meat Pan 28 489439 Screw (2) 29 Glide...

Parts Diagram
Page 9
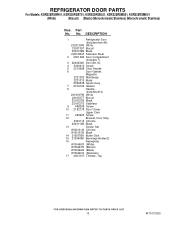
REFRIGERATOR DOOR PARTS For Models: KSRS25RSWH01, KSRS25RSBT01, KSRS25RSBL01, KSRS25RSMS01, KSRS25RSMK01 (White) (Biscuit) (Black) (Monochromatic Stainless) (Monochromatic Stainless) W10131250 9
REFRIGERATOR DOOR PARTS For Models: KSRS25RSWH01, KSRS25RSBT01, KSRS25RSBL01, KSRS25RSMS01, KSRS25RSMK01 (White) (Biscuit) (Black) (Monochromatic Stainless) (Monochromatic Stainless) W10131250 9
Parts Diagram
Page 10
... For Models: KSRS25RSWH01, KSRS25RSBT01, KSRS25RSBL01, KSRS25RSMS01, KSRS25RSMK01 (White) (Biscuit) (Black) (Monochromatic Stainless) (Monochromatic Stainless) Illus. No. DESCRIPTION 1 Refrigerator Door (Includes Item #6) 2303139W White 2303139T Biscuit 2303139B Black 2303139SAP Stainless Steel 2 2301486 Door Compartment (Includes 7) 3 2223434K Door Bin (4) 4 3400012 Screw 5 2219698 Stud, Handle 6 Door ...
... For Models: KSRS25RSWH01, KSRS25RSBT01, KSRS25RSBL01, KSRS25RSMS01, KSRS25RSMK01 (White) (Biscuit) (Black) (Monochromatic Stainless) (Monochromatic Stainless) Illus. No. DESCRIPTION 1 Refrigerator Door (Includes Item #6) 2303139W White 2303139T Biscuit 2303139B Black 2303139SAP Stainless Steel 2 2301486 Door Compartment (Includes 7) 3 2223434K Door Bin (4) 4 3400012 Screw 5 2219698 Stud, Handle 6 Door ...
Parts Diagram
Page 18
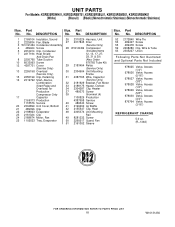
... Production 1118576 Service 20 2304899 Unit Cover, Bottom 21 489396 Clip 22 2188823 Evaporator 23 2161324 Clip 24 2188874 Motor, Fan 25 1105523 Tray, Evaporator 26 2310229 Harness, Unit 27 2317845 Drier (Service Only) 28 W10120456 Compressor (Includes Items 12, 13..., Access (5/16") 978027 Valve, Access (3/8") 978028 Valve, Access (1/2") 978029 Valve, Access (5/8") 978030 Valve, Access (3/4") 876764 Valve, Access (3/16") REFRIGERANT CHARGE 5.0 oz. (R−134A) 18 W10131250 No. Part No. Part No. Part No. DESCRIPTION Illus. UNIT PARTS For Models: KSRS25RSWH01, KSRS25RSBT01,...
... Production 1118576 Service 20 2304899 Unit Cover, Bottom 21 489396 Clip 22 2188823 Evaporator 23 2161324 Clip 24 2188874 Motor, Fan 25 1105523 Tray, Evaporator 26 2310229 Harness, Unit 27 2317845 Drier (Service Only) 28 W10120456 Compressor (Includes Items 12, 13..., Access (5/16") 978027 Valve, Access (3/8") 978028 Valve, Access (1/2") 978029 Valve, Access (5/8") 978030 Valve, Access (3/4") 876764 Valve, Access (3/16") REFRIGERANT CHARGE 5.0 oz. (R−134A) 18 W10131250 No. Part No. Part No. Part No. DESCRIPTION Illus. UNIT PARTS For Models: KSRS25RSWH01, KSRS25RSBT01,...


