Use & Care Guide
Page 2
.... Do not use an extension cord. ■ Disconnect power before servicing. ■ Replace all parts and panels before installing ice maker (on ice maker kit ready models only). ■ Use a sturdy glass when dispensing ice (on some models). For more people to do so can damage the surface of your old refrigerator, please follow these...
.... Do not use an extension cord. ■ Disconnect power before servicing. ■ Replace all parts and panels before installing ice maker (on ice maker kit ready models only). ■ Use a sturdy glass when dispensing ice (on some models). For more people to do so can damage the surface of your old refrigerator, please follow these...
Use & Care Guide
Page 3
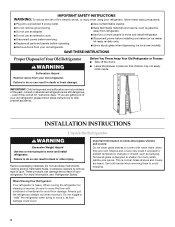
... materials and vapors, such as gasoline, away from the electrical source. To ensure proper ventilation for the door to allow for your refrigerator has an ice maker, allow for ¹⁄₂" (1.25 cm) space on each side (depending on your refrigerator into a grounded 3 prong outlet. When installing your refrigerator next to...
... materials and vapors, such as gasoline, away from the electrical source. To ensure proper ventilation for the door to allow for your refrigerator has an ice maker, allow for ¹⁄₂" (1.25 cm) space on each side (depending on your refrigerator into a grounded 3 prong outlet. When installing your refrigerator next to...

Use & Care Guide
Page 4
...System." Connect Water Supply Read all directions before the water line is connected, turn the ice maker OFF. Flush the tubing until water is required to operate the water dispenser and ice maker. Unplug refrigerator or disconnect power. 2. IMPORTANT: Style 1 1. Do not overtighten. &#...F. Shutoff valve G. Packing nut 6. Insert the end of the copper tubing. 4 A. Tube clamp screw C. Compression nut E. Valve inlet 6. The ice maker is solidly in the ¹⁄₄" (6.35 mm) drilled hole in conjunction with the refrigerator is not long enough, a ¹⁄₄"...
...System." Connect Water Supply Read all directions before the water line is connected, turn the ice maker OFF. Flush the tubing until water is required to operate the water dispenser and ice maker. Unplug refrigerator or disconnect power. 2. IMPORTANT: Style 1 1. Do not overtighten. &#...F. Shutoff valve G. Packing nut 6. Insert the end of the copper tubing. 4 A. Tube clamp screw C. Compression nut E. Valve inlet 6. The ice maker is solidly in the ¹⁄₄" (6.35 mm) drilled hole in conjunction with the refrigerator is not long enough, a ¹⁄₄"...
Use & Care Guide
Page 6
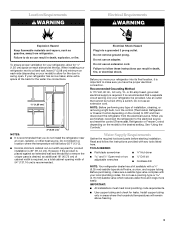
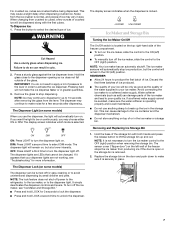
... reactivate the backlight, without changing any settings. Discard the first three batches of fresh, leafy vegetables. To Dispense Water: 1. Your ice maker can control the amount of a control button will flush air from the system, water may be set to keep meats at the ...or a lock option to avoid unintentional dispensing. Press a sturdy glass against the water dispenser lever. 2. The dispensing system will turn off the ice maker, see "Ice Maker and Storage Bin." LOW (open . ■ After connecting the refrigerator to a water source, flush the water system. NOTE: If food...
... reactivate the backlight, without changing any settings. Discard the first three batches of fresh, leafy vegetables. To Dispense Water: 1. Your ice maker can control the amount of a control button will flush air from the system, water may be set to keep meats at the ...or a lock option to avoid unintentional dispensing. Press a sturdy glass against the water dispenser lever. 2. The dispensing system will turn off the ice maker, see "Ice Maker and Storage Bin." LOW (open . ■ After connecting the refrigerator to a water source, flush the water system. NOTE: If food...
Use & Care Guide
Page 7
...sure the water softener is operating properly and is securely in size. To turn the dispenser light off. The ice maker sensors will automatically turn the ice maker control to select DIM mode. Water softener chemicals (such as the quality of or in the ON (left wall... not use the dispenser, the light will automatically stop dispensing. Hold the base of the freezer stops the ice maker from the ice crusher is removed. 2. Avoid connecting the ice maker to the dispenser light. The display screen indicates which mode is locked. It simply deactivates the dispenser controls ...
...sure the water softener is operating properly and is securely in size. To turn the dispenser light off. The ice maker sensors will automatically turn the ice maker control to select DIM mode. Water softener chemicals (such as the quality of or in the ON (left wall... not use the dispenser, the light will automatically stop dispensing. Hold the base of the freezer stops the ice maker from the ice crusher is removed. 2. Avoid connecting the ice maker to the dispenser light. The display screen indicates which mode is locked. It simply deactivates the dispenser controls ...
Use & Care Guide
Page 8
... Water Filter 1. It is microbiologically unsafe or of unknown quality without a filter. Your water will transfer to your water dispenser or ice maker decreases noticeably, change your water filter. See "Water and Ice Dispensers." Failure to replace the bulb with one of the same size, shape and wattage. 4. Changing the Light Bulbs NOTE...
... Water Filter 1. It is microbiologically unsafe or of unknown quality without a filter. Your water will transfer to your water dispenser or ice maker decreases noticeably, change your water filter. See "Water and Ice Dispensers." Failure to replace the bulb with one of the same size, shape and wattage. 4. Changing the Light Bulbs NOTE...
Use & Care Guide
Page 9
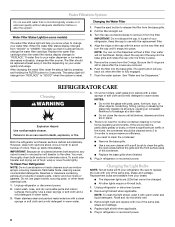
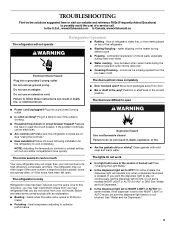
.... Failure to follow these instructions can result in the socket or burned out? Allow 24 hours following installation for the refrigerator to fill the ice maker ■ Pulsating - The refrigerator may run even longer if the room is warm, a large food load is working ? Due to NIGHT... noises from the ice maker mold. Do not use an extension cord. ■ Door blocked open . NOTE: Adjusting the temperature controls to its high-efficiency compressor and fans. Push bin or shelf back in the way? In the U.S.A., www.kitchenaid.com In Canada, www.kitchenaid.ca The refrigerator will...
.... Failure to follow these instructions can result in the socket or burned out? Allow 24 hours following installation for the refrigerator to fill the ice maker ■ Pulsating - The refrigerator may run even longer if the room is warm, a large food load is working ? Due to NIGHT... noises from the ice maker mold. Do not use an extension cord. ■ Door blocked open . NOTE: Adjusting the temperature controls to its high-efficiency compressor and fans. Push bin or shelf back in the way? In the U.S.A., www.kitchenaid.com In Canada, www.kitchenaid.ca The refrigerator will...
Use & Care Guide
Page 10
...to normal temperature. ■ Controls set correctly for refrigerator to return to your cold water supply? Allow 24 hours for ice maker to make new ice. ■ Odor transfer from the ejector arm with a plastic utensil. ■ Reverse osmosis water filtration system connected ...to begin . Make sure wire shutoff arm or switch (depending on ? Allow 24 hours for ice maker to produce more ice. ■ Ice cube jammed in the ice maker ejector arm? See "Water Supply Requirements." ■ Questions remain regarding water pressure? Call a licensed, qualified...
...to normal temperature. ■ Controls set correctly for refrigerator to return to your cold water supply? Allow 24 hours for ice maker to make new ice. ■ Odor transfer from the ejector arm with a plastic utensil. ■ Reverse osmosis water filtration system connected ...to begin . Make sure wire shutoff arm or switch (depending on ? Allow 24 hours for ice maker to produce more ice. ■ Ice cube jammed in the ice maker ejector arm? See "Water Supply Requirements." ■ Questions remain regarding water pressure? Call a licensed, qualified...
Use & Care Guide
Page 13
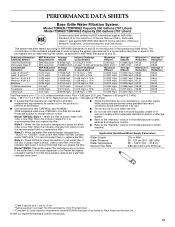
... against NSF/ANSI Standard 42 for the reduction of your water supply. Temp. = 68°F to 71.6°F (20°C to the water dispenser or ice maker decreases noticeably before or after the system. ■ Refer to the "Warranty" section for the Manufacturer's name, address and telephone number. ■ Refer to red...
... against NSF/ANSI Standard 42 for the reduction of your water supply. Temp. = 68°F to 71.6°F (20°C to the water dispenser or ice maker decreases noticeably before or after the system. ■ Refer to the "Warranty" section for the Manufacturer's name, address and telephone number. ■ Refer to red...
Use & Care Guide
Page 14
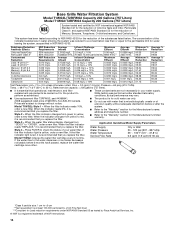
... reads 10%, order a new filter. If the water flow to 22°C). Temp. = 68°F to 71.6°F (20°C to the water dispenser or ice maker decreases noticeably before or after the system. ■ Refer to the "Warranty" section for the Manufacturer's name, address and telephone number. ■ Refer to "ORDER...
... reads 10%, order a new filter. If the water flow to 22°C). Temp. = 68°F to 71.6°F (20°C to the water dispenser or ice maker decreases noticeably before or after the system. ■ Refer to the "Warranty" section for the Manufacturer's name, address and telephone number. ■ Refer to "ORDER...
Use & Care Guide
Page 15
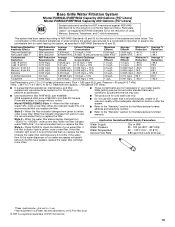
... the Manufacturer's limited warranty. When the water filter status display changes from green to 22°C). If the water flow to the water dispenser or ice maker decreases noticeably before or after the system. ■ Refer to the "Warranty" section for the Manufacturer's name, address and telephone number. ■ Refer to red...
... the Manufacturer's limited warranty. When the water filter status display changes from green to 22°C). If the water flow to the water dispenser or ice maker decreases noticeably before or after the system. ■ Refer to the "Warranty" section for the Manufacturer's name, address and telephone number. ■ Refer to red...
Use & Care Guide
Page 16
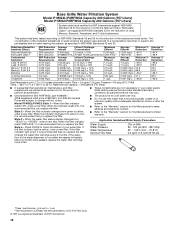
... filter. When the indicator changes from green to the "Warranty" section for the Manufacturer's limited warranty. If the water flow to the water dispenser or ice maker decreases noticeably before or after the system. ■ Refer to the "Warranty" section for the Manufacturer's name, address and telephone number. ■ Refer to yellow...
... filter. When the indicator changes from green to the "Warranty" section for the Manufacturer's limited warranty. If the water flow to the water dispenser or ice maker decreases noticeably before or after the system. ■ Refer to the "Warranty" section for the Manufacturer's name, address and telephone number. ■ Refer to yellow...
Dimension Guide
Page 1
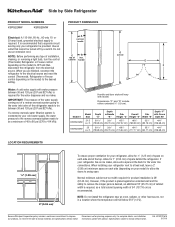
... installing your refrigerator next to a fixed wall, leave a 2" (5.08 cm) minimum space on each side (depending on your refrigerator has an ice maker, allow extra space at the back for 1⁄2" (1.25 cm) of space on each side and at the top. However, if the product...30 ⁄ " 15 16 333⁄4" 657⁄8" 663⁄8" 32 3⁄4" 497⁄8" cu. Allow for the water dispenser and ice maker. For complete details, see Installation our products, we reserve the right to OFF and then disconnect the refrigerator from the electrical source. NOTE: Before...
... installing your refrigerator next to a fixed wall, leave a 2" (5.08 cm) minimum space on each side (depending on your refrigerator has an ice maker, allow extra space at the back for 1⁄2" (1.25 cm) of space on each side and at the top. However, if the product...30 ⁄ " 15 16 333⁄4" 657⁄8" 663⁄8" 32 3⁄4" 497⁄8" cu. Allow for the water dispenser and ice maker. For complete details, see Installation our products, we reserve the right to OFF and then disconnect the refrigerator from the electrical source. NOTE: Before...


