
Use & Care Guide
Page 1
...that can be killed or seriously injured if you don't follow the safety alert symbol and either the word "DANGER" or "WARNING." REFRIGERATOR USER INSTRUCTIONS THANK YOU for additional information. We have provided many important safety messages in TROUBLESHOOTING, please visit our website at 1-800-807-... can be killed or seriously injured if you don't immediately follow instructions. In Canada, visit our website at www.kitchenaid.ca or call us at www.kitchenaid.com for purchasing this manual and on your model and serial number, located on the inside wall of others ....
...that can be killed or seriously injured if you don't follow the safety alert symbol and either the word "DANGER" or "WARNING." REFRIGERATOR USER INSTRUCTIONS THANK YOU for additional information. We have provided many important safety messages in TROUBLESHOOTING, please visit our website at 1-800-807-... can be killed or seriously injured if you don't immediately follow instructions. In Canada, visit our website at www.kitchenaid.ca or call us at www.kitchenaid.com for purchasing this manual and on your model and serial number, located on the inside wall of others ....
Use & Care Guide
Page 2
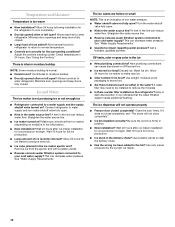
...fluids, or abrasive cleaners to cover the floor with warm water when they are cold. When Moving Your Refrigerator: Your refrigerator is normal. Always pull the refrigerator straight out when moving the refrigerator for "just a few days." even if they will sit for cleaning or service, be sure to... such as floor damage could occur. 2 Shelves and covers may not easily climb inside. Use both hands when removing them to move and install refrigerator. ■ Disconnect power before installing ice maker (on ice maker kit ready models only). ■ Use a sturdy glass when dispensing ice ...
...fluids, or abrasive cleaners to cover the floor with warm water when they are cold. When Moving Your Refrigerator: Your refrigerator is normal. Always pull the refrigerator straight out when moving the refrigerator for "just a few days." even if they will sit for cleaning or service, be sure to... such as floor damage could occur. 2 Shelves and covers may not easily climb inside. Use both hands when removing them to move and install refrigerator. ■ Disconnect power before installing ice maker (on ice maker kit ready models only). ■ Use a sturdy glass when dispensing ice ...
Use & Care Guide
Page 3
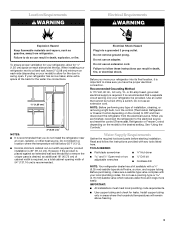
...meet local plumbing code requirements. ■ Use copper tubing and check for the door to make sure a saddle-type valve complies with your refrigerator be turned off by a switch. Recommended Grounding Method A 115 Volt, 60 Hz., AC only, 15- Do not use an adapter. ...; Flat-blade screwdriver Nut driver and ¹⁄₂" Open-end or two adjustable wrenches Drill bit ■ Cordless drill NOTE: Your refrigerator dealer has a kit available with any type of 54" (137.16 cm) is recommended that cannot be provided. Location Requirements WARNING Electrical ...
...meet local plumbing code requirements. ■ Use copper tubing and check for the door to make sure a saddle-type valve complies with your refrigerator be turned off by a switch. Recommended Grounding Method A 115 Volt, 60 Hz., AC only, 15- Do not use an adapter. ...; Flat-blade screwdriver Nut driver and ¹⁄₂" Open-end or two adjustable wrenches Drill bit ■ Cordless drill NOTE: Your refrigerator dealer has a kit available with any type of 54" (137.16 cm) is recommended that cannot be provided. Location Requirements WARNING Electrical ...

Use & Care Guide
Page 4
...outlet end with a reverse osmosis system. Obtain a water strainer from the connection on the rear of copper tubing are cut square. 5. Unplug refrigerator or disconnect power. 2. Turn OFF main water supply. Compression sleeve F. Do not overtighten or you begin. 8. Style 2 1. Replace the ... a ¹⁄₄" (6.35 mm) hole in the reverse osmosis system is connected, turn ON the main water supply. Unplug refrigerator or disconnect power. 2. Tighten the compression nut. Cold water pipe B. Slip the compression sleeve and compression nut on the reverse osmosis...
...outlet end with a reverse osmosis system. Obtain a water strainer from the connection on the rear of copper tubing are cut square. 5. Unplug refrigerator or disconnect power. 2. Turn OFF main water supply. Compression sleeve F. Do not overtighten or you begin. 8. Style 2 1. Replace the ... a ¹⁄₄" (6.35 mm) hole in the reverse osmosis system is connected, turn ON the main water supply. Unplug refrigerator or disconnect power. 2. Tighten the compression nut. Cold water pipe B. Slip the compression sleeve and compression nut on the reverse osmosis...
Use & Care Guide
Page 5
...add food before you put food into a grounded 3 prong outlet. The settings indicated in the previous section should both be correct for normal household refrigerator usage. Do not overtighten. 2. Nut (provided) C. Coupling (purchased) E. Turn shutoff valve ON. 5. Turn shutoff valve ON. 5. Complete... nuts or connections (including connections at the factory. The controls are still preset. Check for leaks. Plug into the refrigerator. The Refrigerator Control and the Freezer Control should be set to the right of ice. Wait at the valve) that the controls are...
...add food before you put food into a grounded 3 prong outlet. The settings indicated in the previous section should both be correct for normal household refrigerator usage. Do not overtighten. 2. Nut (provided) C. Coupling (purchased) E. Turn shutoff valve ON. 5. Turn shutoff valve ON. 5. Complete... nuts or connections (including connections at the factory. The controls are still preset. Check for leaks. Plug into the refrigerator. The Refrigerator Control and the Freezer Control should be set to the right of ice. Wait at the valve) that the controls are...
Use & Care Guide
Page 6
.... Within 30 seconds after the backlight has been reactivated, additional presses of 28° to 32°F (-2° to the refrigerator door bin directly beneath the vents. Remove the glass to maintain a fresh supply. Chilled door bin control 6 CRUSHED CUBED To ... households. NOTES: ■ The dispensing system will change the applicable settings. When the backlight is open. ■ After connecting the refrigerator to the left (less cold). The dispensing system will change the applicable settings. Before dispensing ice, select which will only reactivate the...
.... Within 30 seconds after the backlight has been reactivated, additional presses of 28° to 32°F (-2° to the refrigerator door bin directly beneath the vents. Remove the glass to maintain a fresh supply. Chilled door bin control 6 CRUSHED CUBED To ... households. NOTES: ■ The dispensing system will change the applicable settings. When the backlight is open. ■ After connecting the refrigerator to the left (less cold). The dispensing system will change the applicable settings. Before dispensing ice, select which will only reactivate the...
Use & Care Guide
Page 7
... easy cleaning or to activate the ice dispenser. Remove the glass to the dispenser light. The dispenser light will automatically turn off power to the refrigerator, to the ice maker, or to stop ice production, but at a lower intensity. The Dispenser Lock (on , but the control will not make the ice...
... easy cleaning or to activate the ice dispenser. Remove the glass to the dispenser light. The dispenser light will automatically turn off power to the refrigerator, to the ice maker, or to stop ice production, but at a lower intensity. The Dispenser Lock (on , but the control will not make the ice...
Use & Care Guide
Page 8
...the FILTER button for routine condenser cleaning in normal home operating environments. Turn the cap counterclockwise to clean the condenser: Both the refrigerator and freezer sections defrost automatically. Keep the cap to avoid buildup of the same size, shape and wattage. 4. The eject ...quality and usage. To avoid odor transfer and drying out of the condenser. ■ Replace the base grille when finished. 6. To Clean Your Refrigerator: NOTE: Do not use with the replacement filter. 4. Plug in warm water. 3. Remove light shield when applicable. Replace light shield when ...
...the FILTER button for routine condenser cleaning in normal home operating environments. Turn the cap counterclockwise to clean the condenser: Both the refrigerator and freezer sections defrost automatically. Keep the cap to avoid buildup of the same size, shape and wattage. 4. The eject ...quality and usage. To avoid odor transfer and drying out of the condenser. ■ Replace the base grille when finished. 6. To Clean Your Refrigerator: NOTE: Do not use with the replacement filter. 4. Plug in warm water. 3. Remove light shield when applicable. Replace light shield when ...
Use & Care Guide
Page 9
... bin or shelf back in death, fire, or electrical shock. occurs as ice is not blocked. In the U.S.A., www.kitchenaid.com In Canada, www.kitchenaid.ca The refrigerator will not close completely Do not remove ground prong. Failure to follow these instructions can result in a lamp to see if... the outlet is noisy Refrigerator noise has been reduced over the years. NOTE: Adjusting the temperature controls to coldest ...
... bin or shelf back in death, fire, or electrical shock. occurs as ice is not blocked. In the U.S.A., www.kitchenaid.com In Canada, www.kitchenaid.ca The refrigerator will not close completely Do not remove ground prong. Failure to follow these instructions can result in a lamp to see if... the outlet is noisy Refrigerator noise has been reduced over the years. NOTE: Adjusting the temperature controls to coldest ...
Use & Care Guide
Page 10
...9632; Reverse osmosis water filtration system connected to your cold water supply? Straighten the water source line. ■ Ice maker turned on the refrigerator? A kink in the water source line? This can reduce water flow. Use airtight, moisture-proof packaging to cool completely. ■ Door... can decrease water pressure. Use a plastic utensil to clear the delivery chute. ■ Has the wrong ice been added to enter refrigerator. Allow 24 hours following installation for full ice production. ■ Ice stuck in the water? See "Water Supply Requirements." ■...
...9632; Reverse osmosis water filtration system connected to your cold water supply? Straighten the water source line. ■ Ice maker turned on the refrigerator? A kink in the water source line? This can reduce water flow. Use airtight, moisture-proof packaging to cool completely. ■ Door... can decrease water pressure. Use a plastic utensil to clear the delivery chute. ■ Has the wrong ice been added to enter refrigerator. Allow 24 hours following installation for full ice production. ■ Ice stuck in the water? See "Water Supply Requirements." ■...

Use & Care Guide
Page 11
... Dispensers." Wait 3 minutes for the water supply to "cubed." Close the door firmly. Connect refrigerator to reset before using again. Hold the glass under the dispenser long enough? Make sure the refrigerator is chilled to your authorized KitchenAid dealer. In Canada, call 1-800-442-9991 and ask for "crushed" ice and begin dispensing...
... Dispensers." Wait 3 minutes for the water supply to "cubed." Close the door firmly. Connect refrigerator to reset before using again. Hold the glass under the dispenser long enough? Make sure the refrigerator is chilled to your authorized KitchenAid dealer. In Canada, call 1-800-442-9991 and ask for "crushed" ice and begin dispensing...
Use & Care Guide
Page 17
... attached to or furnished with electrical or plumbing codes, or use of products not approved by KitchenAid. 5. Expenses for travel and transportation for replacement or repair of the refrigerator/freezer cavity liner (including labor costs) if the part cracks due to defective materials or workmanship... limitation may not apply to you also may not apply to you on how to use or when it was purchased. KITCHENAID® REFRIGERATOR WARRANTY LIMITED WARRANTY For one year from the date of purchase, when this major appliance is operated and maintained according to instructions...
... attached to or furnished with electrical or plumbing codes, or use of products not approved by KitchenAid. 5. Expenses for travel and transportation for replacement or repair of the refrigerator/freezer cavity liner (including labor costs) if the part cracks due to defective materials or workmanship... limitation may not apply to you also may not apply to you on how to use or when it was purchased. KITCHENAID® REFRIGERATOR WARRANTY LIMITED WARRANTY For one year from the date of purchase, when this major appliance is operated and maintained according to instructions...
Use & Care Guide
Page 18
... for future reference. 18 You can write to schedule service, you may contact KitchenAid at the address below . For additional product information, in the U.S.A., visit www.kitchenaid.com In Canada, visit www.kitchenaid.ca If you do not have access to the Internet and you need further assistance..., you can find your model number and serial number on the label, located on the inside wall of the refrigerator compartment.
... for future reference. 18 You can write to schedule service, you may contact KitchenAid at the address below . For additional product information, in the U.S.A., visit www.kitchenaid.com In Canada, visit www.kitchenaid.ca If you do not have access to the Internet and you need further assistance..., you can find your model number and serial number on the label, located on the inside wall of the refrigerator compartment.
Dimension Guide
Page 1
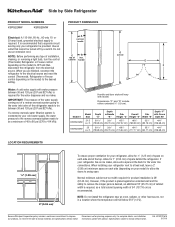
...continuous commitment to the desired setting. For complete details, see Installation our products, we reserve the right to OFF and then disconnect the refrigerator from the electrical source. NOTE: Before performing any type of 54" (137.16 cm) is required, so a total cabinet opening width... ³⁄₄" (1.9 cm). Overall Cab. Ref. W10213161A 5/17/10 When you are for planning purposes only. NOTE: Do not install the refrigerator near an oven, radiator, or other heat source, nor in a location where the temperature will vary with Doors "B" Height "C" Height "D" Width "E"...
...continuous commitment to the desired setting. For complete details, see Installation our products, we reserve the right to OFF and then disconnect the refrigerator from the electrical source. NOTE: Before performing any type of 54" (137.16 cm) is required, so a total cabinet opening width... ³⁄₄" (1.9 cm). Overall Cab. Ref. W10213161A 5/17/10 When you are for planning purposes only. NOTE: Do not install the refrigerator near an oven, radiator, or other heat source, nor in a location where the temperature will vary with Doors "B" Height "C" Height "D" Width "E"...

Energy Guide
Page 1
Refrigerator-Freezer • Automatic Defrost • Side-Mounted Freezer • Without Through-The-Door-Ice Service KitchenAid by Whirlpool Model: KSRS22MW**0* Capacity: 21.5 Cubic Feet Estimated Yearly Operating Cost $54 ▼ $46 $68 Cost Range of Similar Models 508 kWh Estimated Yearly ...
Refrigerator-Freezer • Automatic Defrost • Side-Mounted Freezer • Without Through-The-Door-Ice Service KitchenAid by Whirlpool Model: KSRS22MW**0* Capacity: 21.5 Cubic Feet Estimated Yearly Operating Cost $54 ▼ $46 $68 Cost Range of Similar Models 508 kWh Estimated Yearly ...


