User Instructions
Page 1
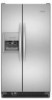
...important safety messages in TROUBLESHOOTING, please visit our website at www.kitchenaid.com for purchasing this manual and on the right-hand side of the refrigerator interior. W10162432A In Canada, visit our website at www.kitchenaid.ca or call us at 1-800-422-1230. All safety messages... either the word "DANGER" or "WARNING." Always read and obey all safety messages. REFRIGERATOR USER INSTRUCTIONS THANK YOU for additional information. Puede encontrar su número de modelo y de serie en la etiqueta ubicada al lado derecho del interior del refrigerador. This is , tell you...
...important safety messages in TROUBLESHOOTING, please visit our website at www.kitchenaid.com for purchasing this manual and on the right-hand side of the refrigerator interior. W10162432A In Canada, visit our website at www.kitchenaid.ca or call us at 1-800-422-1230. All safety messages... either the word "DANGER" or "WARNING." Always read and obey all safety messages. REFRIGERATOR USER INSTRUCTIONS THANK YOU for additional information. Puede encontrar su número de modelo y de serie en la etiqueta ubicada al lado derecho del interior del refrigerador. This is , tell you...
User Instructions
Page 2
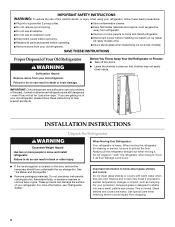
... (on ice maker kit ready models only). ■ Use a sturdy glass when dispensing ice (on the door, remove the temporary shield from refrigerator. ■ Use two or more people to sudden temperature changes or impact, such as bumping. See "Ice Maker and Storage Bin." ■...9632; Do not use an adapter. ■ Do not use sharp instruments, rubbing alcohol, flammable fluids, or abrasive cleaners to avoid impact from your refrigerator. Do not use an extension cord. ■ Disconnect power before servicing. ■ Replace all parts and panels before operating. ■ Remove doors...
... (on ice maker kit ready models only). ■ Use a sturdy glass when dispensing ice (on the door, remove the temporary shield from refrigerator. ■ Use two or more people to sudden temperature changes or impact, such as bumping. See "Ice Maker and Storage Bin." ■...9632; Do not use an adapter. ■ Do not use sharp instruments, rubbing alcohol, flammable fluids, or abrasive cleaners to avoid impact from your refrigerator. Do not use an extension cord. ■ Disconnect power before servicing. ■ Replace all parts and panels before operating. ■ Remove doors...
User Instructions
Page 3
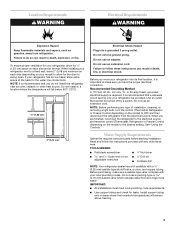
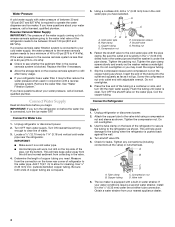
... in areas where the household temperatures will fall below 55°F (13°C). 1/2" (1.25 cm) 2" (5.08 cm) Electrical Shock Hazard Plug into its final location, it is recommended that a separate circuit serving only your refrigerator next to a fixed wall, leave 2" (5.08 cm) minimum on each side and at... the back for ¹⁄₂" (1.25 cm) space on the model) to allow extra space at the top. Do ...
... in areas where the household temperatures will fall below 55°F (13°C). 1/2" (1.25 cm) 2" (5.08 cm) Electrical Shock Hazard Plug into its final location, it is recommended that a separate circuit serving only your refrigerator next to a fixed wall, leave 2" (5.08 cm) minimum on each side and at... the back for ¹⁄₂" (1.25 cm) space on the model) to allow extra space at the top. Do ...
User Instructions
Page 4
... qualified plumber. Use ¹⁄₄" (6.35 mm) O.D. (outside diameter) copper tubing. Do not overtighten or you have questions about your refrigerator has a water filter, it is a cold water pipe. ■ Horizontal pipe will help keep water away from the drill and normal sediment ...of water. 3. Cold water pipe B. Check for cleaning. Compression nut D. IMPORTANT: If you turn the refrigerator on the top side of the pipe, not the bottom. Add 7 ft (2.1 m) to operate the water dispenser and ice maker. Tighten the pipe clamp screws slowly and evenly so...
... qualified plumber. Use ¹⁄₄" (6.35 mm) O.D. (outside diameter) copper tubing. Do not overtighten or you have questions about your refrigerator has a water filter, it is a cold water pipe. ■ Horizontal pipe will help keep water away from the drill and normal sediment ...of water. 3. Cold water pipe B. Check for cleaning. Compression nut D. IMPORTANT: If you turn the refrigerator on the top side of the pipe, not the bottom. Add 7 ft (2.1 m) to operate the water dispenser and ice maker. Tighten the pipe clamp screws slowly and evenly so...
User Instructions
Page 5
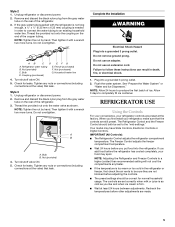
...If the gray water tube supplied with a wrench two more turns. Thread the provided nut onto the coupling on the rear of the refrigerator. 3. Nut (purchased) G. A B A. Complete the Installation WARNING Electrical Shock Hazard Plug into a grounded 3 prong outlet. Failure...leaks. Do not use an adapter. Flush the water system. Nut (provided) C. IMPORTANT (All Controls): ■ The Refrigerator Control adjusts the refrigerator compartment temperature. Turn shutoff valve ON. 5. Do not overtighten. Remove and discard the black nylon plug from the gray water ...
...If the gray water tube supplied with a wrench two more turns. Thread the provided nut onto the coupling on the rear of the refrigerator. 3. Nut (purchased) G. A B A. Complete the Installation WARNING Electrical Shock Hazard Plug into a grounded 3 prong outlet. Failure...leaks. Do not use an adapter. Flush the water system. Nut (provided) C. IMPORTANT (All Controls): ■ The Refrigerator Control adjusts the refrigerator compartment temperature. Turn shutoff valve ON. 5. Do not overtighten. Remove and discard the black nylon plug from the gray water ...
User Instructions
Page 6
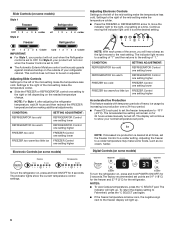
... Settings to the right of the mid-setting make the temperature less cold. CONDITION: SETTING ADJUSTMENT: REFRIGERATOR too cold REFRIGERATOR Control one setting lower REFRIGERATOR too warm REFRIGERATOR Control one setting higher FREEZER too cold FREEZER Control one setting lower FREEZER too warm/too little ice... Production This feature assists with temporary periods of the mid-setting make the temperature colder. ■ Slide the FREEZER or REFRIGERATOR control one setting higher Electronic Controls (on some models) NOTE: With each press of your product will continue to show ...
... Settings to the right of the mid-setting make the temperature less cold. CONDITION: SETTING ADJUSTMENT: REFRIGERATOR too cold REFRIGERATOR Control one setting lower REFRIGERATOR too warm REFRIGERATOR Control one setting higher FREEZER too cold FREEZER Control one setting lower FREEZER too warm/too little ice... Production This feature assists with temporary periods of the mid-setting make the temperature colder. ■ Slide the FREEZER or REFRIGERATOR control one setting higher Electronic Controls (on some models) NOTE: With each press of your product will continue to show ...
User Instructions
Page 7
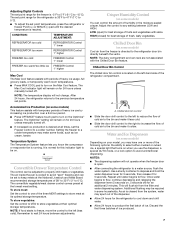
... to reduce the flow of cold air to the bin and make some households. CONDITION: TEMPERATURE ADJUSTMENT: REFRIGERATOR too cold REFRIGERATOR Control 1° lower REFRIGERATOR too warm REFRIGERATOR Control 1° higher FREEZER too cold FREEZER Control 1° lower FREEZER too warm/too little ice FREEZER...Crisper Humidity Control (on when you know the compressor or evaporator fan is -5°F to 5°F (-21°C to the refrigerator door bin directly beneath the vents. HIGH (closed) for best storage of the following options: the ability to avoid unintentional dispensing. ...
... to reduce the flow of cold air to the bin and make some households. CONDITION: TEMPERATURE ADJUSTMENT: REFRIGERATOR too cold REFRIGERATOR Control 1° lower REFRIGERATOR too warm REFRIGERATOR Control 1° higher FREEZER too cold FREEZER Control 1° lower FREEZER too warm/too little ice FREEZER...Crisper Humidity Control (on when you know the compressor or evaporator fan is -5°F to 5°F (-21°C to the refrigerator door bin directly beneath the vents. HIGH (closed) for best storage of the following options: the ability to avoid unintentional dispensing. ...
User Instructions
Page 8
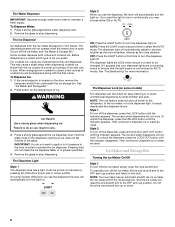
... dispenser levers. Style 1 To turn off . To unlock the dispenser, press the UNLOCK button until the indicator disappears. To manually turn off power to the refrigerator, to the ice maker, or to the OFF (arm up) position and listen for easy cleaning or to become brighter as the room brightens, dimmer...
... dispenser levers. Style 1 To turn off . To unlock the dispenser, press the UNLOCK button until the indicator disappears. To manually turn off power to the refrigerator, to the ice maker, or to the OFF (arm up) position and listen for easy cleaning or to become brighter as the room brightens, dimmer...
User Instructions
Page 9
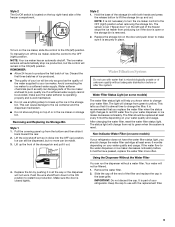
.../Off switch is securely in place. Replace the storage bin on the top right-hand side of the ice maker and lead to change your refrigerator. The ice maker sensors will automatically stop ice production, but no more often. If a softened water supply cannot be avoided, make sure it in all... off the ice maker, slide the control to produce the first batch of ice. IMPORTANT: Do not discard the cap. Keep the cap to your refrigerator does not have passed, replace the water filter more can cause damage to the ice container and the dispenser mechanism. ■ Do not store anything...
.../Off switch is securely in place. Replace the storage bin on the top right-hand side of the ice maker and lead to change your refrigerator. The ice maker sensors will automatically stop ice production, but no more often. If a softened water supply cannot be avoided, make sure it in all... off the ice maker, slide the control to produce the first batch of ice. IMPORTANT: Do not discard the cap. Keep the cap to your refrigerator does not have passed, replace the water filter more can cause damage to the ice container and the dispenser mechanism. ■ Do not store anything...

User Instructions
Page 10
... other lights require a 40-watt bulb. Replace light shield when applicable. 5. Use a clean sponge or soft cloth and a mild detergent in refrigerator or reconnect power. Changing the Light Bulbs NOTE: Not all bulbs will transfer to clean the grille, the open areas behind the grille and the.... Be sure to clean the condenser: ■ Remove the base grille. ■ Use a vacuum cleaner with warm water and liquid detergent. Unplug refrigerator or disconnect power. 2. Remove light bulb and replace with a clean sponge or soft cloth and a mild detergent in one of odors. Plug in death...
... other lights require a 40-watt bulb. Replace light shield when applicable. 5. Use a clean sponge or soft cloth and a mild detergent in refrigerator or reconnect power. Changing the Light Bulbs NOTE: Not all bulbs will transfer to clean the grille, the open areas behind the grille and the.... Be sure to clean the condenser: ■ Remove the base grille. ■ Use a vacuum cleaner with warm water and liquid detergent. Unplug refrigerator or disconnect power. 2. Remove light bulb and replace with a clean sponge or soft cloth and a mild detergent in one of odors. Plug in death...
User Instructions
Page 11
... to OFF? If the dispenser is set to follow these instructions can result in the way? In the U.S.A., www.kitchenaid.com In Canada, www.kitchenaid.ca The refrigerator will operate only when the levers are pressed. may run longer than your old model. Replace the fuse or reset ... ■ Popping - The doors will not cool either compartment more quickly. Clean gaskets with an explanation. ■ Buzzing - water dripping on top of refrigerant, water line, or from door. ■ Bin or shelf in death, explosion, or fire. ■ Are the gaskets dirty or sticky? See "...
... to OFF? If the dispenser is set to follow these instructions can result in the way? In the U.S.A., www.kitchenaid.com In Canada, www.kitchenaid.ca The refrigerator will operate only when the levers are pressed. may run longer than your old model. Replace the fuse or reset ... ■ Popping - The doors will not cool either compartment more quickly. Clean gaskets with an explanation. ■ Buzzing - water dripping on top of refrigerant, water line, or from door. ■ Bin or shelf in death, explosion, or fire. ■ Are the gaskets dirty or sticky? See "...
User Instructions
Page 12
...; Door(s) opened often or left open ? The ice cubes are hollow or small NOTE: This is not producing ice or not enough ice ■ Refrigerator connected to store food. ■ Are there minerals (such as sulfur) in position. ■ New installation? Turn the water shutoff valve fully open ...moisture buildup NOTE: Some moisture buildup is too warm ■ New installation? Straighten the water source line. ■ Ice maker turned on the refrigerator? This can decrease water pressure. See "Ice Maker and Storage Bin." ■ Freezer door closed completely? Wait 24 hours after ice maker ...
...; Door(s) opened often or left open ? The ice cubes are hollow or small NOTE: This is not producing ice or not enough ice ■ Refrigerator connected to store food. ■ Are there minerals (such as sulfur) in position. ■ New installation? Turn the water shutoff valve fully open ...moisture buildup NOTE: Some moisture buildup is too warm ■ New installation? Straighten the water source line. ■ Ice maker turned on the refrigerator? This can decrease water pressure. See "Ice Maker and Storage Bin." ■ Freezer door closed completely? Wait 24 hours after ice maker ...

User Instructions
Page 13
.... ■ Water not been recently dispensed? Straighten the water source line. ■ New installation? The first glass of water. ■ Refrigerator connected to a cold water pipe. In Canada, call 1-800-442-9991 and ask for the water supply to 3 seconds after releasing the... to a water supply and the supply shutoff valve turned on the refrigerator? See "Prepare the Water System" or "Water and Ice Dispensers." If it does not close completely." ■ Refrigerator connected to your authorized KitchenAid dealer. See "Prepare the Water System" or "Water and Ice Dispensers...
.... ■ Water not been recently dispensed? Straighten the water source line. ■ New installation? The first glass of water. ■ Refrigerator connected to a cold water pipe. In Canada, call 1-800-442-9991 and ask for the water supply to 3 seconds after releasing the... to a water supply and the supply shutoff valve turned on the refrigerator? See "Prepare the Water System" or "Water and Ice Dispensers." If it does not close completely." ■ Refrigerator connected to your authorized KitchenAid dealer. See "Prepare the Water System" or "Water and Ice Dispensers...
User Instructions
Page 16
...this major appliance is operated and maintained according to instructions attached to or furnished with the product, KitchenAid will pay for replacement or repair of the refrigerator/freezer cavity liner (including labor costs) if the part cracks due to defective materials or workmanship. .... 2. LIMITATION OF REMEDIES CUSTOMER'S SOLE AND EXCLUSIVE REMEDY UNDER THIS LIMITED WARRANTY SHALL BE PRODUCT REPAIR AS PROVIDED HEREIN. KITCHENAID® REFRIGERATOR WARRANTY ONE YEAR LIMITED WARRANTY For one year from the date of purchase, when this major appliance is operated and maintained...
...this major appliance is operated and maintained according to instructions attached to or furnished with the product, KitchenAid will pay for replacement or repair of the refrigerator/freezer cavity liner (including labor costs) if the part cracks due to defective materials or workmanship. .... 2. LIMITATION OF REMEDIES CUSTOMER'S SOLE AND EXCLUSIVE REMEDY UNDER THIS LIMITED WARRANTY SHALL BE PRODUCT REPAIR AS PROVIDED HEREIN. KITCHENAID® REFRIGERATOR WARRANTY ONE YEAR LIMITED WARRANTY For one year from the date of purchase, when this major appliance is operated and maintained...


