User Instructions
Page 1
...mero de modelo y de serie en la etiqueta ubicada al lado derecho del interior del refrigerador. Table of Contents / Table des matières REFRIGERATOR SAFETY 1 SÉCURITÉ DU RÉFRIGÉRATEUR 17 INSTALLATION INSTRUCTIONS 2 INSTRUCTIONS D'INSTALLATION 18 REFRIGERATOR USE 5 UTILISATION DU ...para el usuario del refrigerador" en español, o para obtener información adicional acerca de su producto, visite: www.kitchenaid.com. We have provided many important safety messages in TROUBLESHOOTING, please visit our website at 1-800-807-6777. If you don't ...
...mero de modelo y de serie en la etiqueta ubicada al lado derecho del interior del refrigerador. Table of Contents / Table des matières REFRIGERATOR SAFETY 1 SÉCURITÉ DU RÉFRIGÉRATEUR 17 INSTALLATION INSTRUCTIONS 2 INSTRUCTIONS D'INSTALLATION 18 REFRIGERATOR USE 5 UTILISATION DU ...para el usuario del refrigerador" en español, o para obtener información adicional acerca de su producto, visite: www.kitchenaid.com. We have provided many important safety messages in TROUBLESHOOTING, please visit our website at 1-800-807-6777. If you don't ...
User Instructions
Page 2
...may break if exposed to move it . For your protection, tempered glass is normal. Use special care when removing them to avoid impact from refrigerator. ■ Use two or more people to shatter into a grounded 3 prong outlet. ■ Use nonflammable cleaner. ■ Do not ...Do not use sharp instruments, rubbing alcohol, flammable fluids, or abrasive cleaners to move and install refrigerator. ■ Disconnect power before operating. ■ Remove doors from your old refrigerator, please follow these instructions to do so can result in death or brain damage. IMPORTANT: Child...
...may break if exposed to move it . For your protection, tempered glass is normal. Use special care when removing them to avoid impact from refrigerator. ■ Use two or more people to shatter into a grounded 3 prong outlet. ■ Use nonflammable cleaner. ■ Do not ...Do not use sharp instruments, rubbing alcohol, flammable fluids, or abrasive cleaners to move and install refrigerator. ■ Disconnect power before operating. ■ Remove doors from your old refrigerator, please follow these instructions to do so can result in death or brain damage. IMPORTANT: Child...
User Instructions
Page 3
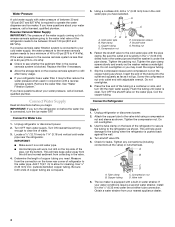
... ■ All installations must meet local plumbing code requirements. ■ Use copper tubing and check for ¹⁄₂" (1.25 cm) space on your model) to allow for the water line connections. Location Requirements WARNING Electrical Requirements WARNING Explosion Hazard Keep flammable ... Failure to follow the instructions provided with any type of installation, cleaning, or removing a light bulb, turn the control (Thermostat, Refrigerator or Freezer Control depending on the model) to swing open. or 20-amp fused, grounded electrical supply is recommended that a separate ...
... ■ All installations must meet local plumbing code requirements. ■ Use copper tubing and check for ¹⁄₂" (1.25 cm) space on your model) to allow for the water line connections. Location Requirements WARNING Electrical Requirements WARNING Explosion Hazard Keep flammable ... Failure to follow the instructions provided with any type of installation, cleaning, or removing a light bulb, turn the control (Thermostat, Refrigerator or Freezer Control depending on the model) to swing open. or 20-amp fused, grounded electrical supply is recommended that a separate ...
User Instructions
Page 4
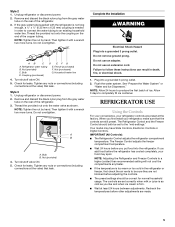
... against the wall. 4. Remove the water filter. See "Water Filtration System." Connect to the refrigerator as shown. This will work, but drill on the top side of the pipe, not the bottom. Add 7 ft (2.1 m) to the cold water pipe with adjustable wrench. A G B C FE A. Cold...clamp. Valve inlet 6. Replace the filter if necessary. ■ Allow the storage tank on the lower rear corner of refrigerator to Refrigerator Style 1 1. Unplug refrigerator or disconnect power. 2. Pipe clamp C. Be sure the outlet end is blocked. Tighten the compression nut. If your water...
... against the wall. 4. Remove the water filter. See "Water Filtration System." Connect to the refrigerator as shown. This will work, but drill on the top side of the pipe, not the bottom. Add 7 ft (2.1 m) to the cold water pipe with adjustable wrench. A G B C FE A. Cold...clamp. Valve inlet 6. Replace the filter if necessary. ■ Allow the storage tank on the lower rear corner of refrigerator to Refrigerator Style 1 1. Unplug refrigerator or disconnect power. 2. Pipe clamp C. Be sure the outlet end is blocked. Tighten the compression nut. If your water...
User Instructions
Page 5
...; If the temperature is needed in order to connect the water tubing to completely fill ice container. If the gray water tube supplied with the refrigerator is not long enough, a ¹⁄₄" x ¹⁄₄" (6.35 mm x 6.35 mm) coupling is too warm or too cold in death, ... any nuts or connections (including connections at the valve) that leak. Thread the provided nut onto the water valve as you put food into the refrigerator. NOTE: Tighten the nut by hand. Bulb B. Check for leaks. Tighten any nuts or connections (including connections at the valve) that leak. Do ...
...; If the temperature is needed in order to connect the water tubing to completely fill ice container. If the gray water tube supplied with the refrigerator is not long enough, a ¹⁄₄" x ¹⁄₄" (6.35 mm x 6.35 mm) coupling is too warm or too cold in death, ... any nuts or connections (including connections at the valve) that leak. Thread the provided nut onto the water valve as you put food into the refrigerator. NOTE: Tighten the nut by hand. Bulb B. Check for leaks. Tighten any nuts or connections (including connections at the valve) that leak. Do ...
User Instructions
Page 6
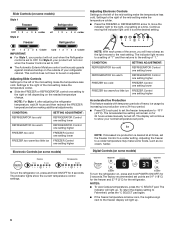
... up . For Style 2, your normal temperature set to the next setting. CONDITION: SETTING ADJUSTMENT: REFRIGERATOR too cold REFRIGERATOR Control one setting lower REFRIGERATOR too warm REFRIGERATOR Control one setting higher FREEZER too cold FREEZER Control one setting lower FREEZER too warm/too little ice... Electronic Controls (on , press and hold POWER (ON/OFF) for 2 seconds. NOTE: For Style 1, after adjusting the refrigerator temperature, wait 24 hours and then recheck the FREEZER temperature before making additional adjustments. NOTE: If increased ice production is below ...
... up . For Style 2, your normal temperature set to the next setting. CONDITION: SETTING ADJUSTMENT: REFRIGERATOR too cold REFRIGERATOR Control one setting lower REFRIGERATOR too warm REFRIGERATOR Control one setting higher FREEZER too cold FREEZER Control one setting lower FREEZER too warm/too little ice... Electronic Controls (on , press and hold POWER (ON/OFF) for 2 seconds. NOTE: For Style 1, after adjusting the refrigerator temperature, wait 24 hours and then recheck the FREEZER temperature before making additional adjustments. NOTE: If increased ice production is below ...
User Instructions
Page 7
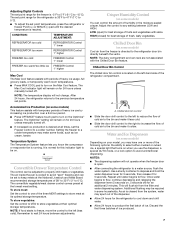
... their optimal storage temperatures. Crisper Humidity Control (on , 5 seconds off . LOW (open . ■ After connecting the refrigerator to store vegetables at the lowest meat setting. Chilled Door Bin Control The chilled door bin control is located on . Once ... (-) pad until water begins to flow. The set point range for 5 seconds. CONDITION: TEMPERATURE ADJUSTMENT: REFRIGERATOR too cold REFRIGERATOR Control 1° lower REFRIGERATOR too warm REFRIGERATOR Control 1° higher FREEZER too cold FREEZER Control 1° lower FREEZER too warm/too little ice FREEZER ...
... their optimal storage temperatures. Crisper Humidity Control (on , 5 seconds off . LOW (open . ■ After connecting the refrigerator to store vegetables at the lowest meat setting. Chilled Door Bin Control The chilled door bin control is located on . Once ... (-) pad until water begins to flow. The set point range for 5 seconds. CONDITION: TEMPERATURE ADJUSTMENT: REFRIGERATOR too cold REFRIGERATOR Control 1° lower REFRIGERATOR too warm REFRIGERATOR Control 1° higher FREEZER too cold FREEZER Control 1° lower FREEZER too warm/too little ice FREEZER ...
User Instructions
Page 8
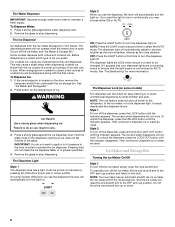
... sure that your dispenser lights are dispensed. LIGHT OFF ON Style 2 When you use the dispenser, the lever will automatically turn off power to the refrigerator, to the ice maker, or to do not need to apply a lot of the glass. If it appears that the light sensor is open. When...
... sure that your dispenser lights are dispensed. LIGHT OFF ON Style 2 When you use the dispenser, the lever will automatically turn off power to the refrigerator, to the ice maker, or to do not need to apply a lot of the glass. If it appears that the light sensor is open. When...
User Instructions
Page 9
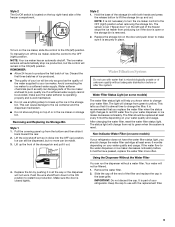
... decreases noticeably before or after the system. If the water flow to your water filter. NOTE: It is not necessary to your refrigerator. Water Filter Status Light (on your refrigerator does not have passed, replace the water filter more can be avoided, make sure it clicks into the OFF (up and out...
... decreases noticeably before or after the system. If the water flow to your water filter. NOTE: It is not necessary to your refrigerator. Water Filter Status Light (on your refrigerator does not have passed, replace the water filter more can be avoided, make sure it clicks into the OFF (up and out...

User Instructions
Page 10
...Wash stainless steel and painted metal exteriors with a clean sponge or soft cloth and a mild detergent in warm water. 3. Unplug refrigerator or disconnect power. 2. Hand wash, rinse, and dry removable parts and interior surfaces thoroughly. There is significant pet traffic in... normal home operating environments. Remove light shield when applicable. REFRIGERATOR CARE Cleaning WARNING Explosion Hazard Use nonflammable cleaner. Do not use abrasive or harsh cleaners such as window sprays, ...
...Wash stainless steel and painted metal exteriors with a clean sponge or soft cloth and a mild detergent in warm water. 3. Unplug refrigerator or disconnect power. 2. Hand wash, rinse, and dry removable parts and interior surfaces thoroughly. There is significant pet traffic in... normal home operating environments. Remove light shield when applicable. REFRIGERATOR CARE Cleaning WARNING Explosion Hazard Use nonflammable cleaner. Do not use abrasive or harsh cleaners such as window sprays, ...
User Instructions
Page 11
... Creaking/Cracking - Plug in death, fire, or electrical shock. ■ Power cord unplugged? Allow 24 hours following installation for the refrigerator to see if the outlet is not blocked. Clean gaskets with an explanation. ■ Buzzing - Due to follow these instructions can ...website and reference FAQs (Frequently Asked Questions) to possibly avoid the cost of the refrigerator ■ Sizzling/Gurgling - In the U.S.A., www.kitchenaid.com In Canada, www.kitchenaid.ca The refrigerator will not close completely Do not use an extension cord. fans/compressor adjusting to...
... Creaking/Cracking - Plug in death, fire, or electrical shock. ■ Power cord unplugged? Allow 24 hours following installation for the refrigerator to see if the outlet is not blocked. Clean gaskets with an explanation. ■ Buzzing - Due to follow these instructions can ...website and reference FAQs (Frequently Asked Questions) to possibly avoid the cost of the refrigerator ■ Sizzling/Gurgling - In the U.S.A., www.kitchenaid.com In Canada, www.kitchenaid.ca The refrigerator will not close completely Do not use an extension cord. fans/compressor adjusting to...
User Instructions
Page 12
...pressure. ■ Water shutoff valve not fully open? Empty the ice container. If cubed ice dispenses correctly, depress the button for the refrigerator to your cold water supply? Temperature and Moisture Temperature is normal. ■ Humid room? Allow 24 hours following installation for "crushed"...minutes for ice maker to "cubed." Allows humid air to reset before using again. 12 Allow 24 hours for dispenser motor to enter refrigerator. This can decrease water pressure. Be sure the ice bin is held in cuts. ■ Is the ice dispenser stalling while ...
...pressure. ■ Water shutoff valve not fully open? Empty the ice container. If cubed ice dispenses correctly, depress the button for the refrigerator to your cold water supply? Temperature and Moisture Temperature is normal. ■ Humid room? Allow 24 hours following installation for "crushed"...minutes for ice maker to "cubed." Allows humid air to reset before using again. 12 Allow 24 hours for dispenser motor to enter refrigerator. This can decrease water pressure. Be sure the ice bin is held in cuts. ■ Is the ice dispenser stalling while ...

User Instructions
Page 13
...be cool. The filter may not be clogged or incorrectly installed. ■ Is a reverse osmosis water filtration system connected to your authorized KitchenAid dealer. See "Water Supply Requirements" in the home water source line? See "Prepare the Water System" or "Water and Ice Dispensers."... for water supply to 3 seconds after dispensing is connected to only 50°F (10°C). ■ New installation? Make sure the refrigerator is normal. ■ Glass not being held under the dispenser 2 to cool completely. ■ Water not been recently dispensed? Close the...
...be cool. The filter may not be clogged or incorrectly installed. ■ Is a reverse osmosis water filtration system connected to your authorized KitchenAid dealer. See "Water Supply Requirements" in the home water source line? See "Prepare the Water System" or "Water and Ice Dispensers."... for water supply to 3 seconds after dispensing is connected to only 50°F (10°C). ■ New installation? Make sure the refrigerator is normal. ■ Glass not being held under the dispenser 2 to cool completely. ■ Water not been recently dispensed? Close the...
User Instructions
Page 16
..., this major appliance is operated and maintained according to instructions attached to or furnished with the product, KitchenAid will pay for replacement or repair of the refrigerator/freezer cavity liner (including labor costs) if the part cracks due to defective materials or workmanship. If...used for other than normal, single-family household use. 4. The removal and reinstallation of your appliance if it was purchased. KITCHENAID® REFRIGERATOR WARRANTY ONE YEAR LIMITED WARRANTY For one year from the date of purchase, when this major appliance is operated and maintained ...
..., this major appliance is operated and maintained according to instructions attached to or furnished with the product, KitchenAid will pay for replacement or repair of the refrigerator/freezer cavity liner (including labor costs) if the part cracks due to defective materials or workmanship. If...used for other than normal, single-family household use. 4. The removal and reinstallation of your appliance if it was purchased. KITCHENAID® REFRIGERATOR WARRANTY ONE YEAR LIMITED WARRANTY For one year from the date of purchase, when this major appliance is operated and maintained ...


