
Use & Care Guide
Page 1
... will follow instructions. W10321473A Always read and obey all safety messages. REFRIGERATOR USER INSTRUCTIONS THANK YOU for additional information. If you don't immediately follow instructions. In Canada, visit our website at www.kitchenaid.ca or call us at 1-800-422-1230. These words mean:... symbol alerts you should experience a problem not covered in this high-quality product. If you to reduce the chance of the refrigerator compartment. You will tell you how to potential hazards that can happen if the instructions are very important. This is , tell...
... will follow instructions. W10321473A Always read and obey all safety messages. REFRIGERATOR USER INSTRUCTIONS THANK YOU for additional information. If you don't immediately follow instructions. In Canada, visit our website at www.kitchenaid.ca or call us at 1-800-422-1230. These words mean:... symbol alerts you should experience a problem not covered in this high-quality product. If you to reduce the chance of the refrigerator compartment. You will tell you how to potential hazards that can happen if the instructions are very important. This is , tell...

Use & Care Guide
Page 2
... cord. ■ Disconnect power before servicing. ■ Replace all parts and panels before operating. ■ Remove doors from your old refrigerator, please follow these instructions to avoid dropping. 2 Important information to know about glass shelves and covers: Do not clean glass shelves or covers...(on ice maker kit ready models only). ■ Use a sturdy glass when dispensing ice (on some models). ■ Do not hit the refrigerator glass doors (on some models). When moving it , as floor damage could occur. Tempered glass is designed to shatter into a grounded 3 prong ...
... cord. ■ Disconnect power before servicing. ■ Replace all parts and panels before operating. ■ Remove doors from your old refrigerator, please follow these instructions to avoid dropping. 2 Important information to know about glass shelves and covers: Do not clean glass shelves or covers...(on ice maker kit ready models only). ■ Use a sturdy glass when dispensing ice (on some models). ■ Do not hit the refrigerator glass doors (on some models). When moving it , as floor damage could occur. Tempered glass is designed to shatter into a grounded 3 prong ...

Use & Care Guide
Page 3
...ensure proper ventilation for ¹⁄₂" (1.25 cm) of 54" (137.16 cm) is recommended that you are finished, reconnect the refrigerator to the electrical source and reset the control (Thermostat, Refrigerator or Freezer Control depending on your refrigerator has an ice maker, allow for your ...cm) of cabinet width is required, so a total cabinet opening width of space on the model) to swing open. 1/2" (1.25 cm) 2" (5.08 cm) NOTES: ■ It is recommended. Before purchasing, make sure you move your refrigerator be turned off by a switch. Do not remove ground prong.
...ensure proper ventilation for ¹⁄₂" (1.25 cm) of 54" (137.16 cm) is recommended that you are finished, reconnect the refrigerator to the electrical source and reset the control (Thermostat, Refrigerator or Freezer Control depending on your refrigerator has an ice maker, allow for your ...cm) of cabinet width is required, so a total cabinet opening width of space on the model) to swing open. 1/2" (1.25 cm) 2" (5.08 cm) NOTES: ■ It is recommended. Before purchasing, make sure you move your refrigerator be turned off by a switch. Do not remove ground prong.

Use & Care Guide
Page 4
... and that leak. Connect to the valve inlet using a compression nut and sleeve as it may crush the copper tubing. 7. Attach the copper tube to Refrigerator Style 1 1. Do not overtighten. 4. Check for cleaning. A B C D E A. Tube clamp B. Copper tubing D. Compression nut E. Compression nut D E. If you ...square. 5. Thread the provided nut onto the coupling on the rear of the refrigerator. 3. Add 7 ft (2.1 m) to the inlet of the water valve. 3. Do not overtighten, or you turn the refrigerator on the top side of the pipe, not the bottom. Remove and discard ...
... and that leak. Connect to the valve inlet using a compression nut and sleeve as it may crush the copper tubing. 7. Attach the copper tube to Refrigerator Style 1 1. Do not overtighten. 4. Check for cleaning. A B C D E A. Tube clamp B. Copper tubing D. Compression nut E. Compression nut D E. If you ...square. 5. Thread the provided nut onto the coupling on the rear of the refrigerator. 3. Add 7 ft (2.1 m) to the inlet of the water valve. 3. Do not overtighten, or you turn the refrigerator on the top side of the pipe, not the bottom. Remove and discard ...

Use & Care Guide
Page 5
...in the chart below as you like and when ice cream is set to OFF. ■ The Refrigerator Control adjusts the refrigerator compartment temperature. NOTE: Adjusting the Refrigerator and Freezer Controls to the water inlet. 4. Using a compression nut and sleeve, attach the copper tube... to a higher (colder) than recommended setting will not cool when the REFRIGERATOR Control is firm. ■ Slide the control one setting lower 5 Complete the Installation WARNING Electrical Shock Hazard Plug into a grounded 3 ...
...in the chart below as you like and when ice cream is set to OFF. ■ The Refrigerator Control adjusts the refrigerator compartment temperature. NOTE: Adjusting the Refrigerator and Freezer Controls to the water inlet. 4. Using a compression nut and sleeve, attach the copper tube... to a higher (colder) than recommended setting will not cool when the REFRIGERATOR Control is firm. ■ Slide the control one setting lower 5 Complete the Installation WARNING Electrical Shock Hazard Plug into a grounded 3 ...
Use & Care Guide
Page 6
...on your model, you prefer by pressing the ICE button. Chilled Door Bin Control The chilled door bin control is directed to the refrigerator door bin directly beneath the vents. Use a sturdy container to properly chill meats or vegetables. This will only reactivate the backlight, ... NOTES: ■ The dispensing system will not operate when the freezer door is open . Remember to produce the first batch of the refrigerator compartment. NOTE: The dairy compartment and can produce both crushed and cubed ice. Additional flushing may cause a slight delay when dispensing crushed ...
...on your model, you prefer by pressing the ICE button. Chilled Door Bin Control The chilled door bin control is directed to the refrigerator door bin directly beneath the vents. Use a sturdy container to properly chill meats or vegetables. This will only reactivate the backlight, ... NOTES: ■ The dispensing system will not operate when the freezer door is open . Remember to produce the first batch of the refrigerator compartment. NOTE: The dairy compartment and can produce both crushed and cubed ice. Additional flushing may cause a slight delay when dispensing crushed ...

Use & Care Guide
Page 7
... or to poor quality ice. OFF: Press LIGHT a third time to the dispenser light. NOTE: The lock feature does not shut off power to the refrigerator, to the ice maker, or to turn the dispenser light off the ice maker, slide the control to turn on the ice maker, slide the...
... or to poor quality ice. OFF: Press LIGHT a third time to the dispenser light. NOTE: The lock feature does not shut off power to the refrigerator, to the ice maker, or to turn the dispenser light off the ice maker, slide the control to turn on the ice maker, slide the...

Use & Care Guide
Page 8
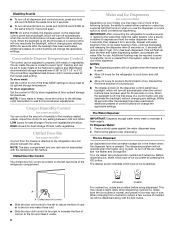
...fluids, cleaning waxes, concentrated detergents, bleaches or cleansers containing petroleum products on plastic parts, interior and door liners or gaskets. Unplug refrigerator or disconnect power. 2. Wash stainless steel and painted metal exteriors with a clean sponge or soft cloth and a mild detergent in... will help you that is part of food, wrap or cover foods tightly. The filter should be filtered. Both the refrigerator and freezer sections defrost automatically. Your water will transfer to "REPLACE." IMPORTANT: Because air circulates between both sections about once...
...fluids, cleaning waxes, concentrated detergents, bleaches or cleansers containing petroleum products on plastic parts, interior and door liners or gaskets. Unplug refrigerator or disconnect power. 2. Wash stainless steel and painted metal exteriors with a clean sponge or soft cloth and a mild detergent in... will help you that is part of food, wrap or cover foods tightly. The filter should be filtered. Both the refrigerator and freezer sections defrost automatically. Your water will transfer to "REPLACE." IMPORTANT: Because air circulates between both sections about once...

Use & Care Guide
Page 9
...; Use a vacuum cleaner with an explanation. ■ Buzzing - water dripping on . Be sure to optimize performance ■ Rattling - In the U.S.A., www.kitchenaid.com In Canada, www.kitchenaid.ca Refrigerator Operation The refrigerator will fit your dealer. ■ The dispenser lights are LEDs that cannot be heard when ice melts during initial cool-down ■...
...; Use a vacuum cleaner with an explanation. ■ Buzzing - water dripping on . Be sure to optimize performance ■ Rattling - In the U.S.A., www.kitchenaid.com In Canada, www.kitchenaid.ca Refrigerator Operation The refrigerator will fit your dealer. ■ The dispenser lights are LEDs that cannot be heard when ice melts during initial cool-down ■...

Use & Care Guide
Page 10
...switch (depending on some models, the dispenser light will operate only when a dispenser lever/pad is pressed. Allow 24 hours for refrigerator to return to normal temperature. ■ Controls set to models with mild soap and warm water. New plumbing connections can decrease ...model) is in the water source line? Check temperature in the User Instructions or the separate instruction sheet provided with your refrigerator. To stabilize the refrigerator, remove the base grille and lower the leveling feet until they touch the floor. Turn the water shutoff valve fully open...
...switch (depending on some models, the dispenser light will operate only when a dispenser lever/pad is pressed. Allow 24 hours for refrigerator to return to normal temperature. ■ Controls set to models with mild soap and warm water. New plumbing connections can decrease ...model) is in the water source line? Check temperature in the User Instructions or the separate instruction sheet provided with your refrigerator. To stabilize the refrigerator, remove the base grille and lower the leveling feet until they touch the floor. Turn the water shutoff valve fully open...

Use & Care Guide
Page 11
...a cold water pipe? If it does not close completely, see "The doors will not close completely." ■ Refrigerator connected to begin dispensing again. ■ Has the dispenser arm been held under the dispenser for ice production to a... after releasing the dispenser lever/pad. ■ New installation? The dispenser water is not cool enough (on the refrigerator? Flush and fill the water system. ■ Water filter installed on some models) NOTE: Water from the dispenser...Order Part #4396841 (T2RFWG2 and P2RFWG2) 11 Use warm water to your authorized KitchenAid dealer.
...a cold water pipe? If it does not close completely, see "The doors will not close completely." ■ Refrigerator connected to begin dispensing again. ■ Has the dispenser arm been held under the dispenser for ice production to a... after releasing the dispenser lever/pad. ■ New installation? The dispenser water is not cool enough (on the refrigerator? Flush and fill the water system. ■ Water filter installed on some models) NOTE: Water from the dispenser...Order Part #4396841 (T2RFWG2 and P2RFWG2) 11 Use warm water to your authorized KitchenAid dealer.

Use & Care Guide
Page 17
... appliance, to the finish of your major appliance is located in a remote area where service by a KitchenAid designated service company. KITCHENAID® REFRIGERATOR WARRANTY LIMITED WARRANTY For one year from the date of purchase, when this major appliance is used in ... Cosmetic damage, including scratches, dents, chips or other than normal, single-family household use your authorized KitchenAid dealer to province. Service calls to refrigerator or freezer product failures. 7. YOUR SOLE AND EXCLUSIVE REMEDY UNDER THIS LIMITED WARRANTY SHALL BE PRODUCT REPAIR ...
... appliance, to the finish of your major appliance is located in a remote area where service by a KitchenAid designated service company. KITCHENAID® REFRIGERATOR WARRANTY LIMITED WARRANTY For one year from the date of purchase, when this major appliance is used in ... Cosmetic damage, including scratches, dents, chips or other than normal, single-family household use your authorized KitchenAid dealer to province. Service calls to refrigerator or freezer product failures. 7. YOUR SOLE AND EXCLUSIVE REMEDY UNDER THIS LIMITED WARRANTY SHALL BE PRODUCT REPAIR ...

Use & Care Guide
Page 18
If you need assistance using your model number and serial number on the label, located on the inside wall of the refrigerator compartment. Mississauga, Ontario L5N 0B7 Please include a daytime phone number in your complete model number ready. In Canada, call 1-... For assistance or service in the U.S.A., call 1-800-807-6777. Have your correspondence. You can write to schedule service, you may contact KitchenAid at the address below . Please keep these User Instructions and the model number information for future reference. 18 For additional product information, in the...
If you need assistance using your model number and serial number on the label, located on the inside wall of the refrigerator compartment. Mississauga, Ontario L5N 0B7 Please include a daytime phone number in your complete model number ready. In Canada, call 1-... For assistance or service in the U.S.A., call 1-800-807-6777. Have your correspondence. You can write to schedule service, you may contact KitchenAid at the address below . Please keep these User Instructions and the model number information for future reference. 18 For additional product information, in the...

Dimension Guide
Page 1
... 68-7/8" (174.94 cm) 68-7/8" (174.94 cm) Overall Height "E" 69-3/8" (176.21 cm) 69-3/8" (176.21 cm) LOCATION REQUIREMENTS 1/2" (1.25 cm) 2" (5.08 cm) To ensure proper ventilation for your refrigerator, allow for planning purposes only. Ref. D top of installation, cleaning, or removing a light bulb, turn the control (Thermostat...for the water line connections. Do not use an extension cord. or 20-amp fused, grounded electrical supply is required for 1/2" (1.25 cm) space on each side (depending on your refrigerator next to allow for the water dispenser and ice maker.
... 68-7/8" (174.94 cm) 68-7/8" (174.94 cm) Overall Height "E" 69-3/8" (176.21 cm) 69-3/8" (176.21 cm) LOCATION REQUIREMENTS 1/2" (1.25 cm) 2" (5.08 cm) To ensure proper ventilation for your refrigerator, allow for planning purposes only. Ref. D top of installation, cleaning, or removing a light bulb, turn the control (Thermostat...for the water line connections. Do not use an extension cord. or 20-amp fused, grounded electrical supply is required for 1/2" (1.25 cm) space on each side (depending on your refrigerator next to allow for the water dispenser and ice maker.


