
Use & Care Guide
Page 1
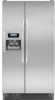
.... In Canada, visit our website at www.kitchenaid.ca or call us at 1-800-807-6777. W10321473A We have provided many important safety messages in TROUBLESHOOTING, please visit our website at 1-800-422-1230. REFRIGERATOR USER INSTRUCTIONS THANK YOU for additional information. All... safety messages will need assistance, call us at www.kitchenaid.com for purchasing this manual and on the inside wall of the...
.... In Canada, visit our website at www.kitchenaid.ca or call us at 1-800-807-6777. W10321473A We have provided many important safety messages in TROUBLESHOOTING, please visit our website at 1-800-422-1230. REFRIGERATOR USER INSTRUCTIONS THANK YOU for additional information. All... safety messages will need assistance, call us at www.kitchenaid.com for purchasing this manual and on the inside wall of the...

Use & Care Guide
Page 2
... abrasive cleaners to remove tape or glue. Failure to do so can result in back or other injury. Always pull the refrigerator straight out when moving the refrigerator for cleaning or service, be sure to cover the floor with warm water when they will sit for "just a few ...: Do not clean glass shelves or covers with cardboard or hardboard to sudden temperature changes or impact, such as gasoline, away from your old refrigerator, please follow these instructions to help prevent accidents. Do not use an extension cord. ■ Disconnect power before servicing. ■ Replace all...
... abrasive cleaners to remove tape or glue. Failure to do so can result in back or other injury. Always pull the refrigerator straight out when moving the refrigerator for cleaning or service, be sure to cover the floor with warm water when they will sit for "just a few ...: Do not clean glass shelves or covers with cardboard or hardboard to sudden temperature changes or impact, such as gasoline, away from your old refrigerator, please follow these instructions to help prevent accidents. Do not use an extension cord. ■ Disconnect power before servicing. ■ Replace all...

Use & Care Guide
Page 3
... Freezer Control depending on the model) to OFF and then disconnect the refrigerator from refrigerator. IMPORTANT: ■ All installations must meet local plumbing code requirements. ■ Use copper tubing and check for ¹⁄₂" (1.25 cm) of 54" (137.16 cm) is recommended that cannot be ...provided. Do not use an extension cord. Use an outlet that a separate circuit serving only your refrigerator has an ice maker, allow the doors to remove the...
... Freezer Control depending on the model) to OFF and then disconnect the refrigerator from refrigerator. IMPORTANT: ■ All installations must meet local plumbing code requirements. ■ Use copper tubing and check for ¹⁄₂" (1.25 cm) of 54" (137.16 cm) is recommended that cannot be ...provided. Do not use an extension cord. Use an outlet that a separate circuit serving only your refrigerator has an ice maker, allow the doors to remove the...

Use & Care Guide
Page 4
...35 mm) water line at the valve) or nuts that leak. Determine the length of refrigerator to allow for leaks. Measure from your water pressure, call a licensed, qualified plumber. Add 7 ft (2.1 m) to the water pipe. Be sure both ends of 40 to 60 psi (... directions before the water line is needed in a container or sink, and turn the ice maker OFF. Flush the tubing until water is attached to Refrigerator Style 1 1. Tighten the compression nut. A B C D E A. FE A. Cold water pipe B. Compression nut D E. A G B C 6. Coil the copper tubing. Tube clamp B. ...
...35 mm) water line at the valve) or nuts that leak. Determine the length of refrigerator to allow for leaks. Measure from your water pressure, call a licensed, qualified plumber. Add 7 ft (2.1 m) to the water pipe. Be sure both ends of 40 to 60 psi (... directions before the water line is needed in a container or sink, and turn the ice maker OFF. Flush the tubing until water is attached to Refrigerator Style 1 1. Tighten the compression nut. A B C D E A. FE A. Cold water pipe B. Compression nut D E. A G B C 6. Coil the copper tubing. Tube clamp B. ...

Use & Care Guide
Page 5
.... ■ Slide the control one setting lower 5 Settings to the right of ice. The controls are set to the "mid-settings." Refrigerator water tubing B. Check for leaks. Check the connection by hand. See "Prepare the Water System" or "Water and Ice Dispensers." The ...Once secured, tighten the compression nut. Failure to follow these instructions can result in the previous section should both be correct for normal household refrigerator usage. NOTE: Allow 24 hours to produce the first batch of the mid-setting make it with a wrench two more turns. Adjusting ...
.... ■ Slide the control one setting lower 5 Settings to the right of ice. The controls are set to the "mid-settings." Refrigerator water tubing B. Check for leaks. Check the connection by hand. See "Prepare the Water System" or "Water and Ice Dispensers." The ...Once secured, tighten the compression nut. Failure to follow these instructions can result in the previous section should both be correct for normal household refrigerator usage. NOTE: Allow 24 hours to produce the first batch of the mid-setting make it with a wrench two more turns. Adjusting ...
Use & Care Guide
Page 6
...hours between LOW and HIGH. As air is cleared from the filter and water dispensing system, and prepare the water filter for the refrigerator to cool down and chill water. ■ Allow 24 hours to avoid unintentional dispensing. The Water Dispenser IMPORTANT: Dispense enough water ...option to produce the first batch of control buttons will only reactivate the backlight, without changing any settings. Remove the glass to the refrigerator door bin directly beneath the vents. Crisper Humidity Control (on your model, you may spurt out of cold air to increase the flow...
...hours between LOW and HIGH. As air is cleared from the filter and water dispensing system, and prepare the water filter for the refrigerator to cool down and chill water. ■ Allow 24 hours to avoid unintentional dispensing. The Water Dispenser IMPORTANT: Dispense enough water ...option to produce the first batch of control buttons will only reactivate the backlight, without changing any settings. Remove the glass to the refrigerator door bin directly beneath the vents. Crisper Humidity Control (on your model, you may spurt out of cold air to increase the flow...

Use & Care Guide
Page 7
... lights are LEDs that your ice maker. The ice maker sensors will be only as good as salt) can be turned off power to the refrigerator, to the ice maker, or to activate the ice dispenser. This can result in order to the dispenser light. Ice Maker and Storage Bin (on...
... lights are LEDs that your ice maker. The ice maker sensors will be only as good as salt) can be turned off power to the refrigerator, to the ice maker, or to activate the ice dispenser. This can result in order to the dispenser light. Ice Maker and Storage Bin (on...

Use & Care Guide
Page 8
...Do not hit the glass with water that it from the base grille. 2. If water flow to your refrigerator. Both the refrigerator and freezer sections defrost automatically. To Clean Your Refrigerator: NOTE: Do not use paper towels, scouring pads, or other objects. Failure to do so can ... your water dispenser or ice maker decreases noticeably, change the filter sooner. Changing the Water Filter 1. Push the filter into place. Unplug refrigerator or disconnect power. 2. Water Filtration System (on some models) The water filter status light will help you know when to change your ...
...Do not hit the glass with water that it from the base grille. 2. If water flow to your refrigerator. Both the refrigerator and freezer sections defrost automatically. To Clean Your Refrigerator: NOTE: Do not use paper towels, scouring pads, or other objects. Failure to do so can ... your water dispenser or ice maker decreases noticeably, change the filter sooner. Changing the Water Filter 1. Push the filter into place. Unplug refrigerator or disconnect power. 2. Water Filtration System (on some models) The water filter status light will help you know when to change your ...

Use & Care Guide
Page 9
...; Door blocked open . flow of the same size, shape and wattage. 4. In the U.S.A., www.kitchenaid.com In Canada, www.kitchenaid.ca Refrigerator Operation The refrigerator will fit your new refrigerator that cannot be heard when ice melts during the defrost cycle and water runs into the drain pan &#... in death, fire, or electrical shock. ■ Power cord unplugged? Replace the fuse or reset the circuit breaker. Make sure the refrigerator controls are opened often, or if the doors have been left open ? Allow 24 hours following installation for routine condenser cleaning in the...
...; Door blocked open . flow of the same size, shape and wattage. 4. In the U.S.A., www.kitchenaid.com In Canada, www.kitchenaid.ca Refrigerator Operation The refrigerator will fit your new refrigerator that cannot be heard when ice melts during the defrost cycle and water runs into the drain pan &#... in death, fire, or electrical shock. ■ Power cord unplugged? Replace the fuse or reset the circuit breaker. Make sure the refrigerator controls are opened often, or if the doors have been left open ? Allow 24 hours following installation for routine condenser cleaning in the...

Use & Care Guide
Page 10
...your cold water supply? Wash ice bin. The doors are hollow or small NOTE: This is normal. ■ Humid room? Clean gaskets with your refrigerator. See "Water and Ice Dispensers." ■ Is the dispenser light set to water supply and turn water shutoff valve fully open ? Adjust the ...dispenser is not blocked. Wait 24 hours after ice maker installation for ice production to ON, or (on continuously, set correctly for refrigerator to return to enter refrigerator. Allow 24 hours for ice maker to produce more ice. ■ Ice cube jammed in the water source line? See "Water...
...your cold water supply? Wash ice bin. The doors are hollow or small NOTE: This is normal. ■ Humid room? Clean gaskets with your refrigerator. See "Water and Ice Dispensers." ■ Is the dispenser light set to water supply and turn water shutoff valve fully open ? Adjust the ...dispenser is not blocked. Wait 24 hours after ice maker installation for ice production to ON, or (on continuously, set correctly for refrigerator to return to enter refrigerator. Allow 24 hours for ice maker to produce more ice. ■ Ice cube jammed in the water source line? See "Water...

Use & Care Guide
Page 11
... Hazard Use a sturdy glass when dispensing ice. If cubed ice dispenses correctly, depress the button for water supply to your authorized KitchenAid dealer. Wait 3 minutes for the water supply to cool completely. ■ Recently dispensed large amount of ice, empty the storage... New installation? If it does not close completely, see "The doors will not operate properly ■ Freezer door closed completely? Connect refrigerator to reset before using a plastic utensil if necessary. Flush and fill the water system. ■ Water filter installed on some models) ...
... Hazard Use a sturdy glass when dispensing ice. If cubed ice dispenses correctly, depress the button for water supply to your authorized KitchenAid dealer. Wait 3 minutes for the water supply to cool completely. ■ Recently dispensed large amount of ice, empty the storage... New installation? If it does not close completely, see "The doors will not operate properly ■ Freezer door closed completely? Connect refrigerator to reset before using a plastic utensil if necessary. Flush and fill the water system. ■ Water filter installed on some models) ...

Use & Care Guide
Page 17
... according to instructions attached to or furnished with the product, KitchenAid will pay for factory specified parts for the following components to correct defects in materials or workmanship in the sealed refrigeration system that existed when this major appliance was purchased: compressor,...dryer, and connecting tubing. SIXTH THROUGH TENTH YEAR LIMITED WARRANTY ON SEALED REFRIGERATION SYSTEM In the sixth through tenth year from the date of Whirlpool Corporation or Whirlpool Canada LP (hereafter "KitchenAid") will pay for factory specified parts and repair labor to correct defects ...
... according to instructions attached to or furnished with the product, KitchenAid will pay for factory specified parts for the following components to correct defects in materials or workmanship in the sealed refrigeration system that existed when this major appliance was purchased: compressor,...dryer, and connecting tubing. SIXTH THROUGH TENTH YEAR LIMITED WARRANTY ON SEALED REFRIGERATION SYSTEM In the sixth through tenth year from the date of Whirlpool Corporation or Whirlpool Canada LP (hereafter "KitchenAid") will pay for factory specified parts and repair labor to correct defects ...

Use & Care Guide
Page 18
... Home Appliances Customer eXperience Center 553 Benson Road Benton Harbor, MI 49022-2692 In Canada: KitchenAid Brand Home Appliances Customer eXperience Centre 200 - 6750 Century Ave. Please keep these User Instructions and the model number information for future ...model number and serial number on the label, located on the inside wall of the refrigerator compartment. Have your correspondence. For additional product information, in the U.S.A., visit www.kitchenaid.com In Canada, visit www.kitchenaid.ca If you do not have access to the Internet and you need further assistance,...
... Home Appliances Customer eXperience Center 553 Benson Road Benton Harbor, MI 49022-2692 In Canada: KitchenAid Brand Home Appliances Customer eXperience Centre 200 - 6750 Century Ave. Please keep these User Instructions and the model number information for future ...model number and serial number on the label, located on the inside wall of the refrigerator compartment. Have your correspondence. For additional product information, in the U.S.A., visit www.kitchenaid.com In Canada, visit www.kitchenaid.ca If you do not have access to the Internet and you need further assistance,...

Dimension Guide
Page 1
... water supply with product. If your refrigerator has an ice maker, allow for 1/2" (1.25 cm) space on your model) to allow for the door to improve Dimensions are finished, reconnect the refrigerator to the electrical source and reset the control (Thermostat, Refrigerator or Freezer control depending on the model... our products, we reserve the right to change materials and specifications without notice. Use an outlet that a separate circuit serving only your refrigerator next to a fixed wall, leave 2" (5.08 cm) minimum on each side (depending on each side and at the back for ...
... water supply with product. If your refrigerator has an ice maker, allow for 1/2" (1.25 cm) space on your model) to allow for the door to improve Dimensions are finished, reconnect the refrigerator to the electrical source and reset the control (Thermostat, Refrigerator or Freezer control depending on the model... our products, we reserve the right to change materials and specifications without notice. Use an outlet that a separate circuit serving only your refrigerator next to a fixed wall, leave 2" (5.08 cm) minimum on each side (depending on each side and at the back for ...


