Use & Care Guide
Page 2
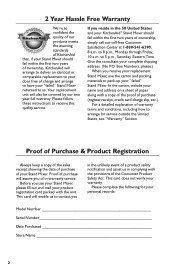
... Free Warranty We're so confident the quality of our products meets the exacting standards of KitchenAid that, if your Stand Mixer should fail within the first two years of ownership, KitchenAid will arrange to deliver an identical or comparable replacement to your door free of purchase (register...of the Consumer Product Safety Act. Before you reside in complying with the unit. This card will enable us to arrange for your KitchenAid® Stand Mixer should fail within the first two years of ownership, simply call our toll-free Customer Satisfaction Center at 1-800-541-6390, 8...
... Free Warranty We're so confident the quality of our products meets the exacting standards of KitchenAid that, if your Stand Mixer should fail within the first two years of ownership, KitchenAid will arrange to deliver an identical or comparable replacement to your door free of purchase (register...of the Consumer Product Safety Act. Before you reside in complying with the unit. This card will enable us to arrange for your KitchenAid® Stand Mixer should fail within the first two years of ownership, simply call our toll-free Customer Satisfaction Center at 1-800-541-6390, 8...
Use & Care Guide
Page 3
... the 50 United States and Puerto Rico 6 Ordering Accessories and Replacement Parts 6 Electrical Requirements...7 Troubleshooting Problems...7 Stand Mixer Features...8 Assembling Your Stand Mixer...9 Using Your KitchenAid® Attachments 10 Mixing Time...10 Mixer Use...10 Speed Control Guide - 10 Speed Mixers 11 Beater To Bowl Clearance...12 Mixing Tips...13 Basic White Bread...14 Care And Cleaning...
... the 50 United States and Puerto Rico 6 Ordering Accessories and Replacement Parts 6 Electrical Requirements...7 Troubleshooting Problems...7 Stand Mixer Features...8 Assembling Your Stand Mixer...9 Using Your KitchenAid® Attachments 10 Mixing Time...10 Mixer Use...10 Speed Control Guide - 10 Speed Mixers 11 Beater To Bowl Clearance...12 Mixing Tips...13 Basic White Bread...14 Care And Cleaning...
Use & Care Guide
Page 4
... or damaged in any manner. Do not operate Stand Mixer with a damaged cord or plug or after the Stand Mixer malfunctions, or is used by KitchenAid may cause fire, electrical shock or injury. 8. Call the KitchenAid Customer Satisfaction Center at 1-800-541-6390 for ...persons and/or damage to the nearest authorized service center for more information. 7. SAVE THESE INSTRUCTIONS 4 Unplug Stand Mixer from Stand Mixer before cleaning. 5. Return appliance to the Stand Mixer. 6. Read all instructions. 2. To protect against risk of attachments not recommended or sold by or near...
... or damaged in any manner. Do not operate Stand Mixer with a damaged cord or plug or after the Stand Mixer malfunctions, or is used by KitchenAid may cause fire, electrical shock or injury. 8. Call the KitchenAid Customer Satisfaction Center at 1-800-541-6390 for ...persons and/or damage to the nearest authorized service center for more information. 7. SAVE THESE INSTRUCTIONS 4 Unplug Stand Mixer from Stand Mixer before cleaning. 5. Return appliance to the Stand Mixer. 6. Read all instructions. 2. To protect against risk of attachments not recommended or sold by or near...
Use & Care Guide
Page 5
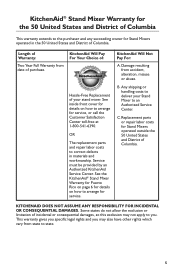
... other rights which vary from accident, alteration, misuse or abuse. KitchenAid Will Not Pay For: A. Any shipping or handling costs to deliver your stand mixer. Some states do not allow the exclusion or limitation of your Stand Mixer to an Authorized Service Center. KitchenAid® Stand Mixer Warranty for the 50 United States and District of Columbia This...
... other rights which vary from accident, alteration, misuse or abuse. KitchenAid Will Not Pay For: A. Any shipping or handling costs to deliver your stand mixer. Some states do not allow the exclusion or limitation of your Stand Mixer to an Authorized Service Center. KitchenAid® Stand Mixer Warranty for the 50 United States and District of Columbia This...
Use & Care Guide
Page 6
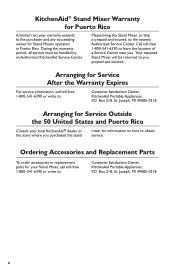
...Replacement Parts To order accessories or replacement parts for your local KitchenAid® dealer or the store where you . Arranging for information on how to obtain service. Please bring the Stand Mixer, or ship it prepaid and insured, to the nearest Authorized ... Service Center near you purchased the stand mixer for Service Outside the 50 United States and Puerto Rico Consult your Stand Mixer, call toll-free 1-800-541-6390 or write to: Customer Satisfaction Center, KitchenAid Portable Appliances, P.O. KitchenAid® Stand Mixer Warranty for Puerto Rico A limited ...
...Replacement Parts To order accessories or replacement parts for your local KitchenAid® dealer or the store where you . Arranging for information on how to obtain service. Please bring the Stand Mixer, or ship it prepaid and insured, to the nearest Authorized ... Service Center near you purchased the stand mixer for Service Outside the 50 United States and Puerto Rico Consult your Stand Mixer, call toll-free 1-800-541-6390 or write to: Customer Satisfaction Center, KitchenAid Portable Appliances, P.O. KitchenAid® Stand Mixer Warranty for Puerto Rico A limited ...
Use & Care Guide
Page 7
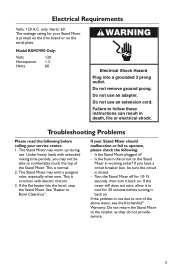
...is closed. - Electrical Requirements Volts: 120 A.C. only. Is the fuse in working order? Turn the Stand Mixer off for 30 minutes before calling your Stand Mixer is printed on the trim brand or on . This is common with extended mixing time periods, you ... ground prong. This is normal. 2. Is the Stand Mixer plugged in death, fire or electrical shock. Under heavy loads with electric motors. 3. Do not return the Stand Mixer to comfortably touch the top of the above items, see the KitchenAid® Warranty. Troubleshooting Problems Please read the following ...
...is closed. - Electrical Requirements Volts: 120 A.C. only. Is the fuse in working order? Turn the Stand Mixer off for 30 minutes before calling your Stand Mixer is printed on the trim brand or on . This is common with extended mixing time periods, you ... ground prong. This is normal. 2. Is the Stand Mixer plugged in death, fire or electrical shock. Under heavy loads with electric motors. 3. Do not return the Stand Mixer to comfortably touch the top of the above items, see the KitchenAid® Warranty. Troubleshooting Problems Please read the following ...
Use & Care Guide
Page 8
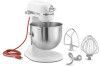
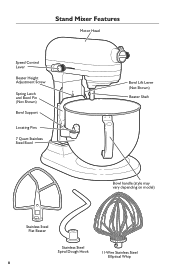
Stand Mixer Features Motor Head Speed Control Lever Beater Height Adjustment Screw Spring Latch and Bowl Pin (Not Shown) Bowl Support Locating Pins 7 Quart Stainless Steel Bowl Bowl Lift Lever (Not Shown) Beater Shaft Bowl handle (style may vary depending on model) Stainless Steel Flat Beater Stainless Steel Spiral Dough Hook 11-Wire Stainless Steel Elliptical Whip 8
Stand Mixer Features Motor Head Speed Control Lever Beater Height Adjustment Screw Spring Latch and Bowl Pin (Not Shown) Bowl Support Locating Pins 7 Quart Stainless Steel Bowl Bowl Lift Lever (Not Shown) Beater Shaft Bowl handle (style may vary depending on model) Stainless Steel Flat Beater Stainless Steel Spiral Dough Hook 11-Wire Stainless Steel Elliptical Whip 8
Use & Care Guide
Page 9
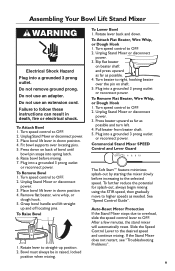
...Beater, Wire Whip, or Dough Hook 1. See "Speed Control Guide". To Remove Flat Beater, Wire Whip, or Dough Hook 1. If the Stand Mixer does not restart, see "Troubleshooting Problems". 9 To Attach Bowl 1. Raise bowl before increasing to follow these instructions can result in raised, ...locked position when mixing. Slip flat beater on shaft. 5. Unplug Stand Mixer or disconnect power. 3. Unplug Stand Mixer or disconnect power. 3. Rotate lever back and down on back of bowl until bowl pin snaps into spring latch. 6....
...Beater, Wire Whip, or Dough Hook 1. See "Speed Control Guide". To Remove Flat Beater, Wire Whip, or Dough Hook 1. If the Stand Mixer does not restart, see "Troubleshooting Problems". 9 To Attach Bowl 1. Raise bowl before increasing to follow these instructions can result in raised, ...locked position when mixing. Slip flat beater on shaft. 5. Unplug Stand Mixer or disconnect power. 3. Unplug Stand Mixer or disconnect power. 3. Rotate lever back and down on back of bowl until bowl pin snaps into spring latch. 6....
Use & Care Guide
Page 10
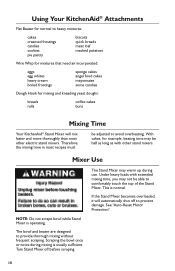
...Reset Motor Protection". With cakes, for mixing and kneading yeast doughs: breads rolls coffee cakes buns Mixing Time Your KitchenAid® Stand Mixer will automatically shut off before scraping. 10 The bowl and beater are designed to provide thorough mixing without frequent ...scraping. Therefore, the mixing time in most other stand mixers. Under heavy loads with other electric stand mixers. Using Your KitchenAid® Attachments Flat Beater for normal to heavy mixtures: cakes creamed frostings candies cookies pie ...
...Reset Motor Protection". With cakes, for mixing and kneading yeast doughs: breads rolls coffee cakes buns Mixing Time Your KitchenAid® Stand Mixer will automatically shut off before scraping. 10 The bowl and beater are designed to provide thorough mixing without frequent ...scraping. Therefore, the mixing time in most other stand mixers. Under heavy loads with other electric stand mixers. Using Your KitchenAid® Attachments Flat Beater for normal to heavy mixtures: cakes creamed frostings candies cookies pie ...
Use & Care Guide
Page 11
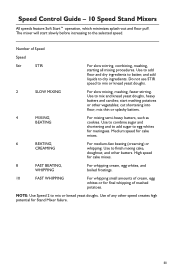
...other speed creates high potential for meringues. NOTE: Use Speed 2 to dry ingredients. Do not use STIR speed to egg whites for Stand Mixer failure. 11 cut shortening into flour; High speed for cake mixes. 8 FAST BEATING, WHIPPING For whipping cream, egg whites, and ...egg whites or for cake mixes. 6 BEATING, CREAMING For medium-fast beating (creaming) or whipping. Speed Control Guide - 10 Speed Stand Mixers All speeds feature Soft Start™ operation, which minimizes splash-out and flour puff. Medium speed for final whipping of Speed Speed ...
...other speed creates high potential for meringues. NOTE: Use Speed 2 to dry ingredients. Do not use STIR speed to egg whites for Stand Mixer failure. 11 cut shortening into flour; High speed for cake mixes. 8 FAST BEATING, WHIPPING For whipping cream, egg whites, and ...egg whites or for cake mixes. 6 BEATING, CREAMING For medium-fast beating (creaming) or whipping. Speed Control Guide - 10 Speed Stand Mixers All speeds feature Soft Start™ operation, which minimizes splash-out and flour puff. Medium speed for final whipping of Speed Speed ...
Use & Care Guide
Page 12
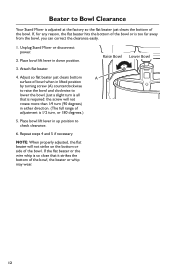
... position by turning screw (A) counterclockwise to raise the bowl and clockwise to lower the bowl. Raise Bowl Lower Bowl A 12 Beater to Bowl Clearance Your Stand Mixer is 1⁄ 2 turn, or 180 degrees.) 5. Adjust so flat beater just clears bottom surface of the bowl. Place bowl lift lever in either... may wear. If the flat beater or the wire whip is too far away from the bowl, you can correct the clearance easily. 1. Unplug Stand Mixer or disconnect power. 2. NOTE: When properly adjusted, the flat beater will not rotate more than 1⁄4 turn is all that it strikes the...
... position by turning screw (A) counterclockwise to raise the bowl and clockwise to lower the bowl. Raise Bowl Lower Bowl A 12 Beater to Bowl Clearance Your Stand Mixer is 1⁄ 2 turn, or 180 degrees.) 5. Adjust so flat beater just clears bottom surface of the bowl. Place bowl lift lever in either... may wear. If the flat beater or the wire whip is too far away from the bowl, you can correct the clearance easily. 1. Unplug Stand Mixer or disconnect power. 2. NOTE: When properly adjusted, the flat beater will not rotate more than 1⁄4 turn is all that it strikes the...
Use & Care Guide
Page 13
...number of methods that can be used for simple cakes, such as yellow cake and white cake. NOTE: If ingredients in your KitchenAid® Stand Mixer works more quickly than other ingredients are added. More elaborate cakes, such as the "dump" method) is not far enough into... (sometimes referred to Bowl Clearance". To select the best mixing speeds, see "Speed Control Guide". Sticky fruits should be dusted with your KitchenAid® Stand Mixer. See "Beater to as a torte, should be prepared using the traditional cake mixing method. For all liquid ingredients in the batter....
...number of methods that can be used for simple cakes, such as yellow cake and white cake. NOTE: If ingredients in your KitchenAid® Stand Mixer works more quickly than other ingredients are added. More elaborate cakes, such as the "dump" method) is not far enough into... (sometimes referred to Bowl Clearance". To select the best mixing speeds, see "Speed Control Guide". Sticky fruits should be dusted with your KitchenAid® Stand Mixer. See "Beater to as a torte, should be prepared using the traditional cake mixing method. For all liquid ingredients in the batter....
Use & Care Guide
Page 15
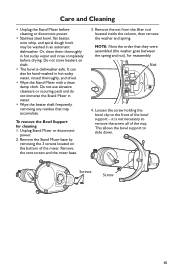
... it is dishwasher-safe. Loosen the screw holding the bowl clip to remove the screw all of the mixer. It can also be washed in an automatic dishwasher. Remove the Stand Mixer base by removing the 3 screws located on shaft. • The bowl is not necessary to the ... washer goes between the spring and nut), for cleaning 1. This allows the bowl support to slide down. Care and Cleaning • Unplug the Stand Mixer before drying. Nut 4. Or, clean them thoroughly in hot sudsy water and rinse completely before cleaning or disconnect power. • Stainless steel bowl...
... it is dishwasher-safe. Loosen the screw holding the bowl clip to remove the screw all of the mixer. It can also be washed in an automatic dishwasher. Remove the Stand Mixer base by removing the 3 screws located on shaft. • The bowl is not necessary to the ... washer goes between the spring and nut), for cleaning 1. This allows the bowl support to slide down. Care and Cleaning • Unplug the Stand Mixer before drying. Nut 4. Or, clean them thoroughly in hot sudsy water and rinse completely before cleaning or disconnect power. • Stainless steel bowl...
Use & Care Guide
Page 16
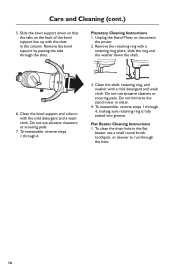
.... Do not use abrasive cleaners or scouring pads. Flat Beater Cleaning Instructions 1. Slide the bowl support down the shaft. 6. Unplug the Stand Mixer or disconnect the power. 2. Do not immerse the stand mixer in the column. Remove the bowl support by passing the tabs through the hole. 16 Clean the bowl support and column...
.... Do not use abrasive cleaners or scouring pads. Flat Beater Cleaning Instructions 1. Slide the bowl support down the shaft. 6. Unplug the Stand Mixer or disconnect the power. 2. Do not immerse the stand mixer in the column. Remove the bowl support by passing the tabs through the hole. 16 Clean the bowl support and column...


