Use & Care Guide
Page 3
... Rico 6 Ordering Accessories and Replacement Parts 6 Electrical Requirements...7 Troubleshooting Problems...7 Stand Mixer Features...8 Assembling Your Stand Mixer...9 Using Your KitchenAid® Attachments 10 Mixing Time...10 Mixer Use...10 Speed Control Guide - 10 Speed Mixers 11 Beater To Bowl Clearance...12 Mixing Tips...13 Basic White Bread...14 Care And Cleaning...15 3
... Rico 6 Ordering Accessories and Replacement Parts 6 Electrical Requirements...7 Troubleshooting Problems...7 Stand Mixer Features...8 Assembling Your Stand Mixer...9 Using Your KitchenAid® Attachments 10 Mixing Time...10 Mixer Use...10 Speed Control Guide - 10 Speed Mixers 11 Beater To Bowl Clearance...12 Mixing Tips...13 Basic White Bread...14 Care And Cleaning...15 3
Use & Care Guide
Page 7
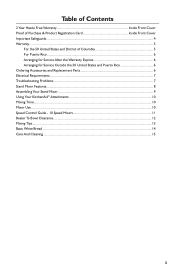
...the retailer, as they do not provide service. 7 Do not return the Stand Mixer to Bowl Clearance". The Stand Mixer may warm up during use an adapter. If the flat beater hits the bowl, stop the Stand Mixer. If you may emit a pungent odor, especially when new. If ...heavy loads with electric motors. 3. Do not remove ground prong. This is not due to comfortably touch the top of the above items, see the KitchenAid® Warranty. Is the Stand Mixer plugged in? - Troubleshooting Problems Please read the following : - Electrical Requirements Volts: 120 A.C. only. Do not...
...the retailer, as they do not provide service. 7 Do not return the Stand Mixer to Bowl Clearance". The Stand Mixer may warm up during use an adapter. If the flat beater hits the bowl, stop the Stand Mixer. If you may emit a pungent odor, especially when new. If ...heavy loads with electric motors. 3. Do not remove ground prong. This is not due to comfortably touch the top of the above items, see the KitchenAid® Warranty. Is the Stand Mixer plugged in? - Troubleshooting Problems Please read the following : - Electrical Requirements Volts: 120 A.C. only. Do not...
Use & Care Guide
Page 8
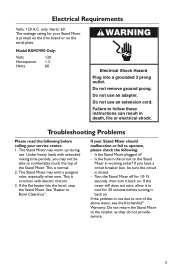
Stand Mixer Features Motor Head Speed Control Lever Beater Height Adjustment Screw Spring Latch and Bowl Pin (Not Shown) Bowl Support Locating Pins 7 Quart Stainless Steel Bowl Bowl Lift Lever (Not Shown) Beater Shaft Bowl handle (style may vary depending on model) Stainless Steel Flat Beater Stainless Steel Spiral Dough Hook 11-Wire Stainless Steel Elliptical Whip 8
Stand Mixer Features Motor Head Speed Control Lever Beater Height Adjustment Screw Spring Latch and Bowl Pin (Not Shown) Bowl Support Locating Pins 7 Quart Stainless Steel Bowl Bowl Lift Lever (Not Shown) Beater Shaft Bowl handle (style may vary depending on model) Stainless Steel Flat Beater Stainless Steel Spiral Dough Hook 11-Wire Stainless Steel Elliptical Whip 8
Use & Care Guide
Page 9
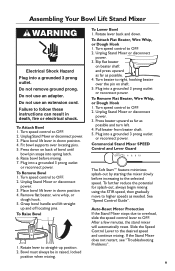
... due to overload, slide the speed control lever to OFF. 2. Press down . Failure to higher speeds as possible and turn left. 4. Place bowl lift lever in down position. 4. Turn speed control to OFF. 2. Pull beater from beater shaft. 5. Plug into a grounded 3 prong outlet ...Whip, or Dough Hook 1. See "Speed Control Guide". If the Stand Mixer does not restart, see "Troubleshooting Problems". 9 To Attach Bowl 1. Place bowl lift lever in down position 4. Turn speed control to the desired speed and continue mixing. Slide the Speed Control Lever to OFF. ...
... due to overload, slide the speed control lever to OFF. 2. Press down . Failure to higher speeds as possible and turn left. 4. Place bowl lift lever in down position. 4. Turn speed control to OFF. 2. Pull beater from beater shaft. 5. Plug into a grounded 3 prong outlet ...Whip, or Dough Hook 1. See "Speed Control Guide". If the Stand Mixer does not restart, see "Troubleshooting Problems". 9 To Attach Bowl 1. Place bowl lift lever in down position 4. Turn speed control to the desired speed and continue mixing. Slide the Speed Control Lever to OFF. ...
Use & Care Guide
Page 10
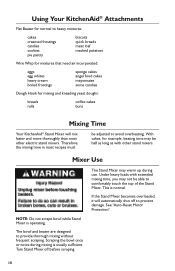
...and more thoroughly than most recipes must be able to comfortably touch the top of the Stand Mixer. NOTE: Do not scrape bowl while Stand Mixer is usually sufficient. Therefore, the mixing time in most other stand mixers. Under heavy loads with other electric stand...yeast doughs: breads rolls coffee cakes buns Mixing Time Your KitchenAid® Stand Mixer will automatically shut off before scraping. 10 The bowl and beater are designed to provide thorough mixing without frequent scraping. Using Your KitchenAid® Attachments Flat Beater for normal to heavy mixtures: ...
...and more thoroughly than most recipes must be able to comfortably touch the top of the Stand Mixer. NOTE: Do not scrape bowl while Stand Mixer is usually sufficient. Therefore, the mixing time in most other stand mixers. Under heavy loads with other electric stand...yeast doughs: breads rolls coffee cakes buns Mixing Time Your KitchenAid® Stand Mixer will automatically shut off before scraping. 10 The bowl and beater are designed to provide thorough mixing without frequent scraping. Using Your KitchenAid® Attachments Flat Beater for normal to heavy mixtures: ...
Use & Care Guide
Page 12
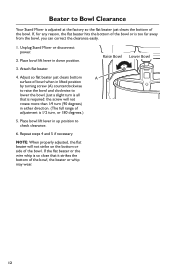
... or the wire whip is so close that is required: the screw will not strike on the bottom or side of the bowl, the beater or whip may wear. Place bowl lift lever in up position to check clearance. 6. Just a slight turn is all that it strikes the bottom of the... bowl. Attach flat beater. 4. Raise Bowl Lower Bowl A 12 NOTE: When properly adjusted, the flat beater will not rotate more than 1⁄4 turn (90 degrees) in lifted position by turning screw (A) counterclockwise to...
... or the wire whip is so close that is required: the screw will not strike on the bottom or side of the bowl, the beater or whip may wear. Place bowl lift lever in up position to check clearance. 6. Just a slight turn is all that it strikes the bottom of the... bowl. Attach flat beater. 4. Raise Bowl Lower Bowl A 12 NOTE: When properly adjusted, the flat beater will not rotate more than 1⁄4 turn (90 degrees) in lifted position by turning screw (A) counterclockwise to...
Use & Care Guide
Page 13
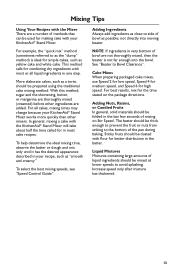
... not thoroughly mixed, then the beater is ideal for simple cakes, such as possible, not directly into the bowl. Sticky fruits should be mixed at lower speeds to Bowl Clearance". Cake Mixes When preparing packaged cake mixes, use Speed 2 for low speed, Speed 4 for medium speed, and ... will take about half the time called for in most or all cakes, mixing times may change because your KitchenAid® Stand Mixer. In general, mixing a cake with your KitchenAid® Stand Mixer works more quickly than other ingredients are added. For best results, mix for high speed...
... not thoroughly mixed, then the beater is ideal for simple cakes, such as possible, not directly into the bowl. Sticky fruits should be mixed at lower speeds to Bowl Clearance". Cake Mixes When preparing packaged cake mixes, use Speed 2 for low speed, Speed 4 for medium speed, and ... will take about half the time called for in most or all cakes, mixing times may change because your KitchenAid® Stand Mixer. In general, mixing a cake with your KitchenAid® Stand Mixer works more quickly than other ingredients are added. For best results, mix for high speed...
Use & Care Guide
Page 14
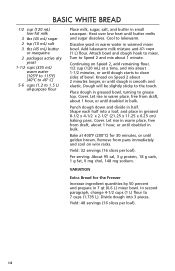
...: About 95 cal, 3 g protein, 18 g carb, 1 g fat, 0 mg chol, 148 mg sodium. Divide dough into a loaf, and place in greased bowl, turning to lukewarm. Let rise in 7 qt (6.6 L) mixer bowl. Yield: 48 servings (16 slices per loaf). Cover. Shape each half into 3 pieces. Cool to grease top. Attach... L) flour to 1.5 L) all-purpose flour Place milk, sugar, salt, and butter in bulk. Let rise in bulk. Punch dough down and divide in warmed mixer bowl. Basic White Bread 1/2 cup (120 mL) low-fat milk 3 tbs (45 mL) sugar 2 tsp (10 mL) salt 3 tbs (45 mL) butter or margarine...
...: About 95 cal, 3 g protein, 18 g carb, 1 g fat, 0 mg chol, 148 mg sodium. Divide dough into a loaf, and place in greased bowl, turning to lukewarm. Let rise in 7 qt (6.6 L) mixer bowl. Yield: 48 servings (16 slices per loaf). Cover. Shape each half into 3 pieces. Cool to grease top. Attach... L) flour to 1.5 L) all-purpose flour Place milk, sugar, salt, and butter in bulk. Let rise in bulk. Punch dough down and divide in warmed mixer bowl. Basic White Bread 1/2 cup (120 mL) low-fat milk 3 tbs (45 mL) sugar 2 tsp (10 mL) salt 3 tbs (45 mL) butter or margarine...
Use & Care Guide
Page 15
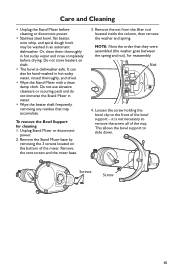
... nut from the lifter rod located inside the column, then remove the washer and spring. it is dishwasher-safe. This allows the bowl support to the front of the bowl support - It can also be washed in hot sudsy water, rinsed thoroughly, and dried. • Wipe the Stand Mixer with a clean ... or scouring pads and do not immerse the Stand Mixer in hot sudsy water and rinse completely before cleaning or disconnect power. • Stainless steel bowl, flat beater, wire whip, and spiral dough hook may accumulate. Remove the Stand Mixer base by removing the 3 screws located on shaft. • The...
... nut from the lifter rod located inside the column, then remove the washer and spring. it is dishwasher-safe. This allows the bowl support to the front of the bowl support - It can also be washed in hot sudsy water, rinsed thoroughly, and dried. • Wipe the Stand Mixer with a clean ... or scouring pads and do not immerse the Stand Mixer in hot sudsy water and rinse completely before cleaning or disconnect power. • Stainless steel bowl, flat beater, wire whip, and spiral dough hook may accumulate. Remove the Stand Mixer base by removing the 3 screws located on shaft. • The...
Use & Care Guide
Page 16
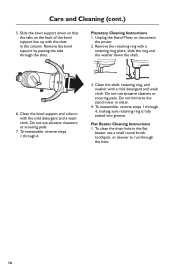
... 1. To clean the drain hole in the flat beater, use a small round brush, toothpick, or skewer to run through the slots. Remove the bowl support by passing the tabs through the hole. 16 Remove the retaining ring with the slots in water. 4. To reassemble, reverse steps 1 through 4,... steps 1 through 6. 3. Unplug the Stand Mixer or disconnect the power. 2. Care and Cleaning (cont.) 5. Slide the bowl support down so that the tabs on the back of the bowl support line up with a retaining ring pliers, slide the ring and the washer down the shaft. 6. Do not use abrasive...
... 1. To clean the drain hole in the flat beater, use a small round brush, toothpick, or skewer to run through the slots. Remove the bowl support by passing the tabs through the hole. 16 Remove the retaining ring with the slots in water. 4. To reassemble, reverse steps 1 through 4,... steps 1 through 6. 3. Unplug the Stand Mixer or disconnect the power. 2. Care and Cleaning (cont.) 5. Slide the bowl support down so that the tabs on the back of the bowl support line up with a retaining ring pliers, slide the ring and the washer down the shaft. 6. Do not use abrasive...


