
Owners Manual 1
Page 2
W11368487C.indb 2 3/9/2020 1:06:28 PM Also available as an optional accessory. **The Bowl design and material depend on the Stand Mixer model. PARTS AND FEATURES 3 2 10 4 1 5 9 11 8 6 7 12 13 14 15 1 Motor Head (locking lever not shown) 2 Attachment Knob 3 Attachment Hub 4 Motor Head 5 Speed Control Lever 6 Beater Height Adjustment Screw (not shown) 7 Bowl Clamping Plate 8 Bowl** 9 Beater Shaft 10 Pouring shield* 11 2.8 L Stainless Steel Bowl* 12 Flat Beater 13 Flex Edge Beater* 14 Wire Whip 15 Dough Hook *Included with select models only.
W11368487C.indb 2 3/9/2020 1:06:28 PM Also available as an optional accessory. **The Bowl design and material depend on the Stand Mixer model. PARTS AND FEATURES 3 2 10 4 1 5 9 11 8 6 7 12 13 14 15 1 Motor Head (locking lever not shown) 2 Attachment Knob 3 Attachment Hub 4 Motor Head 5 Speed Control Lever 6 Beater Height Adjustment Screw (not shown) 7 Bowl Clamping Plate 8 Bowl** 9 Beater Shaft 10 Pouring shield* 11 2.8 L Stainless Steel Bowl* 12 Flat Beater 13 Flex Edge Beater* 14 Wire Whip 15 Dough Hook *Included with select models only.

Owners Manual 1
Page 3
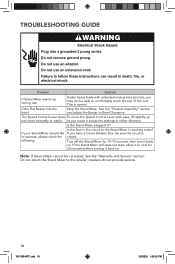
...shock, do not play with reduced physical, sensory, or mental capabilities, or lack of experience and knowledge, unless they do not put Stand Mixer in use of injury to persons and/or damage to reduce the risk of the appliance by persons (including children) with the appliance. 4.... be followed, including the following: 1. Read all instructions. 2. To unplug, grasp the plug and pull from beater during operation to the Stand Mixer. 6. Close supervision is necessary when any appliance with a damaged cord or plug or after the appliance malfunctions, or is not intended for use ...
...shock, do not play with reduced physical, sensory, or mental capabilities, or lack of experience and knowledge, unless they do not put Stand Mixer in use of injury to persons and/or damage to reduce the risk of the appliance by persons (including children) with the appliance. 4.... be followed, including the following: 1. Read all instructions. 2. To unplug, grasp the plug and pull from beater during operation to the Stand Mixer. 6. Close supervision is necessary when any appliance with a damaged cord or plug or after the appliance malfunctions, or is not intended for use ...

Owners Manual 1
Page 4
...serial plate. Breads, rolls, pizza dough, buns. *Included with select models only. SAVE THESE INSTRUCTIONS This product is designed for your Stand Mixer is too short, have a qualified electrician or service technician install an outlet near the appliance. GETTING STARTED CHOOSING THE RIGHT ACCESSORY Accessories Flat...the cord hang over the edge of table or counter. 10. Remove the beaters, wire whip, or dough hook from the Stand Mixer before washing. If the power supply cord is printed on the attachment that need air incorporated Mixing and kneading yeast doughs Suggested items ...
...serial plate. Breads, rolls, pizza dough, buns. *Included with select models only. SAVE THESE INSTRUCTIONS This product is designed for your Stand Mixer is too short, have a qualified electrician or service technician install an outlet near the appliance. GETTING STARTED CHOOSING THE RIGHT ACCESSORY Accessories Flat...the cord hang over the edge of table or counter. 10. Remove the beaters, wire whip, or dough hook from the Stand Mixer before washing. If the power supply cord is printed on the attachment that need air incorporated Mixing and kneading yeast doughs Suggested items ...

Owners Manual 1
Page 5
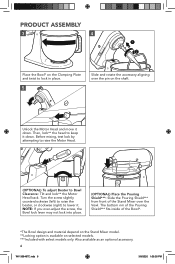
..., combining, and mashing. Mixing, beating For mixing semi-heavy batters, such as cookies, or to the Stand Mixer. Medium speed for cake mixes. High speed for cake mixes. PRODUCT ASSEMBLY 1 2 Unplug and turn the Stand Mixer "OFF/0". For slow mixing, mashing, and faster stirring. Unlock and lift the Motor Head. Do not...
..., combining, and mashing. Mixing, beating For mixing semi-heavy batters, such as cookies, or to the Stand Mixer. Medium speed for cake mixes. High speed for cake mixes. PRODUCT ASSEMBLY 1 2 Unplug and turn the Stand Mixer "OFF/0". For slow mixing, mashing, and faster stirring. Unlock and lift the Motor Head. Do not...
Owners Manual 1
Page 6
... the Motor Head and move it down . NOTE: If you over the Vowl. The bottom rim of the Pouring Shield*** fits inside of the Stand Mixer over -adjust the screw, the Bowl lock lever may not lock into place. (OPTIONAL) Place the Pouring Shield***: Slide the Pouring Shield*** from front of...
... the Motor Head and move it down . NOTE: If you over the Vowl. The bottom rim of the Pouring Shield*** fits inside of the Stand Mixer over -adjust the screw, the Bowl lock lever may not lock into place. (OPTIONAL) Place the Pouring Shield***: Slide the Pouring Shield*** from front of...

Owners Manual 1
Page 7
Scraping the Bowl* once or twice during mixing is usually sufficient. (OPTIONAL): Pour ingredients into a grounded 3 prong outlet. ENGLISH PRODUCT USAGE 1 Plug it gradually. W11368487C.indb 7 7 3/9/2020 1:06:31 PM Refer to avoid splashing and increase it into the Bowl* through the Pouring Chute. *The Bowl design and material depend on the Stand Mixer model. Start with lower speed to the "Speed Control Guide". 2 Do not scrape the Bowl* while operating.
Scraping the Bowl* once or twice during mixing is usually sufficient. (OPTIONAL): Pour ingredients into a grounded 3 prong outlet. ENGLISH PRODUCT USAGE 1 Plug it gradually. W11368487C.indb 7 7 3/9/2020 1:06:31 PM Refer to avoid splashing and increase it into the Bowl* through the Pouring Chute. *The Bowl design and material depend on the Stand Mixer model. Start with lower speed to the "Speed Control Guide". 2 Do not scrape the Bowl* while operating.

Owners Manual 1
Page 8
Pull away from the Stand Mixer. 3 Press the accessory upward, turn the Stand Mixer "OFF/0". OPTIONAL ATTACHMENTS KitchenAid® offers a wide range of the Bowl***. Unlock and lift the Motor Head. Then, lock* the head to unlock the Bowl*** ...from the Beater Shaft. Remove the Attachment Hub cover. *Locking option is available on the Stand Mixer model. 8 W11368487C.indb ...
Pull away from the Stand Mixer. 3 Press the accessory upward, turn the Stand Mixer "OFF/0". OPTIONAL ATTACHMENTS KitchenAid® offers a wide range of the Bowl***. Unlock and lift the Motor Head. Then, lock* the head to unlock the Bowl*** ...from the Beater Shaft. Remove the Attachment Hub cover. *Locking option is available on the Stand Mixer model. 8 W11368487C.indb ...

Owners Manual 1
Page 9
... 3 Dishwasher-safe parts, top rack only: Stainless Steel Bowl, Bowl Lid, Flat Beater, Dough Hook, Flex Edge Beater*, and Pouring Shield*. 4 Wipe the Stand Mixer body with select models only. Also available as an optional accessory. 9 W11368487C.indb 9 3/9/2020 1:06:32 PM ENGLISH OPTIONAL ATTACHMENTS 3 4 Insert attachment into Attachment Hub... fits into the square Attachment Hub socket. Tighten the Attachment Knob by turning it clockwise until the attachment is secured to the Stand Mixer. Clean the Wire Whip thoroughly with hand wash only. *Included with a soft, damp cloth.
... 3 Dishwasher-safe parts, top rack only: Stainless Steel Bowl, Bowl Lid, Flat Beater, Dough Hook, Flex Edge Beater*, and Pouring Shield*. 4 Wipe the Stand Mixer body with select models only. Also available as an optional accessory. 9 W11368487C.indb 9 3/9/2020 1:06:32 PM ENGLISH OPTIONAL ATTACHMENTS 3 4 Insert attachment into Attachment Hub... fits into the square Attachment Hub socket. Tighten the Attachment Knob by turning it clockwise until the attachment is secured to the Stand Mixer. Clean the Wire Whip thoroughly with hand wash only. *Included with a soft, damp cloth.
Owners Manual 1
Page 10
... 10 W11368487C.indb 10 3/9/2020 1:06:32 PM Do not use an extension cord. This is closed. Do not return the Stand Mixer to the Stand Mixer in working order? The Speed Control Lever does To move the Speed Control Lever with extended mixing time periods, you move smoothly or ... and adjust the Beater to follow these instructions can result in ? Failure to Bowl Clearance. Do not remove ground prong. Problem Solution If Stand Mixer warms up during use: Under heavy loads with ease, lift slightly up not move it across the settings in the circuit to the retailer; Is...
... 10 W11368487C.indb 10 3/9/2020 1:06:32 PM Do not use an extension cord. This is closed. Do not return the Stand Mixer to the Stand Mixer in working order? The Speed Control Lever does To move the Speed Control Lever with extended mixing time periods, you move smoothly or ... and adjust the Beater to follow these instructions can result in ? Failure to Bowl Clearance. Do not remove ground prong. Problem Solution If Stand Mixer warms up during use: Under heavy loads with ease, lift slightly up not move it across the settings in the circuit to the retailer; Is...

Owners Manual 1
Page 11
...06:32 PM Service must be provided by an Authorized KitchenAid Service Center. Repairs when your Stand Mixer. C. D. KitchenAid Will Not Pay for Stand Mixer attachments operated outside the 50 United States, District of your Stand Mixer is used in other rights which vary from state ... page for details on how to the purchaser and any succeeding owner for Stand Mixers operated in materials and workmanship. Replacement parts or repair labor costs for : A. KITCHENAID AND KITCHENAID CANADA DO NOT ASSUME ANY RESPONSIBILITY FOR INCIDENTAL OR CONSEQUENTIAL DAMAGES. ENGLISH WARRANTY AND...
...06:32 PM Service must be provided by an Authorized KitchenAid Service Center. Repairs when your Stand Mixer. C. D. KitchenAid Will Not Pay for Stand Mixer attachments operated outside the 50 United States, District of your Stand Mixer is used in other rights which vary from state ... page for details on how to the purchaser and any succeeding owner for Stand Mixers operated in materials and workmanship. Replacement parts or repair labor costs for : A. KITCHENAID AND KITCHENAID CANADA DO NOT ASSUME ANY RESPONSIBILITY FOR INCIDENTAL OR CONSEQUENTIAL DAMAGES. ENGLISH WARRANTY AND...

Owners Manual 1
Page 12
... AND PUERTO RICO We're so confident the quality of our products meets the exacting standards of KitchenAid that , if your Stand Mixer should fail within the first year of ownership, KitchenAid will arrange to deliver an identical or comparable replacement to your door free of charge and arrange to...WARRANTY-CANADA We're so confident the quality of our products meets the exacting standards of the KitchenAid brand that , if your Stand Mixer should fail within the first year of the Stand Mixer are trademarks in Canada. 12 W11368487C.indb 12 3/9/2020 1:06:32 PM ARRANGING FOR SERVICE ...
... AND PUERTO RICO We're so confident the quality of our products meets the exacting standards of KitchenAid that , if your Stand Mixer should fail within the first year of ownership, KitchenAid will arrange to deliver an identical or comparable replacement to your door free of charge and arrange to...WARRANTY-CANADA We're so confident the quality of our products meets the exacting standards of the KitchenAid brand that , if your Stand Mixer should fail within the first year of the Stand Mixer are trademarks in Canada. 12 W11368487C.indb 12 3/9/2020 1:06:32 PM ARRANGING FOR SERVICE ...
Owners Manual
Page 3
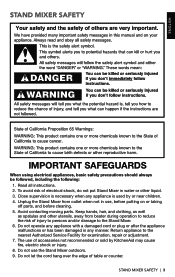
...not recommended or sold by or near children. 4. STAND MIXER SAFETY | 3 Close supervision is used by KitchenAid may cause fire, electric shock or injury. 8. The use the Stand Mixer outdoors. 9. Unplug the Stand Mixer from beater during operation to the nearest Authorized Service Facility ... appliance malfunctions or has been damaged in use, before putting on or taking off parts, and before cleaning. 5. ENGLISH STAND MIXER SAFETY IMPORTANT SAFEGUARDS When using electrical appliances, basic safety precautions should always be followed, including the following: 1. Read all instructions....
...not recommended or sold by or near children. 4. STAND MIXER SAFETY | 3 Close supervision is used by KitchenAid may cause fire, electric shock or injury. 8. The use the Stand Mixer outdoors. 9. Unplug the Stand Mixer from beater during operation to the nearest Authorized Service Facility ... appliance malfunctions or has been damaged in use, before putting on or taking off parts, and before cleaning. 5. ENGLISH STAND MIXER SAFETY IMPORTANT SAFEGUARDS When using electrical appliances, basic safety precautions should always be followed, including the following: 1. Read all instructions....

Owners Manual
Page 4
...use only. If the power supply cord is based on the serial plate. Other recommended attachments may draw significantly less power. 4 | STAND MIXER SAFETY STAND MIXER SAFETY 10. Do not let the cord contact hot surfaces, including the stove. 11. Remove the flat beater, wire whip, or spiral... dough hook from the Stand Mixer before washing. SAVE THESE INSTRUCTIONS This product is designed for your Stand Mixer is printed on the attachment that draws the greatest load (power). ELECTRICAL REQUIREMENTS Voltage: 120 V Frequency: ...
...use only. If the power supply cord is based on the serial plate. Other recommended attachments may draw significantly less power. 4 | STAND MIXER SAFETY STAND MIXER SAFETY 10. Do not let the cord contact hot surfaces, including the stove. 11. Remove the flat beater, wire whip, or spiral... dough hook from the Stand Mixer before washing. SAVE THESE INSTRUCTIONS This product is designed for your Stand Mixer is printed on the attachment that draws the greatest load (power). ELECTRICAL REQUIREMENTS Voltage: 120 V Frequency: ...
Owners Manual
Page 5
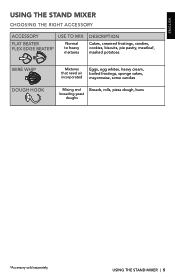
ENGLISH USING THE STAND MIXER CHOOSING THE RIGHT ACCESSORY ACCESSORY USE TO MIX FLAT BEATER FLEX EDGE BEATER* Normal to heavy mixtures DESCRIPTION Cakes, creamed frostings, candies, cookies, biscuits, pie pastry, meatloaf, mashed potatoes WIRE WHIP DOUGH HOOK Mixtures that need air incorporated Eggs, egg whites, heavy cream, boiled frostings, sponge cakes, mayonnaise, some candies Mixing and Breads, rolls, pizza dough, buns kneading yeast doughs *Accessory sold separately USING THE STAND MIXER | 5
ENGLISH USING THE STAND MIXER CHOOSING THE RIGHT ACCESSORY ACCESSORY USE TO MIX FLAT BEATER FLEX EDGE BEATER* Normal to heavy mixtures DESCRIPTION Cakes, creamed frostings, candies, cookies, biscuits, pie pastry, meatloaf, mashed potatoes WIRE WHIP DOUGH HOOK Mixtures that need air incorporated Eggs, egg whites, heavy cream, boiled frostings, sponge cakes, mayonnaise, some candies Mixing and Breads, rolls, pizza dough, buns kneading yeast doughs *Accessory sold separately USING THE STAND MIXER | 5
Owners Manual
Page 6
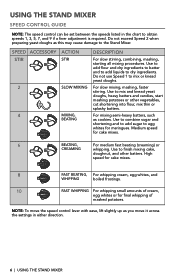
...faster stirring. Use to finish mixing cake, doughnut, and other vegetables, cut shortening into flour, mix thin or splashy batters. Use to the Stand Mixer. SPEED ACCESSORY STIR 2 4 ACTION STIR SLOW MIXING MIXING, BEATING DESCRIPTION For slow stirring, combining, mashing, starting all mixing procedures. Use to add... batters and candies, start mashing potatoes or other batters. Medium speed for final whipping of mashed potatoes. USING THE STAND MIXER SPEED CONTROL GUIDE NOTE: The speed control can be set between the speeds listed in either direction. 6 | USING THE STAND...
...faster stirring. Use to finish mixing cake, doughnut, and other vegetables, cut shortening into flour, mix thin or splashy batters. Use to the Stand Mixer. SPEED ACCESSORY STIR 2 4 ACTION STIR SLOW MIXING MIXING, BEATING DESCRIPTION For slow stirring, combining, mashing, starting all mixing procedures. Use to add... batters and candies, start mashing potatoes or other batters. Medium speed for final whipping of mashed potatoes. USING THE STAND MIXER SPEED CONTROL GUIDE NOTE: The speed control can be set between the speeds listed in either direction. 6 | USING THE STAND...

Owners Manual
Page 7
... upward as far as you move the speed control lever with ease, lift slightly up . USING THE STAND MIXER | 7 ENGLISH USING THE STAND MIXER ASSEMBLING THE STAND MIXER Check to be sure that the Stand 1 Mixer is unplugged, and the speed control is turned to the unlock position 2 and lift the motor head. Raise...
... upward as far as you move the speed control lever with ease, lift slightly up . USING THE STAND MIXER | 7 ENGLISH USING THE STAND MIXER ASSEMBLING THE STAND MIXER Check to be sure that the Stand 1 Mixer is unplugged, and the speed control is turned to the unlock position 2 and lift the motor head. Raise...
Owners Manual
Page 8
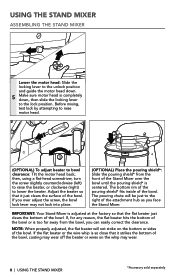
... not lock into place. (OPTIONAL) Place the pouring shield*: Slide the pouring shield* from the bowl, you can easily correct the clearance. IMPORTANT: Your Stand Mixer is adjusted at the factory so that the flat beater just clears the bottom of the bowl or is too far away from the front...) To adjust beater to the right of the attachment hub as you over adjust the screw, the bowl lock lever may wear. 8 | USING THE STAND MIXER *Accessory sold separately The bottom rim of the pouring shield* fits inside of the bowl. NOTE: When properly adjusted, the flat beater will be just...
... not lock into place. (OPTIONAL) Place the pouring shield*: Slide the pouring shield* from the bowl, you can easily correct the clearance. IMPORTANT: Your Stand Mixer is adjusted at the factory so that the flat beater just clears the bottom of the bowl or is too far away from the front...) To adjust beater to the right of the attachment hub as you over adjust the screw, the bowl lock lever may wear. 8 | USING THE STAND MIXER *Accessory sold separately The bottom rim of the pouring shield* fits inside of the bowl. NOTE: When properly adjusted, the flat beater will be just...
Owners Manual
Page 9
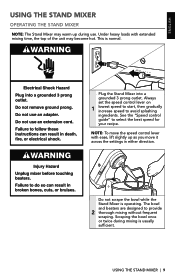
ENGLISH USING THE STAND MIXER OPERATING THE STAND MIXER NOTE: The Stand Mixer may become hot. Always set the speed control lever on 1 lowest speed to start, then gradually increase speed to provide 2 thorough mixing without frequent scraping. ... during mixing is normal. See the "Speed control guide" to select the best speed for your recipe. Do not scrape the bowl while the Stand Mixer is operating. Plug the Stand Mixer into a grounded 3 prong outlet. USING THE STAND...
ENGLISH USING THE STAND MIXER OPERATING THE STAND MIXER NOTE: The Stand Mixer may become hot. Always set the speed control lever on 1 lowest speed to start, then gradually increase speed to provide 2 thorough mixing without frequent scraping. ... during mixing is normal. See the "Speed control guide" to select the best speed for your recipe. Do not scrape the bowl while the Stand Mixer is operating. Plug the Stand Mixer into a grounded 3 prong outlet. USING THE STAND...
Owners Manual
Page 10
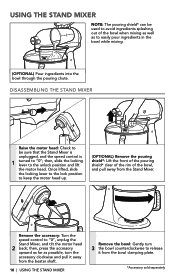
...sold separately Remove the accessory: Turn the speed control to the unlock position and lift the motor head. USING THE STAND MIXER NOTE: The pouring shield* can be sure that the Stand Mixer is unplugged, and the speed control is 1 turned to "0"; then, slide the locking lever to "0", unplug the ... the bowl when mixing as well as possible, turn the accessory clockwise and pull it away from the beater shaft. 10 | USING THE STAND MIXER Remove the bowl: Gently turn 3 the bowl counterclockwise to easily pour ingredients in the bowl while mixing. (OPTIONAL) Pour ingredients into the bowl ...
...sold separately Remove the accessory: Turn the speed control to the unlock position and lift the motor head. USING THE STAND MIXER NOTE: The pouring shield* can be sure that the Stand Mixer is unplugged, and the speed control is 1 turned to "0"; then, slide the locking lever to "0", unplug the ... the bowl when mixing as well as possible, turn the accessory clockwise and pull it away from the beater shaft. 10 | USING THE STAND MIXER Remove the bowl: Gently turn 3 the bowl counterclockwise to easily pour ingredients in the bowl while mixing. (OPTIONAL) Pour ingredients into the bowl ...

Owners Manual
Page 11
... unplugged and the speed control is completely secured 4 to rotate the attachment back and forth. USING THE STAND MIXER | 11 ENGLISH USING THE STAND MIXER OPTIONAL ATTACHMENTS KitchenAid offers a wide range of optional attachments such as shown here. Turn the attachment knob 2 counterclockwise to "0". When it clockwise until the attachment is turned to...
... unplugged and the speed control is completely secured 4 to rotate the attachment back and forth. USING THE STAND MIXER | 11 ENGLISH USING THE STAND MIXER OPTIONAL ATTACHMENTS KitchenAid offers a wide range of optional attachments such as shown here. Turn the attachment knob 2 counterclockwise to "0". When it clockwise until the attachment is turned to...


