
Use & Care Guide
Page 2
...the Warranty Expires - ENGLISH TABLE OF CONTENTS Proof of Purchase and Product Registration 3 Stand Mixer Safety 4 Important Safeguards 4 Electrical Requirements 5 KitchenAid® Stand Mixer Warranty 6 Hassle-Free Replacement Warranty - 50 United States and District of Columbia 7 Hassle-Free Replacement Warranty - All ...Locations 8 How to Bowl Clearance 14 Speed Control Guide 15 Mixing Tips 16 Egg Whites 17 Whipped Cream 17 Attachments and Accessories 18 General Instructions 19 Appetizers and Entrées 60 Yeast Breads and Quick Breads 64 Cakes and Frostings ...
...the Warranty Expires - ENGLISH TABLE OF CONTENTS Proof of Purchase and Product Registration 3 Stand Mixer Safety 4 Important Safeguards 4 Electrical Requirements 5 KitchenAid® Stand Mixer Warranty 6 Hassle-Free Replacement Warranty - 50 United States and District of Columbia 7 Hassle-Free Replacement Warranty - All ...Locations 8 How to Bowl Clearance 14 Speed Control Guide 15 Mixing Tips 16 Egg Whites 17 Whipped Cream 17 Attachments and Accessories 18 General Instructions 19 Appetizers and Entrées 60 Yeast Breads and Quick Breads 64 Cakes and Frostings ...
Use & Care Guide
Page 7
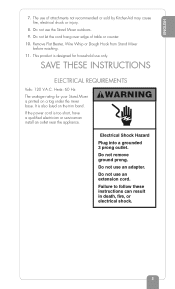
.... Hertz: 60 Hz The wattage rating for household use of table or counter. 10. Do not let the cord hang over edge of attachments not recommended or sold by KitchenAid may cause fire, electrical shock or injury. 8. This product is designed for your Stand Mixer is printed on the trim band...
.... Hertz: 60 Hz The wattage rating for household use of table or counter. 10. Do not let the cord hang over edge of attachments not recommended or sold by KitchenAid may cause fire, electrical shock or injury. 8. This product is designed for your Stand Mixer is printed on the trim band...
Use & Care Guide
Page 12
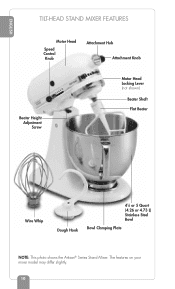
The features on your mixer model may differ slightly. 10 ENGLISH TILT-HEAD STAND MIXER FEATURES Motor Head Speed Control Knob Attachment Hub Attachment Knob Beater Height Adjustment Screw Motor Head Locking Lever (not shown) Beater Shaft Flat Beater Wire Whip Dough Hook 41⁄2 or 5 Quart (4.26 or 4.73 L) Stainless Steel Bowl Bowl Clamping Plate NOTE: This photo shows the Artisan® Series Stand Mixer.
The features on your mixer model may differ slightly. 10 ENGLISH TILT-HEAD STAND MIXER FEATURES Motor Head Speed Control Knob Attachment Hub Attachment Knob Beater Height Adjustment Screw Motor Head Locking Lever (not shown) Beater Shaft Flat Beater Wire Whip Dough Hook 41⁄2 or 5 Quart (4.26 or 4.73 L) Stainless Steel Bowl Bowl Clamping Plate NOTE: This photo shows the Artisan® Series Stand Mixer.
Use & Care Guide
Page 13
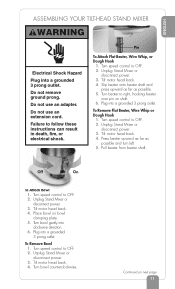
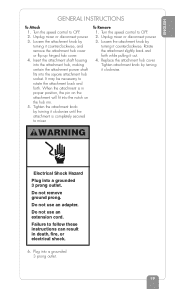
... OFF. 2. To Remove Flat Beater, Wire Whip or Dough Hook 1. Tilt motor head back. 4. Tilt motor head back. 4. Plug into a grounded 3 prong outlet. Pin To Attach Flat Beater, Wire Whip, or Dough Hook 1. Unplug Stand Mixer or disconnect power. 3. Turn speed control to right, hooking beater over pin on shaft. 6. Turn... adapter. Turn bowl gently into a grounded 3 prong outlet. Turn speed control to OFF. 2. Do not remove ground prong. Plug into clockwise direction. 6. Off On To Attach Bowl 1. Continued on bowl clamping plate. 5.
... OFF. 2. To Remove Flat Beater, Wire Whip or Dough Hook 1. Tilt motor head back. 4. Tilt motor head back. 4. Plug into a grounded 3 prong outlet. Pin To Attach Flat Beater, Wire Whip, or Dough Hook 1. Unplug Stand Mixer or disconnect power. 3. Turn speed control to right, hooking beater over pin on shaft. 6. Turn... adapter. Turn bowl gently into a grounded 3 prong outlet. Turn speed control to OFF. 2. Do not remove ground prong. Plug into clockwise direction. 6. Off On To Attach Bowl 1. Continued on bowl clamping plate. 5.
Use & Care Guide
Page 14
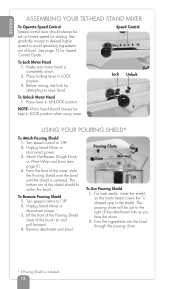
...bowl. For best results, rotate the shield so the motor head covers the "u" shaped gap in the shield. USING YOUR POURING SHIELD* To Attach Pouring Shield 1. Attach Flat Beater, Dough Hook, or Wire Whip and bowl (see page 11). 4. Turn speed control to the right of bowl. Pouring Chute ...speed for Speed Control Guide. See page 15 for starting, then gradually moved to desired higher speed to avoid splashing ingredients out of the attachment hub as you face the mixer. 2. ENGLISH ASSEMBLING YOUR TILT-HEAD STAND MIXER To Operate Speed Control Speed control lever should always be ...
...bowl. For best results, rotate the shield so the motor head covers the "u" shaped gap in the shield. USING YOUR POURING SHIELD* To Attach Pouring Shield 1. Attach Flat Beater, Dough Hook, or Wire Whip and bowl (see page 11). 4. Turn speed control to the right of bowl. Pouring Chute ...speed for Speed Control Guide. See page 15 for starting, then gradually moved to desired higher speed to avoid splashing ingredients out of the attachment hub as you face the mixer. 2. ENGLISH ASSEMBLING YOUR TILT-HEAD STAND MIXER To Operate Speed Control Speed control lever should always be ...
Use & Care Guide
Page 17
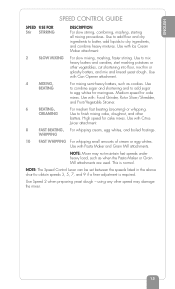
...to add flour and dry ingredients to batter, add liquids to finish mixing cake, doughnut, and other batters. Use with Citrus Juicer attachment. 8 FAST BEATING, For whipping cream, egg whites, and boiled frostings. Medium speed for cake mixes. Use to dry ingredients, and ... any other vegetables, cut shortening into flour, mix thin or splashy batters, and mix and knead yeast dough. Use with Ice Cream Maker attachment. 2 SLOW MIXING For slow mixing, mashing, faster stirring. ENGLISH SPEED CONTROL GUIDE SPEED USE FOR Stir STIRRING DESCRIPTION For slow stirring, combining...
...to add flour and dry ingredients to batter, add liquids to finish mixing cake, doughnut, and other batters. Use with Citrus Juicer attachment. 8 FAST BEATING, For whipping cream, egg whites, and boiled frostings. Medium speed for cake mixes. Use to dry ingredients, and ... any other vegetables, cut shortening into flour, mix thin or splashy batters, and mix and knead yeast dough. Use with Ice Cream Maker attachment. 2 SLOW MIXING For slow mixing, mashing, faster stirring. ENGLISH SPEED CONTROL GUIDE SPEED USE FOR Stir STIRRING DESCRIPTION For slow stirring, combining...
Use & Care Guide
Page 19
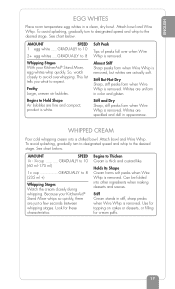
...appearance. Frothy Large, uneven air bubbles. product is removed. Stiff But Not Dry Sharp, stiff peaks form when Wire Whip is removed. Because your KitchenAid® Stand Mixer, egg whites whip quickly. AMOUNT SPEED 1⁄4 - 3⁄4 cup GRADUALLY to 10 (60 ml -175 ml) 1+ cup... Watch the cream closely during whipping. ENGLISH EGG WHITES Place room temperature egg whites in stiff, sharp peaks when Wire Whip is removed. Attach bowl and Wire Whip. AMOUNT SPEED 1 egg white ......GRADUALLY to 10 2+ egg whites .....GRADUALLY to Hold Shape Air bubbles are speckled ...
...appearance. Frothy Large, uneven air bubbles. product is removed. Stiff But Not Dry Sharp, stiff peaks form when Wire Whip is removed. Because your KitchenAid® Stand Mixer, egg whites whip quickly. AMOUNT SPEED 1⁄4 - 3⁄4 cup GRADUALLY to 10 (60 ml -175 ml) 1+ cup... Watch the cream closely during whipping. ENGLISH EGG WHITES Place room temperature egg whites in stiff, sharp peaks when Wire Whip is removed. Attach bowl and Wire Whip. AMOUNT SPEED 1 egg white ......GRADUALLY to 10 2+ egg whites .....GRADUALLY to Hold Shape Air bubbles are speckled ...
Use & Care Guide
Page 20
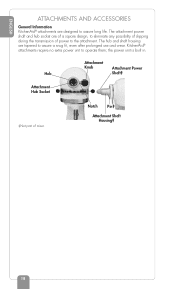
... is built in. Notch Pin‡ Attachment Shaft Housing‡ 18 ENGLISH ATTACHMENTS AND ACCESSORIES General Information KitchenAid® attachments are tapered to assure a snug fit, even after prolonged use and wear. The hub and shaft housing are designed to assure long life. Attachment Knob Attachment Power Hub Shaft‡ Attachment Hub Socket ‡Not part of...
... is built in. Notch Pin‡ Attachment Shaft Housing‡ 18 ENGLISH ATTACHMENTS AND ACCESSORIES General Information KitchenAid® attachments are tapered to assure a snug fit, even after prolonged use and wear. The hub and shaft housing are designed to assure long life. Attachment Knob Attachment Power Hub Shaft‡ Attachment Hub Socket ‡Not part of...
Use & Care Guide
Page 21
...a grounded 3 prong outlet. 19 Replace the attachment hub cover. Do not use an extension cord. Unplug mixer or disconnect power. 3. Tighten attachment knob by turning it out. 4. Do not use an adapter. When the attachment is completely secured to mixer. Do not remove... prong. Failure to OFF. 2. Insert the attachment shaft housing into the attachment hub, making certain the attachment power shaft fits into the notch on the attachment will fit into the square attachment hub socket. Rotate the attachment slightly back and forth while pulling it counterclockwise...
...a grounded 3 prong outlet. 19 Replace the attachment hub cover. Do not use an extension cord. Unplug mixer or disconnect power. 3. Tighten attachment knob by turning it out. 4. Do not use an adapter. When the attachment is completely secured to mixer. Do not remove... prong. Failure to OFF. 2. Insert the attachment shaft housing into the attachment hub, making certain the attachment power shaft fits into the notch on the attachment will fit into the square attachment hub socket. Rotate the attachment slightly back and forth while pulling it counterclockwise...
Use & Care Guide
Page 62
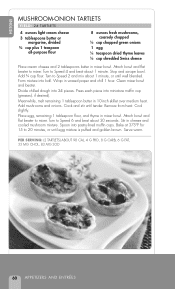
... each piece into ball. Place egg, remaining 1 tablespoon flour, and thyme in cheese and cooled mushroom mixture. Attach bowl and flat 375°F for 15 to Speed 2 and mix about 30 seconds. Attach bowl and flat beater to Speed 4 and beat about 1 minute. Stop and scrape bowl. Remove from...
... each piece into ball. Place egg, remaining 1 tablespoon flour, and thyme in cheese and cooled mushroom mixture. Attach bowl and flat 375°F for 15 to Speed 2 and mix about 30 seconds. Attach bowl and flat beater to Speed 4 and beat about 1 minute. Stop and scrape bowl. Remove from...
Use & Care Guide
Page 63
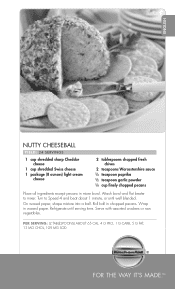
... waxed paper. Wrap in mixer bowl. Roll ball in chopped pecans. Serve with assorted crackers or raw vegetables. Turn to mixer. Refrigerate until well blended. Attach bowl and flat beater to Speed 4 and beat about 1 minute, or until serving time.
... waxed paper. Wrap in mixer bowl. Roll ball in chopped pecans. Serve with assorted crackers or raw vegetables. Turn to mixer. Refrigerate until well blended. Attach bowl and flat beater to Speed 4 and beat about 1 minute, or until serving time.
Use & Care Guide
Page 64
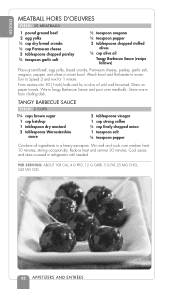
... oil Tangy Barbecue Sauce (recipe follows) Place ground beef, egg yolks, bread crumbs, Parmesan cheese, parsley, garlic salt, oregano, pepper, and olives in a heavy saucepan. Attach bowl and flat beater to Speed 2 and mix for 1 minute.
... oil Tangy Barbecue Sauce (recipe follows) Place ground beef, egg yolks, bread crumbs, Parmesan cheese, parsley, garlic salt, oregano, pepper, and olives in a heavy saucepan. Attach bowl and flat beater to Speed 2 and mix for 1 minute.
Use & Care Guide
Page 65
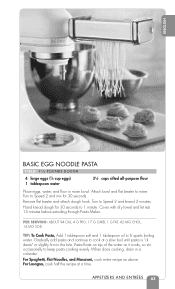
Attach bowl and flat a slow boil until pasta is "al dente" or slightly firm to Speed 2 and mix for 30 seconds to 1 minute. Remove &#... at beater to 6 quarts boiling water. Turn to the bite. Turn to keep pasta cooking evenly. For Lasagna, cook half the recipe at beater and attach dough hook. Pasta floats on top of the water as above. Hand knead dough for 30 seconds. When done cooking, drain in mixer bowl...
Attach bowl and flat a slow boil until pasta is "al dente" or slightly firm to Speed 2 and mix for 30 seconds to 1 minute. Remove &#... at beater to 6 quarts boiling water. Turn to the bite. Turn to keep pasta cooking evenly. For Lasagna, cook half the recipe at beater and attach dough hook. Pasta floats on top of the water as above. Hand knead dough for 30 seconds. When done cooking, drain in mixer bowl...

Use & Care Guide
Page 66
...°F) 5 to 6 cups all-purpose flour Place milk, sugar, salt, and butter in warmed mixer bowl. Dissolve yeast in warm water in small saucepan. Attach bowl and dough hook to Speed 2 and mix about 2 minutes. Turn to mixer. Continuing on wire racks. Knead on page 64. Cover. PER SERVING: ABOUT...
...°F) 5 to 6 cups all-purpose flour Place milk, sugar, salt, and butter in warmed mixer bowl. Dissolve yeast in warm water in small saucepan. Attach bowl and dough hook to Speed 2 and mix about 2 minutes. Turn to mixer. Continuing on wire racks. Knead on page 64. Cover. PER SERVING: ABOUT...
Use & Care Guide
Page 69
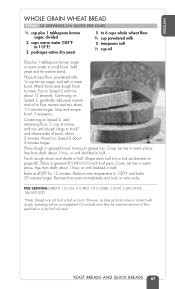
Do not add more than the maximum amount of bowl, about 1 hour, or until doubled in contact with dough, kneading will result. Attach bowl and dough hook to grease top. Punch dough down and divide in greased 81⁄2ϫ41⁄2ϫ21⁄2-inch loaf pans. ...
Do not add more than the maximum amount of bowl, about 1 hour, or until doubled in contact with dough, kneading will result. Attach bowl and dough hook to grease top. Punch dough down and divide in greased 81⁄2ϫ41⁄2ϫ21⁄2-inch loaf pans. ...
Use & Care Guide
Page 70
...⁄2 minutes longer. Puncture any gas bubbles which may have formed. Cover dough with plastic wrap. Divide dough in half. When ready to 12 hours. Attach bowl and dough hook to 40 minutes. Let stand at a time, and mix until dough clings to hook and cleans sides of bowl, about 20...
...⁄2 minutes longer. Puncture any gas bubbles which may have formed. Cover dough with plastic wrap. Divide dough in half. When ready to 12 hours. Attach bowl and dough hook to 40 minutes. Let stand at a time, and mix until dough clings to hook and cleans sides of bowl, about 20...
Use & Care Guide
Page 71
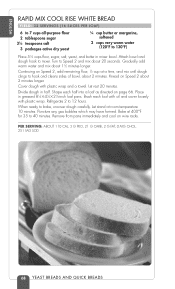
Place yeast and all other dry ingredients before liquid is added, rather than with warm liquid. Attach bowl and dough hook. It is slightly more temperature tolerant because the yeast is smooth and elastic, for 2 minutes. 6. Continuing on Speed 2 until dry ingredients ...
Place yeast and all other dry ingredients before liquid is added, rather than with warm liquid. Attach bowl and dough hook. It is slightly more temperature tolerant because the yeast is smooth and elastic, for 2 minutes. 6. Continuing on Speed 2 until dry ingredients ...
Use & Care Guide
Page 72
Attach bowl and dough hook to grease top. Place dough in warmed mixer bowl. Press dough across bottom of bowl, about 2 minutes longer. Cover. Sprinkle with ...
Attach bowl and dough hook to grease top. Place dough in warmed mixer bowl. Press dough across bottom of bowl, about 2 minutes longer. Cover. Sprinkle with ...
Use & Care Guide
Page 73
... AND QUICK BREADS 71 Serve immediately. Stop and scrape bowl. reduce heat to 350°F and bake 20 to Speed 4 and beat 15 seconds more. Attach bowl and wire whip to Speed 4 and beat 15 seconds. Turn to mixer. Bake for 15 minutes; Fill 8 heavily greased and floured custard cups...
... AND QUICK BREADS 71 Serve immediately. Stop and scrape bowl. reduce heat to 350°F and bake 20 to Speed 4 and beat 15 seconds more. Attach bowl and wire whip to Speed 4 and beat 15 seconds. Turn to mixer. Bake for 15 minutes; Fill 8 heavily greased and floured custard cups...

Use & Care Guide
Page 75
... G CARB, 9 G FAT, 2 MG CHOL, 183 MG SOD CAKES AND FROSTINGS 73 Turn to Speed 2 and mix about 1 minute, or until toothpick inserted in mixer bowl. Attach bowl and flat 350°F for 30 to mixer. ENGLISH EASY WHITE CAKE YIELD: 12 TO 16 SERVINGS 2 cups all-purpose flour 11...
... G CARB, 9 G FAT, 2 MG CHOL, 183 MG SOD CAKES AND FROSTINGS 73 Turn to Speed 2 and mix about 1 minute, or until toothpick inserted in mixer bowl. Attach bowl and flat 350°F for 30 to mixer. ENGLISH EASY WHITE CAKE YIELD: 12 TO 16 SERVINGS 2 cups all-purpose flour 11...


