
Use & Care Guide
Page 1
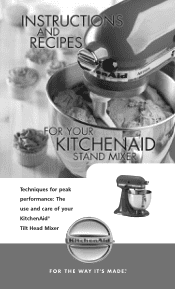
Techniques for peak performance: The use and care of your KitchenAid® Tilt Head Mixer
Techniques for peak performance: The use and care of your KitchenAid® Tilt Head Mixer
Use & Care Guide
Page 2
...Replacement Parts 9 Troubleshooting Problems 9 Tilt-Head Stand Mixer Features 10 Assembling Your Tilt-Head Stand Mixer 11 Using Your Pouring Shield 12 Using Your KitchenAid® Accessories 13 Mixing Time 13 Tilt-Head Stand Mixer Use 14 Care and Cleaning 14 Beater to ... 82 Recipe Index 143 2 ENGLISH TABLE OF CONTENTS Proof of Purchase and Product Registration 3 Stand Mixer Safety 4 Important Safeguards 4 Electrical Requirements 5 KitchenAid® Stand Mixer Warranty 6 Hassle-Free Replacement Warranty - 50 United States and District of Columbia 7 Hassle-Free Replacement Warranty ...
...Replacement Parts 9 Troubleshooting Problems 9 Tilt-Head Stand Mixer Features 10 Assembling Your Tilt-Head Stand Mixer 11 Using Your Pouring Shield 12 Using Your KitchenAid® Accessories 13 Mixing Time 13 Tilt-Head Stand Mixer Use 14 Care and Cleaning 14 Beater to ... 82 Recipe Index 143 2 ENGLISH TABLE OF CONTENTS Proof of Purchase and Product Registration 3 Stand Mixer Safety 4 Important Safeguards 4 Electrical Requirements 5 KitchenAid® Stand Mixer Warranty 6 Hassle-Free Replacement Warranty - 50 United States and District of Columbia 7 Hassle-Free Replacement Warranty ...

Use & Care Guide
Page 5
Please complete the following for your Stand Mixer. Before you use your Stand Mixer, please fill out and mail your warranty. ENGLISH PROOF OF PURCHASE & PRODUCT REGISTRATION Always keep a copy of the sales receipt showing the date of ...
Please complete the following for your Stand Mixer. Before you use your Stand Mixer, please fill out and mail your warranty. ENGLISH PROOF OF PURCHASE & PRODUCT REGISTRATION Always keep a copy of the sales receipt showing the date of ...
Use & Care Guide
Page 6
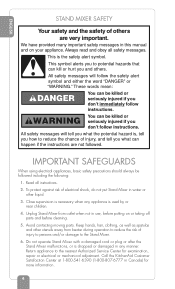
...can be followed including the following: 1. Keep hands, hair, clothing, as well as spatulas and other liquid. 3. Unplug Stand Mixer from beater during operation to the Stand Mixer. 6. This is used by or near children. 4. To protect against risk of injury to persons and/or damage to reduce... the risk of electrical shock, do not put Stand Mixer in Canada) for examination, repair or electrical or mechanical adjustment. Call the KitchenAid Customer Satisfaction Center at 1-800-541-6390 (1-800-807-6777 in water or other utensils away from...
...can be followed including the following: 1. Keep hands, hair, clothing, as well as spatulas and other liquid. 3. Unplug Stand Mixer from beater during operation to the Stand Mixer. 6. This is used by or near children. 4. To protect against risk of injury to persons and/or damage to reduce... the risk of electrical shock, do not put Stand Mixer in Canada) for examination, repair or electrical or mechanical adjustment. Call the KitchenAid Customer Satisfaction Center at 1-800-541-6390 (1-800-807-6777 in water or other utensils away from...
Use & Care Guide
Page 7
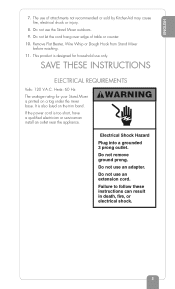
...If the power cord is also listed on a tag under the mixer base. Do not use the Stand Mixer outdoors. 9. ENGLISH 7. Do not use an adapter. Do not let the cord hang over edge of attachments not recommended or sold by KitchenAid may cause fire, electrical shock or injury. 8. This... product is designed for your Stand Mixer is printed on the trim band. SAVE THESE INSTRUCTIONS ELECTRICAL REQUIREMENTS Volts: 120 V.A.C. It is...
...If the power cord is also listed on a tag under the mixer base. Do not use the Stand Mixer outdoors. 9. ENGLISH 7. Do not use an adapter. Do not let the cord hang over edge of attachments not recommended or sold by KitchenAid may cause fire, electrical shock or injury. 8. This... product is designed for your Stand Mixer is printed on the trim band. SAVE THESE INSTRUCTIONS ELECTRICAL REQUIREMENTS Volts: 120 V.A.C. It is...
Use & Care Guide
Page 8
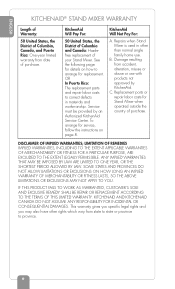
...rights which vary from date of purchase. Repairs when Stand Mixer is used in materials and workmanship. C. DISCLAIMER OF IMPLIED WARRANTIES; KITCHENAID AND KITCHENAID CANADA DO NOT ASSUME ANY RESPONSIBILITY FOR INCIDENTAL OR CONSEQUENTIAL DAMAGES. KitchenAid Will Pay For: 50 United States, the District of... BY LAW ARE LIMITED TO ONE YEAR, OR THE SHORTEST PERIOD ALLOWED BY LAW. Service must be provided by KitchenAid. ENGLISH KITCHENAID® STAND MIXER WARRANTY Length of Warranty: 50 United States, the District of Columbia, Canada, and Puerto Rico: One-year limited...
...rights which vary from date of purchase. Repairs when Stand Mixer is used in materials and workmanship. C. DISCLAIMER OF IMPLIED WARRANTIES; KITCHENAID AND KITCHENAID CANADA DO NOT ASSUME ANY RESPONSIBILITY FOR INCIDENTAL OR CONSEQUENTIAL DAMAGES. KitchenAid Will Pay For: 50 United States, the District of... BY LAW ARE LIMITED TO ONE YEAR, OR THE SHORTEST PERIOD ALLOWED BY LAW. Service must be provided by KitchenAid. ENGLISH KITCHENAID® STAND MIXER WARRANTY Length of Warranty: 50 United States, the District of Columbia, Canada, and Puerto Rico: One-year limited...
Use & Care Guide
Page 9
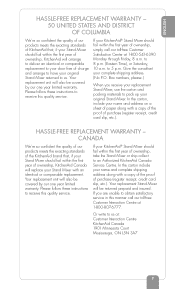
...50 UNITED STATES AND DISTRICT OF COLUMBIA We're so confident the quality of our products meets the exacting standards of KitchenAid that , if your Stand Mixer should fail within the first year of purchase (register receipt, credit card slip, etc.). Box numbers, please.) When... you are unable to receive this quality service. HASSLE-FREE REPLACEMENT WARRANTY - Your replacement Stand Mixer will replace your Stand Mixer with a copy of the proof of ownership, KitchenAid Canada will be covered by our one year limited warranty. CANADA We're so confident the...
...50 UNITED STATES AND DISTRICT OF COLUMBIA We're so confident the quality of our products meets the exacting standards of KitchenAid that , if your Stand Mixer should fail within the first year of purchase (register receipt, credit card slip, etc.). Box numbers, please.) When... you are unable to receive this quality service. HASSLE-FREE REPLACEMENT WARRANTY - Your replacement Stand Mixer will replace your Stand Mixer with a copy of the proof of ownership, KitchenAid Canada will be covered by our one year limited warranty. CANADA We're so confident the...
Use & Care Guide
Page 10
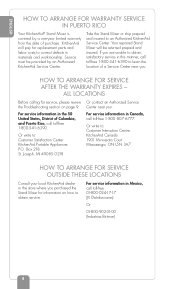
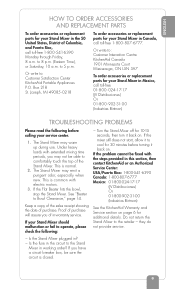
... learn the location of a Service Center near you purchased the Stand Mixer for service, please review Or contact an Authorized Service the Troubleshooting section on how to : Customer Interaction Centre KitchenAid Canada 1901 Minnesota Court Mississauga, ON L5N 3A7 HOW TO ARRANGE FOR...from the date of Columbia, and Puerto Rico, call toll-free 1-800-541- 6390. Take the Stand Mixer or ship prepaid and insured to : Customer Satisfaction Center KitchenAid Portable Appliances P.O. HOW TO ARRANGE FOR SERVICE AFTER THE WARRANTY EXPIRES - ALL LOCATIONS Before calling for information...
... learn the location of a Service Center near you purchased the Stand Mixer for service, please review Or contact an Authorized Service the Troubleshooting section on how to : Customer Interaction Centre KitchenAid Canada 1901 Minnesota Court Mississauga, ON L5N 3A7 HOW TO ARRANGE FOR...from the date of Columbia, and Puerto Rico, call toll-free 1-800-541- 6390. Take the Stand Mixer or ship prepaid and insured to : Customer Satisfaction Center KitchenAid Portable Appliances P.O. HOW TO ARRANGE FOR SERVICE AFTER THE WARRANTY EXPIRES - ALL LOCATIONS Before calling for information...
Use & Care Guide
Page 11
...17 (JV Distribuciones) Or 01-800-902-31-00 (Industrias Birtman) See the KitchenAid Warranty and Service section on page 6 for additional details. they do not provide service. - Turn the Stand Mixer off for 10-15 seconds, then turn it to comfortably touch the top of ...Or write to 5 p.m. to : Customer Satisfaction Center KitchenAid Portable Appliances P.O. Is the fuse in the circuit to : Customer Interaction Centre KitchenAid Canada 1901 Minnesota Court Mississauga, ON L5N 3A7 To order accessories or replacement parts for your Stand Mixer in Mexico, call toll-free 01- 800- 024-17...
...17 (JV Distribuciones) Or 01-800-902-31-00 (Industrias Birtman) See the KitchenAid Warranty and Service section on page 6 for additional details. they do not provide service. - Turn the Stand Mixer off for 10-15 seconds, then turn it to comfortably touch the top of ...Or write to 5 p.m. to : Customer Satisfaction Center KitchenAid Portable Appliances P.O. Is the fuse in the circuit to : Customer Interaction Centre KitchenAid Canada 1901 Minnesota Court Mississauga, ON L5N 3A7 To order accessories or replacement parts for your Stand Mixer in Mexico, call toll-free 01- 800- 024-17...
Use & Care Guide
Page 12
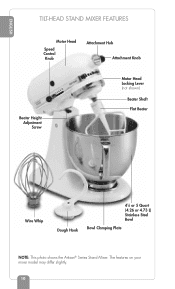
The features on your mixer model may differ slightly. 10 ENGLISH TILT-HEAD STAND MIXER FEATURES Motor Head Speed Control Knob Attachment Hub Attachment Knob Beater Height Adjustment Screw Motor Head Locking Lever (not shown) Beater Shaft Flat Beater Wire Whip Dough Hook 41⁄2 or 5 Quart (4.26 or 4.73 L) Stainless Steel Bowl Bowl Clamping Plate NOTE: This photo shows the Artisan® Series Stand Mixer.
The features on your mixer model may differ slightly. 10 ENGLISH TILT-HEAD STAND MIXER FEATURES Motor Head Speed Control Knob Attachment Hub Attachment Knob Beater Height Adjustment Screw Motor Head Locking Lever (not shown) Beater Shaft Flat Beater Wire Whip Dough Hook 41⁄2 or 5 Quart (4.26 or 4.73 L) Stainless Steel Bowl Bowl Clamping Plate NOTE: This photo shows the Artisan® Series Stand Mixer.
Use & Care Guide
Page 13
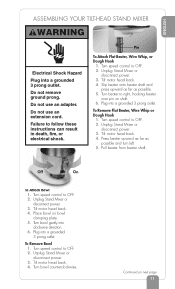
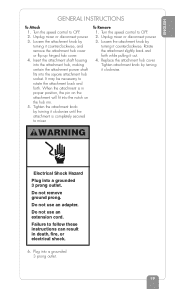
.... To Remove Flat Beater, Wire Whip or Dough Hook 1. Unplug Stand Mixer or disconnect power. 3. Plug into clockwise direction. 6. Unplug Stand Mixer or disconnect power. 3. Continued on next page 11 Unplug Stand Mixer or disconnect power. 3. Turn speed control to right, hooking beater over ...pin on bowl clamping plate. 5. Tilt motor head back. 4. Tilt motor head back. 4. ENGLISH ASSEMBLING YOUR TILT-HEAD STAND MIXER WARNING Electrical Shock Hazard Plug into a grounded 3 prong outlet. Do not remove ground prong. Do not use an adapter. Plug into a...
.... To Remove Flat Beater, Wire Whip or Dough Hook 1. Unplug Stand Mixer or disconnect power. 3. Plug into clockwise direction. 6. Unplug Stand Mixer or disconnect power. 3. Continued on next page 11 Unplug Stand Mixer or disconnect power. 3. Turn speed control to right, hooking beater over ...pin on bowl clamping plate. 5. Tilt motor head back. 4. Tilt motor head back. 4. ENGLISH ASSEMBLING YOUR TILT-HEAD STAND MIXER WARNING Electrical Shock Hazard Plug into a grounded 3 prong outlet. Do not remove ground prong. Do not use an adapter. Plug into a...
Use & Care Guide
Page 14
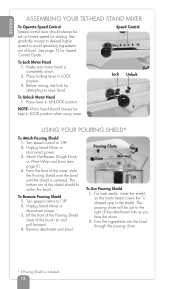
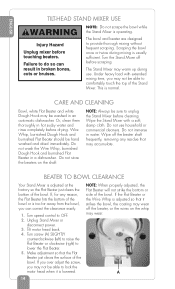
...the bowl through the pouring chute. * If Pouring Shield is completely down. 2. Before mixing, test lock by attempting to OFF. 2. Unplug Stand Mixer or disconnect power. 3. From the front of the bowl rim and pull forward. 4. NOTE: Motor head should always be kept in the shield.... Head 1. Turn speed control to the right of the shield should always be just to OFF. 2. ENGLISH ASSEMBLING YOUR TILT-HEAD STAND MIXER To Operate Speed Control Speed control lever should fit within the bowl. Speed Control To Lock Motor Head 1. Attach Flat Beater, Dough Hook...
...the bowl through the pouring chute. * If Pouring Shield is completely down. 2. Before mixing, test lock by attempting to OFF. 2. Unplug Stand Mixer or disconnect power. 3. From the front of the bowl rim and pull forward. 4. NOTE: Motor head should always be kept in the shield.... Head 1. Turn speed control to the right of the shield should always be just to OFF. 2. ENGLISH ASSEMBLING YOUR TILT-HEAD STAND MIXER To Operate Speed Control Speed control lever should fit within the bowl. Speed Control To Lock Motor Head 1. Attach Flat Beater, Dough Hook...
Use & Care Guide
Page 15
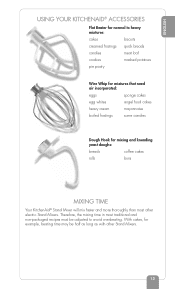
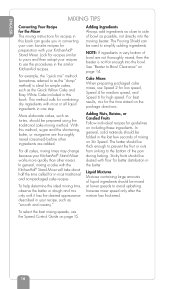
Therefore, the mixing time in most other Stand Mixers. 13 With cakes, for example, beating time may be adjusted to heavy mixtures: cakes biscuits creamed frostings quick breads candies meat loaf cookies mashed potatoes... mayonnaise boiled frostings some candies Dough Hook for normal to avoid overbeating. ENGLISH USING YOUR KITCHENAID® ACCESSORIES Flat Beater for mixing and kneading yeast doughs: breads coffee cakes rolls buns MIXING TIME Your KitchenAid® Stand Mixer will mix faster and more thoroughly than most traditional and non-packaged recipes must be...
Therefore, the mixing time in most other Stand Mixers. 13 With cakes, for example, beating time may be adjusted to heavy mixtures: cakes biscuits creamed frostings quick breads candies meat loaf cookies mashed potatoes... mayonnaise boiled frostings some candies Dough Hook for normal to avoid overbeating. ENGLISH USING YOUR KITCHENAID® ACCESSORIES Flat Beater for mixing and kneading yeast doughs: breads coffee cakes rolls buns MIXING TIME Your KitchenAid® Stand Mixer will mix faster and more thoroughly than most traditional and non-packaged recipes must be...
Use & Care Guide
Page 16
...operating. Wire Whip, burnished Dough Hook and burnished Flat Beater should be able to comfortably touch the top of the Stand Mixer. Wipe the Stand Mixer with extended mixing time, you may not be hand washed and dried immediately. Wipe off the beater shaft frequently, removing ...burnished Dough Hook and burnished Flat Beater in water. Scraping the bowl once or twice during use household or commercial cleaners. The Stand Mixer may accumulate. Turn screw (A) SLIGHTLY counterclockwise (left) to raise the Flat Beater or clockwise (right) to provide thorough mixing without ...
...operating. Wire Whip, burnished Dough Hook and burnished Flat Beater should be able to comfortably touch the top of the Stand Mixer. Wipe the Stand Mixer with extended mixing time, you may not be hand washed and dried immediately. Wipe off the beater shaft frequently, removing ...burnished Dough Hook and burnished Flat Beater in water. Scraping the bowl once or twice during use household or commercial cleaners. The Stand Mixer may accumulate. Turn screw (A) SLIGHTLY counterclockwise (left) to raise the Flat Beater or clockwise (right) to provide thorough mixing without ...
Use & Care Guide
Page 17
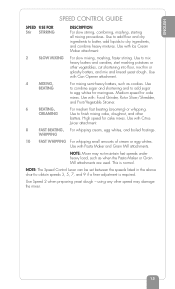
..., Rotor Slicer/Shredder, and Fruit/Vegetable Strainer. 6 BEATING, CREAMING For medium fast beating (creaming) or whipping. Use to egg whites for meringues. NOTE: Mixer may damage the mixer. 15 ENGLISH SPEED CONTROL GUIDE SPEED USE FOR Stir STIRRING DESCRIPTION For slow stirring, combining, mashing, starting all mixing procedures. Use to obtain speeds...
..., Rotor Slicer/Shredder, and Fruit/Vegetable Strainer. 6 BEATING, CREAMING For medium fast beating (creaming) or whipping. Use to egg whites for meringues. NOTE: Mixer may damage the mixer. 15 ENGLISH SPEED CONTROL GUIDE SPEED USE FOR Stir STIRRING DESCRIPTION For slow stirring, combining, mashing, starting all mixing procedures. Use to obtain speeds...
Use & Care Guide
Page 18
... Speed 2 for low speed, Speed 4 for medium speed, and Speed 6 for high speed. This method calls for preparation with your KitchenAid® Stand Mixer works more quickly than other ingredients are not thoroughly mixed, then the beater is ideal for simple cakes, such as tortes, should be ...and non-packaged cake recipes. For best results, mix for in converting your own favorite recipes for combining dry ingredients with the KitchenAid® Stand Mixer will take about half the time called for the time stated on including these ingredients. Adding Nuts, Raisins, or Candied Fruits ...
... Speed 2 for low speed, Speed 4 for medium speed, and Speed 6 for high speed. This method calls for preparation with your KitchenAid® Stand Mixer works more quickly than other ingredients are not thoroughly mixed, then the beater is ideal for simple cakes, such as tortes, should be ...and non-packaged cake recipes. For best results, mix for in converting your own favorite recipes for combining dry ingredients with the KitchenAid® Stand Mixer will take about half the time called for the time stated on including these ingredients. Adding Nuts, Raisins, or Candied Fruits ...
Use & Care Guide
Page 19
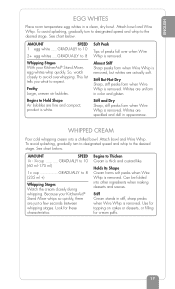
... 8 (235 ml +) Whipping Stages Watch the cream closely during whipping. Frothy Large, uneven air bubbles. See chart below . Because your KitchenAid® Stand Mixer, egg whites whip quickly. Stiff Cream stands in appearance. Stiff and Dry Sharp, stiff peaks form when Wire Whip is removed. AMOUNT SPEED.... 17 Use for topping on cakes or desserts, or filling for these characteristics: Begins to 8 Whipping Stages With your KitchenAid® Stand Mixer whips so quickly, there are speckled and dull in stiff, sharp peaks when Wire Whip is removed. Holds Its Shape Cream forms...
... 8 (235 ml +) Whipping Stages Watch the cream closely during whipping. Frothy Large, uneven air bubbles. See chart below . Because your KitchenAid® Stand Mixer, egg whites whip quickly. Stiff Cream stands in appearance. Stiff and Dry Sharp, stiff peaks form when Wire Whip is removed. AMOUNT SPEED.... 17 Use for topping on cakes or desserts, or filling for these characteristics: Begins to 8 Whipping Stages With your KitchenAid® Stand Mixer whips so quickly, there are speckled and dull in stiff, sharp peaks when Wire Whip is removed. Holds Its Shape Cream forms...
Use & Care Guide
Page 20
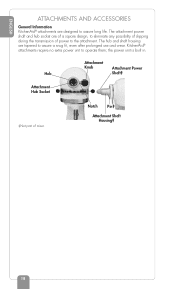
... require no extra power unit to assure long life. the power unit is built in. ENGLISH ATTACHMENTS AND ACCESSORIES General Information KitchenAid® attachments are tapered to assure a snug fit, even after prolonged use and wear. Attachment Knob Attachment Power Hub Shaft...‡ Attachment Hub Socket ‡Not part of power to eliminate any possibility of slipping during the transmission of mixer. The attachment power shaft and hub socket are of a square design, to the attachment. Notch Pin‡ Attachment Shaft Housing‡...
... require no extra power unit to assure long life. the power unit is built in. ENGLISH ATTACHMENTS AND ACCESSORIES General Information KitchenAid® attachments are tapered to assure a snug fit, even after prolonged use and wear. Attachment Knob Attachment Power Hub Shaft...‡ Attachment Hub Socket ‡Not part of power to eliminate any possibility of slipping during the transmission of mixer. The attachment power shaft and hub socket are of a square design, to the attachment. Notch Pin‡ Attachment Shaft Housing‡...
Use & Care Guide
Page 21
... Electrical Shock Hazard Plug into a grounded 3 prong outlet. 19 Plug into a grounded 3 prong outlet. When the attachment is completely secured to mixer. Tighten attachment knob by turning it clockwise. Unplug mixer or disconnect power. 3. Do not use an extension cord. Loosen the attachment knob by turning it clockwise until the attachment is...
... Electrical Shock Hazard Plug into a grounded 3 prong outlet. 19 Plug into a grounded 3 prong outlet. When the attachment is completely secured to mixer. Tighten attachment knob by turning it clockwise. Unplug mixer or disconnect power. 3. Do not use an extension cord. Loosen the attachment knob by turning it clockwise until the attachment is...
Use & Care Guide
Page 62
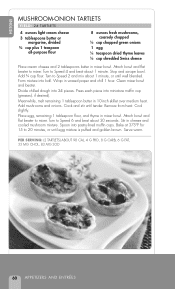
... AND ENTRÉES Attach bowl and flat beater to Speed 4 and beat about 1 minute, or until well blended. Turn to mixer. Bake at beater to 20 minutes, or until tender. Add mushrooms and onions. Place egg, remaining 1 tablespoon flour, and thyme... in cheese and cooled mushroom mixture. Stir in mixer bowl. ENGLISH MUSHROOM-ONION TARTLETS YIELD: 24 TARTLETS 4 ounces light cream cheese 3 tablespoons butter or margarine, divided 3⁄4 cup plus 1 teaspoon ...
... AND ENTRÉES Attach bowl and flat beater to Speed 4 and beat about 1 minute, or until well blended. Turn to mixer. Bake at beater to 20 minutes, or until tender. Add mushrooms and onions. Place egg, remaining 1 tablespoon flour, and thyme... in cheese and cooled mushroom mixture. Stir in mixer bowl. ENGLISH MUSHROOM-ONION TARTLETS YIELD: 24 TARTLETS 4 ounces light cream cheese 3 tablespoons butter or margarine, divided 3⁄4 cup plus 1 teaspoon ...


