User Guide
Page 3
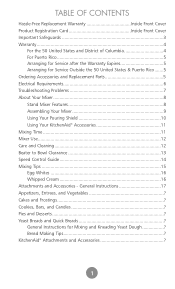
... Replacement Parts 5 Electrical Requirements 6 Troubleshooting Problems 7 About Your Mixer 8 Stand Mixer Features 8 Assembling Your Mixer 9 Using Your Pouring Shield 10 Using Your KitchenAid® Accessories 11 Mixing Time 11 Mixer Use 12 Care and Cleaning 12 Beater to Bowl Clearance 13 Speed Control Guide 14 Mixing Tips 15 Egg Whites 16 Whipped Cream 16 Attachments and Accessories -
... Replacement Parts 5 Electrical Requirements 6 Troubleshooting Problems 7 About Your Mixer 8 Stand Mixer Features 8 Assembling Your Mixer 9 Using Your Pouring Shield 10 Using Your KitchenAid® Accessories 11 Mixing Time 11 Mixer Use 12 Care and Cleaning 12 Beater to Bowl Clearance 13 Speed Control Guide 14 Mixing Tips 15 Egg Whites 16 Whipped Cream 16 Attachments and Accessories -
User Guide
Page 5
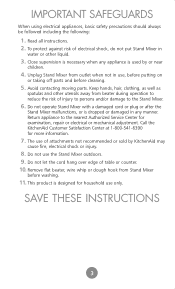
...or electrical or mechanical adjustment. Close supervision is necessary when any manner. Do not operate Stand Mixer with a damaged cord or plug or after the Stand Mixer malfunctions, or is used by KitchenAid may cause fire, electrical shock or injury. 8. This product is designed for household use...the following: 1. Unplug Stand Mixer from beater during operation to the nearest Authorized Service Center for more information. 7. Do not use , before putting on or taking off parts and before washing. 11. Return appliance to reduce the risk of attachments not recommended or sold...
...or electrical or mechanical adjustment. Close supervision is necessary when any manner. Do not operate Stand Mixer with a damaged cord or plug or after the Stand Mixer malfunctions, or is used by KitchenAid may cause fire, electrical shock or injury. 8. This product is designed for household use...the following: 1. Unplug Stand Mixer from beater during operation to the nearest Authorized Service Center for more information. 7. Do not use , before putting on or taking off parts and before washing. 11. Return appliance to reduce the risk of attachments not recommended or sold...
User Guide
Page 7
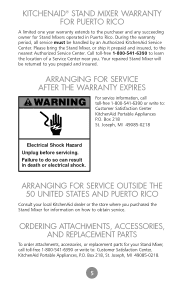
... 1-800-541-6390 to : Customer Satisfaction Center KitchenAid Portable Appliances P.O. Your repaired Stand Mixer will be handled by an Authorized KitchenAid Service Center. ORDERING ATTACHMENTS, ACCESSORIES, AND REPLACEMENT PARTS To order attachments, accessories, or replacement parts for your local KitchenAid dealer or the store where you purchased the Stand Mixer for Stand Mixers operated in death or electrical shock. ARRANGING FOR...
... 1-800-541-6390 to : Customer Satisfaction Center KitchenAid Portable Appliances P.O. Your repaired Stand Mixer will be handled by an Authorized KitchenAid Service Center. ORDERING ATTACHMENTS, ACCESSORIES, AND REPLACEMENT PARTS To order attachments, accessories, or replacement parts for your local KitchenAid dealer or the store where you purchased the Stand Mixer for Stand Mixers operated in death or electrical shock. ARRANGING FOR...
User Guide
Page 10
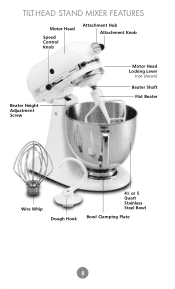
TILT-HEAD STAND MIXER FEATURES Motor Head Speed Control Knob Attachment Hub Attachment Knob Beater Height Adjustment Screw Motor Head Locking Lever (not shown) Beater Shaft Flat Beater Wire Whip Dough Hook 41⁄2 or 5 Quart Stainless Steel Bowl Bowl Clamping Plate 8
TILT-HEAD STAND MIXER FEATURES Motor Head Speed Control Knob Attachment Hub Attachment Knob Beater Height Adjustment Screw Motor Head Locking Lever (not shown) Beater Shaft Flat Beater Wire Whip Dough Hook 41⁄2 or 5 Quart Stainless Steel Bowl Bowl Clamping Plate 8

User Guide
Page 11
... lever should always be set on lowest speed for Speed Control Guide. 9 ** See page 6. To Attach Flat Beater, Wire Whip, or Dough Hook Failure to right, hooking beater over pin on bowl clamping plate. 5. Unplug stand mixer or disconnect power. 3. Place locking lever in UNLOCK position. To Unlock Motor Head SPEED CONTROL 1. Place...
... lever should always be set on lowest speed for Speed Control Guide. 9 ** See page 6. To Attach Flat Beater, Wire Whip, or Dough Hook Failure to right, hooking beater over pin on bowl clamping plate. 5. Unplug stand mixer or disconnect power. 3. Place locking lever in UNLOCK position. To Unlock Motor Head SPEED CONTROL 1. Place...
User Guide
Page 12
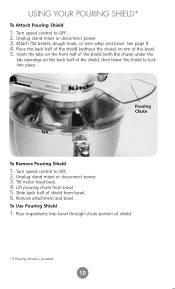
... tab openings on rim of shield from bowl. 5. Tilt motor head back. 4. Unplug stand mixer or disconnect power. 3. Unplug stand mixer or disconnect power. 3. Lift pouring chute from bowl. 6. Pour ingredients into bowl through chute portion of the shield, then lower the shield to lock into place. USING YOUR POURING SHIELD* To Attach Pouring Shield 1.
... tab openings on rim of shield from bowl. 5. Tilt motor head back. 4. Unplug stand mixer or disconnect power. 3. Unplug stand mixer or disconnect power. 3. Lift pouring chute from bowl. 6. Pour ingredients into bowl through chute portion of the shield, then lower the shield to lock into place. USING YOUR POURING SHIELD* To Attach Pouring Shield 1.
User Guide
Page 18
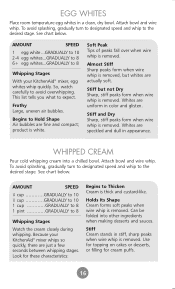
... is white. Whites are just a few seconds between whipping stages. Attach bowl and wire whip. Because your KitchenAid® mixer, egg whites whip quickly. Can be folded into a chilled bowl. Frothy Large, uneven air bubbles. Attach bowl and wire whip. To avoid splashing, gradually turn to designated ...speed and whip to Thicken Cream is removed. So, watch carefully to the desired stage. Stiff but whites are actually soft. Holds Its Shape Cream forms soft peaks when wire whip is removed. Stiff Cream stands...
... is white. Whites are just a few seconds between whipping stages. Attach bowl and wire whip. Because your KitchenAid® mixer, egg whites whip quickly. Can be folded into a chilled bowl. Frothy Large, uneven air bubbles. Attach bowl and wire whip. To avoid splashing, gradually turn to designated ...speed and whip to Thicken Cream is removed. So, watch carefully to the desired stage. Stiff but whites are actually soft. Holds Its Shape Cream forms soft peaks when wire whip is removed. Stiff Cream stands...


