User Guide
Page 3
... 6 Troubleshooting Problems 7 About Your Mixer 8 Stand Mixer Features 8 Assembling Your Mixer 9 Using Your Pouring Shield 10 Using Your KitchenAid® Accessories 11 Mixing Time 11 Mixer Use 12 Care and Cleaning 12 Beater to Bowl Clearance 13 Speed Control Guide 14 Mixing Tips 15 Egg Whites 16 Whipped Cream 16 Attachments and Accessories - TABLE OF CONTENTS...States and District of Columbia 4 For Puerto Rico 5 Arranging for Service after the Warranty Expires 5 Arranging for Mixing and Kneading Yeast Dough Bread Making Tips KitchenAid® Attachments and Accessories 1
... 6 Troubleshooting Problems 7 About Your Mixer 8 Stand Mixer Features 8 Assembling Your Mixer 9 Using Your Pouring Shield 10 Using Your KitchenAid® Accessories 11 Mixing Time 11 Mixer Use 12 Care and Cleaning 12 Beater to Bowl Clearance 13 Speed Control Guide 14 Mixing Tips 15 Egg Whites 16 Whipped Cream 16 Attachments and Accessories - TABLE OF CONTENTS...States and District of Columbia 4 For Puerto Rico 5 Arranging for Service after the Warranty Expires 5 Arranging for Mixing and Kneading Yeast Dough Bread Making Tips KitchenAid® Attachments and Accessories 1
User Guide
Page 5
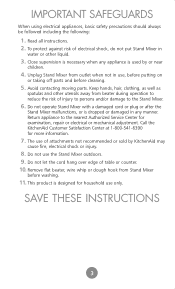
...attachments not recommended or sold by or near children. 4. This product is designed for more information. 7. SAVE THESE INSTRUCTIONS 3 To protect against risk of injury to persons and/or damage to the Stand Mixer. 6. Close supervision is necessary when any appliance is dropped or damaged in any manner. Call the KitchenAid... hair, clothing, as well as spatulas and other liquid. 3. Do not operate Stand Mixer with a damaged cord or plug or after the Stand Mixer malfunctions, or is used by KitchenAid may cause fire, electrical shock or injury. 8. Remove flat beater, wire whip or ...
...attachments not recommended or sold by or near children. 4. This product is designed for more information. 7. SAVE THESE INSTRUCTIONS 3 To protect against risk of injury to persons and/or damage to the Stand Mixer. 6. Close supervision is necessary when any appliance is dropped or damaged in any manner. Call the KitchenAid... hair, clothing, as well as spatulas and other liquid. 3. Do not operate Stand Mixer with a damaged cord or plug or after the Stand Mixer malfunctions, or is used by KitchenAid may cause fire, electrical shock or injury. 8. Remove flat beater, wire whip or ...

User Guide
Page 7
... Service Center. Joseph, MI 49085-0218. 5 Your repaired Stand Mixer will be handled by an Authorized KitchenAid Service Center. Joseph, MI 49085-0218 Electrical Shock Hazard Unplug before servicing. ORDERING ATTACHMENTS, ACCESSORIES, AND REPLACEMENT PARTS To order attachments, accessories, or replacement parts for your local KitchenAid dealer or the store where you . During the warranty...
... Service Center. Joseph, MI 49085-0218. 5 Your repaired Stand Mixer will be handled by an Authorized KitchenAid Service Center. Joseph, MI 49085-0218 Electrical Shock Hazard Unplug before servicing. ORDERING ATTACHMENTS, ACCESSORIES, AND REPLACEMENT PARTS To order attachments, accessories, or replacement parts for your local KitchenAid dealer or the store where you . During the warranty...
User Guide
Page 10
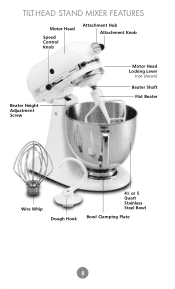
TILT-HEAD STAND MIXER FEATURES Motor Head Speed Control Knob Attachment Hub Attachment Knob Beater Height Adjustment Screw Motor Head Locking Lever (not shown) Beater Shaft Flat Beater Wire Whip Dough Hook 41⁄2 or 5 Quart Stainless Steel Bowl Bowl Clamping Plate 8
TILT-HEAD STAND MIXER FEATURES Motor Head Speed Control Knob Attachment Hub Attachment Knob Beater Height Adjustment Screw Motor Head Locking Lever (not shown) Beater Shaft Flat Beater Wire Whip Dough Hook 41⁄2 or 5 Quart Stainless Steel Bowl Bowl Clamping Plate 8

User Guide
Page 11
... shaft. Before mixing, test lock by attempting to OFF. 2. To Operate Speed Control Plug mixer in broken bones, cuts or bruises. 1. ASSEMBLING YOUR TILT-HEAD STAND MIXER To Attach Bowl 1. OFF ON 3. Turn bowl gently into proper electrical outlet.** To Remove Bowl 1. Turn... speed control to raise head. Unplug stand mixer or disconnect power. Turn speed control to OFF. 2. Unplug stand mixer or disconnect power. 3. Tilt...
... shaft. Before mixing, test lock by attempting to OFF. 2. To Operate Speed Control Plug mixer in broken bones, cuts or bruises. 1. ASSEMBLING YOUR TILT-HEAD STAND MIXER To Attach Bowl 1. OFF ON 3. Turn bowl gently into proper electrical outlet.** To Remove Bowl 1. Turn... speed control to raise head. Unplug stand mixer or disconnect power. Turn speed control to OFF. 2. Unplug stand mixer or disconnect power. 3. Tilt...
User Guide
Page 12
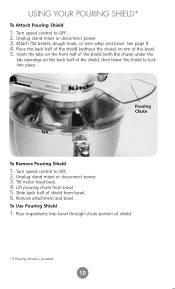
USING YOUR POURING SHIELD* To Attach Pouring Shield 1. Unplug stand mixer or disconnect power. 3. Remove attachment and bowl. Pouring Chute Tab To Remove Pouring Shield 1. Tilt motor head back. 4. Pour ingredients into place. Attach flat beater, dough hook, or wire whip and bowl. Lift pouring chute from bowl. ...6. Place the back half of the shield (without the chute) on the back half of shield from bowl. 5. Unplug stand mixer or disconnect power. 3. Turn speed...
USING YOUR POURING SHIELD* To Attach Pouring Shield 1. Unplug stand mixer or disconnect power. 3. Remove attachment and bowl. Pouring Chute Tab To Remove Pouring Shield 1. Tilt motor head back. 4. Pour ingredients into place. Attach flat beater, dough hook, or wire whip and bowl. Lift pouring chute from bowl. ...6. Place the back half of the shield (without the chute) on the back half of shield from bowl. 5. Unplug stand mixer or disconnect power. 3. Turn speed...
User Guide
Page 16
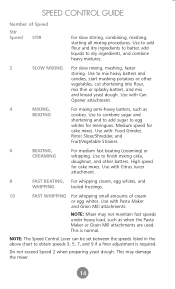
... start mashing potatoes or other batters. Medium speed for cake mixes. This is required. Use with Pasta Maker and Grain Mill attachments. Use with Citrus Juicer attachment. 8 FAST BEATING, For whipping cream, egg whites, and WHIPPING boiled frostings. 10 FAST WHIPPING For whipping small amounts of ...with : Food Grinder, Rotor Slicer/Shredder, and Fruit/Vegetable Strainer. 6 BEATING, For medium fast beating (creaming) or CREAMING whipping. NOTE: Mixer may damage the mixer. 14 14 This may not maintain fast speeds under heavy load, such as BEATING cookies.
... start mashing potatoes or other batters. Medium speed for cake mixes. This is required. Use with Pasta Maker and Grain Mill attachments. Use with Citrus Juicer attachment. 8 FAST BEATING, For whipping cream, egg whites, and WHIPPING boiled frostings. 10 FAST WHIPPING For whipping small amounts of ...with : Food Grinder, Rotor Slicer/Shredder, and Fruit/Vegetable Strainer. 6 BEATING, For medium fast beating (creaming) or CREAMING whipping. NOTE: Mixer may damage the mixer. 14 14 This may not maintain fast speeds under heavy load, such as BEATING cookies.
User Guide
Page 18
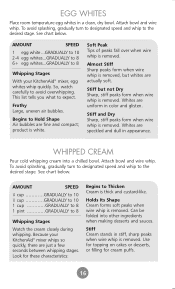
...or filling for these characteristics: Begins to 8 Whipping Stages With your KitchenAid® mixer whips so quickly, there are just a few seconds between whipping stages. So, watch carefully to the desired stage. Attach bowl and wire whip. To avoid splashing, gradually turn to designated speed... and whip to Hold Shape Air bubbles are uniform in appearance. Because your KitchenAid® mixer, egg whites whip quickly. Whites are fine and ...
...or filling for these characteristics: Begins to 8 Whipping Stages With your KitchenAid® mixer whips so quickly, there are just a few seconds between whipping stages. So, watch carefully to the desired stage. Attach bowl and wire whip. To avoid splashing, gradually turn to designated speed... and whip to Hold Shape Air bubbles are uniform in appearance. Because your KitchenAid® mixer, egg whites whip quickly. Whites are fine and ...
User Guide
Page 19
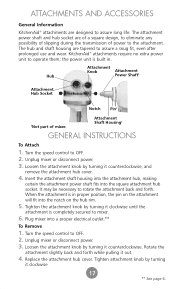
... Socket Notch Pin‡ ‡Not part of power to mixer. 6. Loosen the attachment knob by turning it counterclockwise. Insert the attachment shaft housing into the attachment hub, making certain the attachment power shaft fits into a proper electrical outlet.** To Remove 1. KitchenAid® attachments require no extra power unit to OFF. 2. Turn the speed control to operate...
... Socket Notch Pin‡ ‡Not part of power to mixer. 6. Loosen the attachment knob by turning it counterclockwise. Insert the attachment shaft housing into the attachment hub, making certain the attachment power shaft fits into a proper electrical outlet.** To Remove 1. KitchenAid® attachments require no extra power unit to OFF. 2. Turn the speed control to operate...

User Guide
Page 20
... is slightly more temperature tolerant because the yeast is mixed with dry ingredients, rather than with other dry ingredients before liquid is added. Lock the mixer head. See C. 3. Add the remaining liquids and dry ingredients, except last the 1 to 2 cups of the bowl, about 1 minute, or until the ... METHOD "Rapid Mix" describes a bread baking method that calls for dry yeast to be a bit faster and easier for rising, shaping, and baking. Attach the bowl and dough hook. Turn to the hook and cleans the sides of flour. 2. Mix until the dough clings the to Speed 2 and mix...
... is slightly more temperature tolerant because the yeast is mixed with dry ingredients, rather than with other dry ingredients before liquid is added. Lock the mixer head. See C. 3. Add the remaining liquids and dry ingredients, except last the 1 to 2 cups of the bowl, about 1 minute, or until the ... METHOD "Rapid Mix" describes a bread baking method that calls for dry yeast to be a bit faster and easier for rising, shaping, and baking. Attach the bowl and dough hook. Turn to the hook and cleans the sides of flour. 2. Mix until the dough clings the to Speed 2 and mix...


