User Guide
Page 3
... Rico 5 Arranging for Service after the Warranty Expires 5 Arranging for Mixing and Kneading Yeast Dough Bread Making Tips KitchenAid® Attachments and Accessories 1 General Instructions 17 Appetizers, Entrees, and Vegetables Cakes and Frostings Cookies, Bars, and Candies Pies ...and Replacement Parts 5 Electrical Requirements 6 Troubleshooting Problems 7 About Your Mixer 8 Stand Mixer Features 8 Assembling Your Mixer 9 Using Your Pouring Shield 10 Using Your KitchenAid® Accessories 11 Mixing Time 11 Mixer Use 12 Care and Cleaning 12 Beater to Bowl Clearance 13 ...
... Rico 5 Arranging for Service after the Warranty Expires 5 Arranging for Mixing and Kneading Yeast Dough Bread Making Tips KitchenAid® Attachments and Accessories 1 General Instructions 17 Appetizers, Entrees, and Vegetables Cakes and Frostings Cookies, Bars, and Candies Pies ...and Replacement Parts 5 Electrical Requirements 6 Troubleshooting Problems 7 About Your Mixer 8 Stand Mixer Features 8 Assembling Your Mixer 9 Using Your Pouring Shield 10 Using Your KitchenAid® Accessories 11 Mixing Time 11 Mixer Use 12 Care and Cleaning 12 Beater to Bowl Clearance 13 ...
User Guide
Page 5
...Mixer from outlet when not in use the Stand Mixer outdoors. 9. Do not operate Stand Mixer with a damaged cord or plug or after the Stand Mixer malfunctions, or is used by KitchenAid may cause fire, electrical shock or injury. 8. Call the KitchenAid... Customer Satisfaction Center at 1-800-541-6390 for examination, repair or electrical or mechanical adjustment. Close supervision is designed for household use of table or counter. 10. The use only. Read all instructions. 2. This product is necessary when any manner. Do not let the cord hang over edge of attachments...
...Mixer from outlet when not in use the Stand Mixer outdoors. 9. Do not operate Stand Mixer with a damaged cord or plug or after the Stand Mixer malfunctions, or is used by KitchenAid may cause fire, electrical shock or injury. 8. Call the KitchenAid... Customer Satisfaction Center at 1-800-541-6390 for examination, repair or electrical or mechanical adjustment. Close supervision is designed for household use of table or counter. 10. The use only. Read all instructions. 2. This product is necessary when any manner. Do not let the cord hang over edge of attachments...
User Guide
Page 7
... toll-free 1-800-541-6390 or write to you prepaid and insured. Box 218 St. Your repaired Stand Mixer will be handled by an Authorized KitchenAid Service Center. ORDERING ATTACHMENTS, ACCESSORIES, AND REPLACEMENT PARTS To order attachments, accessories, or replacement parts for information on how to the nearest Authorized Service Center. During the warranty...
... toll-free 1-800-541-6390 or write to you prepaid and insured. Box 218 St. Your repaired Stand Mixer will be handled by an Authorized KitchenAid Service Center. ORDERING ATTACHMENTS, ACCESSORIES, AND REPLACEMENT PARTS To order attachments, accessories, or replacement parts for information on how to the nearest Authorized Service Center. During the warranty...
User Guide
Page 10
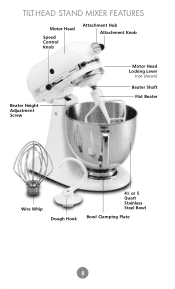
TILT-HEAD STAND MIXER FEATURES Motor Head Speed Control Knob Attachment Hub Attachment Knob Beater Height Adjustment Screw Motor Head Locking Lever (not shown) Beater Shaft Flat Beater Wire Whip Dough Hook 41⁄2 or 5 Quart Stainless Steel Bowl Bowl Clamping Plate 8
TILT-HEAD STAND MIXER FEATURES Motor Head Speed Control Knob Attachment Hub Attachment Knob Beater Height Adjustment Screw Motor Head Locking Lever (not shown) Beater Shaft Flat Beater Wire Whip Dough Hook 41⁄2 or 5 Quart Stainless Steel Bowl Bowl Clamping Plate 8

User Guide
Page 11
...To Lock Motor Head 1. To Unlock Motor Head SPEED CONTROL 1. Unplug stand mixer or disconnect power. Plug mixer into proper electrical outlet.** To Remove Flat Beater, Wire Whip or Dough Hook 1. To Attach Flat Beater, Wire Whip, or Dough Hook Failure to OFF. 2. Slip beater... be set on bowl clamping plate. 5. Tilt motor head back. 4. WARNING Injury Hazard Unplug mixer before touching beaters. Turn beater to OFF. 2. ASSEMBLING YOUR TILT-HEAD STAND MIXER To Attach Bowl 1. Turn bowl counterclockwise. Turn speed control to right, hooking beater over pin on shaft....
...To Lock Motor Head 1. To Unlock Motor Head SPEED CONTROL 1. Unplug stand mixer or disconnect power. Plug mixer into proper electrical outlet.** To Remove Flat Beater, Wire Whip or Dough Hook 1. To Attach Flat Beater, Wire Whip, or Dough Hook Failure to OFF. 2. Slip beater... be set on bowl clamping plate. 5. Tilt motor head back. 4. WARNING Injury Hazard Unplug mixer before touching beaters. Turn beater to OFF. 2. ASSEMBLING YOUR TILT-HEAD STAND MIXER To Attach Bowl 1. Turn bowl counterclockwise. Turn speed control to right, hooking beater over pin on shaft....
User Guide
Page 12
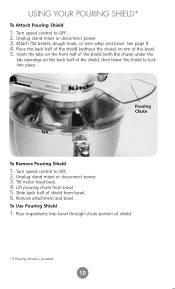
Unplug stand mixer or disconnect power. 3. Insert the tabs on the front half of the shield (with the chute) under the tab openings on rim of the bowl. 5. ...) on the back half of the shield, then lower the shield to lock into bowl through chute portion of shield from bowl. 5. Unplug stand mixer or disconnect power. 3. Remove attachment and bowl. To Use Pouring Shield 1. Lift pouring chute from bowl. 6. Pour ingredients into place. Turn speed control to OFF. 2. See page...
Unplug stand mixer or disconnect power. 3. Insert the tabs on the front half of the shield (with the chute) under the tab openings on rim of the bowl. 5. ...) on the back half of the shield, then lower the shield to lock into bowl through chute portion of shield from bowl. 5. Unplug stand mixer or disconnect power. 3. Remove attachment and bowl. To Use Pouring Shield 1. Lift pouring chute from bowl. 6. Pour ingredients into place. Turn speed control to OFF. 2. See page...
User Guide
Page 16
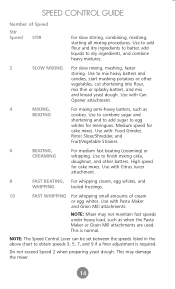
Medium speed for meringues. NOTE: Mixer may damage the mixer. 14 14 NOTE: The Speed Control Lever can be set between the...mix thin or splashy batters, and mix and knead yeast dough. Use with Pasta Maker and Grain Mill attachments. SPEED CONTROL GUIDE Number of cream or egg whites. Use to egg whites for cake mixes. Use ... and Fruit/Vegetable Strainer. 6 BEATING, For medium fast beating (creaming) or CREAMING whipping. Use with Citrus Juicer attachment. 8 FAST BEATING, For whipping cream, egg whites, and WHIPPING boiled frostings. 10 FAST WHIPPING For whipping small ...
Medium speed for meringues. NOTE: Mixer may damage the mixer. 14 14 NOTE: The Speed Control Lever can be set between the...mix thin or splashy batters, and mix and knead yeast dough. Use with Pasta Maker and Grain Mill attachments. SPEED CONTROL GUIDE Number of cream or egg whites. Use to egg whites for cake mixes. Use ... and Fruit/Vegetable Strainer. 6 BEATING, For medium fast beating (creaming) or CREAMING whipping. Use with Citrus Juicer attachment. 8 FAST BEATING, For whipping cream, egg whites, and WHIPPING boiled frostings. 10 FAST WHIPPING For whipping small ...
User Guide
Page 18
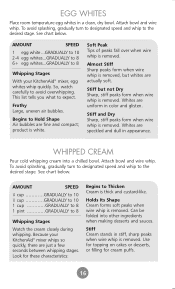
... See chart below . Use for topping on cakes or desserts, or filling for these characteristics: Begins to 8 Whipping Stages With your KitchenAid® mixer whips so quickly, there are fine and compact; See chart below . WHIPPED CREAM Pour cold whipping cream into other ingredients when making ... To avoid splashing, gradually turn to designated speed and whip to expect. Almost Stiff Sharp peaks form when wire whip is removed. Attach bowl and wire whip. This list tells you what to the desired stage. EGG WHITES Place room temperature egg whites in stiff, ...
... See chart below . Use for topping on cakes or desserts, or filling for these characteristics: Begins to 8 Whipping Stages With your KitchenAid® mixer whips so quickly, there are fine and compact; See chart below . WHIPPED CREAM Pour cold whipping cream into other ingredients when making ... To avoid splashing, gradually turn to designated speed and whip to expect. Almost Stiff Sharp peaks form when wire whip is removed. Attach bowl and wire whip. This list tells you what to the desired stage. EGG WHITES Place room temperature egg whites in stiff, ...
User Guide
Page 19
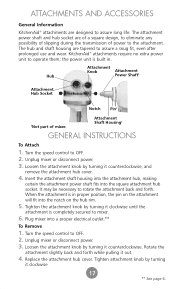
... disconnect power. 3. Unplug mixer or disconnect power. 3. KitchenAid® attachments require no extra power unit to OFF. 2. Turn the speed control to operate them; Insert the attachment shaft housing into the attachment hub, making certain the attachment power shaft fits into a proper electrical outlet.** To Remove 1. The attachment power shaft and hub socket are of a square design...
... disconnect power. 3. Unplug mixer or disconnect power. 3. KitchenAid® attachments require no extra power unit to OFF. 2. Turn the speed control to operate them; Insert the attachment shaft housing into the attachment hub, making certain the attachment power shaft fits into a proper electrical outlet.** To Remove 1. The attachment power shaft and hub socket are of a square design...

User Guide
Page 20
... the last 1 to prepare a favorite recipe, dissolve the yeast in warm water in a warmed bowl. Lock the mixer head. Turn to the hook and cleans the sides of flour. 2. Proceed with warm liquid. ? Attach the bowl and dough hook. Continuing on Speed 2 for 2 minutes, or C until the dough clings the to Speed...
... the last 1 to prepare a favorite recipe, dissolve the yeast in warm water in a warmed bowl. Lock the mixer head. Turn to the hook and cleans the sides of flour. 2. Proceed with warm liquid. ? Attach the bowl and dough hook. Continuing on Speed 2 for 2 minutes, or C until the dough clings the to Speed...


