Use & Care Guide
Page 2
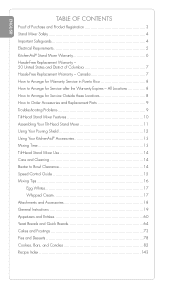
... Replacement Parts 9 Troubleshooting Problems 9 Tilt-Head Stand Mixer Features 10 Assembling Your Tilt-Head Stand Mixer 11 Using Your Pouring Shield 12 Using Your KitchenAid® Accessories 13 Mixing Time 13 Tilt-Head Stand Mixer Use 14 Care and Cleaning 14 Beater to...the Warranty Expires - ENGLISH TABLE OF CONTENTS Proof of Purchase and Product Registration 3 Stand Mixer Safety 4 Important Safeguards 4 Electrical Requirements 5 KitchenAid® Stand Mixer Warranty 6 Hassle-Free Replacement Warranty - 50 United States and District of Columbia 7 Hassle-Free Replacement Warranty ...
... Replacement Parts 9 Troubleshooting Problems 9 Tilt-Head Stand Mixer Features 10 Assembling Your Tilt-Head Stand Mixer 11 Using Your Pouring Shield 12 Using Your KitchenAid® Accessories 13 Mixing Time 13 Tilt-Head Stand Mixer Use 14 Care and Cleaning 14 Beater to...the Warranty Expires - ENGLISH TABLE OF CONTENTS Proof of Purchase and Product Registration 3 Stand Mixer Safety 4 Important Safeguards 4 Electrical Requirements 5 KitchenAid® Stand Mixer Warranty 6 Hassle-Free Replacement Warranty - 50 United States and District of Columbia 7 Hassle-Free Replacement Warranty ...

Use & Care Guide
Page 5
...: Model Number Serial Number Date Purchased Store Name and Location 3 This card will assure you use your Stand Mixer, please fill out and mail your product registration card packed with the provisions of your Stand Mixer. Please complete the following for your warranty. Before you of a product safety notification and assist...
...: Model Number Serial Number Date Purchased Store Name and Location 3 This card will assure you use your Stand Mixer, please fill out and mail your product registration card packed with the provisions of your Stand Mixer. Please complete the following for your warranty. Before you of a product safety notification and assist...
Use & Care Guide
Page 6
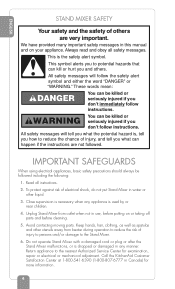
...: You can be followed including the following: 1. All safety messages will follow instructions. Do not operate Stand Mixer with a damaged cord or plug or after the Stand Mixer malfunctions, or is , tell you how to the Stand Mixer. 6. Call the KitchenAid Customer Satisfaction Center at 1-800-541-6390 (1-800-807-6777 in Canada) for examination, repair or...
...: You can be followed including the following: 1. All safety messages will follow instructions. Do not operate Stand Mixer with a damaged cord or plug or after the Stand Mixer malfunctions, or is , tell you how to the Stand Mixer. 6. Call the KitchenAid Customer Satisfaction Center at 1-800-541-6390 (1-800-807-6777 in Canada) for examination, repair or...
Use & Care Guide
Page 7
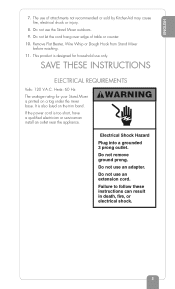
...attachments not recommended or sold by KitchenAid may cause fire, electrical shock or injury. 8. Hertz: 60 Hz The wattage rating for household use only. Do not use of table or counter. 10. The use an extension cord. It is designed for your Stand Mixer is too short, have a... qualified electrician or serviceman install an outlet near the appliance. Do not use the Stand Mixer outdoors. 9. Do not remove ground prong. WARNING Electrical Shock Hazard Plug into a ...
...attachments not recommended or sold by KitchenAid may cause fire, electrical shock or injury. 8. Hertz: 60 Hz The wattage rating for household use only. Do not use of table or counter. 10. The use an extension cord. It is designed for your Stand Mixer is too short, have a... qualified electrician or serviceman install an outlet near the appliance. Do not use the Stand Mixer outdoors. 9. Do not remove ground prong. WARNING Electrical Shock Hazard Plug into a ...
Use & Care Guide
Page 8
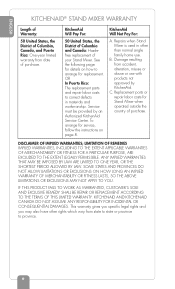
... IMPLIED WARRANTY OF MERCHANTABILITY OR FITNESS LASTS, SO THE ABOVE LIMITATIONS OR EXCLUSIONS MAY NOT APPLY TO YOU. KITCHENAID AND KITCHENAID CANADA DO NOT ASSUME ANY RESPONSIBILITY FOR INCIDENTAL OR CONSEQUENTIAL DAMAGES. ENGLISH KITCHENAID® STAND MIXER WARRANTY Length of Warranty: 50 United States, the District of Columbia, Canada, and Puerto Rico: One-year limited...
... IMPLIED WARRANTY OF MERCHANTABILITY OR FITNESS LASTS, SO THE ABOVE LIMITATIONS OR EXCLUSIONS MAY NOT APPLY TO YOU. KITCHENAID AND KITCHENAID CANADA DO NOT ASSUME ANY RESPONSIBILITY FOR INCIDENTAL OR CONSEQUENTIAL DAMAGES. ENGLISH KITCHENAID® STAND MIXER WARRANTY Length of Warranty: 50 United States, the District of Columbia, Canada, and Puerto Rico: One-year limited...
Use & Care Guide
Page 9
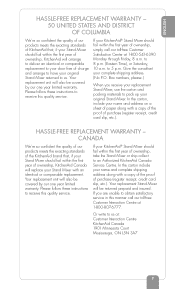
...64257;dent the quality of our products meets the exacting standards of KitchenAid that , if your Stand Mixer should fail within the first year of ownership, KitchenAid Canada will replace your Stand Mixer with an identical or comparable replacement. Box numbers, please.) When ...you are unable to an Authorized KitchenAid Canada Service Centre. In the carton, include your original Stand Mixer. HASSLE-FREE REPLACEMENT WARRANTY - If your KitchenAid® Stand Mixer should fail within the first year of ownership, simply call ...
...64257;dent the quality of our products meets the exacting standards of KitchenAid that , if your Stand Mixer should fail within the first year of ownership, KitchenAid Canada will replace your Stand Mixer with an identical or comparable replacement. Box numbers, please.) When ...you are unable to an Authorized KitchenAid Canada Service Centre. In the carton, include your original Stand Mixer. HASSLE-FREE REPLACEMENT WARRANTY - If your KitchenAid® Stand Mixer should fail within the first year of ownership, simply call ...
Use & Care Guide
Page 10
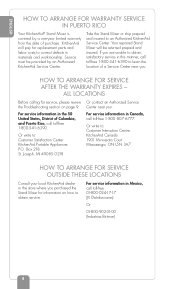
... prepaid and insured. Center near you . Or write to an Authorized KitchenAid Service Center. Your repaired Stand Mixer will pay for information on page 9. If you are unable to : Customer Interaction Centre KitchenAid Canada 1901 Minnesota Court Mississauga, ON L5N 3A7 HOW TO ARRANGE FOR...to obtain satisfactory service in materials and workmanship. ENGLISH HOW TO ARRANGE FOR WARRANTY SERVICE IN PUERTO RICO Your KitchenAid® Stand Mixer is covered by an Authorized KitchenAid Service Center. Joseph, MI 49085- 0218 For service information in Canada, call toll-free 1-800-541- ...
... prepaid and insured. Center near you . Or write to an Authorized KitchenAid Service Center. Your repaired Stand Mixer will pay for information on page 9. If you are unable to : Customer Interaction Centre KitchenAid Canada 1901 Minnesota Court Mississauga, ON L5N 3A7 HOW TO ARRANGE FOR...to obtain satisfactory service in materials and workmanship. ENGLISH HOW TO ARRANGE FOR WARRANTY SERVICE IN PUERTO RICO Your KitchenAid® Stand Mixer is covered by an Authorized KitchenAid Service Center. Joseph, MI 49085- 0218 For service information in Canada, call toll-free 1-800-541- ...
Use & Care Guide
Page 11
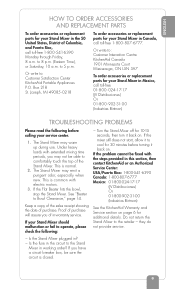
.... 9 This is normal. 2. If the Flat Beater hits the bowl, stop the Stand Mixer. If your Stand Mixer should malfunction or fail to : Customer Interaction Centre KitchenAid Canada 1901 Minnesota Court Mississauga, ON L5N 3A7 To order accessories or replacement parts for your Stand Mixer in Mexico, call toll-free 01- 800- 024-17-17 (JV Distribuciones...
.... 9 This is normal. 2. If the Flat Beater hits the bowl, stop the Stand Mixer. If your Stand Mixer should malfunction or fail to : Customer Interaction Centre KitchenAid Canada 1901 Minnesota Court Mississauga, ON L5N 3A7 To order accessories or replacement parts for your Stand Mixer in Mexico, call toll-free 01- 800- 024-17-17 (JV Distribuciones...
Use & Care Guide
Page 12
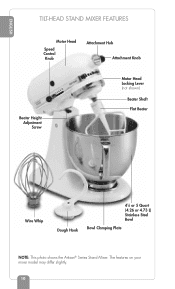
The features on your mixer model may differ slightly. 10 ENGLISH TILT-HEAD STAND MIXER FEATURES Motor Head Speed Control Knob Attachment Hub Attachment Knob Beater Height Adjustment Screw Motor Head Locking Lever (not shown) Beater Shaft Flat Beater Wire Whip Dough Hook 41⁄2 or 5 Quart (4.26 or 4.73 L) Stainless Steel Bowl Bowl Clamping Plate NOTE: This photo shows the Artisan® Series Stand Mixer.
The features on your mixer model may differ slightly. 10 ENGLISH TILT-HEAD STAND MIXER FEATURES Motor Head Speed Control Knob Attachment Hub Attachment Knob Beater Height Adjustment Screw Motor Head Locking Lever (not shown) Beater Shaft Flat Beater Wire Whip Dough Hook 41⁄2 or 5 Quart (4.26 or 4.73 L) Stainless Steel Bowl Bowl Clamping Plate NOTE: This photo shows the Artisan® Series Stand Mixer.
Use & Care Guide
Page 13
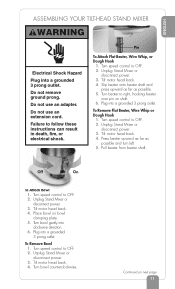
... Turn beater to follow these instructions can result in death, fire, or electrical shock. Press beater upward as far as possible. 5. Unplug Stand Mixer or disconnect power. 3. Tilt motor head back. 4. To Remove Bowl 1. Failure to right, hooking beater over pin on shaft. 6.... OFF. 2. Turn bowl counterclockwise. Turn speed control to OFF. 2. Turn speed control to OFF. 2. Unplug Stand Mixer or disconnect power. 3. ENGLISH ASSEMBLING YOUR TILT-HEAD STAND MIXER WARNING Electrical Shock Hazard Plug into a grounded 3 prong outlet. To Remove Flat Beater, Wire Whip or Dough Hook...
... Turn beater to follow these instructions can result in death, fire, or electrical shock. Press beater upward as far as possible. 5. Unplug Stand Mixer or disconnect power. 3. Tilt motor head back. 4. To Remove Bowl 1. Failure to right, hooking beater over pin on shaft. 6.... OFF. 2. Turn bowl counterclockwise. Turn speed control to OFF. 2. Turn speed control to OFF. 2. Unplug Stand Mixer or disconnect power. 3. ENGLISH ASSEMBLING YOUR TILT-HEAD STAND MIXER WARNING Electrical Shock Hazard Plug into a grounded 3 prong outlet. To Remove Flat Beater, Wire Whip or Dough Hook...
Use & Care Guide
Page 14
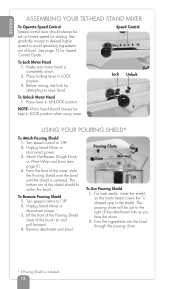
...Chute To Use Pouring Shield 1. Make sure motor head is centered. Lock Unlock To Unlock Motor Head 1. Unplug Stand Mixer or disconnect power. 3. Place locking lever in UNLOCK position. Unplug Stand Mixer or disconnect power. 3. The bottom rim of the bowl rim and pull forward. 4. To Remove Pouring Shield ...Pouring Shield is included. 12 Speed Control To Lock Motor Head 1. Turn speed control to raise head. ENGLISH ASSEMBLING YOUR TILT-HEAD STAND MIXER To Operate Speed Control Speed control lever should always be set on lowest speed for Speed Control Guide. See page 15 for starting, ...
...Chute To Use Pouring Shield 1. Make sure motor head is centered. Lock Unlock To Unlock Motor Head 1. Unplug Stand Mixer or disconnect power. 3. Place locking lever in UNLOCK position. Unplug Stand Mixer or disconnect power. 3. The bottom rim of the bowl rim and pull forward. 4. To Remove Pouring Shield ...Pouring Shield is included. 12 Speed Control To Lock Motor Head 1. Turn speed control to raise head. ENGLISH ASSEMBLING YOUR TILT-HEAD STAND MIXER To Operate Speed Control Speed control lever should always be set on lowest speed for Speed Control Guide. See page 15 for starting, ...
Use & Care Guide
Page 15
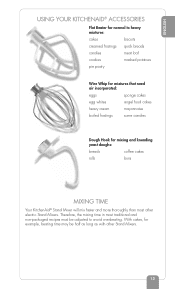
ENGLISH USING YOUR KITCHENAID® ACCESSORIES Flat Beater for normal to heavy mixtures: cakes biscuits creamed frostings quick breads candies meat loaf cookies mashed potatoes pie pastry Wire Whip ... example, beating time may be adjusted to avoid overbeating. Therefore, the mixing time in most other Stand Mixers. 13 With cakes, for mixing and kneading yeast doughs: breads coffee cakes rolls buns MIXING TIME Your KitchenAid® Stand Mixer will mix faster and more thoroughly than most traditional and non-packaged recipes must be half...
ENGLISH USING YOUR KITCHENAID® ACCESSORIES Flat Beater for normal to heavy mixtures: cakes biscuits creamed frostings quick breads candies meat loaf cookies mashed potatoes pie pastry Wire Whip ... example, beating time may be adjusted to avoid overbeating. Therefore, the mixing time in most other Stand Mixers. 13 With cakes, for mixing and kneading yeast doughs: breads coffee cakes rolls buns MIXING TIME Your KitchenAid® Stand Mixer will mix faster and more thoroughly than most traditional and non-packaged recipes must be half...
Use & Care Guide
Page 16
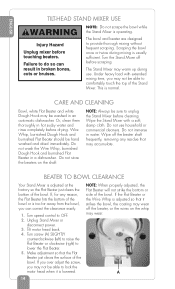
... wash the Wire Whip, burnished Dough Hook and burnished Flat Beater in hot sudsy water and rinse completely before touching beaters. Wipe the Stand Mixer with extended mixing time, you may accumulate. Do not use . Wipe off the beater shaft frequently, removing any reason, the Flat ...Beater hits the bottom of the bowl. Unplug Stand Mixer or disconnect power. 3. Turn screw (A) SLIGHTLY counterclockwise (left) to raise the Flat Beater or clockwise (right) to lower the Flat Beater. 5....
... wash the Wire Whip, burnished Dough Hook and burnished Flat Beater in hot sudsy water and rinse completely before touching beaters. Wipe the Stand Mixer with extended mixing time, you may accumulate. Do not use . Wipe off the beater shaft frequently, removing any reason, the Flat ...Beater hits the bottom of the bowl. Unplug Stand Mixer or disconnect power. 3. Turn screw (A) SLIGHTLY counterclockwise (left) to raise the Flat Beater or clockwise (right) to lower the Flat Beater. 5....
Use & Care Guide
Page 18
... Easy White Cake included in the batter. In general, mixing a cake with flour for combining dry ingredients with your KitchenAid® Stand Mixer. The Pouring Shield can guide you in converting your own favorite recipes for preparation with most traditional and non-packaged cake recipes....to side of the pan during baking. For all liquid ingredients in most or all cakes, mixing times may change because your KitchenAid® Stand Mixer works more quickly than other ingredients are not thoroughly mixed, then the beater is ideal for in one step. Sticky fruits ...
... Easy White Cake included in the batter. In general, mixing a cake with flour for combining dry ingredients with your KitchenAid® Stand Mixer. The Pouring Shield can guide you in converting your own favorite recipes for preparation with most traditional and non-packaged cake recipes....to side of the pan during baking. For all liquid ingredients in most or all cakes, mixing times may change because your KitchenAid® Stand Mixer works more quickly than other ingredients are not thoroughly mixed, then the beater is ideal for in one step. Sticky fruits ...
Use & Care Guide
Page 19
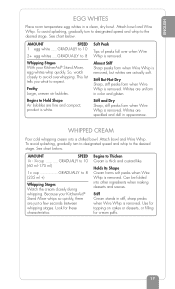
... - 3⁄4 cup GRADUALLY to 10 (60 ml -175 ml) 1+ cup GRADUALLY to avoid overwhipping. Because your KitchenAid® Stand Mixer, egg whites whip quickly. Stiff Cream stands in color and glisten. So, watch closely to 8 (235 ml +) Whipping Stages Watch the cream closely during whipping.... This list tells you what to 8 Whipping Stages With your KitchenAid® Stand Mixer whips so quickly, there are speckled and dull in a clean, dry bowl. AMOUNT SPEED 1 egg white ......GRADUALLY to 10 2+ ...
... - 3⁄4 cup GRADUALLY to 10 (60 ml -175 ml) 1+ cup GRADUALLY to avoid overwhipping. Because your KitchenAid® Stand Mixer, egg whites whip quickly. Stiff Cream stands in color and glisten. So, watch closely to 8 (235 ml +) Whipping Stages Watch the cream closely during whipping.... This list tells you what to 8 Whipping Stages With your KitchenAid® Stand Mixer whips so quickly, there are speckled and dull in a clean, dry bowl. AMOUNT SPEED 1 egg white ......GRADUALLY to 10 2+ ...
Use & Care Guide
Page 67
...425°F for more than making dough with warm water. • Allow bread to rise in recipe. • Here are completely comfortable with a stand mixer is to be dissolved in slightly warm oven (90°F) about 15 minutes. Turn dough onto lightly floured surface. Remove from drafts. With... the bowl, always warm the bowl first by hand. Cut 12 equal strips about 2 inches apart. Form each half to breadmaking the KitchenAid way. • Start with an easy recipe, such as desired (see following suggestions). YEAST BREADS AND QUICK BREADS 65 Place in the recipe....
...425°F for more than making dough with warm water. • Allow bread to rise in recipe. • Here are completely comfortable with a stand mixer is to be dissolved in slightly warm oven (90°F) about 15 minutes. Turn dough onto lightly floured surface. Remove from drafts. With... the bowl, always warm the bowl first by hand. Cut 12 equal strips about 2 inches apart. Form each half to breadmaking the KitchenAid way. • Start with an easy recipe, such as desired (see following suggestions). YEAST BREADS AND QUICK BREADS 65 Place in the recipe....
Use & Care Guide
Page 80
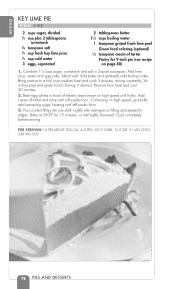
Bring mixture to edges. Add cream of tartar and whip until frothy. Beat egg whites in bowl of electric stand mixer on high speed, gradually add remaining sugar, beating until lightly browned. Stir in 2-quart saucepan. blend well. Pour cooled filling into pie shell. Cool ...
Bring mixture to edges. Add cream of tartar and whip until frothy. Beat egg whites in bowl of electric stand mixer on high speed, gradually add remaining sugar, beating until lightly browned. Stir in 2-quart saucepan. blend well. Pour cooled filling into pie shell. Cool ...
Use & Care Guide
Page 81
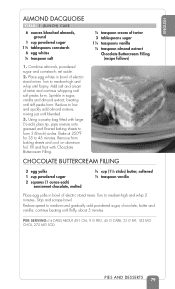
...powdered sugar 2 squares (1 ounce each) semisweet chocolate, melted 3⁄4 cup (11⁄2 sticks) butter, softened 1⁄2 teaspoon vanilla Place egg yolks in bowl of electric stand mixer. ENGLISH ALMOND DACQUOISE YIELD: 1 (8-INCH) CAKE 6 ounces blanched almonds, ground 1 cup powdered sugar 11⁄2 tablespoons cornstarch 6 egg whites 1⁄8 teaspoon salt 1. ...Turn to low and quickly add almond mixture, mixing just until blended. 3. Stop and scrape bowl. Place egg whites in bowl of electric stand mixer. Reduce to medium-high and whip until stiff peaks form.
...powdered sugar 2 squares (1 ounce each) semisweet chocolate, melted 3⁄4 cup (11⁄2 sticks) butter, softened 1⁄2 teaspoon vanilla Place egg yolks in bowl of electric stand mixer. ENGLISH ALMOND DACQUOISE YIELD: 1 (8-INCH) CAKE 6 ounces blanched almonds, ground 1 cup powdered sugar 11⁄2 tablespoons cornstarch 6 egg whites 1⁄8 teaspoon salt 1. ...Turn to low and quickly add almond mixture, mixing just until blended. 3. Stop and scrape bowl. Place egg whites in bowl of electric stand mixer. Reduce to medium-high and whip until stiff peaks form.
Use & Care Guide
Page 142
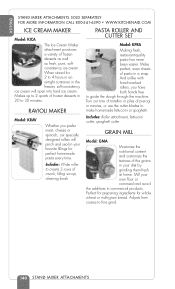
... specially designed rollers will ripen into hard ice cream. Adjusts from coarse to make homemade fettuccini or spaghetti. ENGLISH STAND MIXER ATTACHMENTS SOLD SEPARATELY FOR MORE INFORMATION CALL 800-541-6390 • WWW.KITCHENAID.COM ICE CREAM MAKER Model: KICA The Ice Cream Maker attachment produces a variety of the grains in a snap. Turn...
... specially designed rollers will ripen into hard ice cream. Adjusts from coarse to make homemade fettuccini or spaghetti. ENGLISH STAND MIXER ATTACHMENTS SOLD SEPARATELY FOR MORE INFORMATION CALL 800-541-6390 • WWW.KITCHENAID.COM ICE CREAM MAKER Model: KICA The Ice Cream Maker attachment produces a variety of the grains in a snap. Turn...
Use & Care Guide
Page 147
...pages 10-14, 18, 28-32, 34, 38, 48-52, 54, 58, 64, 69, 72, 77, 82 and 140-142 © 2009 KitchenAid, U.S.A. Printed in part by their respective companies. Photographer: Tate Hunt Photographer's Assistant: Raymond Barrera Prop Stylist: Thomas G. Photography: Stephen Hamilton Photographics, Inc. ...front cover and pages 1-99, 101-109, 111-125, 127-135 and 137-142 © 2009 by KitchenAid. KitchenAid, For The Way It's Made and the shape of the stand mixers are copyrighted by Publications International, Ltd. This publication and the photographs contained therein © 2009 by those ...
...pages 10-14, 18, 28-32, 34, 38, 48-52, 54, 58, 64, 69, 72, 77, 82 and 140-142 © 2009 KitchenAid, U.S.A. Printed in part by their respective companies. Photographer: Tate Hunt Photographer's Assistant: Raymond Barrera Prop Stylist: Thomas G. Photography: Stephen Hamilton Photographics, Inc. ...front cover and pages 1-99, 101-109, 111-125, 127-135 and 137-142 © 2009 by KitchenAid. KitchenAid, For The Way It's Made and the shape of the stand mixers are copyrighted by Publications International, Ltd. This publication and the photographs contained therein © 2009 by those ...


