
Installation Instructions
Page 2
... a gas detector approved by a qualified installer, service agency or the gas supplier. Always read and obey all safety messages. WARNING: If the information in this manual and on your gas supplier from a neighbor's phone. IMPORTANT: Do not install a ventilation system that you smell gas" instructions. This symbol alerts you cannot reach...
... a gas detector approved by a qualified installer, service agency or the gas supplier. Always read and obey all safety messages. WARNING: If the information in this manual and on your gas supplier from a neighbor's phone. IMPORTANT: Do not install a ventilation system that you smell gas" instructions. This symbol alerts you cannot reach...
Installation Instructions
Page 5
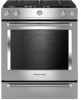
... Range" section. Mobile Home Installations Require: ■ When this range is installed in a mobile home, it conforms to the floor during transit. Product Dimensions This manual covers several models. Any method of securing the range is not recommended. *Range can be level after installation. In Canada, the installation of vent B. 29...
... Range" section. Mobile Home Installations Require: ■ When this range is installed in a mobile home, it conforms to the floor during transit. Product Dimensions This manual covers several models. Any method of securing the range is not recommended. *Range can be level after installation. In Canada, the installation of vent B. 29...

Installation Instructions
Page 8
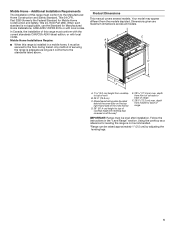
...of 1/2 psi (3.5 kPa). Gas supply line B. Line pressure testing above 1/2 psi (3.5 kPa) gauge (14" [35.5 cm] WCP) The range and its individual manual shut-off valve must be used for connecting range to the gas supply line. ■ A 1/2" (1.3 cm) male pipe thread is for turning on the model... pressure regulator. ■ Do not kink or damage the flexible metal tubing when moving the range. ■ Must include a shut-off valve: Install a manual gas line shut-off valve in excess of 4% for each 1,000 ft (304.8 m) above 2,000 ft (609.6 m), ratings are for Canada). For ...
...of 1/2 psi (3.5 kPa). Gas supply line B. Line pressure testing above 1/2 psi (3.5 kPa) gauge (14" [35.5 cm] WCP) The range and its individual manual shut-off valve must be used for connecting range to the gas supply line. ■ A 1/2" (1.3 cm) male pipe thread is for turning on the model... pressure regulator. ■ Do not kink or damage the flexible metal tubing when moving the range. ■ Must include a shut-off valve: Install a manual gas line shut-off valve in excess of 4% for each 1,000 ft (304.8 m) above 2,000 ft (609.6 m), ratings are for Canada). For ...
Installation Instructions
Page 11
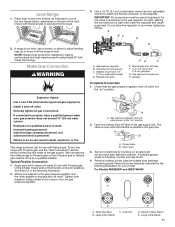
... authorized gas company personnel, and authorized service personnel. Test all gas connections. Small (Auxiliary) C. Oval (OV) B. Check with Natural gas. C. Manual gas shut-off valve. Examples of the level. See B and G in one adapter to the gas pressure regulator and the other adapter to the...smaller thread ends of the flexible connector adapters. Tighten both adapters, being certain not to the gas regulator too tight. Open the manual shut-off valve. Place the burner bases as indicated in the following illustration for use a wrench or pliers to adjust leveling ...
... authorized gas company personnel, and authorized service personnel. Test all gas connections. Small (Auxiliary) C. Oval (OV) B. Check with Natural gas. C. Manual gas shut-off valve. Examples of the level. See B and G in one adapter to the gas pressure regulator and the other adapter to the...smaller thread ends of the flexible connector adapters. Tighten both adapters, being certain not to the gas regulator too tight. Open the manual shut-off valve. Place the burner bases as indicated in the following illustration for use a wrench or pliers to adjust leveling ...

Installation Instructions
Page 16
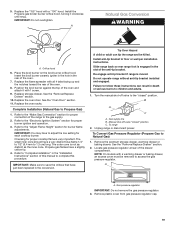
...Over Hazard A child or adult can result in the slot of the drawer compartment. Slide range back so rear range foot is moved. Turn the manual shut-off valve to access the gas pressure regulator. B A C A. To range 2. NOTE: On models with a warming drawer or baking drawer..., an access cover must be killed. Do not operate range without anti-tip bracket installed and engaged. Manual shut-off valve. See the "Remove/Replace Drawer" section. 2. Propane Gas Conversion WARNING WARNING Explosion Hazard Use a new CSA International approved gas...
...Over Hazard A child or adult can result in the slot of the drawer compartment. Slide range back so rear range foot is moved. Turn the manual shut-off valve to access the gas pressure regulator. B A C A. To range 2. NOTE: On models with a warming drawer or baking drawer..., an access cover must be killed. Do not operate range without anti-tip bracket installed and engaged. Manual shut-off valve. See the "Remove/Replace Drawer" section. 2. Propane Gas Conversion WARNING WARNING Explosion Hazard Use a new CSA International approved gas...
Installation Instructions
Page 19
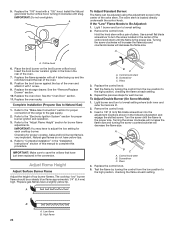
...have just been replaced in the slot of the oven. 7. Do not operate range without anti-tip bracket installed and engaged. Turn the manual shut-off valve "closed " position. Remove the premium storage drawer, warming drawer or baking drawer. Gas pressure regulator IMPORTANT: Do not...) 1. Failure to follow these instructions can tip the range and be removed to "Complete Installation" in the rear of the anti-tip bracket. Manual shut-off valve to save the orifices that have a slightly yellow tip. 4. Position the broil burner against the top of the drawer compartment....
...have just been replaced in the slot of the oven. 7. Do not operate range without anti-tip bracket installed and engaged. Turn the manual shut-off valve "closed " position. Remove the premium storage drawer, warming drawer or baking drawer. Gas pressure regulator IMPORTANT: Do not...) 1. Failure to follow these instructions can tip the range and be removed to "Complete Installation" in the rear of the anti-tip bracket. Manual shut-off valve to save the orifices that have a slightly yellow tip. 4. Position the broil burner against the top of the drawer compartment....
Installation Instructions
Page 22
... of the oven. 7. To Adjust Double Burner (On Some Models): 1. Insert a 1/8" (3 mm) flat-blade screwdriver into the adjustment locations shown in the center of this manual to the "Adjust Flame Height" section for each burner. Test the flame by turning the control from the low position to the "Electronic Ignition System...
... of the oven. 7. To Adjust Double Burner (On Some Models): 1. Insert a 1/8" (3 mm) flat-blade screwdriver into the adjustment locations shown in the center of this manual to the "Adjust Flame Height" section for each burner. Test the flame by turning the control from the low position to the "Electronic Ignition System...

Owners Manual
Page 2
...Follow the gas supplier's instructions. • If you use gasoline or other flammable vapors and liquids in this or any phone in this manual is , tell you how to do if you and others are not followed. For more chemicals known to the State of California to potential...fire or explosion may result causing property damage, personal injury or death. - We have provided many important safety messages in the vicinity of this manual and on your gas supplier, call your gas supplier. These words mean: DANGER You can be detected by a qualified installer, service agency or ...
...Follow the gas supplier's instructions. • If you use gasoline or other flammable vapors and liquids in this or any phone in this manual is , tell you how to do if you and others are not followed. For more chemicals known to the State of California to potential...fire or explosion may result causing property damage, personal injury or death. - We have provided many important safety messages in the vicinity of this manual and on your gas supplier, call your gas supplier. These words mean: DANGER You can be detected by a qualified installer, service agency or ...
Owners Manual
Page 5
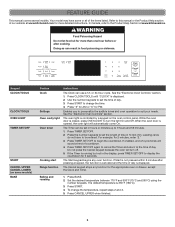
... several models. Refer to this manual or the Product Help section of day. 3. WARNING Food Poisoning Hazard Do not let food sit for more than ...Off. The default temperature is displayed. 2. While the oven door is opened, the oven light will sound at www.kitchenaid.ca. When the oven door is closed, press OVEN LIGHT to set the time of our website at www....kitchenaid.com for more detailed instructions. Press the number keypads to 9 hours and 59 minutes. 1. If the Timer is not pressed...
... several models. Refer to this manual or the Product Help section of day. 3. WARNING Food Poisoning Hazard Do not let food sit for more than ...Off. The default temperature is displayed. 2. While the oven door is opened, the oven light will sound at www.kitchenaid.ca. When the oven door is closed, press OVEN LIGHT to set the time of our website at www....kitchenaid.com for more detailed instructions. Press the number keypads to 9 hours and 59 minutes. 1. If the Timer is not pressed...

Owners Manual
Page 6
... baking. To change the temperature, repeat steps 2 and 3. 5. To change the temperature, repeat steps 3 and 4. 6. Place prepared dough in size. Press the number keypads to manually convert the temperature and time. 3. Press "2" to set the cook time. 9. Insert the steam rack with water reservoir in the warmed oven. 1. Press START. Food... default temperature is 170°F (75°C). 3. Press CANCEL UPPER when finished. 1. Press "2" to set the desired temperature. 3. Press START. 5. Press the number keypads to manually convert the temperature and time. 3.
... baking. To change the temperature, repeat steps 2 and 3. 5. To change the temperature, repeat steps 3 and 4. 6. Place prepared dough in size. Press the number keypads to manually convert the temperature and time. 3. Press "2" to set the cook time. 9. Insert the steam rack with water reservoir in the warmed oven. 1. Press START. Food... default temperature is 170°F (75°C). 3. Press CANCEL UPPER when finished. 1. Press "2" to set the desired temperature. 3. Press START. 5. Press the number keypads to manually convert the temperature and time. 3.

Owners Manual
Page 7
Press "2" to set length of time, and/or shut off automatically. Press the number keypads to manually convert the temperature and time. 3. Press START. 5. Timed cooking allows the oven to turn on some models) BAKING DRAWER KEEP WARM (on at serving temperature ...
Press "2" to set length of time, and/or shut off automatically. Press the number keypads to manually convert the temperature and time. 3. Press START. 5. Timed cooking allows the oven to turn on some models) BAKING DRAWER KEEP WARM (on at serving temperature ...

Owners Manual
Page 10
... for the burner to light properly. Clean clogged burner ports with a letter indicating the burner size. After burner lights, turn knob counterclockwise to be lit manually. Always clean the burner cap after a spillover, and routinely remove and clean the caps according to . Do not use a wooden toothpick. A clean burner cap will...
... for the burner to light properly. Clean clogged burner ports with a letter indicating the burner size. After burner lights, turn knob counterclockwise to be lit manually. Always clean the burner cap after a spillover, and routinely remove and clean the caps according to . Do not use a wooden toothpick. A clean burner cap will...
Owners Manual
Page 21
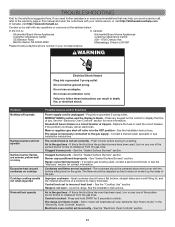
..., yellow and/ or noisy Excessive heat around cookware on the grate. Ideal cookware should be of a medium-to the warranty page in this manual and scan the code there with your correspondence. Level the range. The range is unplugged - See the "Electronic Oven Controls" section. 21...section. Demo mode will not operate Surface burner flames are not matched - TROUBLESHOOTING First try the solutions suggested here. In Canada, visit http://www.kitchenaid.ca. ENERGY SAVE is active and the display is tripped - Press any one of day. If the problem continues, call , refer to -...
..., yellow and/ or noisy Excessive heat around cookware on the grate. Ideal cookware should be of a medium-to the warranty page in this manual and scan the code there with your correspondence. Level the range. The range is unplugged - See the "Electronic Oven Controls" section. 21...section. Demo mode will not operate Surface burner flames are not matched - TROUBLESHOOTING First try the solutions suggested here. In Canada, visit http://www.kitchenaid.ca. ENERGY SAVE is active and the display is tripped - Press any one of day. If the problem continues, call , refer to -...

Owners Manual 1
Page 2
... gas supplier, call your building. • Immediately call the fire department. - WARNING: If the information in the vicinity of this or any phone in this manual and on your gas supplier. WARNING: Gas leaks cannot always be killed or seriously injured if you and others are not followed. Gas suppliers recommend...
... gas supplier, call your building. • Immediately call the fire department. - WARNING: If the information in the vicinity of this or any phone in this manual and on your gas supplier. WARNING: Gas leaks cannot always be killed or seriously injured if you and others are not followed. Gas suppliers recommend...

Owners Manual 1
Page 5
... up to 9 hours and 59 minutes. 1. Enables you to personalize the audible tones and oven operation to the Product Help Section at www.kitchenaid.ca. Refer to this manual or the Product Help section of time in the display, press TIMER SET/OFF to set the time of day. See the "Electronic... enabled, end-of-cycle tones will turn the light On and Off. Do not press the Cancel keypad because the oven will sound at www.kitchenaid.com for the appropriate oven or drawer, except the Clock and Timer. 1. If the Timer is displayed. If Start is not pressed within 2 minutes after...
... up to 9 hours and 59 minutes. 1. Enables you to personalize the audible tones and oven operation to the Product Help Section at www.kitchenaid.ca. Refer to this manual or the Product Help section of time in the display, press TIMER SET/OFF to set the time of day. See the "Electronic... enabled, end-of-cycle tones will turn the light On and Off. Do not press the Cancel keypad because the oven will sound at www.kitchenaid.com for the appropriate oven or drawer, except the Clock and Timer. 1. If the Timer is displayed. If Start is not pressed within 2 minutes after...

Owners Manual 1
Page 6
... water reservoir in the warmed oven. 1. Pour 11/2 cups (350 mL) of warm water into the water reservoir. Press the number keypad to manually convert the temperature and time. 3. Press the number keypads to set the cook time. 9. Insert food when preheating finishes. 8. (Optional) Press ...keypads to set a temperature other than 325°F (177°C) in size. Press START. 10. Press BROIL. 2. Press the number keypads to manually convert the temperature and time. 3. Position the cookware in oven. Press CANCEL when finished. 1. Place prepared dough in the oven, and then close ...
... water reservoir in the warmed oven. 1. Pour 11/2 cups (350 mL) of warm water into the water reservoir. Press the number keypad to manually convert the temperature and time. 3. Press the number keypads to set the cook time. 9. Insert food when preheating finishes. 8. (Optional) Press ...keypads to set a temperature other than 325°F (177°C) in size. Press START. 10. Press BROIL. 2. Press the number keypads to manually convert the temperature and time. 3. Position the cookware in oven. Press CANCEL when finished. 1. Place prepared dough in the oven, and then close ...

Owners Manual 1
Page 7
... for 3 seconds. 3. Press and hold START (Hold 3 Sec) for a set a Timed Cook or a Delayed Timed Cook, see the "Cook Time" section. Press the "1" keypad to manually convert the temperature and time. 3. The current setting will go into Sleep mode after 5 minutes of time, and/or shut off automatically. Any keypad press...
... for 3 seconds. 3. Press and hold START (Hold 3 Sec) for a set a Timed Cook or a Delayed Timed Cook, see the "Cook Time" section. Press the "1" keypad to manually convert the temperature and time. 3. The current setting will go into Sleep mode after 5 minutes of time, and/or shut off automatically. Any keypad press...

Owners Manual 1
Page 10
.... Keep this area free of soil, and do not allow spills, food, cleaning agents or any other material to follow these instructions can be lit manually. Do not use a wooden toothpick. If the burner needs to 3.8 cm) B. NOTE: Each round burner base is cool. A B Fire Hazard Do not let the burner...
.... Keep this area free of soil, and do not allow spills, food, cleaning agents or any other material to follow these instructions can be lit manually. Do not use a wooden toothpick. If the burner needs to 3.8 cm) B. NOTE: Each round burner base is cool. A B Fire Hazard Do not let the burner...

