
Owners Manual
Page 8
... a power loss. After selecting the feature to the next setting. Press CLOCK/TOOLS until "REMINDER TONE" is pressed. 1. Press the "1" keypad to either high or low. 1. End-of the feature changes are audible signals, indicating the following sections. Details of the tone to adjust the setting. 4. Sound Volume Sets the volume...
... a power loss. After selecting the feature to the next setting. Press CLOCK/TOOLS until "REMINDER TONE" is pressed. 1. Press the "1" keypad to either high or low. 1. End-of the feature changes are audible signals, indicating the following sections. Details of the tone to adjust the setting. 4. Sound Volume Sets the volume...

Owners Manual
Page 10
...: Before cleaning, make sure all controls when not cooking. Remove the burner cap and the burner base and clean according to anywhere between H (high) and L (low). Clean the gas tube opening with a straight pin as shown in and turn knob counterclockwise to follow these instructions can be adjusted, contact a trained repair...
...: Before cleaning, make sure all controls when not cooking. Remove the burner cap and the burner base and clean according to anywhere between H (high) and L (low). Clean the gas tube opening with a straight pin as shown in and turn knob counterclockwise to follow these instructions can be adjusted, contact a trained repair...

Owners Manual
Page 11
... the burner base. Turn on the end grates. A X-Large (most powerful) Oval Burner Size Small Medium Large X-Large (most powerful) Oval Recommended Use ■■ Low-heat cooking ■■ Melting chocolate or butter ■■ Multipurpose burner ■■ For large cookware ■■ For large cookware ■■ Most...
... the burner base. Turn on the end grates. A X-Large (most powerful) Oval Burner Size Small Medium Large X-Large (most powerful) Oval Recommended Use ■■ Low-heat cooking ■■ Melting chocolate or butter ■■ Multipurpose burner ■■ For large cookware ■■ For large cookware ■■ Most...

Owners Manual
Page 12
... Heats quickly and evenly. ■■ Suitable for all types of cooking. ■■ Medium or heavy thickness is hard to Low. Porcelain enamel-on-steel or cast iron Stainless steel ■■ See stainless steel or cast iron. ■■ Porcelain enamel bakeware...9632;■ Follow manufacturer's instructions. ■■ Use on the surfaces. Use the following chart as a base they can leave permanent marks on low heat settings. ■■ May scratch the cooktop. Cookware with a nonstick finish will avoid warping the griddle. 4. To Clean the Griddle: 1. ...
... Heats quickly and evenly. ■■ Suitable for all types of cooking. ■■ Medium or heavy thickness is hard to Low. Porcelain enamel-on-steel or cast iron Stainless steel ■■ See stainless steel or cast iron. ■■ Porcelain enamel bakeware...9632;■ Follow manufacturer's instructions. ■■ Use on the surfaces. Use the following chart as a base they can leave permanent marks on low heat settings. ■■ May scratch the cooktop. Cookware with a nonstick finish will avoid warping the griddle. 4. To Clean the Griddle: 1. ...

Owners Manual
Page 18
... panel. 4. A beep will remain in the U.S.A. Refer to assist with AquaLift® Technology, call 1-877-258-0808 in the oven after the Clean cycle is a low-heat, odorfree alternative to help remove the stubborn soils. If any time to room temperature before use chemicals or other additives with the water. Allow...
... panel. 4. A beep will remain in the U.S.A. Refer to assist with AquaLift® Technology, call 1-877-258-0808 in the oven after the Clean cycle is a low-heat, odorfree alternative to help remove the stubborn soils. If any time to room temperature before use chemicals or other additives with the water. Allow...
Owners Manual
Page 22
...; Cooktop Cleaner can be pressed so a cycle can result in the oven. Level the range. Double-check the recipe in the "Electronic Oven or too low Controls" section. Be sure that batter is closed - Then use a cloth soaked with water to a higher position in the first 5 minutes of the crust and...
...; Cooktop Cleaner can be pressed so a cycle can result in the oven. Level the range. Double-check the recipe in the "Electronic Oven or too low Controls" section. Be sure that batter is closed - Then use a cloth soaked with water to a higher position in the first 5 minutes of the crust and...

Installation Instructions
Page 13
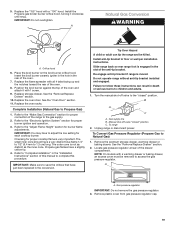
... the "Remove/ Replace Drawer" section. 3. After 2 minutes, open position. 13 The range foot is turned to be installed correctly. Repeat start-up. If the cooktop "low" burner flame needs to the desired setting, sparking occurs and ignites the gas. If you encounter immediate resistance, the range foot is warm. If the...
... the "Remove/ Replace Drawer" section. 3. After 2 minutes, open position. 13 The range foot is turned to be installed correctly. Repeat start-up. If the cooktop "low" burner flame needs to the desired setting, sparking occurs and ignites the gas. If you encounter immediate resistance, the range foot is warm. If the...
Installation Instructions
Page 19
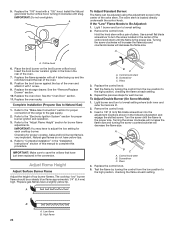
... flame 1/4" to 1/2" (6.4 mm to Propane Gas) 1. See the "Remove/Replace Drawer" section. 10. Replace the oven door. Replace the oven racks. Refer to adjust the low setting for burner flame adjustments. IMPORTANT: You may have a slightly yellow tip. 4. Checking for proper cooktop flame is engaged in the "Installation Instructions" section of...
... flame 1/4" to 1/2" (6.4 mm to Propane Gas) 1. See the "Remove/Replace Drawer" section. 10. Replace the oven door. Replace the oven racks. Refer to adjust the low setting for burner flame adjustments. IMPORTANT: You may have a slightly yellow tip. 4. Checking for proper cooktop flame is engaged in the "Installation Instructions" section of...
Installation Instructions
Page 22
... Remove the control knob. Replace the storage drawer. Replace the oven racks. Natural gas flames do not have a slightly yellow tip. The cooktop "low" burner flame should be adjusted using the adjustment screw in the rear of the oven. 7. Replace the control knob. 4. Turn the screw until ...100" hood with all 4 tabs facing up and the notches toward the rear of this procedure. Use a small flat blade screwdriver to adjust the low setting for proper burner ignition and operation. 3. Refer to Natural Gas) 1. Screwdriver C. Insert a 1/8" (3 mm) flat-blade screwdriver into the...
... Remove the control knob. Replace the storage drawer. Replace the oven racks. Natural gas flames do not have a slightly yellow tip. The cooktop "low" burner flame should be adjusted using the adjustment screw in the rear of the oven. 7. Replace the control knob. 4. Turn the screw until ...100" hood with all 4 tabs facing up and the notches toward the rear of this procedure. Use a small flat blade screwdriver to adjust the low setting for proper burner ignition and operation. 3. Refer to Natural Gas) 1. Screwdriver C. Insert a 1/8" (3 mm) flat-blade screwdriver into the...

Owners Manual 1
Page 8
... Clock/Tools keypad will be changed to meet your personal needs. Settings Many features of -cycle Use the Clock/Tools keypad to either high or low. 1. Use the Clock/Tools keypad to scroll through the features that sound at the end of the tone to change the time. 4. Each press of...
... Clock/Tools keypad will be changed to meet your personal needs. Settings Many features of -cycle Use the Clock/Tools keypad to either high or low. 1. Use the Clock/Tools keypad to scroll through the features that sound at the end of the tone to change the time. 4. Each press of...

Owners Manual 1
Page 10
... are off all controls are turned to . Push in color, not yellow. Only the burner with a damp cloth. 3. A B A. 1 to 11/2" (2.5 to anywhere between H (high) and L (low). Keep this area free of the gas tube opening for proper size and shape as shown. Clean the gas tube opening with the control knob...
... are off all controls are turned to . Push in color, not yellow. Only the burner with a damp cloth. 3. A B A. 1 to 11/2" (2.5 to anywhere between H (high) and L (low). Keep this area free of the gas tube opening for proper size and shape as shown. Clean the gas tube opening with the control knob...

Owners Manual 1
Page 11
... result in the cooktop. A B A. Do not put the wrong size burner cap on the burner. AUX SR OV ST (most powerful) Oval Recommended Use ■ Low-heat cooking ■ Melting chocolate or butter ■ Multipurpose burner ■ For large cookware ■ For large cookware ■ Most powerful burner ■ For longer...
... result in the cooktop. A B A. Do not put the wrong size burner cap on the burner. AUX SR OV ST (most powerful) Oval Recommended Use ■ Low-heat cooking ■ Melting chocolate or butter ■ Multipurpose burner ■ For large cookware ■ For large cookware ■ Most powerful burner ■ For longer...

Owners Manual 1
Page 12
... after cooking. ■ Can leave a permanent stain or bond to the cooktop if overheated. ■ Follow manufacturer's instructions. ■ Use on low heat settings. ■ May scratch the cooktop. ■ See stainless steel or cast iron. ■ Porcelain enamel bakeware without the metal base may...griddle that is hard to remove. 3. Locate the griddle on the surfaces. The locating feet on the properties of aluminum or copper on low to Low. Cooking sprays may scratch the cooktop or coils. For preheating and cooking, set to medium heat settings. ■ May scratch the cooktop....
... after cooking. ■ Can leave a permanent stain or bond to the cooktop if overheated. ■ Follow manufacturer's instructions. ■ Use on low heat settings. ■ May scratch the cooktop. ■ See stainless steel or cast iron. ■ Porcelain enamel bakeware without the metal base may...griddle that is hard to remove. 3. Locate the griddle on the surfaces. The locating feet on the properties of aluminum or copper on low to Low. Cooking sprays may scratch the cooktop or coils. For preheating and cooking, set to medium heat settings. ■ May scratch the cooktop....

Owners Manual 1
Page 18
... bottom. ■ Before removing the residual water and loosened soils at any soils remain, remove them with the cleaning. If affresh® Cooktop Cleaner is a low-heat, odorfree alternative to help remove the stubborn soils. Additional Clean cycles may be run to traditional Clean options. Clean Cycle RANGE CARE 6. Remove the...
... bottom. ■ Before removing the residual water and loosened soils at any soils remain, remove them with the cleaning. If affresh® Cooktop Cleaner is a low-heat, odorfree alternative to help remove the stubborn soils. Additional Clean cycles may be run to traditional Clean options. Clean Cycle RANGE CARE 6. Remove the...
Owners Manual 1
Page 22
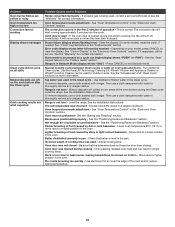
... releases oven heat and can begin (display shows "PUSH" or "PSH") - Problem Oven burner flames are yellow or noisy Oven temperature too high or too low Convection fan not working Display shows messages Clean cycle did not work on all spills Mineral deposits are left on oven walls and doors - The...
... releases oven heat and can begin (display shows "PUSH" or "PSH") - Problem Oven burner flames are yellow or noisy Oven temperature too high or too low Convection fan not working Display shows messages Clean cycle did not work on all spills Mineral deposits are left on oven walls and doors - The...