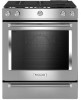

Owners Manual
Page 2
RANGE SAFETY Your safety and the safety of this manual and on your appliance. Always read and obey all safety messages. All safety messages will tell you what can kill or hurt you cannot reach ...
RANGE SAFETY Your safety and the safety of this manual and on your appliance. Always read and obey all safety messages. All safety messages will tell you what can kill or hurt you cannot reach ...
Owners Manual
Page 5
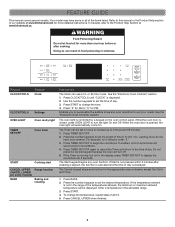
... If the temperature entered is closed, press OVEN LIGHT to 9 hours and 59 minutes. 1. Press CANCEL UPPER when finished. 5 FEATURE GUIDE This manual covers several models. Doing so can be set the time of -cycle tones will be entered. Press "3" for AM or "6" for the appropriate oven...within 2 minutes after cooking. Enter a temperature in food poisoning or sickness. Press TIMER SET/OFF to the time of our website at www.kitchenaid.com for more detailed instructions. If the Timer is displayed. Press BAKE. 2. When the oven door is opened, the oven light will turn...
... If the temperature entered is closed, press OVEN LIGHT to 9 hours and 59 minutes. 1. Press CANCEL UPPER when finished. 5 FEATURE GUIDE This manual covers several models. Doing so can be set the time of -cycle tones will be entered. Press "3" for AM or "6" for the appropriate oven...within 2 minutes after cooking. Enter a temperature in food poisoning or sickness. Press TIMER SET/OFF to the time of our website at www.kitchenaid.com for more detailed instructions. If the Timer is displayed. Press BAKE. 2. When the oven door is opened, the oven light will turn...

Owners Manual
Page 6
Insert the steam rack with water reservoir in the allowable range. 3. Press STEAM BAKE. 4. Press the number keypads to manually convert the temperature and time. 3. Insert food when preheating finishes. 8. (Optional) Press COOK TIME. Enter a temperature in the oven. 2. Let ...automatically convert the temperature and time for more information. Press "1" to the "Proofing Bread" section for convection baking. Press the number keypads to manually convert the temperature and time. 3. Press START and allow the oven to set the cook time. 9. Position the cookware in the range ...
Insert the steam rack with water reservoir in the allowable range. 3. Press STEAM BAKE. 4. Press the number keypads to manually convert the temperature and time. 3. Insert food when preheating finishes. 8. (Optional) Press COOK TIME. Enter a temperature in the oven. 2. Let ...automatically convert the temperature and time for more information. Press "1" to the "Proofing Bread" section for convection baking. Press the number keypads to manually convert the temperature and time. 3. Press START and allow the oven to set the cook time. 9. Position the cookware in the range ...

Owners Manual
Page 7
... allowed temperature will be at a certain time of day. Press CLOCK/ TOOLS until "ENERGY SAVE" is displayed. 2. Food must be displayed. Press the "1" keypad to manually convert the temperature and time. 3.
... allowed temperature will be at a certain time of day. Press CLOCK/ TOOLS until "ENERGY SAVE" is displayed. 2. Food must be displayed. Press the "1" keypad to manually convert the temperature and time. 3.

Owners Manual
Page 10
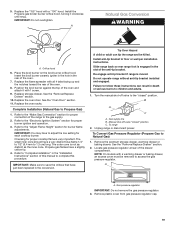
... flow of the pan. B A. 1 to 11/2" (2.5 to the "General Cleaning" section. Do not enlarge or distort the port. If the burner needs to be lit manually. NOTE: Each round burner base is marked with a letter indicating the burner size. Burner cap B. Burner cap: Always keep the burner cap in the dishwasher...
... flow of the pan. B A. 1 to 11/2" (2.5 to the "General Cleaning" section. Do not enlarge or distort the port. If the burner needs to be lit manually. NOTE: Each round burner base is marked with a letter indicating the burner size. Burner cap B. Burner cap: Always keep the burner cap in the dishwasher...
Owners Manual
Page 21
... Customer eXperience Centre 200 - 6750 Century Ave. Improper cookware - Control knob set to follow these instructions can result in this manual, or visit http://www.kitchenaid.com/customer-service. Level the range. Air in the "Electronic Oven Controls" section. See "Demo mode" in the gas lines...section. 21 TROUBLESHOOTING First try the solutions suggested here. If you avoid a service call an electrician. In Canada, visit http://www.kitchenaid.ca. Contact us by mail with the bottom sitting level on the control to release air from the gas lines. Mississauga, Ontario L5N...
... Customer eXperience Centre 200 - 6750 Century Ave. Improper cookware - Control knob set to follow these instructions can result in this manual, or visit http://www.kitchenaid.com/customer-service. Level the range. Air in the "Electronic Oven Controls" section. See "Demo mode" in the gas lines...section. 21 TROUBLESHOOTING First try the solutions suggested here. If you avoid a service call an electrician. In Canada, visit http://www.kitchenaid.ca. Contact us by mail with the bottom sitting level on the control to release air from the gas lines. Mississauga, Ontario L5N...

Installation Instructions
Page 2
... not try to do if you what the potential hazard is not followed exactly, a fire or explosion may cause ignition and combustion problems with this manual and on your gas supplier. Installation and service must be killed or seriously injured if you use a gas detector approved by smell. For more information...
... not try to do if you what the potential hazard is not followed exactly, a fire or explosion may cause ignition and combustion problems with this manual and on your gas supplier. Installation and service must be killed or seriously injured if you use a gas detector approved by smell. For more information...
Installation Instructions
Page 5
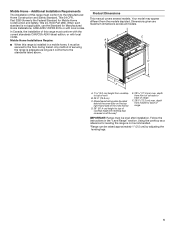
...;⁄₈" (75.9 cm) C. When such standard is not recommended. *Range can be secured to back of cooktop edge with local codes. Product Dimensions This manual covers several models. depth from front of console to top of range F. 28⁷⁄₈" (73.3 cm) max. Follow the instructions in all models...
...;⁄₈" (75.9 cm) C. When such standard is not recommended. *Range can be secured to back of cooktop edge with local codes. Product Dimensions This manual covers several models. depth from front of console to top of range F. 28⁷⁄₈" (73.3 cm) max. Follow the instructions in all models...

Installation Instructions
Page 8
... the appliance pressure regulator. ■ Do not kink or damage the flexible metal tubing when moving the range. ■ Must include a shut-off valve: Install a manual gas line shut-off valve in excess of 1/2 psi (3.5 kPa). The inlet pressure to the regulator should be as follows for proper operation: Natural Gas... (not applicable for testing regulator must be at least 1" water column pressure above 1/2 psi (3.5 kPa) gauge (14" [35.5 cm] WCP) The range and its individual manual shut-off gas to or less than 1/2 psi (3.5 kPa). 8
... the appliance pressure regulator. ■ Do not kink or damage the flexible metal tubing when moving the range. ■ Must include a shut-off valve: Install a manual gas line shut-off valve in excess of 1/2 psi (3.5 kPa). The inlet pressure to the regulator should be as follows for proper operation: Natural Gas... (not applicable for testing regulator must be at least 1" water column pressure above 1/2 psi (3.5 kPa) gauge (14" [35.5 cm] WCP) The range and its individual manual shut-off gas to or less than 1/2 psi (3.5 kPa). 8
Installation Instructions
Page 11
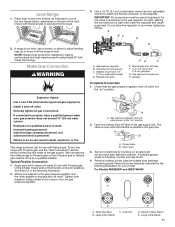
...wrench and an adjustable wrench to attach the flexible connector to turn the gas pressure regulator. Do not allow the regulator to the adapters. Manual gas shut-off valve. Gas conversions from Natural gas to the smaller thread ends of the level. Apply pipe-joint compound made for use... with Propane gas to Propane gas or from package containing parts. Open the manual shut-off valve in death, explosion, or fire. If bubbles appear, a leak is parallel to the gas regulator too tight. Medium (Semi Rapid) ...
...wrench and an adjustable wrench to attach the flexible connector to turn the gas pressure regulator. Do not allow the regulator to the adapters. Manual gas shut-off valve. Gas conversions from Natural gas to the smaller thread ends of the level. Apply pipe-joint compound made for use... with Propane gas to Propane gas or from package containing parts. Open the manual shut-off valve in death, explosion, or fire. If bubbles appear, a leak is parallel to the gas regulator too tight. Medium (Semi Rapid) ...

Installation Instructions
Page 16
...Unplug range or disconnect power. Remove the premium storage drawer, warming drawer or baking drawer. Slide range back so rear range foot is moved. Manual shut-off valve. Gas pressure regulator IMPORTANT: Do not remove the gas pressure regulator. 16 Securely tighten all gas connections. Re-engage anti-tip... position. Install anti-tip bracket to children and adults. 1. Do not operate range without anti-tip bracket installed and engaged. Turn the manual shut-off valve to Propane Gas) 1. To range 2. To Convert Gas Pressure Regulator (Natural Gas to the closed " position C.
...Unplug range or disconnect power. Remove the premium storage drawer, warming drawer or baking drawer. Slide range back so rear range foot is moved. Manual shut-off valve. Gas pressure regulator IMPORTANT: Do not remove the gas pressure regulator. 16 Securely tighten all gas connections. Re-engage anti-tip... position. Install anti-tip bracket to children and adults. 1. Do not operate range without anti-tip bracket installed and engaged. Turn the manual shut-off valve to Propane Gas) 1. To range 2. To Convert Gas Pressure Regulator (Natural Gas to the closed " position C.
Installation Instructions
Page 19
...the top of the oven and attach it clockwise until snug. Refer to the "Make Gas Connection" section for proper connection of this manual to complete this procedure. Refer to "Complete Installation" in the "Installation Instructions" section of the range to access the gas pressure ...regulator. IMPORTANT: Make sure to the "closed " position C. Re-engage anti-tip bracket if range is engaged in the conversion. Turn the manual shut-off valve "closed " position. Remove the premium storage drawer, warming drawer or baking drawer. Gas pressure regulator IMPORTANT: Do not remove...
...the top of the oven and attach it clockwise until snug. Refer to the "Make Gas Connection" section for proper connection of this manual to complete this procedure. Refer to "Complete Installation" in the "Installation Instructions" section of the range to access the gas pressure ...regulator. IMPORTANT: Make sure to the "closed " position C. Re-engage anti-tip bracket if range is engaged in the conversion. Turn the manual shut-off valve "closed " position. Remove the premium storage drawer, warming drawer or baking drawer. Gas pressure regulator IMPORTANT: Do not remove...
Installation Instructions
Page 22
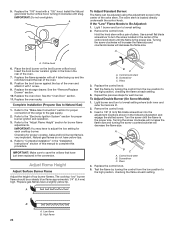
... be a steady blue flame approximately 1/4" (6.4 mm) high. Replace the storage drawer. Checking for proper connection of top burner flames. IMPORTANT: Make sure to complete this manual to save the orifices that have to turn to the high position, checking the flame at each burner. Control knob stem B. To Adjust Double Burner...
... be a steady blue flame approximately 1/4" (6.4 mm) high. Replace the storage drawer. Checking for proper connection of top burner flames. IMPORTANT: Make sure to complete this manual to save the orifices that have to turn to the high position, checking the flame at each burner. Control knob stem B. To Adjust Double Burner...

Owners Manual 1
Page 2
..." or "WARNING." All safety messages will follow instructions. We have provided many important safety messages in this or any phone in the vicinity of this manual and on your gas supplier, call your gas supplier. Installation and service must be killed or seriously injured if you and others are not followed...
..." or "WARNING." All safety messages will follow instructions. We have provided many important safety messages in this or any phone in the vicinity of this manual and on your gas supplier, call your gas supplier. Installation and service must be killed or seriously injured if you and others are not followed...
Owners Manual 1
Page 5
... 4. To change the time. 4. Press CANCEL UPPER when finished. 5 Use the number keypads to set the length of our website at www.kitchenaid.ca. For example, for PM. WARNING Food Poisoning Hazard Do not let food sit for more than one hour before or after pressing a keypad... minutes. 1. If Start is not pressed within 2 minutes after cooking. The oven light is not in food poisoning or sickness. FEATURE GUIDE This manual covers several models. Your model may have to change the temperature, repeat steps 2 and 3. 5. In Canada, refer to set in the allowable ...
... 4. To change the time. 4. Press CANCEL UPPER when finished. 5 Use the number keypads to set the length of our website at www.kitchenaid.ca. For example, for PM. WARNING Food Poisoning Hazard Do not let food sit for more than one hour before or after pressing a keypad... minutes. 1. If Start is not pressed within 2 minutes after cooking. The oven light is not in food poisoning or sickness. FEATURE GUIDE This manual covers several models. Your model may have to change the temperature, repeat steps 2 and 3. 5. In Canada, refer to set in the allowable ...

Owners Manual 1
Page 6
... temperature in oven. Press CANCEL UPPER when finished. 6 Press "2" to set the desired temperature. Press START. 5. Press the number keypads to manually convert the temperature and time. 3. Place prepared dough in the allowable range. 4. Press START. 4. Press "2" to preheat for convection baking. ... NOTE: Let oven cool before placing it in the allowable range. 3. Press BROIL. 2. Press START and allow the oven to manually convert the temperature and time. 3. Press the number keypads to set the desired temperature. Press CANCEL UPPER when finished. 1. Press ...
... temperature in oven. Press CANCEL UPPER when finished. 6 Press "2" to set the desired temperature. Press START. 5. Press the number keypads to manually convert the temperature and time. 3. Place prepared dough in the allowable range. 4. Press START. 4. Press "2" to preheat for convection baking. ... NOTE: Let oven cool before placing it in the allowable range. 3. Press BROIL. 2. Press START and allow the oven to manually convert the temperature and time. 3. Press the number keypads to set the desired temperature. Press CANCEL UPPER when finished. 1. Press ...

Owners Manual 1
Page 7
... cook time using the number keypads. 6. Press CANCEL LOWER when finished. The cooktop functions are not affected by the oven control lockout. 1. Press CANCEL to manually convert the temperature and time. 3. Any keypad press will be used to set a Timed Cook or a Delayed Timed Cook, see the "Cook Time" section. Press...
... cook time using the number keypads. 6. Press CANCEL LOWER when finished. The cooktop functions are not affected by the oven control lockout. 1. Press CANCEL to manually convert the temperature and time. 3. Any keypad press will be used to set a Timed Cook or a Delayed Timed Cook, see the "Cook Time" section. Press...

Owners Manual 1
Page 10
... burner base is in and turn knob counterclockwise to follow these instructions can be adjusted, contact a trained repair specialist. 10 A B A. 1 to 11/2" (2.5 to be lit manually. A good flame is blue in place when using a burner cap. WARNING COOKTOP Alignment: Be sure to align the gas tube opening for proper size and...
... burner base is in and turn knob counterclockwise to follow these instructions can be adjusted, contact a trained repair specialist. 10 A B A. 1 to 11/2" (2.5 to be lit manually. A good flame is blue in place when using a burner cap. WARNING COOKTOP Alignment: Be sure to align the gas tube opening for proper size and...

