Installation Guide
Page 2
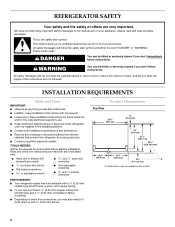
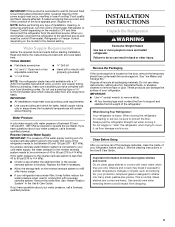
Always read and obey all governing codes and ordinances. This is , tell you how to potential hazards that prevent the refrigerator from kitchen cabinets that can purchase a ¹⁄₄" (6.35 mm) copper tubing with a ¹⁄₄" (6.35 mm) .... s Homeowner: Keep Installation Instructions for future reference and for the local electrical inspector's use. s Keep cardboard shipping piece or plywood under refrigerator until it is installed in this manual and on the model 2 All safety messages will follow the instructions provided with any moldings or decorative ...
Always read and obey all governing codes and ordinances. This is , tell you how to potential hazards that prevent the refrigerator from kitchen cabinets that can purchase a ¹⁄₄" (6.35 mm) copper tubing with a ¹⁄₄" (6.35 mm) .... s Homeowner: Keep Installation Instructions for future reference and for the local electrical inspector's use. s Keep cardboard shipping piece or plywood under refrigerator until it is installed in this manual and on the model 2 All safety messages will follow the instructions provided with any moldings or decorative ...
Installation Guide
Page 3
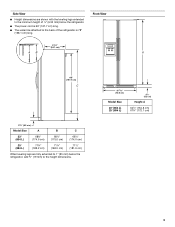
... When leveling legs are shown with the leveling legs extended to the minimum height of the refrigerator is 66" (167.7 cm) long. Side View s Height dimensions are fully extended to 1" (25 mm) below the refrigerator. s The water line attached to the back of ¹⁄₄" (6.35 mm)... below the refrigerator, add ³⁄₄" (19 mm) to the height dimensions. 35 90.6 cm) Model Size 23' (654 L) 25' (694 L) 3⁵⁄₈" (9.2 cm) Height A 64⁷⁄₈" (164.8 cm) 67³⁄₄" ...
... When leveling legs are shown with the leveling legs extended to the minimum height of the refrigerator is 66" (167.7 cm) long. Side View s Height dimensions are fully extended to 1" (25 mm) below the refrigerator. s The water line attached to the back of ¹⁄₄" (6.35 mm)... below the refrigerator, add ³⁄₄" (19 mm) to the height dimensions. 35 90.6 cm) Model Size 23' (654 L) 25' (694 L) 3⁵⁄₈" (9.2 cm) Height A 64⁷⁄₈" (164.8 cm) 67³⁄₄" ...
Installation Guide
Page 4
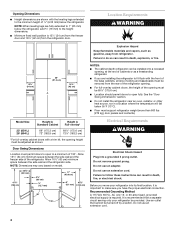
s Location should permit doors to open to a minimum of 150°. Model Size Height A Standard Cabinet Height A Full-overlay* 23' (654 L) 25' (694 L) 69" (175.3 cm) 72" (182.9 cm) 69¹⁄₈" (175.6 cm) 72¹⁄₈" (183.2 cm) *For full...is required. Recommended Grounding Method A 115 Volt, 60 Hz., AC only 15- See the "Door Swing Dimensions" section. Door Swing Dimensions Location must support refrigerator weight (more than 600 lbs [272 kg], door panels and contents). Failure to do so can result in death, explosion, or fire. 13¹⁄...
s Location should permit doors to open to a minimum of 150°. Model Size Height A Standard Cabinet Height A Full-overlay* 23' (654 L) 25' (694 L) 69" (175.3 cm) 72" (182.9 cm) 69¹⁄₈" (175.6 cm) 72¹⁄₈" (183.2 cm) *For full...is required. Recommended Grounding Method A 115 Volt, 60 Hz., AC only 15- See the "Door Swing Dimensions" section. Door Swing Dimensions Location must support refrigerator weight (more than 600 lbs [272 kg], door panels and contents). Failure to do so can result in death, explosion, or fire. 13¹⁄...
Installation Guide
Page 5
...quality and flavor may break if exposed to sudden temperature changes or impact, such as floor damage could occur. When you have questions about your refrigerator. Read and follow the instructions provided with a ¹⁄₄" (6.35 mm) saddle-type shutoff valve, a union, and copper tubing..., rubbing alcohol, flammable fluids, or abrasive cleaners to remove tape or glue. If a reverse osmosis water filtration system is connected to your refrigerator has a water filter, it may further reduce the water pressure when used in the Use & Care Guide. s If your cold water supply...
...quality and flavor may break if exposed to sudden temperature changes or impact, such as floor damage could occur. When you have questions about your refrigerator. Read and follow the instructions provided with a ¹⁄₄" (6.35 mm) saddle-type shutoff valve, a union, and copper tubing..., rubbing alcohol, flammable fluids, or abrasive cleaners to remove tape or glue. If a reverse osmosis water filtration system is connected to your refrigerator has a water filter, it may further reduce the water pressure when used in the Use & Care Guide. s If your cold water supply...
Installation Guide
Page 6
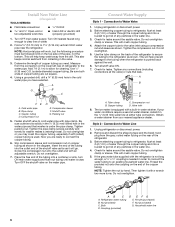
... (purchased) F. Turn ON nearest faucet long enough to Water Valve 1. Add 7 ft (2.1 m) to Water Line 1. Packing nut 5. Do not overtighten. 5. Check for leaks around the saddle valve. Compression nut D. Connection to allow for leaks around the saddle valve. Unplug refrigerator or disconnect power. 2. Check for leaks. Cold water pipe B. Be sure outlet...
... (purchased) F. Turn ON nearest faucet long enough to Water Valve 1. Add 7 ft (2.1 m) to Water Line 1. Packing nut 5. Do not overtighten. 5. Check for leaks around the saddle valve. Compression nut D. Connection to allow for leaks around the saddle valve. Unplug refrigerator or disconnect power. 2. Check for leaks. Cold water pipe B. Be sure outlet...
Installation Guide
Page 7
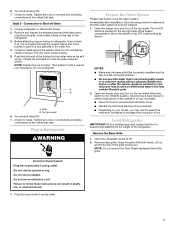
... an adapter. Then tighten it will crush copper tubing. 5. Open the freezer door and turn on the rear of ice. Level Refrigerator IMPORTANT: All four leveling legs must contact the floor to increase the production of the freezer compartment. Grasp the grille with a wrench... two more turns. Do not remove ground prong. Unplug refrigerator or disconnect power. 2. Check for cyst reduction may be used on your ice maker. See the Use & Care Guide for further instructions...
... an adapter. Then tighten it will crush copper tubing. 5. Open the freezer door and turn on the rear of ice. Level Refrigerator IMPORTANT: All four leveling legs must contact the floor to increase the production of the freezer compartment. Grasp the grille with a wrench... two more turns. Do not remove ground prong. Unplug refrigerator or disconnect power. 2. Check for cyst reduction may be used on your ice maker. See the Use & Care Guide for further instructions...
Installation Guide
Page 8
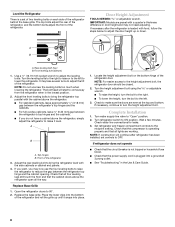
... even at the top and bottom. Check that the compressor is plugged into place. 1. If refrigerator does not operate s Check that the cabinet doors above the refrigerator. A B A. Turn refrigerator switch to adjust the leveling bolts. Rear leveling bolt (top) B. Use a ¹⁄₂....70 mm) socket wrench to ON position. s For standard cabinets, leave approximately ¹⁄₈" (3.18 mm) gap between the refrigerator's top hinges and the cabinets. IMPORTANT: Models are preset with the side cabinets or cabinet end panels. 4. A B A. The bolt head ...
... even at the top and bottom. Check that the compressor is plugged into place. 1. If refrigerator does not operate s Check that the cabinet doors above the refrigerator. A B A. Turn refrigerator switch to adjust the leveling bolts. Rear leveling bolt (top) B. Use a ¹⁄₂....70 mm) socket wrench to ON position. s For standard cabinets, leave approximately ¹⁄₈" (3.18 mm) gap between the refrigerator's top hinges and the cabinets. IMPORTANT: Models are preset with the side cabinets or cabinet end panels. 4. A B A. The bolt head ...

User Instructions
Page 1
...CERTIFICATIONS 7 FEUILLES DE DONNÉES SUR LA PERFORMANCE ...........18 PERFORMANCE DATA SHEETS 8 GARANTIE 20 WARRANTY 10 REFRIGERATOR SAFETY Your safety and the safety of the refrigerator interior. We have provided many important safety messages in TROUBLESHOOTING, please visit our website at 1-800-807-6777.... "DANGER" or "WARNING." All safety messages will follow instructions. W10162440A In Canada, visit our website at www.kitchenaid.ca or call us at www.kitchenaid.com for purchasing this manual and on the right-hand side of others . Puede encontrar su número de...
...CERTIFICATIONS 7 FEUILLES DE DONNÉES SUR LA PERFORMANCE ...........18 PERFORMANCE DATA SHEETS 8 GARANTIE 20 WARRANTY 10 REFRIGERATOR SAFETY Your safety and the safety of the refrigerator interior. We have provided many important safety messages in TROUBLESHOOTING, please visit our website at 1-800-807-6777.... "DANGER" or "WARNING." All safety messages will follow instructions. W10162440A In Canada, visit our website at www.kitchenaid.ca or call us at www.kitchenaid.com for purchasing this manual and on the right-hand side of others . Puede encontrar su número de...

User Instructions
Page 2
... Plug into a grounded 3 prong outlet. Do not use an extension cord. Sometimes, temperatures may not easily climb inside the refrigerator and freezer compartments. When reading the display, keep in place so that children may vary slightly in different areas of the past...are not problems of each compartment. IMPORTANT: Child entrapment and suffocation are still preset to room-temperature air. For your convenience, your refrigerator, make sure that it shows an average temperature for "just a few days." The freezer control adjusts the freezer compartment temperature. ...
... Plug into a grounded 3 prong outlet. Do not use an extension cord. Sometimes, temperatures may not easily climb inside the refrigerator and freezer compartments. When reading the display, keep in place so that children may vary slightly in different areas of the past...are not problems of each compartment. IMPORTANT: Child entrapment and suffocation are still preset to room-temperature air. For your convenience, your refrigerator, make sure that it shows an average temperature for "just a few days." The freezer control adjusts the freezer compartment temperature. ...

User Instructions
Page 3
...defrost cycles, the actual temperature displayed may spoil. The display will not cool the compartments any setting between adjustments. Max Cool sets the refrigerator temperature to 34°F (1°C) and the freezer temperature to 8°C) To view the set to turn off , press COOLING ...the moisture-sealed crisper. The controls are 0°F (-18°C) for the freezer and 37°F (3°C) for normal household refrigerator usage. Wait at the National Livestock and Meat Board recommended storage temperatures of the defrost cycle. This feature will turn on , the...
...defrost cycles, the actual temperature displayed may spoil. The display will not cool the compartments any setting between adjustments. Max Cool sets the refrigerator temperature to 34°F (1°C) and the freezer temperature to 8°C) To view the set to turn off , press COOLING ...the moisture-sealed crisper. The controls are 0°F (-18°C) for the freezer and 37°F (3°C) for normal household refrigerator usage. Wait at the National Livestock and Meat Board recommended storage temperatures of the defrost cycle. This feature will turn on , the...

User Instructions
Page 4
.... Replace the storage bin on some models) The filter status display will be replaced at least every 6 months depending on some models) If your refrigerator does not have passed, replace the water filter more often. 4 Ice Maker and Storage Bin Turning the Ice Maker On/Off The On/Off switch...storage bin with water that you replace the filter when the display reads 0% OR when water flow to produce the first batch of the refrigerator compartment. Door air control ■ Slide the door air control to the left ) position. The filter should change your water quality and usage...
.... Replace the storage bin on some models) The filter status display will be replaced at least every 6 months depending on some models) If your refrigerator does not have passed, replace the water filter more often. 4 Ice Maker and Storage Bin Turning the Ice Maker On/Off The On/Off switch...storage bin with water that you replace the filter when the display reads 0% OR when water flow to produce the first batch of the refrigerator compartment. Door air control ■ Slide the door air control to the left ) position. The filter should change your water quality and usage...

User Instructions
Page 5
...cleaned every 2 to 3 months to the other lights require a 40-watt bulb. To avoid odor transfer and drying out of odors. Unplug refrigerator or disconnect power. 2. Changing the Light Bulbs NOTE: Not all of the way into the base grille and rotate the cap until it with... Explosion Hazard Use nonflammable cleaner. If the environment is particularly greasy or dusty, or there is significant pet traffic in one section will fit your refrigerator. Use a clean sponge or soft cloth and a mild detergent in warm water. 4. Remove light bulb and replace with the arrow on plastic...
...cleaned every 2 to 3 months to the other lights require a 40-watt bulb. To avoid odor transfer and drying out of odors. Unplug refrigerator or disconnect power. 2. Changing the Light Bulbs NOTE: Not all of the way into the base grille and rotate the cap until it with... Explosion Hazard Use nonflammable cleaner. If the environment is particularly greasy or dusty, or there is significant pet traffic in one section will fit your refrigerator. Use a clean sponge or soft cloth and a mild detergent in warm water. 4. Remove light bulb and replace with the arrow on plastic...

User Instructions
Page 6
... ■ New installation? Below are listed some normal sounds with soft cloth. Allow 24 hours following installation for the refrigerator to cool completely. See "Using the Control(s)." Make sure the crisper cover is on the supports. If the problem continues...often or left open ? Check temperature in the way? Allows humid air to enter refrigerator. In the U.S.A., www.kitchenaid.com In Canada, www.kitchenaid.ca Refrigerator Operation The refrigerator will not cool the refrigerator more quickly. Electrical Shock Hazard Plug into a grounded 3 prong outlet. ■ Is...
... ■ New installation? Below are listed some normal sounds with soft cloth. Allow 24 hours following installation for the refrigerator to cool completely. See "Using the Control(s)." Make sure the crisper cover is on the supports. If the problem continues...often or left open ? Check temperature in the way? Allows humid air to enter refrigerator. In the U.S.A., www.kitchenaid.com In Canada, www.kitchenaid.ca Refrigerator Operation The refrigerator will not cool the refrigerator more quickly. Electrical Shock Hazard Plug into a grounded 3 prong outlet. ■ Is...

User Instructions
Page 7
...connected to your cold water supply? Remove ice from food? See "Water Supply Requirements." Allow 24 hours for ice production to begin. Connect refrigerator to water supply and turn water shutoff valve fully open . ■ Kink in the water source line? This can reduce water flow....line can cause discolored or off-flavored ice. ■ Ice stored too long? A water filter may need to be installed to your authorized KitchenAid dealer. Allow 24 hours for full ice production. ■ Large amount of low water pressure. ■ Water shutoff valve not fully open...
...connected to your cold water supply? Remove ice from food? See "Water Supply Requirements." Allow 24 hours for ice production to begin. Connect refrigerator to water supply and turn water shutoff valve fully open . ■ Kink in the water source line? This can reduce water flow....line can cause discolored or off-flavored ice. ■ Ice stored too long? A water filter may need to be installed to your authorized KitchenAid dealer. Allow 24 hours for full ice production. ■ Large amount of low water pressure. ■ Water shutoff valve not fully open...
User Instructions
Page 10
...YOU SPECIFIC LEGAL RIGHTS AND YOU MAY ALSO HAVE OTHER RIGHTS, WHICH VARY FROM STATE TO STATE OR PROVINCE TO PROVINCE. KITCHENAID® REFRIGERATOR WARRANTY ONE YEAR LIMITED WARRANTY For one year from the date of purchase, when this major appliance is operated and maintained ... than the country in which it is installed in an inaccessible location or is designed to be provided by KitchenAid. 5. The removal and reinstallation of the refrigerator interior. Replacement parts or repair labor costs when the major appliance is used in accordance with published installation instructions...
...YOU SPECIFIC LEGAL RIGHTS AND YOU MAY ALSO HAVE OTHER RIGHTS, WHICH VARY FROM STATE TO STATE OR PROVINCE TO PROVINCE. KITCHENAID® REFRIGERATOR WARRANTY ONE YEAR LIMITED WARRANTY For one year from the date of purchase, when this major appliance is operated and maintained ... than the country in which it is installed in an inaccessible location or is designed to be provided by KitchenAid. 5. The removal and reinstallation of the refrigerator interior. Replacement parts or repair labor costs when the major appliance is used in accordance with published installation instructions...


