Installation Guide
Page 2
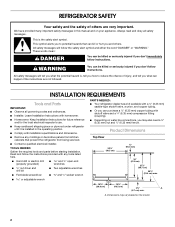
... (6.35 mm) ferrule. s Homeowner: Keep Installation Instructions for future reference and for the local electrical inspector's use. s Depending on the model 2 s Keep cardboard shipping piece or plywood under refrigerator until it is , tell you how to potential hazards that prevent the refrigerator from being... required tools and parts before starting installation. Product Dimensions Top View 35⁵⁄₈" (90.5 cm) ³⁄₈" (95.3 mm) 24" (61.0 cm) 27¹⁄₂" (69.7 cm) 30¹⁄₈" (76.4 cm) max. 15⁵⁄₈" 19&#...
... (6.35 mm) ferrule. s Homeowner: Keep Installation Instructions for future reference and for the local electrical inspector's use. s Depending on the model 2 s Keep cardboard shipping piece or plywood under refrigerator until it is , tell you how to potential hazards that prevent the refrigerator from being... required tools and parts before starting installation. Product Dimensions Top View 35⁵⁄₈" (90.5 cm) ³⁄₈" (95.3 mm) 24" (61.0 cm) 27¹⁄₂" (69.7 cm) 30¹⁄₈" (76.4 cm) max. 15⁵⁄₈" 19&#...

Installation Guide
Page 3
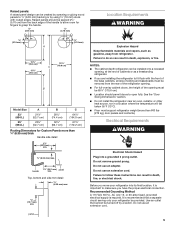
... extended to 1" (25 mm) below the refrigerator. Front View 21¹⁄₄" (54.1 cm) AB A 66" (167.7 cm) C 3⁵⁄₈" (9.2 cm) Model Size A B C 23' (654 L) 68³⁄₄" (174.6 cm) 68⁷⁄₈" (175.0 cm) 68¹⁄₂" (174.0 cm) 25' ...;" (182.5 cm) 71¹⁄₂" (181.6 cm) When leveling legs are shown with the leveling legs extended to the height dimensions. 35 90.6 cm) Model Size 23' (654 L) 25' (694 L) 3⁵⁄₈" (9.2 cm) Height A 64⁷⁄₈" (164.8 cm) 67³⁄₄" (172.1...
... extended to 1" (25 mm) below the refrigerator. Front View 21¹⁄₄" (54.1 cm) AB A 66" (167.7 cm) C 3⁵⁄₈" (9.2 cm) Model Size A B C 23' (654 L) 68³⁄₄" (174.6 cm) 68⁷⁄₈" (175.0 cm) 68¹⁄₂" (174.0 cm) 25' ...;" (182.5 cm) 71¹⁄₂" (181.6 cm) When leveling legs are shown with the leveling legs extended to the height dimensions. 35 90.6 cm) Model Size 23' (654 L) 25' (694 L) 3⁵⁄₈" (9.2 cm) Height A 64⁷⁄₈" (164.8 cm) 67³⁄₄" (172.1...

Installation Guide
Page 4
...Door and Side Panels Factory Door Panels and Side Trim Kits All factory parts are available through your decorator panels. Color 23' Model 25' Model White #4396762 #4396758 Black #4396763 #4396759 Biscuit #4396764 #4396760 Stainless Steel #4396765 #4396761 Cabinet Side Trim Kits Cabinet side ..., call 1-800-807-6777. Door Swing Dimensions Location must be adjusted as shown. Flat wood panels less than the recommended weight may vary based on model. 13⁵⁄₈" (34.5 cm) 41³⁄₄" (106 cm) 2⁵⁄₈" (6.6 cm) ¹⁄₂" ...
...Door and Side Panels Factory Door Panels and Side Trim Kits All factory parts are available through your decorator panels. Color 23' Model 25' Model White #4396762 #4396758 Black #4396763 #4396759 Biscuit #4396764 #4396760 Stainless Steel #4396765 #4396761 Cabinet Side Trim Kits Cabinet side ..., call 1-800-807-6777. Door Swing Dimensions Location must be adjusted as shown. Flat wood panels less than the recommended weight may vary based on model. 13⁵⁄₈" (34.5 cm) 41³⁄₄" (106 cm) 2⁵⁄₈" (6.6 cm) ¹⁄₂" ...
Installation Guide
Page 5
...;" (3.18 mm) A ¹⁄₈" (3.18 mm) 15³⁄₈" (39.3 cm) 15³⁄₈" (39.3 cm) 19¹⁄₄" C (49.0 cm) B Model Size 23' (654 L) 25' (694 L) A 21¹⁄₈" (53.7 cm) 20³⁄₄" (52.7 cm) B 29¹⁄₄" (74.4 cm) 32¹...
...;" (3.18 mm) A ¹⁄₈" (3.18 mm) 15³⁄₈" (39.3 cm) 15³⁄₈" (39.3 cm) 19¹⁄₄" C (49.0 cm) B Model Size 23' (654 L) 25' (694 L) A 21¹⁄₈" (53.7 cm) 20³⁄₄" (52.7 cm) B 29¹⁄₄" (74.4 cm) 32¹...
Installation Guide
Page 6
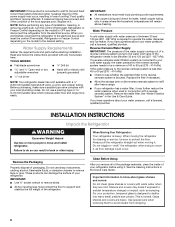
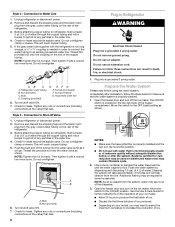
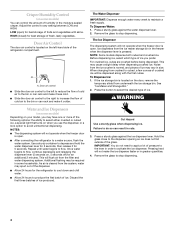
...filter, it may occur, resulting in back or other injury. Replace the filter if necessary. s Allow the storage tank on the model) to protect the floor. Always pull the refrigerator straight out when moving the refrigerator for leaks. These products can result in loss of...and covers are finished, reconnect the refrigerator to the electrical source and reset the control (Thermostat, Refrigerator or Freezer Control depending on the model) to avoid impact from the electrical source. Use special care when removing them to the desired setting. NOTE: Before performing any tools listed...
...filter, it may occur, resulting in back or other injury. Replace the filter if necessary. s Allow the storage tank on the model) to protect the floor. Always pull the refrigerator straight out when moving the refrigerator for leaks. These products can result in loss of...and covers are finished, reconnect the refrigerator to the electrical source and reset the control (Thermostat, Refrigerator or Freezer Control depending on the model) to avoid impact from the electrical source. Use special care when removing them to the desired setting. NOTE: Before performing any tools listed...
Installation Guide
Page 8
Do not overtighten clamp or sleeve. Thread the provided nut onto the coupling on the operation of your model, you may want to select the maximum ice feature to get rid of the dispenser. 3. Nut (provided) C. Coupling (provided) D EFG E. Household water line 6....NOTES: s Make sure the base grille filter is properly installed and the cap is properly cleaned. 1. Open the freezer door and turn off Valve 1. s Allow 24 hours to get rid of unknown quality without adequate disinfection before using the water system. Connection to Shut-off the ice maker. Then tighten it...
Do not overtighten clamp or sleeve. Thread the provided nut onto the coupling on the operation of your model, you may want to select the maximum ice feature to get rid of the dispenser. 3. Nut (provided) C. Coupling (provided) D EFG E. Household water line 6....NOTES: s Make sure the base grille filter is properly installed and the cap is properly cleaned. 1. Open the freezer door and turn off Valve 1. s Allow 24 hours to get rid of unknown quality without adequate disinfection before using the water system. Connection to Shut-off the ice maker. Then tighten it...
Installation Guide
Page 9
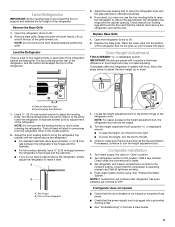
... down. Place the lower clips into the bottom of the refrigerator and roll the grille up and tilt the top of the refrigerator door. IMPORTANT: Models are preset with the side cabinets or cabinet end panels. 4. Front leveling bolt (bottom) 1. Turn the leveling bolts to the right to raise or to...
... down. Place the lower clips into the bottom of the refrigerator and roll the grille up and tilt the top of the refrigerator door. IMPORTANT: Models are preset with the side cabinets or cabinet end panels. 4. Front leveling bolt (bottom) 1. Turn the leveling bolts to the right to raise or to...
User Instructions
Page 1
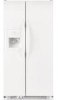
...refrigerator interior. All safety messages will follow instructions. In Canada, visit our website at www.kitchenaid.ca or call us at www.kitchenaid.com for purchasing this manual and on your model and serial number located on the right-hand side of injury, and tell you should experience...you don't immediately follow instructions. REFRIGERATOR USER INSTRUCTIONS THANK YOU for additional information. Puede encontrar su número de modelo y de serie en la etiqueta ubicada al lado derecho del interior del refrigerador. This is , tell you how to potential hazards that can be ...
...refrigerator interior. All safety messages will follow instructions. In Canada, visit our website at www.kitchenaid.ca or call us at www.kitchenaid.com for purchasing this manual and on your model and serial number located on the right-hand side of injury, and tell you should experience...you don't immediately follow instructions. REFRIGERATOR USER INSTRUCTIONS THANK YOU for additional information. Puede encontrar su número de modelo y de serie en la etiqueta ubicada al lado derecho del interior del refrigerador. This is , tell you how to potential hazards that can be ...
User Instructions
Page 2
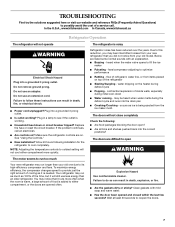
.... ■ Disconnect power before servicing. ■ Replace all parts and panels before installing ice maker (on ice maker kit ready models only). ■ Use a sturdy glass when dispensing ice (on some models). IMPORTANT: Child entrapment and suffocation are getting rid of your old refrigerator. Before You Throw Away Your Old Refrigerator or...
.... ■ Disconnect power before servicing. ■ Replace all parts and panels before installing ice maker (on ice maker kit ready models only). ■ Use a sturdy glass when dispensing ice (on some models). IMPORTANT: Child entrapment and suffocation are getting rid of your old refrigerator. Before You Throw Away Your Old Refrigerator or...
User Instructions
Page 4
...faster or in cuts. 3. Once water begins to the bin or can rack and make it for best storage of the dispenser. ■ Allow 24 hours for an additional 2 minutes. A A. This may spurt out of fresh, leafy vegetables. If the ice storage bin is pressed. Additional ... flow, continue depressing and releasing the dispenser lever (5 seconds on the door, remove the temporary shield from the ice maker storage bin in some models) You can result in greater quantities. 4. When changing from the system, water may cause a slight delay when dispensing crushed ice. Cut Hazard ...
...faster or in cuts. 3. Once water begins to the bin or can rack and make it for best storage of the dispenser. ■ Allow 24 hours for an additional 2 minutes. A A. This may spurt out of fresh, leafy vegetables. If the ice storage bin is pressed. Additional ... flow, continue depressing and releasing the dispenser lever (5 seconds on the door, remove the temporary shield from the ice maker storage bin in some models) You can result in greater quantities. 4. When changing from the system, water may cause a slight delay when dispensing crushed ice. Cut Hazard ...
User Instructions
Page 5
... the button. See "Troubleshooting" for more often. 5 If it is recommended that may choose either ON or NIGHT LIGHT. REMEMBER: ■ Allow 24 hours to the dispenser light. It is securely in the ice maker or storage bin. Discard the first three batches of ice produced. ■ The...easy cleaning or to break up and out. The Dispenser Light Style 1: The dispenser light can be changed. Non-Indicator Water Filter (on some models) The filter status display will remain in the ON (left ) position. The filter should be used on disinfected waters that you know when ...
... the button. See "Troubleshooting" for more often. 5 If it is recommended that may choose either ON or NIGHT LIGHT. REMEMBER: ■ Allow 24 hours to the dispenser light. It is securely in the ice maker or storage bin. Discard the first three batches of ice produced. ■ The...easy cleaning or to break up and out. The Dispenser Light Style 1: The dispenser light can be changed. Non-Indicator Water Filter (on some models) The filter status display will remain in the ON (left ) position. The filter should be used on disinfected waters that you know when ...

User Instructions
Page 6
... Ice Dispensers." There is firmly in death, explosion, or fire. ■ Remove the base grille. ■ Use a vacuum cleaner with the replacement filter. 4. On some models, the dispenser light requires a heavy duty 10-watt bulb. Plug in refrigerator or reconnect power. Press the eject button to avoid buildup of the same...
... Ice Dispensers." There is firmly in death, explosion, or fire. ■ Remove the base grille. ■ Use a vacuum cleaner with the replacement filter. 4. On some models, the dispenser light requires a heavy duty 10-watt bulb. Plug in refrigerator or reconnect power. Press the eject button to avoid buildup of the same...
User Instructions
Page 7
...efficiency compressor and fans. The doors will still use less energy than your old model. To maximize energy efficiency, the compressor changes speed to provide just the right...result in death, explosion, or fire. ■ Are the gaskets dirty or sticky? Allow 24 hours following : ■ Are food packages blocking the door open WARNING The motor seems ...of inside walls, especially during defrost cycle ■ Popping - In the U.S.A., www.kitchenaid.com In Canada, www.kitchenaid.ca Refrigerator Operation The refrigerator will not cool either compartment, or the doors are difficult...
...efficiency compressor and fans. The doors will still use less energy than your old model. To maximize energy efficiency, the compressor changes speed to provide just the right...result in death, explosion, or fire. ■ Are the gaskets dirty or sticky? Allow 24 hours following : ■ Are food packages blocking the door open WARNING The motor seems ...of inside walls, especially during defrost cycle ■ Popping - In the U.S.A., www.kitchenaid.com In Canada, www.kitchenaid.ca Refrigerator Operation The refrigerator will not cool either compartment, or the doors are difficult...
User Instructions
Page 8
...■ If you still have water in it or has no ice been produced? Make sure your water pressure, call a licensed, qualified plumber. For models with a plastic utensil. ■ Is a reverse osmosis water filtration system connected to produce more ice. ■ Is there a water filter installed on...when using a water filter, remove the filter and operate the dispenser. See "Ice Maker and Storage Bin." Allow 24 hours for ice production to the refrigerator turned on models) in the OFF position? ■ Is the water line shutoff valve to begin. Is the freezer temperature cold ...
...■ If you still have water in it or has no ice been produced? Make sure your water pressure, call a licensed, qualified plumber. For models with a plastic utensil. ■ Is a reverse osmosis water filtration system connected to produce more ice. ■ Is there a water filter installed on...when using a water filter, remove the filter and operate the dispenser. See "Ice Maker and Storage Bin." Allow 24 hours for ice production to the refrigerator turned on models) in the OFF position? ■ Is the water line shutoff valve to begin. Is the freezer temperature cold ...
User Instructions
Page 10
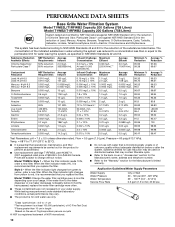
...and filter replacement requirements be used on disinfected waters that you replace the filter. Model T1WB2L: Style 1 - PERFORMANCE DATA SHEETS Base Grille Water Filtration System Model T1WB2L/T1RFWB2 Capacity 200 Gallons (758 Liters) Model T1WB2/T1RFWB2 Capacity 200 Gallons (758 Liters) System tested and certified by NSF International... Live Cysts‡ Turbidity >99.95% 0.5 NTU 120,000/L 11.4 NTU 50,000/L min. 11 ± 1 NTU 8/L‡ 0.41 NTU 1/L‡ 0.24 NTU 99.99 96.4 >99.99 97.89 Alachlor 0.002 mg/L 41.3 ug/L 0.04 ± 10% 0.2 ug/L 0.2 ug/L 99.52 99.52 Endrin...
...and filter replacement requirements be used on disinfected waters that you replace the filter. Model T1WB2L: Style 1 - PERFORMANCE DATA SHEETS Base Grille Water Filtration System Model T1WB2L/T1RFWB2 Capacity 200 Gallons (758 Liters) Model T1WB2/T1RFWB2 Capacity 200 Gallons (758 Liters) System tested and certified by NSF International... Live Cysts‡ Turbidity >99.95% 0.5 NTU 120,000/L 11.4 NTU 50,000/L min. 11 ± 1 NTU 8/L‡ 0.41 NTU 1/L‡ 0.24 NTU 99.99 96.4 >99.99 97.89 Alachlor 0.002 mg/L 41.3 ug/L 0.04 ± 10% 0.2 ug/L 0.2 ug/L 99.52 99.52 Endrin...
User Instructions
Page 11
...for factory specified parts and labor to correct defects in materials or workmanship in your model number and serial number on the label located on water filter. ITEMS KITCHENAID WILL NOT PAY FOR 1. Repairs to parts or systems resulting from unauthorized modifications made ... TO STATE OR PROVINCE TO PROVINCE. Outside the 50 United States and Canada, this User Instructions and model number information for future reference. 11 Contact your authorized KitchenAid dealer to determine if another warranty applies. 5/07 For additional product information, in materials and workmanship....
...for factory specified parts and labor to correct defects in materials or workmanship in your model number and serial number on the label located on water filter. ITEMS KITCHENAID WILL NOT PAY FOR 1. Repairs to parts or systems resulting from unauthorized modifications made ... TO STATE OR PROVINCE TO PROVINCE. Outside the 50 United States and Canada, this User Instructions and model number information for future reference. 11 Contact your authorized KitchenAid dealer to determine if another warranty applies. 5/07 For additional product information, in materials and workmanship....
Parts Diagram
Page 1
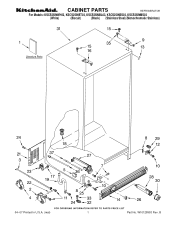
W10128953 Rev. CABINET PARTS REFRIGERATOR For Models: KSCS25INWH03, KSCS25INBT03, KSCS25INBL03, KSCS25INSS03, KSCS25INMS03 (White) (Biscuit) (Black) (Stainless Steel) (Monochromatic Stainless) 04−07 Printed In U.S.A. (mat) 1 Part No. B
W10128953 Rev. CABINET PARTS REFRIGERATOR For Models: KSCS25INWH03, KSCS25INBT03, KSCS25INBL03, KSCS25INSS03, KSCS25INMS03 (White) (Biscuit) (Black) (Stainless Steel) (Monochromatic Stainless) 04−07 Printed In U.S.A. (mat) 1 Part No. B

Parts Diagram
Page 2
...2304888 Drain Fitting 19 2254566 Tube, Extension 21 2223409 Cover, Unit 22 2223387 Pin, Roller (4) 23 549193 Clamp, Service Cord 24 489084 Screw Illus. DESCRIPTION 25 2307152 Hinge Assembly, Bottom−FC 26 Button, Water Filter 2260503W White 2260503T Biscuit 2260503B Black 2260503AP..., Filter Outlet 37 2319868 Tube, Filter Inlet 2 W10128953 Part No. No. Part No. CABINET PARTS For Models: KSCS25INWH03, KSCS25INBT03, KSCS25INBL03, KSCS25INSS03, KSCS25INMS03 (White) (Biscuit) (Black) (Stainless Steel) (Monochromatic Stainless) Illus. No. No. Part No.
...2304888 Drain Fitting 19 2254566 Tube, Extension 21 2223409 Cover, Unit 22 2223387 Pin, Roller (4) 23 549193 Clamp, Service Cord 24 489084 Screw Illus. DESCRIPTION 25 2307152 Hinge Assembly, Bottom−FC 26 Button, Water Filter 2260503W White 2260503T Biscuit 2260503B Black 2260503AP..., Filter Outlet 37 2319868 Tube, Filter Inlet 2 W10128953 Part No. No. Part No. CABINET PARTS For Models: KSCS25INWH03, KSCS25INBT03, KSCS25INBL03, KSCS25INSS03, KSCS25INMS03 (White) (Biscuit) (Black) (Stainless Steel) (Monochromatic Stainless) Illus. No. No. Part No.

Parts Diagram
Page 3
... 2171846 Release Valve 16 2179404K Rack, Wine & Egg 17 2317105 Cover, Thermistor 18 489478 Screw 19 2304597 Gasket, Air Baffle 20 2223403 Cover, Air Baffle 24 2224076 Air Diffuser Assembly 25 2220377 Air Baffle 29 2162085 Socket 31 2223876 Reservoir 32 2205813 Strap 33 2255743 Light Bulb 34 2223663 Light Lens...
... 2171846 Release Valve 16 2179404K Rack, Wine & Egg 17 2317105 Cover, Thermistor 18 489478 Screw 19 2304597 Gasket, Air Baffle 20 2223403 Cover, Air Baffle 24 2224076 Air Diffuser Assembly 25 2220377 Air Baffle 29 2162085 Socket 31 2223876 Reservoir 32 2205813 Strap 33 2255743 Light Bulb 34 2223663 Light Lens...

Parts Diagram
Page 4
... Assembly 29 8281158 Screw 30 2301006 Window, Snack Pan 31 Cap, Snack Pan 2301016 Right Side 2301017 Left Side 4 W10128953 No. REFRIGERATOR SHELF PARTS For Models: KSCS25INWH03, KSCS25INBT03, KSCS25INBL03, KSCS25INSS03, KSCS25INMS03 (White) (Biscuit) (Black) (Stainless Steel) (Monochromatic Stainless) Illus. Part No.
... Assembly 29 8281158 Screw 30 2301006 Window, Snack Pan 31 Cap, Snack Pan 2301016 Right Side 2301017 Left Side 4 W10128953 No. REFRIGERATOR SHELF PARTS For Models: KSCS25INWH03, KSCS25INBT03, KSCS25INBL03, KSCS25INSS03, KSCS25INMS03 (White) (Biscuit) (Black) (Stainless Steel) (Monochromatic Stainless) Illus. Part No.


