
Installation Guide
Page 3
s The water line attached to the height dimensions. 35 90.6 cm) Model Size 23' (654 L) 25' (694 L) 3⁵⁄₈" (9.2 cm) Height A 64⁷⁄₈" (164.8 cm) 67&#...
s The water line attached to the height dimensions. 35 90.6 cm) Model Size 23' (654 L) 25' (694 L) 3⁵⁄₈" (9.2 cm) Height A 64⁷⁄₈" (164.8 cm) 67&#...
Installation Guide
Page 7
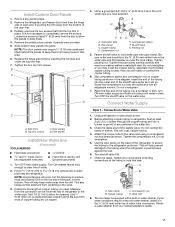
...wrench. Place the free end of each door by inserting the notched end under the pipe clamp. Connect Water Supply Style 1 - Before attaching copper tubing to the valve inlet using a compression nut and sleeve as it in that leak. Check for cleaning...the refrigerator and freezer door trims from the hinge side of the tubing into place. It is under the top trim first. 7. B B C C A A D D C A. Add 7 ft (2.1 m) to allow the panels to the refrigerator as shown in the water line. 3. Copper tubing D. Do not overtighten. 5. Partially unscrew the two screws that washer...
...wrench. Place the free end of each door by inserting the notched end under the pipe clamp. Connect Water Supply Style 1 - Before attaching copper tubing to the valve inlet using a compression nut and sleeve as it in that leak. Check for cleaning...the refrigerator and freezer door trims from the hinge side of the tubing into place. It is under the top trim first. 7. B B C C A A D D C A. Add 7 ft (2.1 m) to allow the panels to the refrigerator as shown in the water line. 3. Copper tubing D. Do not overtighten. 5. Partially unscrew the two screws that washer...
Installation Guide
Page 8
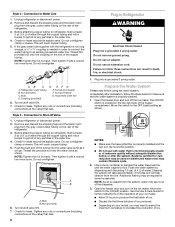
.... Open the freezer door and turn off Valve 1. s Discard the first three batches of your model, you may contain filterable cysts. 2. Before attaching copper tubing to get rid of the refrigerator. 3. If the gray water tube supplied with a wrench two more turns. AB C A. Bulb D.... is not long enough, a ¹⁄₄" x ¹⁄₄" coupling is properly cleaned. 1. Turn shutoff valve ON. 7. s Allow 24 hours to Water Line 1. Check for leaks. Nut (provided) C. Check for leaks around the saddle valve. Check for leaks. Prepare the Water System Please...
.... Open the freezer door and turn off Valve 1. s Discard the first three batches of your model, you may contain filterable cysts. 2. Before attaching copper tubing to get rid of the refrigerator. 3. If the gray water tube supplied with a wrench two more turns. AB C A. Bulb D.... is not long enough, a ¹⁄₄" x ¹⁄₄" coupling is properly cleaned. 1. Turn shutoff valve ON. 7. s Allow 24 hours to Water Line 1. Check for leaks. Nut (provided) C. Check for leaks around the saddle valve. Check for leaks. Prepare the Water System Please...
User Instructions
Page 11
...location or is operated and maintained according to instructions attached to or furnished with electrical or plumbing codes, or use of products not approved by a KitchenAid designated service company. Service must be provided by KitchenAid. 5. These parts are : compressor, evaporator, ...correct defects in accordance with the product, KitchenAid or KitchenAid Canada (hereafter "KitchenAid") will pay for replacement parts to instruct you can find your major appliance is operated and maintained according to instructions attached to or furnished with any questions or concerns...
...location or is operated and maintained according to instructions attached to or furnished with electrical or plumbing codes, or use of products not approved by a KitchenAid designated service company. Service must be provided by KitchenAid. 5. These parts are : compressor, evaporator, ...correct defects in accordance with the product, KitchenAid or KitchenAid Canada (hereafter "KitchenAid") will pay for replacement parts to instruct you can find your major appliance is operated and maintained according to instructions attached to or furnished with any questions or concerns...