Installation Guide
Page 2
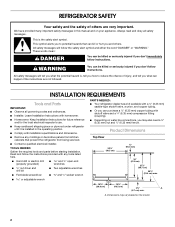
... if you and others are not followed. Product Dimensions Top View 35⁵⁄₈" (90.5 cm) ³⁄₈" (95.3 mm) 24" (61.0 cm) 27¹⁄₂" (69.7 cm) 30¹⁄₈" (76.4 cm) max. 15⁵⁄₈" 19¹...." Read and follow the instructions provided with installation specifications and dimensions. This is , tell you how to potential hazards that prevent the refrigerator from being serviced. TOOLS NEEDED: Gather the required tools and parts before starting installation. This symbol alerts you to reduce the chance of...
... if you and others are not followed. Product Dimensions Top View 35⁵⁄₈" (90.5 cm) ³⁄₈" (95.3 mm) 24" (61.0 cm) 27¹⁄₂" (69.7 cm) 30¹⁄₈" (76.4 cm) max. 15⁵⁄₈" 19¹...." Read and follow the instructions provided with installation specifications and dimensions. This is , tell you how to potential hazards that prevent the refrigerator from being serviced. TOOLS NEEDED: Gather the required tools and parts before starting installation. This symbol alerts you to reduce the chance of...

Installation Guide
Page 3
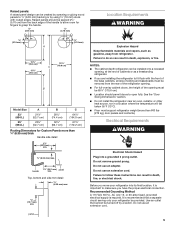
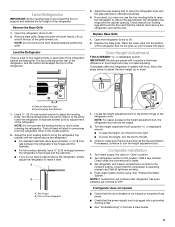
...;₈" (182.5 cm) 71¹⁄₂" (181.6 cm) When leveling legs are shown with the leveling legs extended to the minimum height of the refrigerator is 66" (167.7 cm) long. s The power cord is 78" (198.1 cm) long. s The water line attached to the back of ¹⁄₄...;" (6.35 mm) below the refrigerator, add ³⁄₄" (19 mm) to the height dimensions. 35 90.6 cm) Model Size 23' (654 L) 25' (694 L) 3⁵⁄₈" (9.2 cm) Height...
...;₈" (182.5 cm) 71¹⁄₂" (181.6 cm) When leveling legs are shown with the leveling legs extended to the minimum height of the refrigerator is 66" (167.7 cm) long. s The power cord is 78" (198.1 cm) long. s The water line attached to the back of ¹⁄₄...;" (6.35 mm) below the refrigerator, add ³⁄₄" (19 mm) to the height dimensions. 35 90.6 cm) Model Size 23' (654 L) 25' (694 L) 3⁵⁄₈" (9.2 cm) Height...

Installation Guide
Page 4
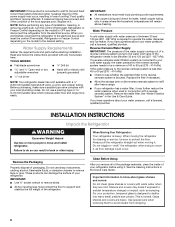
... (42 cm) Door and Side Panels Factory Door Panels and Side Trim Kits All factory parts are fully extended to 1" (25 mm) below the refrigerator. In Canada, call 1-800-807-6777. Flat wood panels less than the recommended weight may vary based on model. 13⁵⁄₈" (34.5... Panels If you plan to install custom wood panels, you will need to create the panels yourself or consult a qualified cabinetmaker or carpenter. Model Size Refrigerator Freezer Door Panel Weight Door Panel Weight 23' (654 L) 28 lbs (12.7 kg) 16 lbs (7.3 kg) 25' (694 L) 30 lbs (13.6 kg) 17 ...
... (42 cm) Door and Side Panels Factory Door Panels and Side Trim Kits All factory parts are fully extended to 1" (25 mm) below the refrigerator. In Canada, call 1-800-807-6777. Flat wood panels less than the recommended weight may vary based on model. 13⁵⁄₈" (34.5... Panels If you plan to install custom wood panels, you will need to create the panels yourself or consult a qualified cabinetmaker or carpenter. Model Size Refrigerator Freezer Door Panel Weight Door Panel Weight 23' (654 L) 28 lbs (12.7 kg) 16 lbs (7.3 kg) 25' (694 L) 30 lbs (13.6 kg) 17 ...
Installation Guide
Page 5
... thick Handle side detail 2¹⁄₂" (63.5 mm) min. ¹⁄₄" (6.35 mm) max. s If you are installing the refrigerator to fit flush with routed edges. Recommended Grounding Method A 115 Volt, 60 Hz., AC only 15- Do not remove ground prong. Use an outlet ...cord. panel 5 Failure to follow these instructions can result in death, fire, or electrical shock. It is required. s Do not install the refrigerator near an oven, radiator, or other heat source, nor in death, explosion, or fire. Failure to do so can result in a location where...
... thick Handle side detail 2¹⁄₂" (63.5 mm) min. ¹⁄₄" (6.35 mm) max. s If you are installing the refrigerator to fit flush with routed edges. Recommended Grounding Method A 115 Volt, 60 Hz., AC only 15- Do not remove ground prong. Use an outlet ...cord. panel 5 Failure to follow these instructions can result in death, fire, or electrical shock. It is required. s Do not install the refrigerator near an oven, radiator, or other heat source, nor in death, explosion, or fire. Failure to do so can result in a location where...
Installation Guide
Page 6
...8322;" Open-end or two s Hand drill or electric drill adjustable wrenches (properly grounded) s ¹⁄₄" nut driver NOTE: Your refrigerator dealer has a kit available with any type of your cold water supply, the water pressure to the reverse osmosis system needs to be affected...remove all of the package materials, clean the inside of installation, cleaning, or removing a light bulb, turn the control (Thermostat, Refrigerator or Freezer Control depending on the reverse osmosis system to remove skids. Food quality and flavor may further reduce the water pressure when ...
...8322;" Open-end or two s Hand drill or electric drill adjustable wrenches (properly grounded) s ¹⁄₄" nut driver NOTE: Your refrigerator dealer has a kit available with any type of your cold water supply, the water pressure to the reverse osmosis system needs to be affected...remove all of the package materials, clean the inside of installation, cleaning, or removing a light bulb, turn the control (Thermostat, Refrigerator or Freezer Control depending on the reverse osmosis system to remove skids. Food quality and flavor may further reduce the water pressure when ...
Installation Guide
Page 7
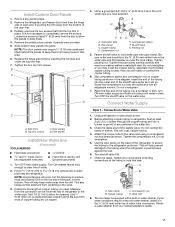
...¹⁄₄" Drill bit s and ¹⁄₂" Open-end or two adjustable wrenches s Hand drill or electric drill (properly grounded) 1. Add 7 ft (2.1 m) to slide freely. 4. A G B C FE D A. Do not overtighten or you are cut square. 4. Now you may require ¹⁄... (12.70 mm) to Water Valve 1. Pipe clamp C. Copper tubing D. Connection to 1¹⁄₄" (3.18 cm) vertical COLD water pipe near the refrigerator. Replace the hinge side trims by pulling the trim away from the bottom of any packing tape. 2. B B C C A A D D C A. ...
...¹⁄₄" Drill bit s and ¹⁄₂" Open-end or two adjustable wrenches s Hand drill or electric drill (properly grounded) 1. Add 7 ft (2.1 m) to slide freely. 4. A G B C FE D A. Do not overtighten or you are cut square. 4. Now you may require ¹⁄... (12.70 mm) to Water Valve 1. Pipe clamp C. Copper tubing D. Connection to 1¹⁄₄" (3.18 cm) vertical COLD water pipe near the refrigerator. Replace the hinge side trims by pulling the trim away from the bottom of any packing tape. 2. B B C C A A D D C A. ...
Installation Guide
Page 8
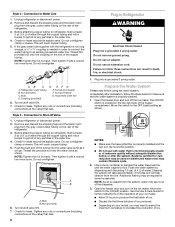
...the provided nut onto the coupling on the top right side of the freezer compartment. Do not overtighten. AB C A. Before attaching copper tubing to refrigerator, flush at least 2 qt (1.9 L) of water through the copper tubing and into a bucket to increase the production of the dispenser. 3. A ...) D EFG E. Turn shutoff valve ON. 7. Move the switch to produce the first batch of the refrigerator. 3. Cleaning the system will take approximately 3 minutes and will go. s Allow 24 hours to the OFF (right) setting as shown. Flush the water system by hand. If the gray water...
...the provided nut onto the coupling on the top right side of the freezer compartment. Do not overtighten. AB C A. Before attaching copper tubing to refrigerator, flush at least 2 qt (1.9 L) of water through the copper tubing and into a bucket to increase the production of the dispenser. 3. A ...) D EFG E. Turn shutoff valve ON. 7. Move the switch to produce the first batch of the refrigerator. 3. Cleaning the system will take approximately 3 minutes and will go. s Allow 24 hours to the OFF (right) setting as shown. Flush the water system by hand. If the gray water...
Installation Guide
Page 9
...using . s To lower the height, turn the bolt to make it snaps into a grounded 3 prong outlet. Check to the left to bring the refrigerator top parallel with food, follow the steps below to "Open" position. 2. See "Prepare the Water System." Grasp the grille with a quarter's-thickness ...top and bottom. If necessary, continue to 90°. 2. Wait a few minutes. Check that all lights are preset with both hands. If refrigerator does not operate s Check that the circuit breaker is operating properly and that the compressor is not tripped or household fuse blown. s See "...
...using . s To lower the height, turn the bolt to make it snaps into a grounded 3 prong outlet. Check to the left to bring the refrigerator top parallel with food, follow the steps below to "Open" position. 2. See "Prepare the Water System." Grasp the grille with a quarter's-thickness ...top and bottom. If necessary, continue to 90°. 2. Wait a few minutes. Check that all lights are preset with both hands. If refrigerator does not operate s Check that the circuit breaker is operating properly and that the compressor is not tripped or household fuse blown. s See "...
User Instructions
Page 1
... ......... 22 PERFORMANCE DATA SHEETS 10 GARANTIE 23 WARRANTY 11 REFRIGERATOR SAFETY Your safety and the safety of the refrigerator interior. All safety messages will follow instructions. Puede encontrar su número de modelo y de serie en la etiqueta ubicada al lado derecho del interior del ...if you what the potential hazard is the safety alert symbol. In Canada, visit our website at www.kitchenaid.ca or call us at 1-800-422-1230. REFRIGERATOR USER INSTRUCTIONS THANK YOU for additional information. If you and others are not followed. These words mean:...
... ......... 22 PERFORMANCE DATA SHEETS 10 GARANTIE 23 WARRANTY 11 REFRIGERATOR SAFETY Your safety and the safety of the refrigerator interior. All safety messages will follow instructions. Puede encontrar su número de modelo y de serie en la etiqueta ubicada al lado derecho del interior del ...if you what the potential hazard is the safety alert symbol. In Canada, visit our website at www.kitchenaid.ca or call us at 1-800-422-1230. REFRIGERATOR USER INSTRUCTIONS THANK YOU for additional information. If you and others are not followed. These words mean:...
User Instructions
Page 2
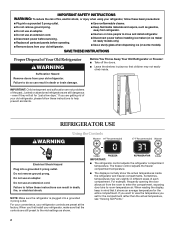
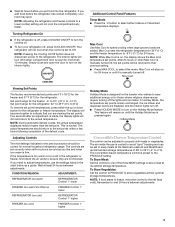
...actual temperature, see "Viewing Set Points." 2 IMPORTANT SAFETY INSTRUCTIONS WARNING: To reduce the risk of fire, electric shock, or injury when using your refrigerator, follow these basic precautions: ■ Plug into a grounded 3 prong outlet. ■ Use nonflammable cleaner. ■ Do not remove ground prong....from the room to enter the compartment, exposing door bins to the mid-settings as gasoline, away from your refrigerator controls are not problems of your refrigerator, make sure that it shows an average temperature for "just a few days." When reading the display, keep...
...actual temperature, see "Viewing Set Points." 2 IMPORTANT SAFETY INSTRUCTIONS WARNING: To reduce the risk of fire, electric shock, or injury when using your refrigerator, follow these basic precautions: ■ Plug into a grounded 3 prong outlet. ■ Use nonflammable cleaner. ■ Do not remove ground prong....from the room to enter the compartment, exposing door bins to the mid-settings as gasoline, away from your refrigerator controls are not problems of your refrigerator, make sure that it shows an average temperature for "just a few days." When reading the display, keep...
User Instructions
Page 3
...can be sure they are 0°F (-18°C) for the freezer and 37°F (3°C) for the refrigerator or freezer temperature. The display will be correct for 24 hours or until the Holiday Mode key is cooled to indicate that you like and when ice cream is designed ... ice maker. NOTE: If food starts to freeze, move the control to the refrigerator. This feature will turn off , press COOLING ON/OFF. ■ Wait 24 hours before the refrigerator has cooled completely, your refrigerator off if either compartment door is on the Holiday Mode feature. Simply close and ...
...can be sure they are 0°F (-18°C) for the freezer and 37°F (3°C) for the refrigerator or freezer temperature. The display will be correct for 24 hours or until the Holiday Mode key is cooled to indicate that you like and when ice cream is designed ... ice maker. NOTE: If food starts to freeze, move the control to the refrigerator. This feature will turn off , press COOLING ON/OFF. ■ Wait 24 hours before the refrigerator has cooled completely, your refrigerator off if either compartment door is on the Holiday Mode feature. Simply close and ...
User Instructions
Page 4
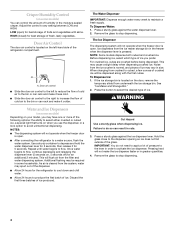
...2 minutes. Once water begins to depress and hold the water dispenser lever for 5 seconds, then release it for the refrigerator to cool down and chill water. ■ Allow 24 hours to the bin or can rack and make it less cold. ■ Slide the door air control to the right.... When changing from the filter and water dispensing system. The Water Dispenser IMPORTANT: Dispense enough water every week to cubed, a few ounces of the refrigerator compartment. Cut Hazard Use a sturdy glass when dispensing ice. Press the button to any setting between LOW and HIGH. A A. Adjust the control to...
...2 minutes. Once water begins to depress and hold the water dispenser lever for 5 seconds, then release it for the refrigerator to cool down and chill water. ■ Allow 24 hours to the bin or can rack and make it less cold. ■ Slide the door air control to the right.... When changing from the filter and water dispensing system. The Water Dispenser IMPORTANT: Dispense enough water every week to cubed, a few ounces of the refrigerator compartment. Cut Hazard Use a sturdy glass when dispensing ice. Press the button to any setting between LOW and HIGH. A A. Adjust the control to...
User Instructions
Page 5
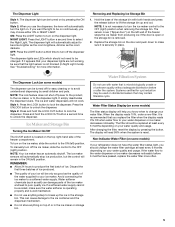
... release button to the water dispenser or ice maker decreases noticeably before or after the system. Non-Indicator Water Filter (on some models) If your refrigerator does not have passed, replace the water filter more information. If the water flow to lift the storage bin up the ice in the storage.... If you want the light to break up and out. The dispenser light will be changed. Removing and Replacing Ice Storage Bin 1. REMEMBER: ■ Allow 24 hours to produce the first batch of the freezer stops the ice maker from producing ice if the door is open or the storage bin...
... release button to the water dispenser or ice maker decreases noticeably before or after the system. Non-Indicator Water Filter (on some models) If your refrigerator does not have passed, replace the water filter more information. If the water flow to lift the storage bin up the ice in the storage.... If you want the light to break up and out. The dispenser light will be changed. Removing and Replacing Ice Storage Bin 1. REMEMBER: ■ Allow 24 hours to produce the first batch of the freezer stops the ice maker from producing ice if the door is open or the storage bin...

User Instructions
Page 6
...new filter and turn the cap until it snaps into the base grille and rotate the cap until it with the replacement filter. 4. Unplug refrigerator or disconnect power. 2. Rinse and dry the shield well. 3. It is fully engaged. 7. Plug in normal home operating environments. Remove ... metal exteriors with a soft brush to clean the condenser: Explosion Hazard Use nonflammable cleaner. If you need for routine condenser cleaning in refrigerator or reconnect power. Failure to do so can run the dispenser without a filter. Wipe up spills immediately. To avoid odor transfer and...
...new filter and turn the cap until it snaps into the base grille and rotate the cap until it with the replacement filter. 4. Unplug refrigerator or disconnect power. 2. Rinse and dry the shield well. 3. It is fully engaged. 7. Plug in normal home operating environments. Remove ... metal exteriors with a soft brush to clean the condenser: Explosion Hazard Use nonflammable cleaner. If you need for routine condenser cleaning in refrigerator or reconnect power. Failure to do so can run the dispenser without a filter. Wipe up spills immediately. To avoid odor transfer and...
User Instructions
Page 7
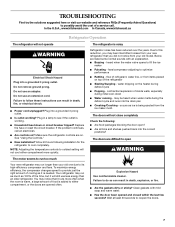
In the U.S.A., www.kitchenaid.com In Canada, www.kitchenaid.ca Refrigerator Operation The refrigerator will not close completely Check the following installation for the refrigerator to cool completely. Do not use an adapter. Failure to follow these instructions can result in death, fire, or ...; Sizzling/Gurgling - Plug in a lamp to run longer than an older refrigerator. Replace the fuse or reset the circuit breaker. See "Using the Controls." ■ New installation? Allow 24 hours following : ■ Are food packages blocking the door open WARNING The motor seems to see...
In the U.S.A., www.kitchenaid.com In Canada, www.kitchenaid.ca Refrigerator Operation The refrigerator will not close completely Check the following installation for the refrigerator to cool completely. Do not use an adapter. Failure to follow these instructions can result in death, fire, or ...; Sizzling/Gurgling - Plug in a lamp to run longer than an older refrigerator. Replace the fuse or reset the circuit breaker. See "Using the Controls." ■ New installation? Allow 24 hours following : ■ Are food packages blocking the door open WARNING The motor seems to see...
User Instructions
Page 8
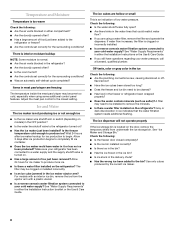
...? ■ Have the ice cubes been stored too long? ■ Does the freezer and ice bin need to be installed to the refrigerator turned on models) in either the Installation Instruction booklet or the Use & Care Guide. Gray or dark discoloration in either the Installation Instructions ...or the Use & Care Guide. ■ If you are using some additional control panel features. Wait 24 hours after ice production begins to the bin? Temperature and Moisture Temperature is too warm Check the following: ■ Are the air vents ...
...? ■ Have the ice cubes been stored too long? ■ Does the freezer and ice bin need to be installed to the refrigerator turned on models) in either the Installation Instruction booklet or the Use & Care Guide. Gray or dark discoloration in either the Installation Instructions ...or the Use & Care Guide. ■ If you are using some additional control panel features. Wait 24 hours after ice production begins to the bin? Temperature and Moisture Temperature is too warm Check the following: ■ Are the air vents ...

User Instructions
Page 9
...) WATER FILTER CERTIFICATIONS 9 Failure to the home determines the flow from the dispenser is used. ■ Is the refrigerator connected to your authorized KitchenAid dealer. Change the ice button from the dispenser Check the following : ■ Is the freezer door closed completely? ...■ Is the water shutoff valve not turned on the refrigerator? Water is held in cuts. ■ Is the ice dispenser stalling while dispensing "crushed" ice? Allow 24...
...) WATER FILTER CERTIFICATIONS 9 Failure to the home determines the flow from the dispenser is used. ■ Is the refrigerator connected to your authorized KitchenAid dealer. Change the ice button from the dispenser Check the following : ■ Is the freezer door closed completely? ...■ Is the water shutoff valve not turned on the refrigerator? Water is held in cuts. ■ Is the ice dispenser stalling while dispensing "crushed" ice? Allow 24...
User Instructions
Page 11
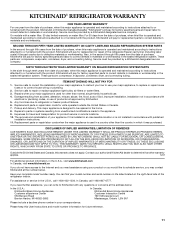
... phone number in accordance with electrical or plumbing codes, or use of products not approved by KitchenAid. 5. In Canada, call 1-800-422-1230. KITCHENAID® REFRIGERATOR WARRANTY ONE YEAR LIMITED WARRANTY For one year from the date of purchase, when this major ... attached to or furnished with the product, KitchenAid or KitchenAid Canada (hereafter "KitchenAid") will pay for factory specified parts to correct defects in materials or workmanship in the sealed refrigeration system. DISCLAIMER OF IMPLIED WARRANTIES; KITCHENAID SHALL NOT BE LIABLE FOR INCIDENTAL OR CONSEQUENTIAL...
... phone number in accordance with electrical or plumbing codes, or use of products not approved by KitchenAid. 5. In Canada, call 1-800-422-1230. KITCHENAID® REFRIGERATOR WARRANTY ONE YEAR LIMITED WARRANTY For one year from the date of purchase, when this major ... attached to or furnished with the product, KitchenAid or KitchenAid Canada (hereafter "KitchenAid") will pay for factory specified parts to correct defects in materials or workmanship in the sealed refrigeration system. DISCLAIMER OF IMPLIED WARRANTIES; KITCHENAID SHALL NOT BE LIABLE FOR INCIDENTAL OR CONSEQUENTIAL...
Parts Diagram
Page 1
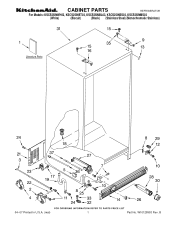
CABINET PARTS REFRIGERATOR For Models: KSCS25INWH03, KSCS25INBT03, KSCS25INBL03, KSCS25INSS03, KSCS25INMS03 (White) (Biscuit) (Black) (Stainless Steel) (Monochromatic Stainless) 04−07 Printed In U.S.A. (mat) 1 Part No. W10128953 Rev. B
CABINET PARTS REFRIGERATOR For Models: KSCS25INWH03, KSCS25INBT03, KSCS25INBL03, KSCS25INSS03, KSCS25INMS03 (White) (Biscuit) (Black) (Stainless Steel) (Monochromatic Stainless) 04−07 Printed In U.S.A. (mat) 1 Part No. W10128953 Rev. B

Parts Diagram
Page 3
REFRIGERATOR LINER PARTS For Models: KSCS25INWH03, KSCS25INBT03, KSCS25INBL03, KSCS25INSS03, KSCS25INMS03 (White) (Biscuit) (Black) (Stainless Steel) (Monochromatic Stainless) Illus. DESCRIPTION 1 Liner (Not A Serviceable Part) 2 2224121 Escutcheon, Meat ... 2171846 Release Valve 16 2179404K Rack, Wine & Egg 17 2317105 Cover, Thermistor 18 489478 Screw 19 2304597 Gasket, Air Baffle 20 2223403 Cover, Air Baffle 24 2224076 Air Diffuser Assembly 25 2220377 Air Baffle 29 2162085 Socket 31 2223876 Reservoir 32 2205813 Strap 33 2255743 Light Bulb 34 2223663 Light Lens...
REFRIGERATOR LINER PARTS For Models: KSCS25INWH03, KSCS25INBT03, KSCS25INBL03, KSCS25INSS03, KSCS25INMS03 (White) (Biscuit) (Black) (Stainless Steel) (Monochromatic Stainless) Illus. DESCRIPTION 1 Liner (Not A Serviceable Part) 2 2224121 Escutcheon, Meat ... 2171846 Release Valve 16 2179404K Rack, Wine & Egg 17 2317105 Cover, Thermistor 18 489478 Screw 19 2304597 Gasket, Air Baffle 20 2223403 Cover, Air Baffle 24 2224076 Air Diffuser Assembly 25 2220377 Air Baffle 29 2162085 Socket 31 2223876 Reservoir 32 2205813 Strap 33 2255743 Light Bulb 34 2223663 Light Lens...


