
Installation Guide
Page 2
...until it is the safety alert symbol. Product Dimensions Top View 35⁵⁄₈" (90.5 cm) ³⁄₈" (95.3 mm) 24" (61.0 cm) 27¹⁄₂" (69.7 cm) 30¹⁄₈" (76.4 cm) max. 15⁵⁄₈" 19... kill or hurt you don't immediately follow the instructions provided with any moldings or decorative panels from being serviced. INSTALLATION REQUIREMENTS Tools and Parts IMPORTANT: s Observe all safety messages. s Installer: Leave Installation Instructions with installation specifications and dimensions. A. s Remove any tools listed ...
...until it is the safety alert symbol. Product Dimensions Top View 35⁵⁄₈" (90.5 cm) ³⁄₈" (95.3 mm) 24" (61.0 cm) 27¹⁄₂" (69.7 cm) 30¹⁄₈" (76.4 cm) max. 15⁵⁄₈" 19... kill or hurt you don't immediately follow the instructions provided with any moldings or decorative panels from being serviced. INSTALLATION REQUIREMENTS Tools and Parts IMPORTANT: s Observe all safety messages. s Installer: Leave Installation Instructions with installation specifications and dimensions. A. s Remove any tools listed ...

Installation Guide
Page 5
Water Supply Requirements Gather the required tools and parts before using it may break if exposed to OFF and then disconnect the refrigerator from underneath the ice storage bin. Read and follow the instructions ...
Water Supply Requirements Gather the required tools and parts before using it may break if exposed to OFF and then disconnect the refrigerator from underneath the ice storage bin. Read and follow the instructions ...
Use & Care Guide
Page 2
...in place so that the controls are still set to the "mid-settings." Junked or abandoned refrigerators are located on some models). IMPORTANT: ■ Wait 24 hours before you add food before installing ice maker (on ice maker kit ready models only). ■ Use a sturdy glass when dispensing ice (on... ground prong. ■ Do not use an adapter. ■ Do not use an extension cord. ■ Disconnect power before servicing. ■ Replace all parts and panels before other settings, be correct for "just a few days." NOTE: Adjusting the set points, press the COOLING button on .
...in place so that the controls are still set to the "mid-settings." Junked or abandoned refrigerators are located on some models). IMPORTANT: ■ Wait 24 hours before you add food before installing ice maker (on ice maker kit ready models only). ■ Use a sturdy glass when dispensing ice (on... ground prong. ■ Do not use an adapter. ■ Do not use an extension cord. ■ Disconnect power before servicing. ■ Replace all parts and panels before other settings, be correct for "just a few days." NOTE: Adjusting the set points, press the COOLING button on .
Use & Care Guide
Page 5
... can cause damage to the ice container and the dispenser mechanism. ■ Do not store anything sharp to the ON (left ) position. REMEMBER: ■ Allow 24 hours to your ice will be on top of ice. Press the button to select the desired type of the water supplied to produce the... batches of ice produced. ■ The quality of your ice maker. If it is not necessary to be only as good as salt) can damage parts of the glass. The display screen indicates when the dispenser is selected. NOTE: It is securely in the ice maker or storage bin. The Dispenser...
... can cause damage to the ice container and the dispenser mechanism. ■ Do not store anything sharp to the ON (left ) position. REMEMBER: ■ Allow 24 hours to your ice will be on top of ice. Press the button to select the desired type of the water supplied to produce the... batches of ice produced. ■ The quality of your ice maker. If it is not necessary to be only as good as salt) can damage parts of the glass. The display screen indicates when the dispenser is selected. NOTE: It is securely in the ice maker or storage bin. The Dispenser...
Use & Care Guide
Page 6
...filter and turn the cap until it snaps into the base grille. Rinse and dry the shield well. 3. Hand wash, rinse, and dry removable parts and interior surfaces thoroughly. Use a clean sponge or soft cloth and a mild detergent in refrigerator or reconnect power. NOTE: To clean the light ...the home, the condenser should be replaced at least every 6 months depending on your water quality and usage. Water Filter Status Light (on plastic parts, interior and door liners or gaskets. Pull the filter straight out. 3. Turn the cap counterclockwise to remove it with a soft brush to ensure...
...filter and turn the cap until it snaps into the base grille. Rinse and dry the shield well. 3. Hand wash, rinse, and dry removable parts and interior surfaces thoroughly. Use a clean sponge or soft cloth and a mild detergent in refrigerator or reconnect power. NOTE: To clean the light ...the home, the condenser should be replaced at least every 6 months depending on your water quality and usage. Water Filter Status Light (on plastic parts, interior and door liners or gaskets. Pull the filter straight out. 3. Turn the cap counterclockwise to remove it with a soft brush to ensure...
Use & Care Guide
Page 9
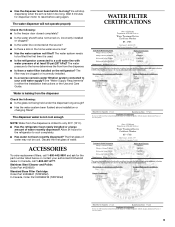
...water source line? ■ Has the water system not filled? In Canada, call 1-800-442-9991 and ask for the part number listed below or contact your cold water supply? The dispenser water is not cool enough NOTE: Water from the dispenser is... may not be cool. Allow 24 hours for dispenser motor to your authorized KitchenAid dealer. ACCESSORIES To order replacement filters, call 1-800-807-6777. Stainless Steel Cleaner and Polish: Order Part #4396920 Standard Base Filter Cartridge: Order Part #4396841 (T2RFWG2) In Canada, Order Part #4396841B (T2RFWG2) WATER FILTER ...
...water source line? ■ Has the water system not filled? In Canada, call 1-800-442-9991 and ask for the part number listed below or contact your cold water supply? The dispenser water is not cool enough NOTE: Water from the dispenser is... may not be cool. Allow 24 hours for dispenser motor to your authorized KitchenAid dealer. ACCESSORIES To order replacement filters, call 1-800-807-6777. Stainless Steel Cleaner and Polish: Order Part #4396920 Standard Base Filter Cartridge: Order Part #4396841 (T2RFWG2) In Canada, Order Part #4396841B (T2RFWG2) WATER FILTER ...
Use & Care Guide
Page 10
...certified by NSF International against NSF/ANSI Standard 53 for water leaving the system, as advertised. ■ Use replacement filter T2RFWG2, part #4396841. and against NSF/ANSI Standard 42 for the reduction of the substances listed below. The concentration of the indicated substances in ... be carried out for the product to the "Warranty" section for cold water use only. ■ Do not use replacement filter T2RFWG2, part #4396841B. 2008 suggested retail price of Mercury, Benzene, Toxaphene, O-dichlorobenzene, and Carbofuran. When the water filter status display changes from "GOOD...
...certified by NSF International against NSF/ANSI Standard 53 for water leaving the system, as advertised. ■ Use replacement filter T2RFWG2, part #4396841. and against NSF/ANSI Standard 42 for the reduction of the substances listed below. The concentration of the indicated substances in ... be carried out for the product to the "Warranty" section for cold water use only. ■ Do not use replacement filter T2RFWG2, part #4396841B. 2008 suggested retail price of Mercury, Benzene, Toxaphene, O-dichlorobenzene, and Carbofuran. When the water filter status display changes from "GOOD...

Use & Care Guide
Page 11
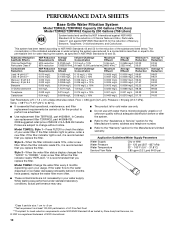
... "REPLACE," it is recommended that you replace the filter. ■ The product is for cold water use only. ■ Do not use replacement filter T2RFWG2, part #4396841B. 2008 suggested retail price of $39.99 U.S.A./$49.99 Canada. Substance Reduction Aesthetic Effects Chlorine Taste/Odor Particulate Class II* Contaminant Reduction Lead: @ pH... was reduced to a concentration less than or equal to NSF/ANSI 42/53 for water leaving the system, as advertised. ■ Use replacement filter T2RFWG2, part #4396841.
... "REPLACE," it is recommended that you replace the filter. ■ The product is for cold water use only. ■ Do not use replacement filter T2RFWG2, part #4396841B. 2008 suggested retail price of $39.99 U.S.A./$49.99 Canada. Substance Reduction Aesthetic Effects Chlorine Taste/Odor Particulate Class II* Contaminant Reduction Lead: @ pH... was reduced to a concentration less than or equal to NSF/ANSI 42/53 for water leaving the system, as advertised. ■ Use replacement filter T2RFWG2, part #4396841.
Use & Care Guide
Page 12
... when this major appliance is operated and maintained according to instructions attached to or furnished with the product, KitchenAid will pay for factory specified parts to correct defects in materials or workmanship in the sealed refrigeration system. Any food loss due to repair or... tubing. The removal and reinstallation of your product or you would like to schedule service, you may contact KitchenAid at the address below . Replacement parts or repair labor costs when the major appliance is operated and maintained according to instructions attached to or furnished with...
... when this major appliance is operated and maintained according to instructions attached to or furnished with the product, KitchenAid will pay for factory specified parts to correct defects in materials or workmanship in the sealed refrigeration system. Any food loss due to repair or... tubing. The removal and reinstallation of your product or you would like to schedule service, you may contact KitchenAid at the address below . Replacement parts or repair labor costs when the major appliance is operated and maintained according to instructions attached to or furnished with...


