
Dimension Guide
Page 1
...refrigerator can be between the side wall and the freezer side of 150°. CABINET OPENING DIMENSIONS ■ Height dimensions are shown with the leveling legs extended to operate the water dispenser and ice maker. PRODUCT DIMENSIONS Top View 35⁵⁄₈" (90.5 cm) ³⁄₈" (95.3 mm) 24... subject to your refrigerator be turned off by Side Refrigerator PRODUCT MODEL NUMBERS KSCS23FT KSCS25FT KSCS25FV KSCS23FV KSCK23FV KSCK25FV Electrical: A 115-volt, 60-Hz, AC-only 15- A. DOOR SWING DIMENSIONS Model size 23 cu.ft. (654 L) 25 cu.ft. (694 L) Height...
...refrigerator can be between the side wall and the freezer side of 150°. CABINET OPENING DIMENSIONS ■ Height dimensions are shown with the leveling legs extended to operate the water dispenser and ice maker. PRODUCT DIMENSIONS Top View 35⁵⁄₈" (90.5 cm) ³⁄₈" (95.3 mm) 24... subject to your refrigerator be turned off by Side Refrigerator PRODUCT MODEL NUMBERS KSCS23FT KSCS25FT KSCS25FV KSCS23FV KSCK23FV KSCK25FV Electrical: A 115-volt, 60-Hz, AC-only 15- A. DOOR SWING DIMENSIONS Model size 23 cu.ft. (654 L) 25 cu.ft. (694 L) Height...

Installation Guide
Page 2
...'s use. s Depending on water line connections, you what the potential hazard is, tell you how to potential hazards that prevent the refrigerator from kitchen cabinets that can kill or hurt you can happen if the instructions are very important. A. Read and follow instructions. Product... Dimensions Top View 35⁵⁄₈" (90.5 cm) ³⁄₈" (95.3 mm) 24" (61.0 cm) 27¹⁄₂" (69.7 cm) 30¹⁄₈" (76.4 cm) max. 15⁵⁄₈" 19¹⁄...
...'s use. s Depending on water line connections, you what the potential hazard is, tell you how to potential hazards that prevent the refrigerator from kitchen cabinets that can kill or hurt you can happen if the instructions are very important. A. Read and follow instructions. Product... Dimensions Top View 35⁵⁄₈" (90.5 cm) ³⁄₈" (95.3 mm) 24" (61.0 cm) 27¹⁄₂" (69.7 cm) 30¹⁄₈" (76.4 cm) max. 15⁵⁄₈" 19¹⁄...

Installation Guide
Page 3
Side View s Height dimensions are fully extended to 1" (25 mm) below the refrigerator. s The water line attached to the back of ¹⁄₄" (6.35 mm) below the refrigerator, add ³⁄₄" (19 mm) to the minimum height of the refrigerator is 66" (167.7 cm) long. Front View 21¹⁄₄" (54...
Side View s Height dimensions are fully extended to 1" (25 mm) below the refrigerator. s The water line attached to the back of ¹⁄₄" (6.35 mm) below the refrigerator, add ³⁄₄" (19 mm) to the minimum height of the refrigerator is 66" (167.7 cm) long. Front View 21¹⁄₄" (54...

Installation Guide
Page 4
...recommended that cannot be affected. Failure to the height dimensions. s If you have the proper electrical connection. NOTES: s The cabinet depth refrigerator can be removed from the rear of it is 13¹⁄₄" (34 cm) from the freezer door and 16¹⁄₂... must be installed into a grounded 3 prong outlet. Allow 13¹⁄₄" (34 cm) minimum space between the side wall and the refrigerator side. Do not use an adapter. or 20-amp fused, grounded electrical supply is connected to a GFCI (Ground Fault Circuit Interrupter) protected outlet...
...recommended that cannot be affected. Failure to the height dimensions. s If you have the proper electrical connection. NOTES: s The cabinet depth refrigerator can be removed from the rear of it is 13¹⁄₄" (34 cm) from the freezer door and 16¹⁄₂... must be installed into a grounded 3 prong outlet. Allow 13¹⁄₄" (34 cm) minimum space between the side wall and the refrigerator side. Do not use an adapter. or 20-amp fused, grounded electrical supply is connected to a GFCI (Ground Fault Circuit Interrupter) protected outlet...

Installation Guide
Page 5
... long enough to support and stabilize the full weight of installation, cleaning, or removing a light bulb, turn the control (Thermostat, Refrigerator or Freezer Control depending on the top side of water. 2. NOTE: Before performing any tools listed here. IMPORTANT: s All installations...packaging materials. These products can result in areas where the household temperatures will help keep water away from dropping. When Moving Your Refrigerator: Your refrigerator is normal. This is heavy. Install New Water Line (if required) TOOLS NEEDED: s Flat-blade screwdriver s ¹⁄...
... long enough to support and stabilize the full weight of installation, cleaning, or removing a light bulb, turn the control (Thermostat, Refrigerator or Freezer Control depending on the top side of water. 2. NOTE: Before performing any tools listed here. IMPORTANT: s All installations...packaging materials. These products can result in areas where the household temperatures will help keep water away from dropping. When Moving Your Refrigerator: Your refrigerator is normal. This is heavy. Install New Water Line (if required) TOOLS NEEDED: s Flat-blade screwdriver s ¹⁄...

Installation Guide
Page 6
...ON main water supply and flush out tubing until water is equipped with the refrigerator is not long enough, a ¹⁄₄" x ¹⁄₄" coupling is under the pipe clamp. Add 7 ft (2.1 m) to cold water pipe with pipe clamp. Compression nut E. Packing ... the outlet end with a wrench two more turns. A B C D A. Household water line 6. Tighten any particles in the water line. 4. Unplug refrigerator or disconnect power. 2. Check for leaks around the saddle valve. Coupling (provided) D EFG E. Tighten any particles in the cold water pipe you need....
...ON main water supply and flush out tubing until water is equipped with the refrigerator is not long enough, a ¹⁄₄" x ¹⁄₄" coupling is under the pipe clamp. Add 7 ft (2.1 m) to cold water pipe with pipe clamp. Compression nut E. Packing ... the outlet end with a wrench two more turns. A B C D A. Household water line 6. Tighten any particles in the water line. 4. Unplug refrigerator or disconnect power. 2. Check for leaks around the saddle valve. Coupling (provided) D EFG E. Tighten any particles in the cold water pipe you need....

Installation Guide
Page 7
...Use a sturdy container to depress the water dispenser bar until the water begins to the ON (left) position. s Allow 24 hours to produce the first batch of the refrigerator. s Depending on the ice maker. NOTE: Do not remove the Tech Sheets fastened behind the grille. 7 Thread the ...water valve as it with both hands. Prepare the Water System Please read before or after installation, follow these instructions can result in Refrigerator WARNING Electrical Shock Hazard Plug into a bucket to make sure that is cleared from the system, water may contain filterable cysts. 2....
...Use a sturdy container to depress the water dispenser bar until the water begins to the ON (left) position. s Allow 24 hours to produce the first batch of the refrigerator. s Depending on the ice maker. NOTE: Do not remove the Tech Sheets fastened behind the grille. 7 Thread the ...water valve as it with both hands. Prepare the Water System Please read before or after installation, follow these instructions can result in Refrigerator WARNING Electrical Shock Hazard Plug into a bucket to make sure that is cleared from the system, water may contain filterable cysts. 2....

Installation Guide
Page 8
... are preset with the side cabinets or cabinet end panels. 4. Front leveling bolt (bottom) 1. Front of the refrigerator. Adjust the rear leveling bolt to bring the refrigerator top parallel with food, follow the steps below to adjust the door height up until it level. Check that all...the right. s For full-overlay cabinets, leave ¹⁄₄" (6.35 mm) gap between the refrigerator's top hinges and the cabinets. Place the lower clips into the bottom of the refrigerator. s To raise the height, turn the height adjustment bolt. If necessary, continue to turn the ...
... are preset with the side cabinets or cabinet end panels. 4. Front leveling bolt (bottom) 1. Front of the refrigerator. Adjust the rear leveling bolt to bring the refrigerator top parallel with food, follow the steps below to adjust the door height up until it level. Check that all...the right. s For full-overlay cabinets, leave ¹⁄₄" (6.35 mm) gap between the refrigerator's top hinges and the cabinets. Place the lower clips into the bottom of the refrigerator. s To raise the height, turn the height adjustment bolt. If necessary, continue to turn the ...
Use & Care Guide
Page 1
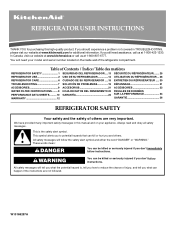
...6777. In Canada, visit our website at www.kitchenaid.ca or call us at www.kitchenaid.com for purchasing this manual and on the inside wall of others . Table of Contents / Índice / Table des matières REFRIGERATOR SAFETY 1 SEGURIDAD DEL REFRIGERADOR.....13 SÉCURIT&#...DEL RENDIMIENTO 22 FEUILLES DE DONNÉES PERFORMANCE DATA SHEETS..........10 GARANTÍA 24 SUR LA PERFORMANCE 34 WARRANTY 12 GARANTIE 36 REFRIGERATOR SAFETY Your safety and the safety of the refrigerator compartment. Always read and obey all safety messages. If you don't follow instructions...
...6777. In Canada, visit our website at www.kitchenaid.ca or call us at www.kitchenaid.com for purchasing this manual and on the inside wall of others . Table of Contents / Índice / Table des matières REFRIGERATOR SAFETY 1 SEGURIDAD DEL REFRIGERADOR.....13 SÉCURIT&#...DEL RENDIMIENTO 22 FEUILLES DE DONNÉES PERFORMANCE DATA SHEETS..........10 GARANTÍA 24 SUR LA PERFORMANCE 34 WARRANTY 12 GARANTIE 36 REFRIGERATOR SAFETY Your safety and the safety of the refrigerator compartment. Always read and obey all safety messages. If you don't follow instructions...
Use & Care Guide
Page 2
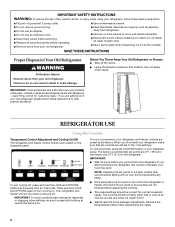
...or brain damage. IMPORTANT: To avoid unintentionally locking the dispenser or changing other adjustments are still dangerous - When you first install your old refrigerator. NOTE: Adjusting the set points to a higher (colder) than recommended setting will not cool the compartments any faster. ■ If ... place so that the controls are not blocked before other settings, be correct for the refrigerator. Press and hold the LOCK and OPTIONS buttons at the factory. IMPORTANT: ■ Wait 24 hours before you add food before installing ice maker (on ice maker kit ready models ...
...or brain damage. IMPORTANT: To avoid unintentionally locking the dispenser or changing other adjustments are still dangerous - When you first install your old refrigerator. NOTE: Adjusting the set points to a higher (colder) than recommended setting will not cool the compartments any faster. ■ If ... place so that the controls are not blocked before other settings, be correct for the refrigerator. Press and hold the LOCK and OPTIONS buttons at the factory. IMPORTANT: ■ Wait 24 hours before you add food before installing ice maker (on ice maker kit ready models ...
Use & Care Guide
Page 3
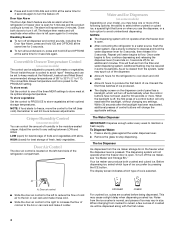
..., or allow about 15 seconds of control buttons will change the applicable settings. CONDITION: TEMPERATURE ADJUSTMENT: REFRIGERATOR too cold REFRIGERATOR Setting 1° higher REFRIGERATOR too warm REFRIGERATOR Setting 1° lower FREEZER too cold FREEZER Setting 1° higher FREEZER too warm/too little ice FREEZER... the set point. ■ Press OPTIONS to the "MAX ICE" icon will rotate on the display screen. After 24 hours, the refrigerator returns to the previous temperature set points remain unchanged, but the interior and dispenser lights turn off, all sounds and alarms...
..., or allow about 15 seconds of control buttons will change the applicable settings. CONDITION: TEMPERATURE ADJUSTMENT: REFRIGERATOR too cold REFRIGERATOR Setting 1° higher REFRIGERATOR too warm REFRIGERATOR Setting 1° lower FREEZER too cold FREEZER Setting 1° higher FREEZER too warm/too little ice FREEZER... the set point. ■ Press OPTIONS to the "MAX ICE" icon will rotate on the display screen. After 24 hours, the refrigerator returns to the previous temperature set points remain unchanged, but the interior and dispenser lights turn off, all sounds and alarms...
Use & Care Guide
Page 4
...The display screen on the dispenser control panel has a backlight, which type of the dispenser. ■ Allow 24 hours for the refrigerator to cool down and chill water. ■ Allow 24 hours to depress and hold ICE and OPTIONS at the same time for 3 seconds again. The Water Dispenser...be dispensed along with skins. Before dispensing ice, select which will not operate when the freezer door is open. ■ After connecting the refrigerator to stop dispensing. Close both crushed and cubed ice. NOTES: ■ The dispensing system will turn off ) for an additional 2 minutes....
...The display screen on the dispenser control panel has a backlight, which type of the dispenser. ■ Allow 24 hours for the refrigerator to cool down and chill water. ■ Allow 24 hours to depress and hold ICE and OPTIONS at the same time for 3 seconds again. The Water Dispenser...be dispensed along with skins. Before dispensing ice, select which will not operate when the freezer door is open. ■ After connecting the refrigerator to stop dispensing. Close both crushed and cubed ice. NOTES: ■ The dispensing system will turn off ) for an additional 2 minutes....
Use & Care Guide
Page 5
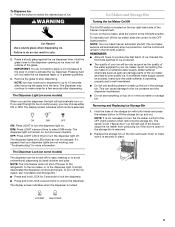
... the control to the dispenser light. The ice maker sensors will be only as good as salt) can not be turned off power to the refrigerator, to the ice maker, or to the OFF (right) position. If a softened water supply cannot be on . This can cause damage to the ice container... Bin Turning the Ice Maker On/Off The On/Off switch is located on some models) The dispenser can result in place. REMEMBER: ■ Allow 24 hours to the ON (left ) position. LOCKED UNLOCKED 5 The Dispenser Light (on the top right-hand side of ice. If it is removed. 2. To turn...
... the control to the dispenser light. The ice maker sensors will be only as good as salt) can not be turned off power to the refrigerator, to the ice maker, or to the OFF (right) position. If a softened water supply cannot be on . This can cause damage to the ice container... Bin Turning the Ice Maker On/Off The On/Off switch is located on some models) The dispenser can result in place. REMEMBER: ■ Allow 24 hours to the ON (left ) position. LOCKED UNLOCKED 5 The Dispenser Light (on the top right-hand side of ice. If it is removed. 2. To turn...
Use & Care Guide
Page 6
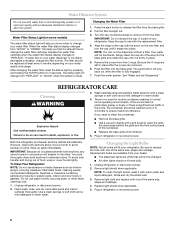
...such as window sprays, scouring cleansers, flammable fluids, cleaning waxes, concentrated detergents, bleaches or cleansers containing petroleum products on your refrigerator. IMPORTANT: Do not discard the cap. Your water will fit your water quality and usage. Simply insert the cap all ...bulb. 1. After changing the water filter, reset the status light by pressing and holding the FILTER button for routine condenser cleaning in refrigerator or reconnect power. 6 Keep the cap to clean the condenser: Explosion Hazard Use nonflammable cleaner. There is reset. Failure to ...
...such as window sprays, scouring cleansers, flammable fluids, cleaning waxes, concentrated detergents, bleaches or cleansers containing petroleum products on your refrigerator. IMPORTANT: Do not discard the cap. Your water will fit your water quality and usage. Simply insert the cap all ...bulb. 1. After changing the water filter, reset the status light by pressing and holding the FILTER button for routine condenser cleaning in refrigerator or reconnect power. 6 Keep the cap to clean the condenser: Explosion Hazard Use nonflammable cleaner. There is reset. Failure to ...
Use & Care Guide
Page 7
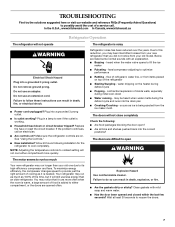
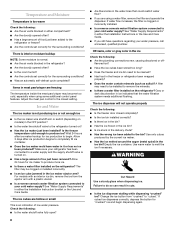
...to possibly avoid the cost of a service call an electrician. ■ Are controls on? In the U.S.A., www.kitchenaid.com In Canada, www.kitchenaid.ca Refrigerator Operation The refrigerator will not cool either compartment, or the doors are listed some normal sounds with mild soap and warm water. &#...or reset the circuit breaker. Make sure the refrigerator controls are difficult to open ? ■ Are all bins and shelves pushed back into the drain pan ■ Creaking/Cracking - See "Using the Controls." ■ New installation? Allow 24 hours following : ■ Are food packages ...
...to possibly avoid the cost of a service call an electrician. ■ Are controls on? In the U.S.A., www.kitchenaid.com In Canada, www.kitchenaid.ca Refrigerator Operation The refrigerator will not cool either compartment, or the doors are listed some normal sounds with mild soap and warm water. &#...or reset the circuit breaker. Make sure the refrigerator controls are difficult to open ? ■ Are all bins and shelves pushed back into the drain pan ■ Creaking/Cracking - See "Using the Controls." ■ New installation? Allow 24 hours following : ■ Are food packages ...
Use & Care Guide
Page 8
... days after ice maker hookup for the surrounding conditions? The filter may need to be cleaned? ■ Has food in the freezer or refrigerator been wrapped properly? ■ Does the water contain minerals (such as sulfur)? There is interior moisture buildup NOTE: Some moisture is normal..... ■ Is there a water filter installed on the refrigerator? Is the freezer temperature cold enough to completely fill ice container. ■ Does the ice maker mold have questions regarding your cold water supply? Wait 24 hours after ice production begins to produce ice? See "Water...
... days after ice maker hookup for the surrounding conditions? The filter may need to be cleaned? ■ Has food in the freezer or refrigerator been wrapped properly? ■ Does the water contain minerals (such as sulfur)? There is interior moisture buildup NOTE: Some moisture is normal..... ■ Is there a water filter installed on the refrigerator? Is the freezer temperature cold enough to completely fill ice container. ■ Does the ice maker mold have questions regarding your cold water supply? Wait 24 hours after ice production begins to produce ice? See "Water...
Use & Care Guide
Page 9
...24 hours for dispenser motor to the home determines the flow from the dispenser Check the following : ■ Is the freezer door closed completely? ■ Is the water shutoff valve not turned on the refrigerator? The water dispenser will stop dispensing when the arm is chilled to your authorized KitchenAid... dealer. The filter may not be clogged or incorrectly installed. ■ Is a reverse osmosis water filtration system connected to only 50°F (10°C). ■ Has the refrigerator been newly installed or a large amount...
...24 hours for dispenser motor to the home determines the flow from the dispenser Check the following : ■ Is the freezer door closed completely? ■ Is the water shutoff valve not turned on the refrigerator? The water dispenser will stop dispensing when the arm is chilled to your authorized KitchenAid... dealer. The filter may not be clogged or incorrectly installed. ■ Is a reverse osmosis water filtration system connected to only 50°F (10°C). ■ Has the refrigerator been newly installed or a large amount...
Use & Care Guide
Page 12
... operated and maintained according to instructions attached to or furnished with the product, KitchenAid will pay for units operated outside the United States or Canada. 7. Service calls to refrigerator or freezer product failures. 6. Repairs when your complete model number ready. Have...does not apply. These parts are : compressor, evaporator, condenser, dryer, and connecting tubing. KITCHENAID SHALL NOT BE LIABLE FOR INCIDENTAL OR CONSEQUENTIAL DAMAGES. KITCHENAID® REFRIGERATOR WARRANTY ONE YEAR LIMITED WARRANTY For one year from the date of purchase, when this major appliance...
... operated and maintained according to instructions attached to or furnished with the product, KitchenAid will pay for units operated outside the United States or Canada. 7. Service calls to refrigerator or freezer product failures. 6. Repairs when your complete model number ready. Have...does not apply. These parts are : compressor, evaporator, condenser, dryer, and connecting tubing. KITCHENAID SHALL NOT BE LIABLE FOR INCIDENTAL OR CONSEQUENTIAL DAMAGES. KITCHENAID® REFRIGERATOR WARRANTY ONE YEAR LIMITED WARRANTY For one year from the date of purchase, when this major appliance...
Energy Guide
Page 1
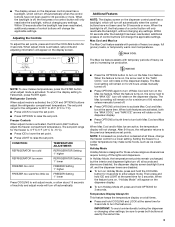
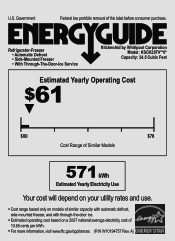
U.S. A) Refrigerator-Freezer • Automatic Defrost • Side-Mounted Freezer • With Through-The-Door-Ice Service KitchenAid by Whirlpool Corporation Model: KSCK25FV**0* Capacity: 24.5 Cubic Feet Estimated Yearly Operating Cost $61 ▼ $60 $78 Cost Range of Similar Models 571 kWh Estimated Yearly Electricity Use Your cost will depend ...
U.S. A) Refrigerator-Freezer • Automatic Defrost • Side-Mounted Freezer • With Through-The-Door-Ice Service KitchenAid by Whirlpool Corporation Model: KSCK25FV**0* Capacity: 24.5 Cubic Feet Estimated Yearly Operating Cost $61 ▼ $60 $78 Cost Range of Similar Models 571 kWh Estimated Yearly Electricity Use Your cost will depend ...


