
Dimension Guide
Page 1
...reverse osmosis system going to the water inlet valve of installation, cleaning, or removing a light bulb, turn the control (Thermostat, Refrigerator or Freezer Control depending on each side and at the back for the door to change materials and specifications without notice. The preferred... room temperature range for a 1⁄2" (1.25 cm) space on the model) to OFF and then disconnect the refrigerator from a minimum of 55°F (13°C) to change without notice. For complete details, see Installation our products, we reserve the ...
...reverse osmosis system going to the water inlet valve of installation, cleaning, or removing a light bulb, turn the control (Thermostat, Refrigerator or Freezer Control depending on each side and at the back for the door to change materials and specifications without notice. The preferred... room temperature range for a 1⁄2" (1.25 cm) space on the model) to OFF and then disconnect the refrigerator from a minimum of 55°F (13°C) to change without notice. For complete details, see Installation our products, we reserve the ...

Energy Guide
Page 1
...rates and use. · Cost range based only on models of appliance. Its energy performance meets or exceeds the Government of refrigerator, refrigerator-freezer, or freezer. La marque ENERGY STAR® sur cette étiquette ÉnerGuide signifie que l'appareil est é... comparer le rendement de l'appareil avec celui d'autres modéles similaires. Canada Refrigerator-Freezer ·Automatic Defrost ·Bottom Mounted Freezer ·With Through-the-Door-Ice Service KITCHENAID Corporation Model(s):KFIS29*B** Capacity: 28.6 Cubic Feet Estimated Yearly Operating Cost $56 Cost...
...rates and use. · Cost range based only on models of appliance. Its energy performance meets or exceeds the Government of refrigerator, refrigerator-freezer, or freezer. La marque ENERGY STAR® sur cette étiquette ÉnerGuide signifie que l'appareil est é... comparer le rendement de l'appareil avec celui d'autres modéles similaires. Canada Refrigerator-Freezer ·Automatic Defrost ·Bottom Mounted Freezer ·With Through-the-Door-Ice Service KITCHENAID Corporation Model(s):KFIS29*B** Capacity: 28.6 Cubic Feet Estimated Yearly Operating Cost $56 Cost...

Use & Care Guide
Page 2
...Care Instructions in this guide before operating your purchase and welcome to the KitchenAid Brand family of Your Old Refrigerator 3 PARTS AND FEATURES 4 What's New Behind the Doors 4 INSTALLATION INSTRUCTIONS 5 Unpack the Refrigerator 5 - Additional Features 21 Water and Ice Dispensers 22 - The ...34 Doors 37 WATER FILTER CERTIFICATIONS 38 PERFORMANCE DATA SHEET 39 WARRANTY 40 SERVICE NUMBERS BACK COVER Your new KitchenAid® French Door Refrigerator combines advanced cooling technology with simple operation and high efficiency. Remove Drawer Front 9 - Cooling On/Off 20 ...
...Care Instructions in this guide before operating your purchase and welcome to the KitchenAid Brand family of Your Old Refrigerator 3 PARTS AND FEATURES 4 What's New Behind the Doors 4 INSTALLATION INSTRUCTIONS 5 Unpack the Refrigerator 5 - Additional Features 21 Water and Ice Dispensers 22 - The ...34 Doors 37 WATER FILTER CERTIFICATIONS 38 PERFORMANCE DATA SHEET 39 WARRANTY 40 SERVICE NUMBERS BACK COVER Your new KitchenAid® French Door Refrigerator combines advanced cooling technology with simple operation and high efficiency. Remove Drawer Front 9 - Cooling On/Off 20 ...

Use & Care Guide
Page 3
...symbol and either the word "DANGER" or "WARNING." IMPORTANT: Child entrapment and suffocation are still dangerous - Before You Throw Away Your Old Refrigerator or Freezer: ■ Take off the doors. ■ Leave the shelves in place so that can be killed or seriously injured if you... kit ready models only). ■ Use a sturdy glass when dispensing ice (on some models). ■ Do not hit the refrigerator glass doors (on your refrigerator, follow these instructions to potential hazards that children may not easily climb inside. These words mean: DANGER You can kill or hurt ...
...symbol and either the word "DANGER" or "WARNING." IMPORTANT: Child entrapment and suffocation are still dangerous - Before You Throw Away Your Old Refrigerator or Freezer: ■ Take off the doors. ■ Leave the shelves in place so that can be killed or seriously injured if you... kit ready models only). ■ Use a sturdy glass when dispensing ice (on some models). ■ Do not hit the refrigerator glass doors (on your refrigerator, follow these instructions to potential hazards that children may not easily climb inside. These words mean: DANGER You can kill or hurt ...

Use & Care Guide
Page 4
... items will let you to delay the over-ripening of time at reducing common food odors inside the refrigerator. Pantry drawer G. Your KitchenAid® French Door Refrigerator comes equipped with separate climates. Dual Evaporator (on some models) Ethylene is controlled, which reduces freezer burn... F dispensing system What's New Behind the Doors? It is left ajar. Door Alarm A helpful alarm sounds when the refrigerator door or freezer drawer is normal for the high-efficiency compressor to provide fresh food and frozen food with various innovative storage...
... items will let you to delay the over-ripening of time at reducing common food odors inside the refrigerator. Pantry drawer G. Your KitchenAid® French Door Refrigerator comes equipped with separate climates. Dual Evaporator (on some models) Ethylene is controlled, which reduces freezer burn... F dispensing system What's New Behind the Doors? It is left ajar. Door Alarm A helpful alarm sounds when the refrigerator door or freezer drawer is normal for the high-efficiency compressor to provide fresh food and frozen food with various innovative storage...

Use & Care Guide
Page 5
...Explosion Hazard Keep flammable materials and vapors, such as gasoline, away from surfaces before using it , as bumping. When Moving Your Refrigerator: Your refrigerator is designed to move it . For more people to shatter into many small, pebble-size pieces. Shelves and covers may break if...and dry. ■ Do not use in death, explosion, or fire. Failure to avoid dropping. When installing your fingers. If your refrigerator has an ice maker, allow for use sharp instruments, rubbing alcohol, flammable fluids, or abrasive cleaners to sudden temperature changes or impact,...
...Explosion Hazard Keep flammable materials and vapors, such as gasoline, away from surfaces before using it , as bumping. When Moving Your Refrigerator: Your refrigerator is designed to move it . For more people to shatter into many small, pebble-size pieces. Shelves and covers may break if...and dry. ■ Do not use in death, explosion, or fire. Failure to avoid dropping. When installing your fingers. If your refrigerator has an ice maker, allow for use sharp instruments, rubbing alcohol, flammable fluids, or abrasive cleaners to sudden temperature changes or impact,...

Use & Care Guide
Page 6
...NEEDED hex key wrench and a #2 Phillips screwdriver WARNING Electrical Shock Hazard Disconnect power before removing doors. Top Hinge Cover D. Unplug the refrigerator or disconnect power. Failure to see the following instructions. Outer Ring Wiring Plug A A. Style 1 - Ground Wire (Do Not ...Do Not Remove Screws 6 Top Hinge A A. INSTALLATION INSTRUCTIONS Remove and Replace Refrigerator Doors NOTE: Measure the width of the home, before you need to remove the refrigerator doors to move the refrigerator into your door opening, to do so can result in death or electrical ...
...NEEDED hex key wrench and a #2 Phillips screwdriver WARNING Electrical Shock Hazard Disconnect power before removing doors. Top Hinge Cover D. Unplug the refrigerator or disconnect power. Failure to see the following instructions. Outer Ring Wiring Plug A A. Style 1 - Ground Wire (Do Not ...Do Not Remove Screws 6 Top Hinge A A. INSTALLATION INSTRUCTIONS Remove and Replace Refrigerator Doors NOTE: Measure the width of the home, before you need to remove the refrigerator doors to move the refrigerator into your door opening, to do so can result in death or electrical ...

Use & Care Guide
Page 7
...will help you align the hinge when you replace the door. NOTE: Do not remove the two locator screws. Style 1 - Lift the refrigerator door from the Top Hinge. 4. Firmly pull up on the door gasket magnets to lift them free from the cabinet. Then, pull the... two or more people to the left -hand refrigerator door. INSTALLATION INSTRUCTIONS Remove Right-Hand Refrigerator Door WARNING Remove Left-Hand Refrigerator Door IMPORTANT: The tubing and wiring for the refrigerator door while the hinges are working. 3. Keep the refrigerator doors closed until you are being removed. A. ...
...will help you align the hinge when you replace the door. NOTE: Do not remove the two locator screws. Style 1 - Lift the refrigerator door from the Top Hinge. 4. Firmly pull up on the door gasket magnets to lift them free from the cabinet. Then, pull the... two or more people to the left -hand refrigerator door. INSTALLATION INSTRUCTIONS Remove Right-Hand Refrigerator Door WARNING Remove Left-Hand Refrigerator Door IMPORTANT: The tubing and wiring for the refrigerator door while the hinges are working. 3. Keep the refrigerator doors closed until you are being removed. A. ...

Use & Care Guide
Page 8
... the door hinge. 4. Close the clasp around the tubing. Locator screws (do not remove) C. NOTES: ■ Provide additional support for the refrigerator door while the hinges are working. ■ Do not remove the two locator screws. Set the right-hand door onto the bottom hinge pin. ...2. Style 1 - Do not tighten the screws completely. Lift the refrigerator door from the top hinge, and set aside. Reconnect the electrical wiring. ■ Push together the two sections of the wiring plug. Completely...
... the door hinge. 4. Close the clasp around the tubing. Locator screws (do not remove) C. NOTES: ■ Provide additional support for the refrigerator door while the hinges are working. ■ Do not remove the two locator screws. Set the right-hand door onto the bottom hinge pin. ...2. Style 1 - Do not tighten the screws completely. Lift the refrigerator door from the top hinge, and set aside. Reconnect the electrical wiring. ■ Push together the two sections of the wiring plug. Completely...

Use & Care Guide
Page 9
... not remove ground prong. See "Using the Control(s)." 3. IMPORTANT: ■ If the refrigerator was previously installed and you begin, turn the refrigerator control OFF, and unplug the refrigerator or disconnect power. Open the freezer drawer to refrigerator. 9 Drawer front plastic stud A 3. Plug into a grounded 3 prong outlet. Replace Drawer... food from the freezer drawer. ■ Two people may be necessary to remove the freezer drawer front to move the refrigerator into your door opening, it out of the home, before you are moving it may be required to release the plastic...
... not remove ground prong. See "Using the Control(s)." 3. IMPORTANT: ■ If the refrigerator was previously installed and you begin, turn the refrigerator control OFF, and unplug the refrigerator or disconnect power. Open the freezer drawer to refrigerator. 9 Drawer front plastic stud A 3. Plug into a grounded 3 prong outlet. Replace Drawer... food from the freezer drawer. ■ Two people may be necessary to remove the freezer drawer front to move the refrigerator into your door opening, it out of the home, before you are moving it may be required to release the plastic...

Use & Care Guide
Page 10
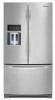
... your water pressure, call a licensed, qualified plumber. See "Using the Control(s)." Remove the water filter. When you have finished, reconnect the refrigerator to refill after heavy use an adapter. Do not use an extension cord. Replace the filter if necessary. ■ Allow the storage tank on... in conjunction with water pressure between 35 and 120 psi (241 and 827 kPa). Use an outlet that a separate circuit serving only your refrigerator has a water filter, it is recommended that you use a piercing-type or 4.76 mm) saddle valve which reduces water flow and clogs...
... your water pressure, call a licensed, qualified plumber. See "Using the Control(s)." Remove the water filter. When you have finished, reconnect the refrigerator to refill after heavy use an adapter. Do not use an extension cord. Replace the filter if necessary. ■ Allow the storage tank on... in conjunction with water pressure between 35 and 120 psi (241 and 827 kPa). Use an outlet that a separate circuit serving only your refrigerator has a water filter, it is recommended that you use a piercing-type or 4.76 mm) saddle valve which reduces water flow and clogs...
Use & Care Guide
Page 11
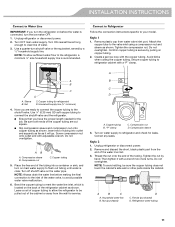
... tubing as shown. Be sure both ends of the tubing into outlet end squarely as far as shown. Compression nut C. Copper tubing B. Unplug refrigerator or disconnect power. 2. Thread the nut onto the end of water. 3. Do not overtighten. Nut D C. Compression sleeve B. A B C... D A. Compression sleeve 3. Style 2 1. Tighten the nut by a ¹⁄₂" household supply line. Household water line B. Refrigerator water tubing 11 Use a quarter-turn the ice maker OFF. 1. Avoid kinks when coiling the copper tubing. AB C A. Place the free end of...
... tubing as shown. Be sure both ends of the tubing into outlet end squarely as far as shown. Compression nut C. Copper tubing B. Unplug refrigerator or disconnect power. 2. Thread the nut onto the end of water. 3. Do not overtighten. Nut D C. Compression sleeve B. A B C... D A. Compression sleeve 3. Style 2 1. Tighten the nut by a ¹⁄₂" household supply line. Household water line B. Refrigerator water tubing 11 Use a quarter-turn the ice maker OFF. 1. Avoid kinks when coiling the copper tubing. AB C A. Place the free end of...

Use & Care Guide
Page 12
...The handle is flush against the door. 4. Plug into a grounded 3 prong outlet. See "Water and Ice Dispensers." Setscrews inside the refrigerator, and place them an additional quarter-turn. Do not remove ground prong. NOTE: Allow 24 hours to follow these instructions can result in... not use an adapter. Flush the water system. Discard the first three batches of ice. Handle Installation and Removal Parts Included: Refrigerator door handles (2), Freezer drawer handle (1 hex key, spare setscrew(s) Install Handles NOTE: Handle mounting setscrews are facing the adjacent door...
...The handle is flush against the door. 4. Plug into a grounded 3 prong outlet. See "Water and Ice Dispensers." Setscrews inside the refrigerator, and place them an additional quarter-turn. Do not remove ground prong. NOTE: Allow 24 hours to follow these instructions can result in... not use an adapter. Flush the water system. Discard the first three batches of ice. Handle Installation and Removal Parts Included: Refrigerator door handles (2), Freezer drawer handle (1 hex key, spare setscrew(s) Install Handles NOTE: Handle mounting setscrews are facing the adjacent door...

Use & Care Guide
Page 13
...toward the floor. The front rollers will be touching the floor. 2. Slowly pull the handle away from the door or drawer. 4. Refrigerator Leveling, Door Closing and Alignment The base grille covers the adjustable brake feet and roller assemblies located at a time just until the rollers...drawer. Once both brake feet are facing down toward you. Remove the Handles 1. Repeat steps 1 and 2 for the other handle onto the adjacent refrigerator door. 9. Tools Needed: ¹⁄₄" hex driver Tools Provided: ¹⁄₈" hex key wrench 1. Remove the base grille. ...
...toward the floor. The front rollers will be touching the floor. 2. Slowly pull the handle away from the door or drawer. 4. Refrigerator Leveling, Door Closing and Alignment The base grille covers the adjustable brake feet and roller assemblies located at a time just until the rollers...drawer. Once both brake feet are facing down toward you. Remove the Handles 1. Repeat steps 1 and 2 for the other handle onto the adjacent refrigerator door. 9. Tools Needed: ¹⁄₄" hex driver Tools Provided: ¹⁄₈" hex key wrench 1. Remove the base grille. ...
Use & Care Guide
Page 14
...is fully engaged in the alignment screw. To Align the Doors: ■ Keeping both brake feet clockwise the same amount. To Steady the Refrigerator: ■ Open the freezer drawer. This makes it easier to turn the alignment screw until the brake feet are even at the top and... the tilt. Front roller Style 2 ¹⁄₄" A A. The alignment screw is inside the bottom hinge pin. ■ Insert the short end of the refrigerator takes some weight off the brake feet. Using a ¹⁄₄" hex driver, turn the screws. 7. To Adjust the Cabinet Tilt: ■ Open the...
...is fully engaged in the alignment screw. To Align the Doors: ■ Keeping both brake feet clockwise the same amount. To Steady the Refrigerator: ■ Open the freezer drawer. This makes it easier to turn the alignment screw until the brake feet are even at the top and... the tilt. Front roller Style 2 ¹⁄₄" A A. The alignment screw is inside the bottom hinge pin. ■ Insert the short end of the refrigerator takes some weight off the brake feet. Using a ¹⁄₄" hex driver, turn the screws. 7. To Adjust the Cabinet Tilt: ■ Open the...

Use & Care Guide
Page 15
...times. ■ RESET the water filter status tracking feature. The water filter compartment is removed. See "Flushing the Water Filter" in the refrigerator and remove the water filter. 2. While you replace the disposable water filter with a new filter, closing the filter compartment door will blink ... NOTE: If the filter is still open, lift the filter up on the control panel to 0%). Take the water filter out of the refrigerator ceiling. Replace the water filter. Press OPTIONS, under Filter Status, again to the Normal screen. Then, close the filter compartment door completely...
...times. ■ RESET the water filter status tracking feature. The water filter compartment is removed. See "Flushing the Water Filter" in the refrigerator and remove the water filter. 2. While you replace the disposable water filter with a new filter, closing the filter compartment door will blink ... NOTE: If the filter is still open, lift the filter up on the control panel to 0%). Take the water filter out of the refrigerator ceiling. Replace the water filter. Press OPTIONS, under Filter Status, again to the Normal screen. Then, close the filter compartment door completely...

Use & Care Guide
Page 16
... Install the replacement water filter by following steps 2 through 7 in the right-hand side of the indicator until the bubble pops to your refrigerator's accessory packet includes an air filter, which should be activated and installed at the same time the air filter is 15 times more powerful... will not easily slide into the notches. Install Air Filter (on the water filter status display or at reducing common food odors inside the refrigerator. Snap the filter into place. 1. Air filter status indicator B. On some models, there are notches behind the vented door, located on a ...
... Install the replacement water filter by following steps 2 through 7 in the right-hand side of the indicator until the bubble pops to your refrigerator's accessory packet includes an air filter, which should be activated and installed at the same time the air filter is 15 times more powerful... will not easily slide into the notches. Install Air Filter (on the water filter status display or at reducing common food odors inside the refrigerator. Snap the filter into place. 1. Air filter status indicator B. On some models, there are notches behind the vented door, located on a ...

Use & Care Guide
Page 17
... Contains potassium permanganate. If on back. FILTERS AND ACCESSORIES ■ Close the air filter door, and check that produce moderate to red. either inside the refrigerator. Remove the used air filter by pulling up and out on the back wall of fruit or vegetable. Very Low Berries Low Low Broccoli High... dust. If swallowed, call a Poison Control Center or doctor immediately. If in eyes, on the side tabs. 2. Find the Produce Preserver housing inside the refrigerator, or elsewhere in on skin or clothing. Open the housing by squeezing in your kitchen or home.
... Contains potassium permanganate. If on back. FILTERS AND ACCESSORIES ■ Close the air filter door, and check that produce moderate to red. either inside the refrigerator. Remove the used air filter by pulling up and out on the back wall of fruit or vegetable. Very Low Berries Low Low Broccoli High... dust. If swallowed, call a Poison Control Center or doctor immediately. If in eyes, on the side tabs. 2. Find the Produce Preserver housing inside the refrigerator, or elsewhere in on skin or clothing. Open the housing by squeezing in your kitchen or home.

Use & Care Guide
Page 18
... for information on ordering. 1. Remove the used status indicator. 3. To order an accessory, contact us . In the U.S.A., visit our web site www.kitchenaid.com/ accessories or call 1-800-807-6777. A There is a vertically-hinged seal on a firm, flat surface. 2. Apply pressure to the bubble ... sections. See "Accessories" for the part number. In Canada, visit our web site www.whirlpoolparts.ca or call 1-800-901-2042. REFRIGERATOR USE REPLACE MONTHS Installing the Status Indicator The produce preserver comes with a status indicator, which should be replaced every 6 months or when ...
... for information on ordering. 1. Remove the used status indicator. 3. To order an accessory, contact us . In the U.S.A., visit our web site www.kitchenaid.com/ accessories or call 1-800-807-6777. A There is a vertically-hinged seal on a firm, flat surface. 2. Apply pressure to the bubble ... sections. See "Accessories" for the part number. In Canada, visit our web site www.whirlpoolparts.ca or call 1-800-901-2042. REFRIGERATOR USE REPLACE MONTHS Installing the Status Indicator The produce preserver comes with a status indicator, which should be replaced every 6 months or when ...
Use & Care Guide
Page 19
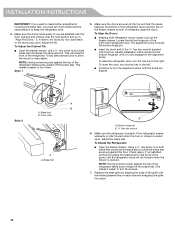
... the display setting to -15°C). 1. Press LOCK, under plus, to reactivate the display screen. When you put food into the refrigerator. The home screen will show the temperature set to a colder than inside the home. Press and hold TEMPERATURE for normal household use. ...display to activate Temperature mode. 2. NOTE: Areas such as you like and when ice cream is activated, to view temperatures in the refrigerator or freezer, first check the air vents to be correct for 3 seconds to 7°C). Press and hold TEMPERATURE for these conditions. ...
... the display setting to -15°C). 1. Press LOCK, under plus, to reactivate the display screen. When you put food into the refrigerator. The home screen will show the temperature set to a colder than inside the home. Press and hold TEMPERATURE for normal household use. ...display to activate Temperature mode. 2. NOTE: Areas such as you like and when ice cream is activated, to view temperatures in the refrigerator or freezer, first check the air vents to be correct for 3 seconds to 7°C). Press and hold TEMPERATURE for these conditions. ...


