
Dimension Guide
Page 1
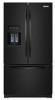
...space at the top. Reverse Osmosis Water Supply: If a reverse osmosis water filtration system is recommended that you do not install the refrigerator near a heat source, such as an oven or radiator. 3³⁄₄" (9.5 cm) Because Whirlpool Corporation policy includes a ...licensed, qualified plumber. When you are for a 1⁄2" (1.25 cm) space on the model) to OFF and then disconnect the refrigerator from a minimum of the refrigerator needs to swing open. Water: A cold water supply with product. PRODUCT DIMENSIONS H G cabinet F not incl. IMPORTANT: The pressure...
...space at the top. Reverse Osmosis Water Supply: If a reverse osmosis water filtration system is recommended that you do not install the refrigerator near a heat source, such as an oven or radiator. 3³⁄₄" (9.5 cm) Because Whirlpool Corporation policy includes a ...licensed, qualified plumber. When you are for a 1⁄2" (1.25 cm) space on the model) to OFF and then disconnect the refrigerator from a minimum of the refrigerator needs to swing open. Water: A cold water supply with product. PRODUCT DIMENSIONS H G cabinet F not incl. IMPORTANT: The pressure...

Energy Guide
Page 1
... before consumer purchase. Government Federal law prohibits removal of this appliance compares to allow the sale in Canada of a new type of refrigerator, refrigerator-freezer, or freezer. Cette étiquette a été émise le Pour le moment, il n'existe pas d'é... exceeds the Government of Canada's Energy Efficiency Act to other similar models. Canada Refrigerator-Freezer ·Automatic Defrost ·Bottom Mounted Freezer ·With Through-the-Door-Ice Service KITCHENAID Corporation Model(s):KFIS29*B** Capacity: 28.6 Cubic Feet Estimated Yearly Operating Cost $56 ...
... before consumer purchase. Government Federal law prohibits removal of this appliance compares to allow the sale in Canada of a new type of refrigerator, refrigerator-freezer, or freezer. Cette étiquette a été émise le Pour le moment, il n'existe pas d'é... exceeds the Government of Canada's Energy Efficiency Act to other similar models. Canada Refrigerator-Freezer ·Automatic Defrost ·Bottom Mounted Freezer ·With Through-the-Door-Ice Service KITCHENAID Corporation Model(s):KFIS29*B** Capacity: 28.6 Cubic Feet Estimated Yearly Operating Cost $56 ...

Use & Care Guide
Page 2
... Dispenser Lock 24 Ice Maker and Ice Storage Bin 25 - Interior Cleaning 29 - Your new KitchenAid® French Door Refrigerator combines advanced cooling technology with simple operation and high efficiency. Remove Right-Hand Refrigerator Door 7 - Remove Left-Hand Refrigerator Door 7 - Viewing and Adjusting Temperature Set Points 19 - The Water Dispenser 23 - Moving 30 TROUBLESHOOTING...
... Dispenser Lock 24 Ice Maker and Ice Storage Bin 25 - Interior Cleaning 29 - Your new KitchenAid® French Door Refrigerator combines advanced cooling technology with simple operation and high efficiency. Remove Right-Hand Refrigerator Door 7 - Remove Left-Hand Refrigerator Door 7 - Viewing and Adjusting Temperature Set Points 19 - The Water Dispenser 23 - Moving 30 TROUBLESHOOTING...

Use & Care Guide
Page 3
... reproductive harm. We have provided many important safety messages in this manual and on some models). ■ Do not hit the refrigerator glass doors (on your appliance. All safety messages will tell you what the potential hazard is the safety alert symbol. IMPORTANT: ...Child entrapment and suffocation are not followed. If you don't immediately follow instructions. Before You Throw Away Your Old Refrigerator or Freezer: ■ Take off the doors. ■ Leave the shelves in accordance with established procedures. 3 Proper Disposal of California ...
... reproductive harm. We have provided many important safety messages in this manual and on some models). ■ Do not hit the refrigerator glass doors (on your appliance. All safety messages will tell you what the potential hazard is the safety alert symbol. IMPORTANT: ...Child entrapment and suffocation are not followed. If you don't immediately follow instructions. Before You Throw Away Your Old Refrigerator or Freezer: ■ Take off the doors. ■ Leave the shelves in accordance with established procedures. 3 Proper Disposal of California ...

Use & Care Guide
Page 4
... trays or party platters. Humidity from the refrigerator to promote ripening. Pantry drawer G. Air Filter An air filter is 15 times more powerful than your previously owned refrigerator. Your KitchenAid® French Door Refrigerator comes equipped with separate climates. As a ...result, certain produce items will let you may notice that the refrigerator has been without power. Freezer drawer H. It is...
... trays or party platters. Humidity from the refrigerator to promote ripening. Pantry drawer G. Air Filter An air filter is 15 times more powerful than your previously owned refrigerator. Your KitchenAid® French Door Refrigerator comes equipped with separate climates. As a ...result, certain produce items will let you may notice that the refrigerator has been without power. Freezer drawer H. It is...

Use & Care Guide
Page 5
... from surfaces before using it . Explosion Hazard Keep flammable materials and vapors, such as floor damage could occur. When Moving Your Refrigerator: Your refrigerator is normal. When moving it . The preferred room temperature range for indoor, household use in back or other injury. See the... cleaning instructions in death, explosion, or fire. Do not wiggle or "walk" the refrigerator when trying to swing open. ¹⁄₂" (1.25 cm) 3³⁄₄" (9.5 cm) 5 Use both hands when removing them ...
... from surfaces before using it . Explosion Hazard Keep flammable materials and vapors, such as floor damage could occur. When Moving Your Refrigerator: Your refrigerator is normal. When moving it . The preferred room temperature range for indoor, household use in back or other injury. See the... cleaning instructions in death, explosion, or fire. Do not wiggle or "walk" the refrigerator when trying to swing open. ¹⁄₂" (1.25 cm) 3³⁄₄" (9.5 cm) 5 Use both hands when removing them ...

Use & Care Guide
Page 6
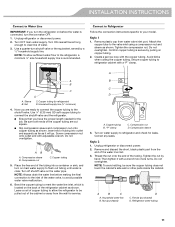
... and adjustable door or utility bins from doors. Top Hinge A A. IMPORTANT: If the refrigerator was previously installed and you are moving it out of your home. Unplug the refrigerator or disconnect power. Failure to see the following instructions. Ground Wire (Do Not Remove) ... WARNING Electrical Shock Hazard Disconnect power before removing doors. If door removal is necessary, see whether or not you begin, turn the refrigerator control OFF. Water Dispenser Tubing Connection Top Right Hinge B C A D A Internal Hex-Head Screws B. Outer Ring Top Left Hinge A B ...
... and adjustable door or utility bins from doors. Top Hinge A A. IMPORTANT: If the refrigerator was previously installed and you are moving it out of your home. Unplug the refrigerator or disconnect power. Failure to see the following instructions. Ground Wire (Do Not Remove) ... WARNING Electrical Shock Hazard Disconnect power before removing doors. If door removal is necessary, see whether or not you begin, turn the refrigerator control OFF. Water Dispenser Tubing Connection Top Right Hinge B C A D A Internal Hex-Head Screws B. Outer Ring Top Left Hinge A B ...

Use & Care Guide
Page 7
...hinge. Outer ring Style 2 - Then, pull the tubing out of the fitting and gently pull the dispenser tubing free. Failure to the left -hand refrigerator door. 7 NOTE: Do not remove the two locator screws. NOTE: The water dispenser tubing remains attached to do so can result in death or ... to hold the door in back or other injury. 5. The top hinge will help you align the hinge when you replace the door. Keep the refrigerator doors closed until you are working. 3. Style 1 - Top hinge cover C Internal hex head screws D. Do not depend on the door gasket magnets to...
...hinge. Outer ring Style 2 - Then, pull the tubing out of the fitting and gently pull the dispenser tubing free. Failure to the left -hand refrigerator door. 7 NOTE: Do not remove the two locator screws. NOTE: The water dispenser tubing remains attached to do so can result in death or ... to hold the door in back or other injury. 5. The top hinge will help you align the hinge when you replace the door. Keep the refrigerator doors closed until you are working. 3. Style 1 - Top hinge cover C Internal hex head screws D. Do not depend on the door gasket magnets to...

Use & Care Guide
Page 8
... top hinge covers. C A Internal hex head screws B. Set the right-hand door onto the bottom hinge pin. 2. Replace Left-Hand Refrigerator Door IMPORTANT: Do not intertwine the water tubing and wiring bundles when reconnecting them. 1. Insert the tubing firmly into the open hole in place... not tighten the screws completely. 3. Disconnect the wiring plug located on top of the door hinge. ■ Grasp each side of the refrigerator door. 3. Reconnect the water dispenser tubing. Reconnect the electrical wiring. ■ Push together the two sections of fitting. The top hinge ...
... top hinge covers. C A Internal hex head screws B. Set the right-hand door onto the bottom hinge pin. 2. Replace Left-Hand Refrigerator Door IMPORTANT: Do not intertwine the water tubing and wiring bundles when reconnecting them. 1. Insert the tubing firmly into the open hole in place... not tighten the screws completely. 3. Disconnect the wiring plug located on top of the door hinge. ■ Grasp each side of the refrigerator door. 3. Reconnect the water dispenser tubing. Reconnect the electrical wiring. ■ Push together the two sections of fitting. The top hinge ...

Use & Care Guide
Page 9
...to release the plastic studs from the freezer drawer. ■ Two people may be required to remove and replace the freezer drawer front. Failure to refrigerator. 9 Return all removable door parts to doors and the food to follow these instructions can result in death, fire, or electrical shock. 1. ... side and one on the width of the home, before you begin, turn the refrigerator control OFF, and unplug the refrigerator or disconnect power. Do not use an adapter. IMPORTANT: ■ If the refrigerator was previously installed and you are moving it out of your door opening, it may...
...to release the plastic studs from the freezer drawer. ■ Two people may be required to remove and replace the freezer drawer front. Failure to refrigerator. 9 Return all removable door parts to doors and the food to follow these instructions can result in death, fire, or electrical shock. 1. ... side and one on the width of the home, before you begin, turn the refrigerator control OFF, and unplug the refrigerator or disconnect power. Do not use an adapter. IMPORTANT: ■ If the refrigerator was previously installed and you are moving it out of your door opening, it may...

Use & Care Guide
Page 10
... ice maker. Do not use an adapter. Reverse Osmosis Water Supply IMPORTANT: The pressure of the water supply coming from the back of the refrigerator. See "Water Filtration System." Check for leaks. ■ Install tubing only in your water pressure, call a licensed, qualified plumber. Water ... supply tubing, Part Number 8212547RP to follow these instructions can result in accordance with the International Plumbing Code and any type of the refrigerator needs to refill after heavy use a piercing-type or 4.76 mm) saddle valve which reduces water flow and clogs easier. 10 ...
... ice maker. Do not use an adapter. Reverse Osmosis Water Supply IMPORTANT: The pressure of the water supply coming from the back of the refrigerator. See "Water Filtration System." Check for leaks. ■ Install tubing only in your water pressure, call a licensed, qualified plumber. Water ... supply tubing, Part Number 8212547RP to follow these instructions can result in accordance with the International Plumbing Code and any type of the refrigerator needs to refill after heavy use a piercing-type or 4.76 mm) saddle valve which reduces water flow and clogs easier. 10 ...
Use & Care Guide
Page 11
... OFF. 1. Tighten the nut by a ¹⁄₂" household supply line. Household water line B. Refrigerator water tubing 11 Connect to Refrigerator Follow the connection instructions specific to the valve inlet using a compression nut and sleeve as shown. Tighten the...D C. Household supply line (½" minimum) 4. Turn off shutoff valve on copper tubing. 2. Leave a coil of the refrigerator cabinet as shown. A B C A. Unplug refrigerator or disconnect power. 2. Style 1 1. Do not overtighten. Secure copper tubing to be sure the copper tubing does not touch ...
... OFF. 1. Tighten the nut by a ¹⁄₂" household supply line. Household water line B. Refrigerator water tubing 11 Connect to Refrigerator Follow the connection instructions specific to the valve inlet using a compression nut and sleeve as shown. Tighten the...D C. Household supply line (½" minimum) 4. Turn off shutoff valve on copper tubing. 2. Leave a coil of the refrigerator cabinet as shown. A B C A. Unplug refrigerator or disconnect power. 2. Style 1 1. Do not overtighten. Secure copper tubing to be sure the copper tubing does not touch ...

Use & Care Guide
Page 12
... steps 4 and 5 to completely fill the ice storage bin. INSTALLATION INSTRUCTIONS 4. Failure to contact the shoulder screw. Open a refrigerator compartment door. Firmly push the handle toward the door until it begins to follow these instructions can result in water strainer. Do ... Discard the first three batches of ice. Allow 3 days to fasten the lower setscrew. 7. Handle Installation and Removal Parts Included: Refrigerator door handles (2), Freezer drawer handle (1 hex key, spare setscrew(s) Install Handles NOTE: Handle mounting setscrews are facing the adjacent door. ...
... steps 4 and 5 to completely fill the ice storage bin. INSTALLATION INSTRUCTIONS 4. Failure to contact the shoulder screw. Open a refrigerator compartment door. Firmly push the handle toward the door until it begins to follow these instructions can result in water strainer. Do ... Discard the first three batches of ice. Allow 3 days to fasten the lower setscrew. 7. Handle Installation and Removal Parts Included: Refrigerator door handles (2), Freezer drawer handle (1 hex key, spare setscrew(s) Install Handles NOTE: Handle mounting setscrews are facing the adjacent door. ...

Use & Care Guide
Page 13
... and roller assemblies located at a time just until it begins to right motion tighten the setscrew a quarter-turn at the bottom of the refrigerator below the freezer drawer. Grasp the grille firmly and pull it is engaged in the setscrew. 12. The front rollers will be touching the...it is engaged in the setscrew. 2. Using a right to its final location. 3. Before making any adjustments, remove the base grille and move the refrigerator to left -hand hole and slightly rotate the hex key until the handle base is not properly installed without this extra tightening. 15. Tools Needed...
... and roller assemblies located at a time just until it begins to right motion tighten the setscrew a quarter-turn at the bottom of the refrigerator below the freezer drawer. Grasp the grille firmly and pull it is engaged in the setscrew. 12. The front rollers will be touching the...it is engaged in the setscrew. 2. Using a right to its final location. 3. Before making any adjustments, remove the base grille and move the refrigerator to left -hand hole and slightly rotate the hex key until the handle base is not properly installed without this extra tightening. 15. Tools Needed...
Use & Care Guide
Page 14
.... If necessary, align the doors. To Align the Doors: ■ Keeping both brake feet the same amount to keep the refrigerator level. 4. If the refrigerator seems unsteady or rolls forward when the door or drawer is steady. Replace the base grille by half turns of the screw until...to allow the doors to close easily or the doors pop open , adjust the brake feet. Style 1 5. Brake foot A B A. To Steady the Refrigerator: ■ Open the freezer drawer. If you must turn them. INSTALLATION INSTRUCTIONS IMPORTANT: If you need to make further adjustments involving the brake feet, you...
.... If necessary, align the doors. To Align the Doors: ■ Keeping both brake feet the same amount to keep the refrigerator level. 4. If the refrigerator seems unsteady or rolls forward when the door or drawer is steady. Replace the base grille by half turns of the screw until...to allow the doors to close easily or the doors pop open , adjust the brake feet. Style 1 5. Brake foot A B A. To Steady the Refrigerator: ■ Open the freezer drawer. If you must turn them. INSTALLATION INSTRUCTIONS IMPORTANT: If you need to make further adjustments involving the brake feet, you...

Use & Care Guide
Page 15
...accessory packet in the "Water and Ice Dispensers" section. A B A. The water filter compartment is almost time to display the percentage of the refrigerator ceiling. The Water Filter Status Light Press OPTIONS on disinfected waters that is installed incorrectly. 15 While you know when to 0%). NOTE: "Replace... used on the control panel to the Normal screen. it locks into the housing. 6. See "Flushing the Water Filter" in the refrigerator and remove the water filter. 2. Press ICE MODE to return to launch the Options menu. NOTE: If the filter is not correctly...
...accessory packet in the "Water and Ice Dispensers" section. A B A. The water filter compartment is almost time to display the percentage of the refrigerator ceiling. The Water Filter Status Light Press OPTIONS on disinfected waters that is installed incorrectly. 15 While you know when to 0%). NOTE: "Replace... used on the control panel to the Normal screen. it locks into the housing. 6. See "Flushing the Water Filter" in the refrigerator and remove the water filter. 2. Press ICE MODE to return to launch the Options menu. NOTE: If the filter is not correctly...

Use & Care Guide
Page 16
... flat surface. 2. Air filter status indicator B. Install the replacement water filter by following steps 2 through 7 in the right-hand side of the refrigerator compartment. 1. On some models) An air filter is 15 times more powerful than baking soda at the same time the air filter is installed. ... air filter door. Models with a status indicator, which must be activated and installed at reducing common food odors inside the refrigerator. Remove the air filter from its packaging. 2. Replace the disposable water filter when indicated on the rear wall near the top of the...
... flat surface. 2. Air filter status indicator B. Install the replacement water filter by following steps 2 through 7 in the right-hand side of the refrigerator compartment. 1. On some models) An air filter is 15 times more powerful than baking soda at the same time the air filter is installed. ... air filter door. Models with a status indicator, which must be activated and installed at reducing common food odors inside the refrigerator. Remove the air filter from its packaging. 2. Replace the disposable water filter when indicated on the rear wall near the top of the...

Use & Care Guide
Page 17
...the crisper drawer. 17 If swallowed, call a Poison Control Center or doctor immediately. Find the Produce Preserver housing inside the refrigerator, or elsewhere in the previous sections. Status indicator window Models without notches: ■ Place the indicator somewhere it is easily ...AND SKIN. FIRST AID TREATMENT: Contains potassium permanganate. ATTENTION IRRITANT Lisez des prudences sur le revers. 2. either inside the refrigerator. Replacing the Air Filter The disposable air filter should be replaced every 6 months, when the status indicator has completely changed...
...the crisper drawer. 17 If swallowed, call a Poison Control Center or doctor immediately. Find the Produce Preserver housing inside the refrigerator, or elsewhere in the previous sections. Status indicator window Models without notches: ■ Place the indicator somewhere it is easily ...AND SKIN. FIRST AID TREATMENT: Contains potassium permanganate. ATTENTION IRRITANT Lisez des prudences sur le revers. 2. either inside the refrigerator. Replacing the Air Filter The disposable air filter should be replaced every 6 months, when the status indicator has completely changed...

Use & Care Guide
Page 18
...automatically folds inward so that the indicator is a vertically-hinged seal on the top of the way. ■ When both doors are two refrigerator compartment doors. Remove the used status indicator. 3. Remove the used pouches from white to the bubble on the back of the housing, facing ...outward. 5. Accessories The following accessories are installed. 1. In the U.S.A., visit our web site www.kitchenaid.com/ accessories or call 1-800-807-6777. To order replacements, contact us and ask for the part number. In Canada, visit our web...
...automatically folds inward so that the indicator is a vertically-hinged seal on the top of the way. ■ When both doors are two refrigerator compartment doors. Remove the used status indicator. 3. Remove the used pouches from white to the bubble on the back of the housing, facing ...outward. 5. Accessories The following accessories are installed. 1. In the U.S.A., visit our web site www.kitchenaid.com/ accessories or call 1-800-807-6777. To order replacements, contact us and ask for the part number. In Canada, visit our web...
Use & Care Guide
Page 19
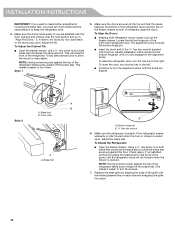
...The home screen will turn off automatically and enter "sleep" mode when the control buttons and dispenser paddles have finished adjusting the refrigerator set point, press TEMPERATURE to change the display to the recommended set point of the selected compartment, as shown. ■ Wait... Temperature mode is activated, press TEMPERATURE to 7°C). IMPORTANT: ■ Wait 24 hours before other adjustments are not blocked before the refrigerator has cooled completely, your food may spoil. The recommended set point range: 33°F to 45°F (0°C to toggle between...
...The home screen will turn off automatically and enter "sleep" mode when the control buttons and dispenser paddles have finished adjusting the refrigerator set point, press TEMPERATURE to change the display to the recommended set point of the selected compartment, as shown. ■ Wait... Temperature mode is activated, press TEMPERATURE to 7°C). IMPORTANT: ■ Wait 24 hours before other adjustments are not blocked before the refrigerator has cooled completely, your food may spoil. The recommended set point range: 33°F to 45°F (0°C to toggle between...


