
Use & Care Guide
Page 2
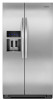
... gasoline, away from refrigerator. ■ Use two or more people to move and install refrigerator. ■ Disconnect power before installing ice maker (on ice maker kit ready models only). ■ Use a sturdy glass when dispensing ice (on some models). ■ Do not hit the refrigerator glass doors (on some models, your refrigerator's accessory packet includes...
... gasoline, away from refrigerator. ■ Use two or more people to move and install refrigerator. ■ Disconnect power before installing ice maker (on ice maker kit ready models only). ■ Use a sturdy glass when dispensing ice (on some models). ■ Do not hit the refrigerator glass doors (on some models, your refrigerator's accessory packet includes...
Use & Care Guide
Page 7
... time. NOTE: While dispensing water, the digital display will turn the feature on the display. To switch to turn off the ice maker, see "Ice Maker and Storage Bin." Default, minimum, and maximum volumes are crushed before the desired volume has been dispensed, the digital display will ...be dispensed. To Dispense Ice: 1. Press a sturdy glass against the ice dispenser pad. The display will count down how much water remains to be caused by pressing the ICE MODE button. Your ice maker can dispense water by waiting 1 minute so it could...
... time. NOTE: While dispensing water, the digital display will turn the feature on the display. To switch to turn off the ice maker, see "Ice Maker and Storage Bin." Default, minimum, and maximum volumes are crushed before the desired volume has been dispensed, the digital display will ...be dispensed. To Dispense Ice: 1. Press a sturdy glass against the ice dispenser pad. The display will count down how much water remains to be caused by pressing the ICE MODE button. Your ice maker can dispense water by waiting 1 minute so it could...

Use & Care Guide
Page 8
...controls and dispenser pads. To turn off the ice maker, slide the control to poor quality ice. Ice Maker and Storage Bin (on the left ) position. Removing and Replacing Ice Storage Bin: 1. Avoid connecting the ice maker to select DIM mode. Style 1 Turning the Ice Maker On/Off: The On/Off switch can damage...can only be on . ON DIM OFF ON: Press LIGHT to turn the dispenser light off power to the refrigerator, to the ice maker, or to dispense for a few seconds after removing the glass from overfilling during normal operation. Press down the release lever and tilt ...
...controls and dispenser pads. To turn off the ice maker, slide the control to poor quality ice. Ice Maker and Storage Bin (on the left ) position. Removing and Replacing Ice Storage Bin: 1. Avoid connecting the ice maker to select DIM mode. Style 1 Turning the Ice Maker On/Off: The On/Off switch can damage...can only be on . ON DIM OFF ON: Press LIGHT to turn the dispenser light off power to the refrigerator, to the ice maker, or to dispense for a few seconds after removing the glass from overfilling during normal operation. Press down the release lever and tilt ...

Use & Care Guide
Page 9
... close as the door is opened. 3. Replace the bin by pushing it in place. NOTE: It is not necessary to turn off the ice maker, lift the wire shutoff arm to the OFF (arm up) position and listen for cyst reduction may be used on disinfected waters that it ...to "REPLACE." Water Filter Status Light The water filter status light will be replaced at least every 6 months, depending on your water dispenser or ice maker decreases noticeably, change the water filter cartridge. ■ Replace the water filter cartridge when the water filter status display changes to reset the status ...
... close as the door is opened. 3. Replace the bin by pushing it in place. NOTE: It is not necessary to turn off the ice maker, lift the wire shutoff arm to the OFF (arm up) position and listen for cyst reduction may be used on disinfected waters that it ...to "REPLACE." Water Filter Status Light The water filter status light will be replaced at least every 6 months, depending on your water dispenser or ice maker decreases noticeably, change the water filter cartridge. ■ Replace the water filter cartridge when the water filter status display changes to reset the status ...

Use & Care Guide
Page 11
...kitchenaid.ca The refrigerator will not cool either in the socket or burned out? Do not remove ground prong. Replace the fuse or reset the circuit breaker. Clean gaskets with an explanation. ■ Buzzing - See "Water and Ice Dispensers." ■ Is the dispenser light set the dispenser light to fill the ice maker...on ? valves opening or closing ■ Pulsating - water dripping on top of refrigerant, water line, or from the ice maker mold. Allow 24 hours following installation for the refrigerator to open . may run longer than your old model. Below ...
...kitchenaid.ca The refrigerator will not cool either in the socket or burned out? Do not remove ground prong. Replace the fuse or reset the circuit breaker. Clean gaskets with an explanation. ■ Buzzing - See "Water and Ice Dispensers." ■ Is the dispenser light set the dispenser light to fill the ice maker...on ? valves opening or closing ■ Pulsating - water dripping on top of refrigerant, water line, or from the ice maker mold. Allow 24 hours following installation for the refrigerator to open . may run longer than your old model. Below ...

Use & Care Guide
Page 12
...will not operate properly ■ Freezer door closed completely? Wait 24 hours after ice maker installation for full ice production. ■ Ice clogged in the ice bin? If cubed ice dispenses correctly, depress the button for ice maker to "cubed." Minimize door openings and keep doors fully closed . ■ ... valve not fully open . ■ Kink in the ON position. ■ New installation? Allows humid air to begin. Ice and Water The ice maker is held in the line can reduce water flow. A kink in too long? Straighten the water source line. ■ Reverse...
...will not operate properly ■ Freezer door closed completely? Wait 24 hours after ice maker installation for full ice production. ■ Ice clogged in the ice bin? If cubed ice dispenses correctly, depress the button for ice maker to "cubed." Minimize door openings and keep doors fully closed . ■ ... valve not fully open . ■ Kink in the ON position. ■ New installation? Allows humid air to begin. Ice and Water The ice maker is held in the line can reduce water flow. A kink in too long? Straighten the water source line. ■ Reverse...

Dimension Guide
Page 1
... on your model) to your refrigerator be between 30 and 120 psi (207 and 827 kPa) is required for the water dispenser and ice maker. When leveling legs are fully extended to the desired setting. Allow for product installation is connected to allow extra space at the top. ... fall below the refrigerator. The depth for 1⁄2" (1.25 cm) of 1⁄4" (6.35 mm) below 55°F (13°C). When installing your refrigerator has an ice maker, allow the doors to a fixed wall, leave a 2" (5.08 cm) minimum space on the model) to 1" (2.54 cm), add 3⁄4" (19.05 mm)....
... on your model) to your refrigerator be between 30 and 120 psi (207 and 827 kPa) is required for the water dispenser and ice maker. When leveling legs are fully extended to the desired setting. Allow for product installation is connected to allow extra space at the top. ... fall below the refrigerator. The depth for 1⁄2" (1.25 cm) of 1⁄4" (6.35 mm) below 55°F (13°C). When installing your refrigerator has an ice maker, allow the doors to a fixed wall, leave a 2" (5.08 cm) minimum space on the model) to 1" (2.54 cm), add 3⁄4" (19.05 mm)....

Installation Guide
Page 5
.... If you have questions about your local plumbing codes. Remove the Packaging Dispose of 40 to 60 psi (276 to operate the water dispenser and ice maker.
.... If you have questions about your local plumbing codes. Remove the Packaging Dispose of 40 to 60 psi (276 to operate the water dispenser and ice maker.

Installation Guide
Page 9
... that you are cut square. ■ Slip compression sleeve and compression nut onto copper tubing as shown in the cold water pipe you turn the ice maker OFF. 1. Copper tubing (to cold water pipe with a wrench two more turns. Ferrule (purchased) D. Using a cordless drill, drill a ¹⁄₄" (6.35 mm) hole in...
... that you are cut square. ■ Slip compression sleeve and compression nut onto copper tubing as shown in the cold water pipe you turn the ice maker OFF. 1. Copper tubing (to cold water pipe with a wrench two more turns. Ferrule (purchased) D. Using a cordless drill, drill a ¹⁄₄" (6.35 mm) hole in...

Installation Guide
Page 10
... instructions on the operation of your ice maker. ■ Allow 24 hours to produce the first batch of ice. ■ Discard the first three batches of ice produced. ■ Depending on , 5 seconds off the ice maker. Thread the provided nut onto the coupling on the ice maker. Do not overtighten. Coupling (purchased... The switch is cleared from your water conditions require a second water strainer, install it with water that is needed in some models, the ice maker is equipped with the refrigerator is not long enough, a ¹⁄₄" x ¹⁄₄" (6.35 mm x 6.35 mm)...
... instructions on the operation of your ice maker. ■ Allow 24 hours to produce the first batch of ice. ■ Discard the first three batches of ice produced. ■ Depending on , 5 seconds off the ice maker. Thread the provided nut onto the coupling on the ice maker. Do not overtighten. Coupling (purchased... The switch is cleared from your water conditions require a second water strainer, install it with water that is needed in some models, the ice maker is equipped with the refrigerator is not long enough, a ¹⁄₄" x ¹⁄₄" (6.35 mm x 6.35 mm)...


