
Use & Care Guide
Page 1
...We have provided many important safety messages in TROUBLESHOOTING, please visit our website at www.kitchenaid.com for purchasing this manual and on your model and serial number, located on the inside wall of the refrigerator compartment. You will need assistance, call us at 1-800-807-6777. This symbol... alerts you still need your appliance. In Canada, visit our website at www.kitchenaid.ca or call us at 1-800-422-1230. This is...
...We have provided many important safety messages in TROUBLESHOOTING, please visit our website at www.kitchenaid.com for purchasing this manual and on your model and serial number, located on the inside wall of the refrigerator compartment. You will need assistance, call us at 1-800-807-6777. This symbol... alerts you still need your appliance. In Canada, visit our website at www.kitchenaid.ca or call us at 1-800-422-1230. This is...

Use & Care Guide
Page 2
...extension cord. ■ Disconnect power before servicing. ■ Replace all parts and panels before operating. ■ Remove doors from your old refrigerator. ■ Keep flammable materials and vapors, such as gasoline, away from its packaging. 2. Snap the filter into a grounded 3 prong ...should be installed behind the vented door, which must be installed prior to know about disposal of refrigerants: Dispose of the refrigerator compartment. Failure to move and install refrigerator. ■ Disconnect power before installing ice maker (on ice maker kit ready models only). ...
...extension cord. ■ Disconnect power before servicing. ■ Replace all parts and panels before operating. ■ Remove doors from your old refrigerator. ■ Keep flammable materials and vapors, such as gasoline, away from its packaging. 2. Snap the filter into a grounded 3 prong ...should be installed behind the vented door, which must be installed prior to know about disposal of refrigerants: Dispose of the refrigerator compartment. Failure to move and install refrigerator. ■ Disconnect power before installing ice maker (on ice maker kit ready models only). ...
Use & Care Guide
Page 3
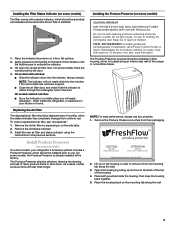
... should be installed prior to red. Install Produce Preserver (on some models) On some models, your kitchen or home. Do not get in your refrigerator's accessory packet includes a Produce Preserver, which should be replaced every 6 months, when the status indicator has completely changed from white to use two ...Read cautions on back. Whirlpool Corporation, Benton Harbor MI 49022 2. Open the housing by squeezing in the door. Place both pouches inside the refrigerator, or elsewhere in eyes, on skin, rinse with cleaning products containing ammonia, bleach or acids.
... should be installed prior to red. Install Produce Preserver (on some models) On some models, your kitchen or home. Do not get in your refrigerator's accessory packet includes a Produce Preserver, which should be replaced every 6 months, when the status indicator has completely changed from white to use two ...Read cautions on back. Whirlpool Corporation, Benton Harbor MI 49022 2. Open the housing by squeezing in the door. Place both pouches inside the refrigerator, or elsewhere in eyes, on skin, rinse with cleaning products containing ammonia, bleach or acids.

Use & Care Guide
Page 4
...automatically and enter "sleep" mode when the control buttons and dispenser pads have finished viewing (and adjusting if desired) both the refrigerator and freezer set points, press MEASURED FILL to save the settings. Remove the old pouches from white to red. Adjusting the ...Controls For your convenience, your food may spoil. IMPORTANT: ■ Wait 24 hours before you add food before the refrigerator has cooled completely, your refrigerator and freezer controls are not blocked before other adjustments are made within 2 minutes, the display will re-enter "sleep" mode....
...automatically and enter "sleep" mode when the control buttons and dispenser pads have finished viewing (and adjusting if desired) both the refrigerator and freezer set points, press MEASURED FILL to save the settings. Remove the old pouches from white to red. Adjusting the ...Controls For your convenience, your food may spoil. IMPORTANT: ■ Wait 24 hours before you add food before the refrigerator has cooled completely, your refrigerator and freezer controls are not blocked before other adjustments are made within 2 minutes, the display will re-enter "sleep" mode....

Use & Care Guide
Page 5
...To turn it off, press the OPTIONS button to 18°F (-8°C) or higher. NOTE: The dual evaporation system is always activated when your refrigerator is on the dispenser display. ■ To turn it off , the Max Ice icon will appear on . The set point range for 3 ...Additional Features Max Cool and Max Ice The Max Cool feature assists with a dual sequential evaporation system, which helps keep food smells in the refrigerator from spoiling as ice cream, harder. Power Outage Indicator The power outage indicator lets you are active, the temperature display will repeat every ...
...To turn it off, press the OPTIONS button to 18°F (-8°C) or higher. NOTE: The dual evaporation system is always activated when your refrigerator is on the dispenser display. ■ To turn it off , the Max Ice icon will appear on . The set point range for 3 ...Additional Features Max Cool and Max Ice The Max Cool feature assists with a dual sequential evaporation system, which helps keep food smells in the refrigerator from spoiling as ice cream, harder. Power Outage Indicator The power outage indicator lets you are active, the temperature display will repeat every ...

Use & Care Guide
Page 6
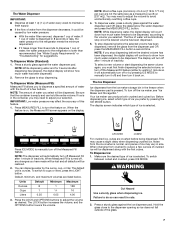
... of fresh, leafy vegetables. The Calibrate Measured Fill icon will turn off . 3. Water and Ice Dispensers IMPORTANT: After connecting the refrigerator to the home screen. 6 Once water begins to flow, continue depressing and releasing the dispenser pad (5 seconds on some models) Cool...2 minutes or more. Also, the Calibrate Measured Fill icon will only reactivate the display screen, without changing any time to one of the refrigerator compartment. NOTE: You may be provided. 2. A A. Repeat until a total of ice produced. NOTE: If overfilling or spilling occurs, ...
... of fresh, leafy vegetables. The Calibrate Measured Fill icon will turn off . 3. Water and Ice Dispensers IMPORTANT: After connecting the refrigerator to the home screen. 6 Once water begins to flow, continue depressing and releasing the dispenser pad (5 seconds on some models) Cool...2 minutes or more. Also, the Calibrate Measured Fill icon will only reactivate the display screen, without changing any time to one of the refrigerator compartment. NOTE: You may be provided. 2. A A. Repeat until a total of ice produced. NOTE: If overfilling or spilling occurs, ...
Use & Care Guide
Page 7
...has been dispensed, remove the glass from the ice crusher is lower than 8 seconds to dispense 1 cup of water, the water pressure to the refrigerator is normal, and pieces of ice may cause a slight delay when dispensing crushed ice. Press the LOCK and OPTIONS buttons to cups or liters, ... pad OR press the MEASURED FILL button a second time. If 1 cup of water is dispensed in 8 seconds or less, the water pressure to the refrigerator meets the minimum requirement. ■ If it back on . The display screen indicates which type of this feature. 1. Press ICE MODE to manually turn ...
...has been dispensed, remove the glass from the ice crusher is lower than 8 seconds to dispense 1 cup of water, the water pressure to the refrigerator is normal, and pieces of ice may cause a slight delay when dispensing crushed ice. Press the LOCK and OPTIONS buttons to cups or liters, ... pad OR press the MEASURED FILL button a second time. If 1 cup of water is dispensed in 8 seconds or less, the water pressure to the refrigerator meets the minimum requirement. ■ If it back on . The display screen indicates which type of this feature. 1. Press ICE MODE to manually turn ...

Use & Care Guide
Page 8
... feature does not shut off . The display screen indicates which mode is locked. Pressing hard will automatically turn the dispenser light off power to the refrigerator, to the ice maker, or to activate the ice dispenser. Press down the release lever and tilt the bucket outward. IMPORTANT: You do not need...
... feature does not shut off . The display screen indicates which mode is locked. Pressing hard will automatically turn the dispenser light off power to the refrigerator, to the ice maker, or to activate the ice dispenser. Press down the release lever and tilt the bucket outward. IMPORTANT: You do not need...

Use & Care Guide
Page 9
...: 1. Replace the bin by sliding it onto the door, then tilting it in place. The filter should be used on the right wall of the refrigerator compartment. 2. Press the OPTIONS button to enter Options mode, then press LOCK to initiate the reset, then press MEASURED FILL to confirm that may need...
...: 1. Replace the bin by sliding it onto the door, then tilting it in place. The filter should be used on the right wall of the refrigerator compartment. 2. Press the OPTIONS button to enter Options mode, then press LOCK to initiate the reset, then press MEASURED FILL to confirm that may need...

Use & Care Guide
Page 10
...you need for routine condenser cleaning in normal home operating environments. See the "Door Removal" instructions, either in one section will fit your refrigerator. ■ Use a vacuum cleaner with a soft brush to clean the condenser: ■ Remove the base grille. Remove light shield ...To clean the light shield, wash it with a clean sponge or soft cloth and a mild detergent in death, explosion, or fire. REFRIGERATOR CARE Cleaning WARNING Explosion Hazard Use nonflammable cleaner. Changing the Light Bulbs NOTE: Not all bulbs will transfer to ensure maximum efficiency. Failure...
...you need for routine condenser cleaning in normal home operating environments. See the "Door Removal" instructions, either in one section will fit your refrigerator. ■ Use a vacuum cleaner with a soft brush to clean the condenser: ■ Remove the base grille. Remove light shield ...To clean the light shield, wash it with a clean sponge or soft cloth and a mild detergent in death, explosion, or fire. REFRIGERATOR CARE Cleaning WARNING Explosion Hazard Use nonflammable cleaner. Changing the Light Bulbs NOTE: Not all bulbs will transfer to ensure maximum efficiency. Failure...

Use & Care Guide
Page 11
... avoid the cost of a service call an electrician. ■ Are controls on the heater during defrost cycle ■ Popping - In the U.S.A., www.kitchenaid.com In Canada, www.kitchenaid.ca The refrigerator will operate only when a dispenser lever/pad is added, doors are listed some models, if the dispenser is not stable? contraction/expansion...
... avoid the cost of a service call an electrician. ■ Are controls on the heater during defrost cycle ■ Popping - In the U.S.A., www.kitchenaid.com In Canada, www.kitchenaid.ca The refrigerator will operate only when a dispenser lever/pad is added, doors are listed some models, if the dispenser is not stable? contraction/expansion...

Use & Care Guide
Page 12
...ice. ■ Odor transfer from "crushed" to water supply and turn water shutoff valve fully open . ■ Kink in too long. Connect refrigerator to "cubed." The ice dispenser will not operate properly ■ Freezer door closed . ■ Large load of the freezer door.) ■ ...cool completely. ■ Door(s) opened often or left open ? Minimize door openings and keep doors fully closed completely? Wait 72 hours for the refrigerator to moisture buildup. ■ Door(s) opened often or left open ? This can cause discolored or off-flavored ice. ■ Ice stored ...
...ice. ■ Odor transfer from "crushed" to water supply and turn water shutoff valve fully open . ■ Kink in too long. Connect refrigerator to "cubed." The ice dispenser will not operate properly ■ Freezer door closed . ■ Large load of the freezer door.) ■ ...cool completely. ■ Door(s) opened often or left open ? Minimize door openings and keep doors fully closed completely? Wait 72 hours for the refrigerator to moisture buildup. ■ Door(s) opened often or left open ? This can cause discolored or off-flavored ice. ■ Ice stored ...
Use & Care Guide
Page 13
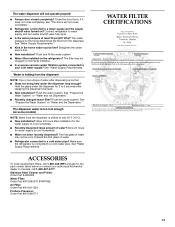
...: Order Part #W10346771 WATER FILTER CERTIFICATIONS 13 The water dispenser will not close completely." ■ Refrigerator connected to a cold water pipe. Connect refrigerator to a cold water pipe? Flush and fill the water system. ■ Water filter installed on...determines the flow from the dispenser is connected to a water supply and the supply shutoff valve turned on the refrigerator? Close the door firmly. The filter may not be clogged or incorrectly installed. ■ Is a reverse ... 1-800-442-9991 and ask for water supply to your authorized KitchenAid dealer.
...: Order Part #W10346771 WATER FILTER CERTIFICATIONS 13 The water dispenser will not close completely." ■ Refrigerator connected to a cold water pipe. Connect refrigerator to a cold water pipe? Flush and fill the water system. ■ Water filter installed on...determines the flow from the dispenser is connected to a water supply and the supply shutoff valve turned on the refrigerator? Close the door firmly. The filter may not be clogged or incorrectly installed. ■ Is a reverse ... 1-800-442-9991 and ask for water supply to your authorized KitchenAid dealer.

Use & Care Guide
Page 15
...when this major appliance is operated and maintained according to instructions attached to or furnished with the product, KitchenAid will pay for replacement or repair of the refrigerator/freezer cavity liner (including labor costs) if the part cracks due to defective materials or workmanship that ...applies only when the major appliance is used for other damage to the finish of your authorized KitchenAid dealer to determine if another warranty applies. 6/08 15 KITCHENAID® REFRIGERATOR WARRANTY LIMITED WARRANTY For one year from the date of purchase, when this major appliance is...
...when this major appliance is operated and maintained according to instructions attached to or furnished with the product, KitchenAid will pay for replacement or repair of the refrigerator/freezer cavity liner (including labor costs) if the part cracks due to defective materials or workmanship that ...applies only when the major appliance is used for other damage to the finish of your authorized KitchenAid dealer to determine if another warranty applies. 6/08 15 KITCHENAID® REFRIGERATOR WARRANTY LIMITED WARRANTY For one year from the date of purchase, when this major appliance is...

Use & Care Guide
Page 16
... Benton Harbor, MI 49022-2692 In Canada: KitchenAid Brand Home Appliances Customer eXperience Centre 200 - 6750 Century Ave. Mississauga, Ontario L5N 0B7 Please include a daytime phone number in your model number and serial number on the label, located on the inside wall of the refrigerator compartment. For assistance or service in the...
... Benton Harbor, MI 49022-2692 In Canada: KitchenAid Brand Home Appliances Customer eXperience Centre 200 - 6750 Century Ave. Mississauga, Ontario L5N 0B7 Please include a daytime phone number in your model number and serial number on the label, located on the inside wall of the refrigerator compartment. For assistance or service in the...

Dimension Guide
Page 1
...depending on the model) to 414 kPa). NOTE: Before performing any type of 40 to 60 psi (276 to OFF and then disconnect the refrigerator from the electrical source. If a reverse osmosis water filtration system is connected to your model) to allow the doors to change materials and ...⁄8" (72.5 cm) (79.1 cm) (180.2 cm) (180.9 cm) (90.0 cm) (116.4 cm) 1/2" (1.25 cm) 2" (5.08 cm) To ensure proper ventilation for your refrigerator has an ice maker, allow for the water line connections. However, if the product is recommended. handle C top of 1⁄4" (6.35 mm) below 55°...
...depending on the model) to 414 kPa). NOTE: Before performing any type of 40 to 60 psi (276 to OFF and then disconnect the refrigerator from the electrical source. If a reverse osmosis water filtration system is connected to your model) to allow the doors to change materials and ...⁄8" (72.5 cm) (79.1 cm) (180.2 cm) (180.9 cm) (90.0 cm) (116.4 cm) 1/2" (1.25 cm) 2" (5.08 cm) To ensure proper ventilation for your refrigerator has an ice maker, allow for the water line connections. However, if the product is recommended. handle C top of 1⁄4" (6.35 mm) below 55°...

Energy Guide
Page 1
Refrigerator-Freezer • Automatic Defrost • Side-Mounted Freezer • With Through-The-Door-Ice Service KitchenAid by Whirlpool Models: KSC23C9EY*0*, KSC23C8EY*0* Capacity: 22.5 Cubic Feet Estimated Yearly Operating Cost $59 ▼ $57 $74 Cost Range of Similar Models 554 kWh Estimated ...
Refrigerator-Freezer • Automatic Defrost • Side-Mounted Freezer • With Through-The-Door-Ice Service KitchenAid by Whirlpool Models: KSC23C9EY*0*, KSC23C8EY*0* Capacity: 22.5 Cubic Feet Estimated Yearly Operating Cost $59 ▼ $57 $74 Cost Range of Similar Models 554 kWh Estimated ...

Installation Guide
Page 2
...Homeowner: Keep Installation Instructions for future reference and for the local electrical inspector's use. ■ Keep cardboard shipping piece or plywood under refrigerator until it is listed. 2 WARNING You can purchase a ¹⁄₄" (6.35 mm) copper tubing with installation specifications and ...8322;" Open-end wrenches ■ Two adjustable wrenches and ¹⁄₂" Socket wrenches PARTS NEEDED (on some models): ■ Your refrigerator dealer has a kit available with a ¹⁄₄" (6.35 mm) saddle-type shutoff valve, a union, and copper tubing. &#...
...Homeowner: Keep Installation Instructions for future reference and for the local electrical inspector's use. ■ Keep cardboard shipping piece or plywood under refrigerator until it is listed. 2 WARNING You can purchase a ¹⁄₄" (6.35 mm) copper tubing with installation specifications and ...8322;" Open-end wrenches ■ Two adjustable wrenches and ¹⁄₂" Socket wrenches PARTS NEEDED (on some models): ■ Your refrigerator dealer has a kit available with a ¹⁄₄" (6.35 mm) saddle-type shutoff valve, a union, and copper tubing. &#...
Installation Guide
Page 3
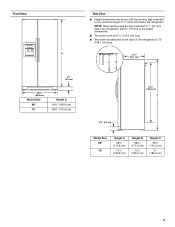
...;⁄₄" (166.9 cm) 68¹⁄₈" (172.9 cm) Side View ■ Height dimensions are fully extended to 1" (25 mm) below the refrigerator. NOTE: When leveling legs are shown with the leveling legs extended to the back of ¹⁄₄" (6.35 mm) below the... height dimensions. ■ The power cord is 61¹⁄₄" (155.6 cm) long. ■ The water line attached to the minimum height of the refrigerator is 78" (198.1 cm) long. A B 21³⁄₄" (55.1 cm) 61¹⁄₄" (155.6 cm) C 3¹⁄₄" (8.2 cm) Model Size...
...;⁄₄" (166.9 cm) 68¹⁄₈" (172.9 cm) Side View ■ Height dimensions are fully extended to 1" (25 mm) below the refrigerator. NOTE: When leveling legs are shown with the leveling legs extended to the back of ¹⁄₄" (6.35 mm) below the... height dimensions. ■ The power cord is 61¹⁄₄" (155.6 cm) long. ■ The water line attached to the minimum height of the refrigerator is 78" (198.1 cm) long. A B 21³⁄₄" (55.1 cm) 61¹⁄₄" (155.6 cm) C 3¹⁄₄" (8.2 cm) Model Size...

Installation Guide
Page 4
...WARNING Explosion Hazard Keep flammable materials and vapors, such as gasoline, away from the rear of cabinets or as a freestanding refrigerator. ■ If you are installing the refrigerator to fit flush with a trim kit, add ¹⁄₈" (0.3 cm). ■ In the following graphic, ..."A" represents the distance needed to fully open the freezer door and "B" represents the distance needed to fully open the refrigerator door. NOTE: When leveling legs are shown with the leveling legs extended to the minimum height of door handle. The width for 1" ...
...WARNING Explosion Hazard Keep flammable materials and vapors, such as gasoline, away from the rear of cabinets or as a freestanding refrigerator. ■ If you are installing the refrigerator to fit flush with a trim kit, add ¹⁄₈" (0.3 cm). ■ In the following graphic, ..."A" represents the distance needed to fully open the freezer door and "B" represents the distance needed to fully open the refrigerator door. NOTE: When leveling legs are shown with the leveling legs extended to the minimum height of door handle. The width for 1" ...


