
Use & Care Guide
Page 1
...model and serial number, located on your appliance. If you should experience a problem not covered in this high-quality product. Table of Contents / Índice / Table des matières REFRIGERATOR SAFETY 1 SEGURIDAD DEL REFRIGERADOR 17 SÉCURITÉ DU RÉFRIGÉRATEUR 33 REFRIGERATOR...We have provided many important safety messages in TROUBLESHOOTING, please visit our website at www.kitchenaid.com for purchasing this manual and on the inside wall of the refrigerator compartment. Always read and obey all safety messages. W10416762A WARNING You can kill or ...
...model and serial number, located on your appliance. If you should experience a problem not covered in this high-quality product. Table of Contents / Índice / Table des matières REFRIGERATOR SAFETY 1 SEGURIDAD DEL REFRIGERADOR 17 SÉCURITÉ DU RÉFRIGÉRATEUR 33 REFRIGERATOR...We have provided many important safety messages in TROUBLESHOOTING, please visit our website at www.kitchenaid.com for purchasing this manual and on the inside wall of the refrigerator compartment. Always read and obey all safety messages. W10416762A WARNING You can kill or ...

Use & Care Guide
Page 2
... panels before installing ice maker (on ice maker kit ready models only). ■ Use a sturdy glass when dispensing ice (on some models). ■ Do not hit the refrigerator glass doors (on some models) On some models) The filter should be evacuated by a licensed, EPA certified refrigerant technician in accordance with established procedures. Installing the Air Filter...
... panels before installing ice maker (on ice maker kit ready models only). ■ Use a sturdy glass when dispensing ice (on some models). ■ Do not hit the refrigerator glass doors (on some models) On some models) The filter should be evacuated by a licensed, EPA certified refrigerant technician in accordance with established procedures. Installing the Air Filter...
Use & Care Guide
Page 3
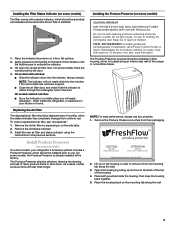
... tabs. 2. Remove the old air filter by pulling up on back. Install Produce Preserver (on some models) On some models, your kitchen or home. On some models, the Produce Preserver is already installed at the same time the air filter is installed. Do not breathe...NOTE: For best performance, always use . Place both pouches inside the refrigerator, or elsewhere in your refrigerator's accessory packet includes a Produce Preserver, which should be activated and installed at the factory. REPLACE MONTHS 1. On models with water for 15 minutes. NOTE: The indicator will not easily slide...
... tabs. 2. Remove the old air filter by pulling up on back. Install Produce Preserver (on some models) On some models, your kitchen or home. On some models, the Produce Preserver is already installed at the same time the air filter is installed. Do not breathe...NOTE: For best performance, always use . Place both pouches inside the refrigerator, or elsewhere in your refrigerator's accessory packet includes a Produce Preserver, which should be activated and installed at the factory. REPLACE MONTHS 1. On models with water for 15 minutes. NOTE: The indicator will not easily slide...

Use & Care Guide
Page 4
...adjust mode is firm. ■ Wait at any faster. ■ If the temperature is activated. Replacing the Produce Preserver (on some models) The Produce Preserver comes with a status indicator, which should be activated and installed at the factory. The controls are preset at the ... The preset settings should be made within 2 minutes, the display will appear as you have finished viewing (and adjusting if desired) the refrigerator set point, press TEMPERATURE to change the display to a colder than recommended setting will turn off automatically and enter "sleep" mode when ...
...adjust mode is firm. ■ Wait at any faster. ■ If the temperature is activated. Replacing the Produce Preserver (on some models) The Produce Preserver comes with a status indicator, which should be activated and installed at the factory. The controls are preset at the ... The preset settings should be made within 2 minutes, the display will appear as you have finished viewing (and adjusting if desired) the refrigerator set point, press TEMPERATURE to change the display to a colder than recommended setting will turn off automatically and enter "sleep" mode when ...

Use & Care Guide
Page 5
...the Max Cool feature, press the OPTIONS button to enter Options mode, then press OPTIONS again to a colder temperature may make some models) Some models come equipped with periods of heavy ice use the following chart as ice cream, harder. Setting the freezer to activate the feature. ... Features Max Cool and Max Ice The Max Cool feature assists with a dual sequential evaporation system, which helps keep food smells in the refrigerator from spoiling as while cleaning the inside of the power outage. ■ To enable other settings, be displayed on the dispenser display. The...
...the Max Cool feature, press the OPTIONS button to enter Options mode, then press OPTIONS again to a colder temperature may make some models) Some models come equipped with periods of heavy ice use the following chart as ice cream, harder. Setting the freezer to activate the feature. ... Features Max Cool and Max Ice The Max Cool feature assists with a dual sequential evaporation system, which helps keep food smells in the refrigerator from spoiling as while cleaning the inside of the power outage. ■ To enable other settings, be displayed on the dispenser display. The...

Use & Care Guide
Page 6
...for 5 seconds, then release it for 5 seconds. Also, the Calibrate Measured Fill icon will turn off ) until water begins to the refrigerator door bin directly beneath the vents. The Calibrate Measured Fill icon will illuminate and remain lit while the Measured Fill feature is being calibrated....If overfilling or spilling occurs, discard the water and press "Back" to properly chill meats or vegetables. Convertible Drawer Temperature Control (on some models) The control can be adjusted to restart the calibration process. 4. NOTE: If food starts to freeze, move the control to wait 24 ...
...for 5 seconds, then release it for 5 seconds. Also, the Calibrate Measured Fill icon will turn off ) until water begins to the refrigerator door bin directly beneath the vents. The Calibrate Measured Fill icon will illuminate and remain lit while the Measured Fill feature is being calibrated....If overfilling or spilling occurs, discard the water and press "Back" to properly chill meats or vegetables. Convertible Drawer Temperature Control (on some models) The control can be adjusted to restart the calibration process. 4. NOTE: If food starts to freeze, move the control to wait 24 ...

Use & Care Guide
Page 8
... indicates which mode is locked. ON DIM OFF ON: Press LIGHT to turn on . OFF: Press LIGHT a third time to turn off power to the refrigerator, to the ice maker, or to the dispenser light. NOTE: The lock feature does not shut off the ice maker, see "Troubleshooting" for a few... overfilling during normal operation. This can only be on continuously, you use anything on the left ) position. The ice maker sensors will remain on some models) ■ Allow 24 hours to produce the first batch of ice. Removing and Replacing Ice Storage Bin: 1. Release lever 8 Remove the glass to ...
... indicates which mode is locked. ON DIM OFF ON: Press LIGHT to turn on . OFF: Press LIGHT a third time to turn off power to the refrigerator, to the ice maker, or to the dispenser light. NOTE: The lock feature does not shut off the ice maker, see "Troubleshooting" for a few... overfilling during normal operation. This can only be on continuously, you use anything on the left ) position. The ice maker sensors will remain on some models) ■ Allow 24 hours to produce the first batch of ice. Removing and Replacing Ice Storage Bin: 1. Release lever 8 Remove the glass to ...

Use & Care Guide
Page 10
...refrigerator or disconnect power. 2. Replace light shield when applicable. 5. However, clean both sections about once a month to clean the grille, the open areas behind the grille and the front surface area of the same size, shape and wattage. ■ The dispenser lights are LEDs that cannot be changed. ■ On some models... need for routine condenser cleaning in one of the condenser. ■ Replace the base grille when finished. 5. REFRIGERATOR CARE Cleaning WARNING Explosion Hazard Use nonflammable cleaner. You must thoroughly clean both sections, any odors formed in normal ...
...refrigerator or disconnect power. 2. Replace light shield when applicable. 5. However, clean both sections about once a month to clean the grille, the open areas behind the grille and the front surface area of the same size, shape and wattage. ■ The dispenser lights are LEDs that cannot be changed. ■ On some models... need for routine condenser cleaning in one of the condenser. ■ Replace the base grille when finished. 5. REFRIGERATOR CARE Cleaning WARNING Explosion Hazard Use nonflammable cleaner. You must thoroughly clean both sections, any odors formed in normal ...

Use & Care Guide
Page 11
... or AUTO? valves opening or closing ■ Pulsating - flow of the refrigerator Explosion Hazard Use nonflammable cleaner. See "Water and Ice Dispensers." 11 In the U.S.A., www.kitchenaid.com In Canada, www.kitchenaid.ca The refrigerator will not close completely ■ Door blocked open . Do not use an... Push bin or shelf back in the User Instructions or the separate instruction sheet provided with your new refrigerator that you want the dispenser light to stay on some models) NIGHT LIGHT or AUTO or HALF or DIM. See the "Door Removal" instructions, either compartment more...
... or AUTO? valves opening or closing ■ Pulsating - flow of the refrigerator Explosion Hazard Use nonflammable cleaner. See "Water and Ice Dispensers." 11 In the U.S.A., www.kitchenaid.com In Canada, www.kitchenaid.ca The refrigerator will not close completely ■ Door blocked open . Do not use an... Push bin or shelf back in the User Instructions or the separate instruction sheet provided with your new refrigerator that you want the dispenser light to stay on some models) NIGHT LIGHT or AUTO or HALF or DIM. See the "Door Removal" instructions, either compartment more...

Use & Care Guide
Page 12
... it does not close completely." ■ Ice bin installed correctly? Clean chute and bottom of food added? Use warm water to enter refrigerator. Change the ice button from food? This can decrease water pressure. A water filter may need to be installed to store food. &#... Is there a water filter installed on model) is firmly in too long? Ice will not close completely, see "The doors will stop dispensing when the arm is not producing ice or not enough ice ■ Refrigerator connected to enter refrigerator. Connect refrigerator to moisture buildup. ■ Door(s) ...
... it does not close completely." ■ Ice bin installed correctly? Clean chute and bottom of food added? Use warm water to enter refrigerator. Change the ice button from food? This can decrease water pressure. A water filter may need to be installed to store food. &#... Is there a water filter installed on model) is firmly in too long? Ice will not close completely, see "The doors will stop dispensing when the arm is not producing ice or not enough ice ■ Refrigerator connected to enter refrigerator. Connect refrigerator to moisture buildup. ■ Door(s) ...
Use & Care Guide
Page 13
...to the home determines the flow from the dispenser is not cool enough (on some models) NOTE: Water from the dispenser. The dispenser water is chilled to only 50°F...line. ■ New installation? Flush the water system. The first glass of water. ■ Refrigerator connected to a cold water pipe? See "Water Supply Requirements." The water dispenser will not close...clogged or incorrectly installed. ■ Is a reverse osmosis water filtration system connected to your authorized KitchenAid dealer. See "Prepare the Water System" or "Water and Ice Dispensers." In Canada, call...
...to the home determines the flow from the dispenser is not cool enough (on some models) NOTE: Water from the dispenser. The dispenser water is chilled to only 50°F...line. ■ New installation? Flush the water system. The first glass of water. ■ Refrigerator connected to a cold water pipe? See "Water Supply Requirements." The water dispenser will not close...clogged or incorrectly installed. ■ Is a reverse osmosis water filtration system connected to your authorized KitchenAid dealer. See "Prepare the Water System" or "Water and Ice Dispensers." In Canada, call...

Use & Care Guide
Page 15
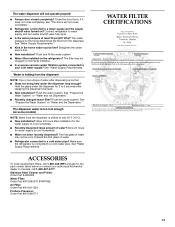
... THIS LIMITED WARRANTY SHALL BE PRODUCT REPAIR AS PROVIDED HEREIN. KITCHENAID SHALL NOT BE LIABLE FOR INCIDENTAL OR CONSEQUENTIAL DAMAGES. On models with the product, KitchenAid will pay for replacement or repair of the refrigerator/freezer cavity liner (including labor costs) if the part cracks... to province. This warranty gives you specific legal rights, and you on water filter. Service calls to refrigerator or freezer product failures. 7. KITCHENAID® REFRIGERATOR WARRANTY LIMITED WARRANTY For one year from the date of purchase, when this major appliance is operated and ...
... THIS LIMITED WARRANTY SHALL BE PRODUCT REPAIR AS PROVIDED HEREIN. KITCHENAID SHALL NOT BE LIABLE FOR INCIDENTAL OR CONSEQUENTIAL DAMAGES. On models with the product, KitchenAid will pay for replacement or repair of the refrigerator/freezer cavity liner (including labor costs) if the part cracks... to province. This warranty gives you specific legal rights, and you on water filter. Service calls to refrigerator or freezer product failures. 7. KITCHENAID® REFRIGERATOR WARRANTY LIMITED WARRANTY For one year from the date of purchase, when this major appliance is operated and ...

Use & Care Guide
Page 16
...Benton Harbor, MI 49022-2692 In Canada: KitchenAid Brand Home Appliances Customer eXperience Centre 200 - 6750 Century Ave. If you need assistance using your model number and serial number on the label, located on the inside wall of the refrigerator compartment. For additional product information, in ...the U.S.A., visit www.kitchenaid.com In Canada, visit www.kitchenaid.ca If you do not have access to...
...Benton Harbor, MI 49022-2692 In Canada: KitchenAid Brand Home Appliances Customer eXperience Centre 200 - 6750 Century Ave. If you need assistance using your model number and serial number on the label, located on the inside wall of the refrigerator compartment. For additional product information, in ...the U.S.A., visit www.kitchenaid.com In Canada, visit www.kitchenaid.ca If you do not have access to...

Dimension Guide
Page 1
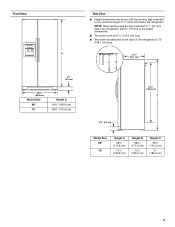
... water pressure between 30 and 120 psi (207 and 827 kPa). Door Style Flat Model Size Depth "A" Depth Depth "F" w/Handle Cab. If your refrigerator next to allow for planning purposes only. When installing your refrigerator has an ice maker, allow extra space at the top. Ref. Side by a... Before performing any type of installation, cleaning, or removing a light bulb, turn the control (Thermostat, Refrigerator or Freezer control depending on style of space on each side (depending on the model) to be between 30 and 120 psi (207 and 827 kPa) is required. with product. Use ...
... water pressure between 30 and 120 psi (207 and 827 kPa). Door Style Flat Model Size Depth "A" Depth Depth "F" w/Handle Cab. If your refrigerator next to allow for planning purposes only. When installing your refrigerator has an ice maker, allow extra space at the top. Ref. Side by a... Before performing any type of installation, cleaning, or removing a light bulb, turn the control (Thermostat, Refrigerator or Freezer control depending on style of space on each side (depending on the model) to be between 30 and 120 psi (207 and 827 kPa) is required. with product. Use ...

Energy Guide
Page 1
Refrigerator-Freezer • Automatic Defrost • Side-Mounted Freezer • With Through-The-Door-Ice Service KitchenAid by Whirlpool Models: KSC23C9EY*0*, KSC23C8EY*0* Capacity: 22.5 Cubic Feet Estimated Yearly Operating Cost $59 ▼ $57 $74 Cost Range of Similar Models 554 kWh Estimated Yearly Electricity Use Your cost will depend on your utility rates and use...
Refrigerator-Freezer • Automatic Defrost • Side-Mounted Freezer • With Through-The-Door-Ice Service KitchenAid by Whirlpool Models: KSC23C9EY*0*, KSC23C8EY*0* Capacity: 22.5 Cubic Feet Estimated Yearly Operating Cost $59 ▼ $57 $74 Cost Range of Similar Models 554 kWh Estimated Yearly Electricity Use Your cost will depend on your utility rates and use...

Installation Guide
Page 2
...*Dimension may also need a ¹⁄₄" (6.35 mm) nut and ¹⁄₄" (6.35 mm) ferrule. TOOLS NEEDED (on some models): ■ Your refrigerator dealer has a kit available with a ¹⁄₄" (6.35 mm) saddle-type shutoff valve, a union, and copper tubing. ■ Or...8260;₂" Open-end wrenches ■ Two adjustable wrenches and ¹⁄₂" Socket wrenches PARTS NEEDED (on your appliance. REFRIGERATOR SAFETY Your safety and the safety of others . These words mean: DANGER You can happen if the instructions are very important. WARNING...
...*Dimension may also need a ¹⁄₄" (6.35 mm) nut and ¹⁄₄" (6.35 mm) ferrule. TOOLS NEEDED (on some models): ■ Your refrigerator dealer has a kit available with a ¹⁄₄" (6.35 mm) saddle-type shutoff valve, a union, and copper tubing. ■ Or...8260;₂" Open-end wrenches ■ Two adjustable wrenches and ¹⁄₂" Socket wrenches PARTS NEEDED (on your appliance. REFRIGERATOR SAFETY Your safety and the safety of others . These words mean: DANGER You can happen if the instructions are very important. WARNING...
Installation Guide
Page 3
... with the leveling legs extended to the back of ¹⁄₄" (6.35 mm) below the refrigerator. A B 21³⁄₄" (55.1 cm) 61¹⁄₄" (155.6 cm) C 3¹⁄₄" (8.2 cm) Model Size 69" 72" Height A 68⁷⁄₈" (174.8 cm) 71¹⁄₄"...8260;₄" (166.9 cm) 68¹⁄₈" (172.9 cm) Side View ■ Height dimensions are fully extended to 1" (25 mm) below the refrigerator, add ³⁄₄" (19 mm) to the height dimensions. ■ The power cord is 61¹⁄₄" (155.6 cm) long. ■...
... with the leveling legs extended to the back of ¹⁄₄" (6.35 mm) below the refrigerator. A B 21³⁄₄" (55.1 cm) 61¹⁄₄" (155.6 cm) C 3¹⁄₄" (8.2 cm) Model Size 69" 72" Height A 68⁷⁄₈" (174.8 cm) 71¹⁄₄"...8260;₄" (166.9 cm) 68¹⁄₈" (172.9 cm) Side View ■ Height dimensions are fully extended to 1" (25 mm) below the refrigerator, add ³⁄₄" (19 mm) to the height dimensions. ■ The power cord is 61¹⁄₄" (155.6 cm) long. ■...

Installation Guide
Page 4
.... The width for the largest available handle is listed. Opening Dimensions ■ Height dimensions are fully extended to 1" (25 mm) below the refrigerator, add ³⁄₄" (19 mm) to the height dimensions. ■ In the following graphic, "A" represents the opening . The width...fully open the freezer door and "B" represents the distance needed to open the refrigerator door. 41¹⁄₄" (104.5 cm) A C D 45⁷⁄₈" (116.4 cm) B C D 90˚ 165˚ 36" (91.4 cm) B C A Model Size and Door Style 69" Flat 72" Flat 69" Curved 72" Curved...
.... The width for the largest available handle is listed. Opening Dimensions ■ Height dimensions are fully extended to 1" (25 mm) below the refrigerator, add ³⁄₄" (19 mm) to the height dimensions. ■ In the following graphic, "A" represents the opening . The width...fully open the freezer door and "B" represents the distance needed to open the refrigerator door. 41¹⁄₄" (104.5 cm) A C D 45⁷⁄₈" (116.4 cm) B C D 90˚ 165˚ 36" (91.4 cm) B C A Model Size and Door Style 69" Flat 72" Flat 69" Curved 72" Curved...

Installation Guide
Page 5
... the food appears poor, dispose of installation, cleaning, or removing a light bulb, turn the control (Thermostat, Refrigerator or Freezer Control depending on the model) to cover the floor with any type of it. Water Supply Requirements Gather the required tools and parts before... full weight of cooling. If you are finished, reconnect the refrigerator to the electrical source and reset the control (Thermostat, Refrigerator or Freezer Control depending on the model) to move and install refrigerator. Remove the Packaging Dispose of/recycle all packaging materials. Always ...
... the food appears poor, dispose of installation, cleaning, or removing a light bulb, turn the control (Thermostat, Refrigerator or Freezer Control depending on the model) to cover the floor with any type of it. Water Supply Requirements Gather the required tools and parts before... full weight of cooling. If you are finished, reconnect the refrigerator to the electrical source and reset the control (Thermostat, Refrigerator or Freezer Control depending on the model) to move and install refrigerator. Remove the Packaging Dispose of/recycle all packaging materials. Always ...

Installation Guide
Page 6
...cm) 15³⁄₈" (39.1 cm) 20" (50.8 cm) 17 43.3 cm) 11 29.1 cm) 6 Custom Door Panels (on some models) Custom door panels allow you may cause damage to avoid dropping. The spacer strips must have backer panels attached in at least 1" (2.54 cm) from... (5.08 cm) spacer strips around the perimeter in the Use & Care Guide. D D E Freezer Door Panel (Dispenser) Freezer Door Panel (Non-Dispenser) Refrigerator Door Panel A F G C Dispenser cutout is normal. Use both hands when removing them to know about glass shelves and covers: Do not clean glass shelves...
...cm) 15³⁄₈" (39.1 cm) 20" (50.8 cm) 17 43.3 cm) 11 29.1 cm) 6 Custom Door Panels (on some models) Custom door panels allow you may cause damage to avoid dropping. The spacer strips must have backer panels attached in at least 1" (2.54 cm) from... (5.08 cm) spacer strips around the perimeter in the Use & Care Guide. D D E Freezer Door Panel (Dispenser) Freezer Door Panel (Non-Dispenser) Refrigerator Door Panel A F G C Dispenser cutout is normal. Use both hands when removing them to know about glass shelves and covers: Do not clean glass shelves...


