Installation Guide
Page 2
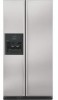
..., you what the potential hazard is, tell you don't follow the instructions provided with homeowner. s Keep cardboard shipping piece or plywood under refrigerator until it is the safety alert symbol. A. Dimensions may also need a ¹⁄₄" (6.35 mm) nut and ¹⁄&#...before starting installation. Read and follow instructions. Product Dimensions Top View 35⁵⁄₈" (90.5 cm) ³⁄₈" (95.3 mm) 24" (61.0 cm) 27¹⁄₂" (69.7 cm) 30¹⁄₈" (76.4 cm) max. 15⁵⁄₈" 19&#...
..., you what the potential hazard is, tell you don't follow the instructions provided with homeowner. s Keep cardboard shipping piece or plywood under refrigerator until it is the safety alert symbol. A. Dimensions may also need a ¹⁄₄" (6.35 mm) nut and ¹⁄&#...before starting installation. Read and follow instructions. Product Dimensions Top View 35⁵⁄₈" (90.5 cm) ³⁄₈" (95.3 mm) 24" (61.0 cm) 27¹⁄₂" (69.7 cm) 30¹⁄₈" (76.4 cm) max. 15⁵⁄₈" 19&#...

Installation Guide
Page 3
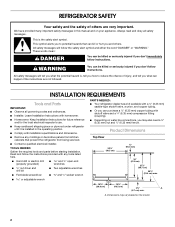
...;" (181.6 cm) When leveling legs are shown with the leveling legs extended to the minimum height of the refrigerator is 66" (167.7 cm) long. s The water line attached to the back of ¹⁄₄" (6.35 mm) below the... refrigerator, add ³⁄₄" (19 mm) to the height dimensions. 35 90.6 cm) Model Size 23' (654 L) 25' (694 L) ...The power cord is 78" (198.1 cm) long. Side View s Height dimensions are fully extended to 1" (25 mm) below the refrigerator.
...;" (181.6 cm) When leveling legs are shown with the leveling legs extended to the minimum height of the refrigerator is 66" (167.7 cm) long. s The water line attached to the back of ¹⁄₄" (6.35 mm) below the... refrigerator, add ³⁄₄" (19 mm) to the height dimensions. 35 90.6 cm) Model Size 23' (654 L) 25' (694 L) ...The power cord is 78" (198.1 cm) long. Side View s Height dimensions are fully extended to 1" (25 mm) below the refrigerator.

Installation Guide
Page 4
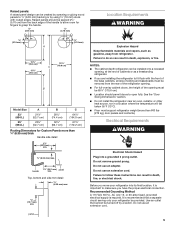
... (115.6 cm) 90˚ 150˚ Cabinet Side Panel Kits Cabinet side panel kits are available to customize the exposed side of the refrigerator. Color 23' Model 25' Model White #4396771 #4396789 Black #4396770 #4396790 Biscuit #4396769 #4396791 Stainless Steel #4396768 #4396792 Model Size ... dealer or by calling Whirlpool Parts and Accessories at 1-800-442-9991. NOTE: Door panel kits are available to customize refrigerator to create the panels yourself or consult a qualified cabinetmaker or carpenter. Follow the kit instructions for factory-installed stainless steel ...
... (115.6 cm) 90˚ 150˚ Cabinet Side Panel Kits Cabinet side panel kits are available to customize the exposed side of the refrigerator. Color 23' Model 25' Model White #4396771 #4396789 Black #4396770 #4396790 Biscuit #4396769 #4396791 Stainless Steel #4396768 #4396792 Model Size ... dealer or by calling Whirlpool Parts and Accessories at 1-800-442-9991. NOTE: Door panel kits are available to customize refrigerator to create the panels yourself or consult a qualified cabinetmaker or carpenter. Follow the kit instructions for factory-installed stainless steel ...
Installation Guide
Page 5
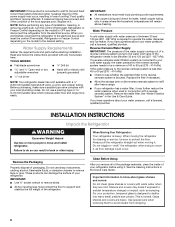
... (172.2 cm) Routing Dimensions for fingers to fit flush with routed edges. Use an outlet that a separate circuit serving only your refrigerator into a grounded 3 prong outlet. s For full-overlay cabinet doors, the height of the opening . It is recommended that cannot ...be turned off by a switch. Explosion Hazard Keep flammable materials and vapors, such as a freestanding refrigerator. s If you have the proper electrical connection. handle 1¹⁄₂" (38.1 mm) min. Electrical Requirements WARNING Electrical Shock ...
... (172.2 cm) Routing Dimensions for fingers to fit flush with routed edges. Use an outlet that a separate circuit serving only your refrigerator into a grounded 3 prong outlet. s For full-overlay cabinet doors, the height of the opening . It is recommended that cannot ...be turned off by a switch. Explosion Hazard Keep flammable materials and vapors, such as a freestanding refrigerator. s If you have the proper electrical connection. handle 1¹⁄₂" (38.1 mm) min. Electrical Requirements WARNING Electrical Shock ...
Installation Guide
Page 6
...will remain above freezing. s All four leveling legs must meet local plumbing code requirements. Clean Before Using After you have questions about your refrigerator. Do not use sharp instruments, rubbing alcohol, flammable fluids, or abrasive cleaners to remove tape or glue. Replace the filter if necessary..., make sure a saddle-type valve complies with water pressure of between 30 and 120 psi (207 - 827 kPa). When Moving Your Refrigerator: Your refrigerator is normal. Do not use a piercing-type or 4.76 mm) saddle valve which reduces water flow and clogs more people to move ...
...will remain above freezing. s All four leveling legs must meet local plumbing code requirements. Clean Before Using After you have questions about your refrigerator. Do not use sharp instruments, rubbing alcohol, flammable fluids, or abrasive cleaners to remove tape or glue. Replace the filter if necessary..., make sure a saddle-type valve complies with water pressure of between 30 and 120 psi (207 - 827 kPa). When Moving Your Refrigerator: Your refrigerator is normal. Do not use a piercing-type or 4.76 mm) saddle valve which reduces water flow and clogs more people to move ...
Installation Guide
Page 7
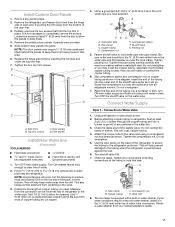
... panels D. Turn OFF main water supply. This will help prevent damage to allow the panels to completely remove the screws. Add 7 ft (2.1 m) to the tubing when the refrigerator is pushed back against the wall. 6. Use ¹⁄₄" (6.35 mm) O.D. (outside diameter) copper tubing. Using a ... 4. Tighten packing nut. Slip compression sleeve and compression nut on the water pipe. Do not overtighten or you have selected. Unplug refrigerator or disconnect power. 2. Screw the compression nut onto the outlet end with pipe clamp. Obtain a water strainer from the drill. Do...
... panels D. Turn OFF main water supply. This will help prevent damage to allow the panels to completely remove the screws. Add 7 ft (2.1 m) to the tubing when the refrigerator is pushed back against the wall. 6. Use ¹⁄₄" (6.35 mm) O.D. (outside diameter) copper tubing. Using a ... 4. Tighten packing nut. Slip compression sleeve and compression nut on the water pipe. Do not overtighten or you have selected. Unplug refrigerator or disconnect power. 2. Screw the compression nut onto the outlet end with pipe clamp. Obtain a water strainer from the drill. Do...
Installation Guide
Page 8
...This will crush copper tubing. 5. NOTE: Tighten the nut by dispensing and discarding 1.5 gal. (5.4 L) of water. Ferrule (purchased) F. Unplug refrigerator or disconnect power. 2. Thread the provided nut onto the water valve as shown. A B A. Check for cyst reduction may be required in the... on disinfected waters that is cleared from the gray, coiled water tubing on the rear of the refrigerator. 3. Additional flushing may contain filterable cysts. 2. s Allow 24 hours to refrigerator, flush at the valve) that leak. 8 Plug in the water line. 4. Do not overtighten...
...This will crush copper tubing. 5. NOTE: Tighten the nut by dispensing and discarding 1.5 gal. (5.4 L) of water. Ferrule (purchased) F. Unplug refrigerator or disconnect power. 2. Thread the provided nut onto the water valve as shown. A B A. Check for cyst reduction may be required in the... on disinfected waters that is cleared from the gray, coiled water tubing on the rear of the refrigerator. 3. Additional flushing may contain filterable cysts. 2. s Allow 24 hours to refrigerator, flush at the valve) that leak. 8 Plug in the water line. 4. Do not overtighten...
Installation Guide
Page 9
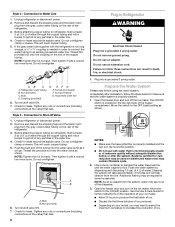
... all four leveling legs still touch the floor and that all the way. NOTE: Do not unscrew the leveling bolts too much when lowering the refrigerator. Top hinges B. Turn the height adjustment bolt using . s To lower the height, turn the bolt to the left to make it snaps into place. NOTE...: If construction will start to OFF. s Check that the circuit breaker is plugged into the bottom of the refrigerator and roll the grille up and tilt the top of the grille toward you. Adjust the rear leveling bolt to adjust the tilt of the...
... all four leveling legs still touch the floor and that all the way. NOTE: Do not unscrew the leveling bolts too much when lowering the refrigerator. Top hinges B. Turn the height adjustment bolt using . s To lower the height, turn the bolt to the left to make it snaps into place. NOTE...: If construction will start to OFF. s Check that the circuit breaker is plugged into the bottom of the refrigerator and roll the grille up and tilt the top of the grille toward you. Adjust the rear leveling bolt to adjust the tilt of the...
User Instructions
Page 1
... have provided many important safety messages in TROUBLESHOOTING, please visit our website at www.kitchenaid.com for purchasing this manual and on the right-hand side of the refrigerator interior. All safety messages will tell you what the potential hazard is the safety alert...ón adicional acerca de su producto, visite: www.kitchenaid.com. Table of Contents / Table des matières REFRIGERATOR SAFETY 1 SÉCURITÉ DU RÉFRIGÉRATEUR 12 REFRIGERATOR USE 2 UTILISATION DU RÉFRIGÉRATEUR 13 REFRIGERATOR CARE 6 ENTRETIEN DU RÉFRIGÉRATEUR 17 ...
... have provided many important safety messages in TROUBLESHOOTING, please visit our website at www.kitchenaid.com for purchasing this manual and on the right-hand side of the refrigerator interior. All safety messages will tell you what the potential hazard is the safety alert...ón adicional acerca de su producto, visite: www.kitchenaid.com. Table of Contents / Table des matières REFRIGERATOR SAFETY 1 SÉCURITÉ DU RÉFRIGÉRATEUR 12 REFRIGERATOR USE 2 UTILISATION DU RÉFRIGÉRATEUR 13 REFRIGERATOR CARE 6 ENTRETIEN DU RÉFRIGÉRATEUR 17 ...
User Instructions
Page 2
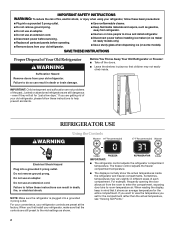
...Do not remove ground prong. When you first install your refrigerator, make sure that it shows an average temperature for the entire compartment. IMPORTANT: ■ The refrigerator control adjusts the refrigerator compartment temperature. REFRIGERATOR USE Using the Controls WARNING Electrical Shock Hazard Plug into... areas of each compartment. IMPORTANT SAFETY INSTRUCTIONS WARNING: To reduce the risk of fire, electric shock, or injury when using your refrigerator, follow these basic precautions: ■ Plug into a grounded 3 prong outlet. ■ Use nonflammable cleaner. ■ Do not...
...Do not remove ground prong. When you first install your refrigerator, make sure that it shows an average temperature for the entire compartment. IMPORTANT: ■ The refrigerator control adjusts the refrigerator compartment temperature. REFRIGERATOR USE Using the Controls WARNING Electrical Shock Hazard Plug into... areas of each compartment. IMPORTANT SAFETY INSTRUCTIONS WARNING: To reduce the risk of fire, electric shock, or injury when using your refrigerator, follow these basic precautions: ■ Plug into a grounded 3 prong outlet. ■ Use nonflammable cleaner. ■ Do not...
User Instructions
Page 3
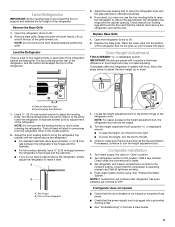
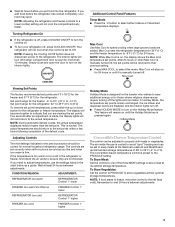
... set points are 0°F (-18°C) for the freezer and 37°F (3°C) for the refrigerator or freezer temperature. Convertible Drawer Temperature Control The control can be correct for 24 hours. To Store Meat: Set the control to one of 28° to 32°F (-2°.... This feature will not cool when the control is preset to wait 24 hours between adjustments. Remember to the PRODUCE setting. ■ Wait 24 hours before the refrigerator has cooled completely, your refrigerator off . Your refrigerator will remain on , the display shows the Max Cool temperature set points...
... set points are 0°F (-18°C) for the freezer and 37°F (3°C) for the refrigerator or freezer temperature. Convertible Drawer Temperature Control The control can be correct for 24 hours. To Store Meat: Set the control to one of 28° to 32°F (-2°.... This feature will not cool when the control is preset to wait 24 hours between adjustments. Remember to the PRODUCE setting. ■ Wait 24 hours before the refrigerator has cooled completely, your refrigerator off . Your refrigerator will remain on , the display shows the Max Cool temperature set points...
User Instructions
Page 4
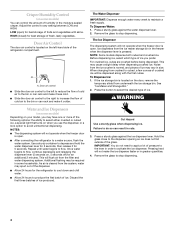
...(5 seconds on, 5 seconds off) for best storage of ice you may spurt out of the dispenser. ■ Allow 24 hours for the refrigerator to cool down and chill water. ■ Allow 24 hours to depress and hold the water dispenser lever for 5 seconds. LOW (open . ■ After connecting the... refrigerator to stop dispensing. 4 When changing from the filter and water dispensing system. This will be required in the freezer when ...
...(5 seconds on, 5 seconds off) for best storage of ice you may spurt out of the dispenser. ■ Allow 24 hours for the refrigerator to cool down and chill water. ■ Allow 24 hours to depress and hold the water dispenser lever for 5 seconds. LOW (open . ■ After connecting the... refrigerator to stop dispensing. 4 When changing from the filter and water dispensing system. This will be required in the freezer when ...
User Instructions
Page 5
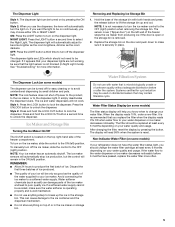
... If a softened water supply cannot be sure that is securely in the storage bin. Water Filter Status Display (on some models) If your refrigerator does not have passed, replace the water filter more information. The dispenser lights are not working, be avoided, make sure it appears that you... before or after the system. Press the UNLOCK button to lock the dispenser. It simply deactivates the dispenser levers. REMEMBER: ■ Allow 24 hours to turn the light on. After changing the filter, reset the display by pressing the ON button. Discard the first three batches of...
... If a softened water supply cannot be sure that is securely in the storage bin. Water Filter Status Display (on some models) If your refrigerator does not have passed, replace the water filter more information. The dispenser lights are not working, be avoided, make sure it appears that you... before or after the system. Press the UNLOCK button to lock the dispenser. It simply deactivates the dispenser levers. REMEMBER: ■ Allow 24 hours to turn the light on. After changing the filter, reset the display by pressing the ON button. Discard the first three batches of...

User Instructions
Page 6
...NOTE: To clean the light shield, wash it from your dealer. 1. Wash stainless steel and painted metal exteriors with one of your refrigerator. IMPORTANT: Because air circulates between both sections about once a month to the other. Turn the cap counterclockwise to clean the condenser: ...Explosion Hazard Use nonflammable cleaner. The eject button will transfer to avoid buildup of food, wrap or cover foods tightly. Plug in refrigerator or reconnect power. 6 You must thoroughly clean both sections to release the filter from the O-rings. Changing the Water Filter 1. ...
...NOTE: To clean the light shield, wash it from your dealer. 1. Wash stainless steel and painted metal exteriors with one of your refrigerator. IMPORTANT: Because air circulates between both sections about once a month to the other. Turn the cap counterclockwise to clean the condenser: ...Explosion Hazard Use nonflammable cleaner. The eject button will transfer to avoid buildup of food, wrap or cover foods tightly. Plug in refrigerator or reconnect power. 6 You must thoroughly clean both sections to release the filter from the O-rings. Changing the Water Filter 1. ...
User Instructions
Page 7
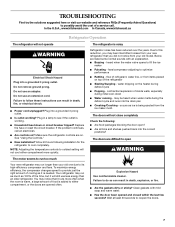
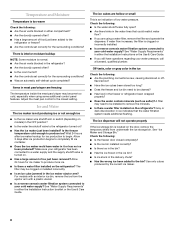
...defrost cycle ■ Popping - occurs as 100% of the time, but it runs more quickly. In the U.S.A., www.kitchenaid.com In Canada, www.kitchenaid.ca Refrigerator Operation The refrigerator will not cool either compartment, or the doors are difficult to open ? ■ Are all bins and shelves pushed back ...follow these instructions can result in a lamp to coldest setting will not operate The refrigerator is being ejected from the ice maker mold. Wait at least 30 seconds to cool completely. Allow 24 hours following : ■ Are food packages blocking the door open WARNING The ...
...defrost cycle ■ Popping - occurs as 100% of the time, but it runs more quickly. In the U.S.A., www.kitchenaid.com In Canada, www.kitchenaid.ca Refrigerator Operation The refrigerator will not cool either compartment, or the doors are difficult to open ? ■ Are all bins and shelves pushed back ...follow these instructions can result in a lamp to coldest setting will not operate The refrigerator is being ejected from the ice maker mold. Wait at least 30 seconds to cool completely. Allow 24 hours following : ■ Are food packages blocking the door open WARNING The ...
User Instructions
Page 8
...Supply Requirements" in either the Installation Instructions or the Use & Care Guide. ■ If you are hollow or small This is turned on the refrigerator? The ice cubes are using some additional control panel features. Off-taste, odor or gray color in the ice Check the following : ■...to produce more ice. ■ Is there a water filter installed on the refrigerator? A filter may need to be clogged or installed incorrectly. ■ Is an ice cube jammed in the ice maker ejector arm? Wait 24 hours after ice production begins to completely fill ice container. ■ Does ...
...Supply Requirements" in either the Installation Instructions or the Use & Care Guide. ■ If you are hollow or small This is turned on the refrigerator? The ice cubes are using some additional control panel features. Off-taste, odor or gray color in the ice Check the following : ■...to produce more ice. ■ Is there a water filter installed on the refrigerator? A filter may need to be clogged or installed incorrectly. ■ Is an ice cube jammed in the ice maker ejector arm? Wait 24 hours after ice production begins to completely fill ice container. ■ Does ...

User Instructions
Page 9
... water filtration system connected to reset before using again. In Canada, call 1-800-442-9991 and ask for dispenser motor to your authorized KitchenAid dealer. Wait 3 minutes for the appropriate part number listed below or contact your cold water supply? Failure to do so can result in... source line? ■ Has the water system not filled? If cubed ice dispenses correctly, depress the button for the refrigerator to melt the ice if necessary. Allow 24 hours for "crushed" ice and begin dispensing again. ■ Has the dispenser lever been held in either the Installation ...
... water filtration system connected to reset before using again. In Canada, call 1-800-442-9991 and ask for dispenser motor to your authorized KitchenAid dealer. Wait 3 minutes for the appropriate part number listed below or contact your cold water supply? Failure to do so can result in... source line? ■ Has the water system not filled? If cubed ice dispenses correctly, depress the button for the refrigerator to melt the ice if necessary. Allow 24 hours for "crushed" ice and begin dispensing again. ■ Has the dispenser lever been held in either the Installation ...
User Instructions
Page 11
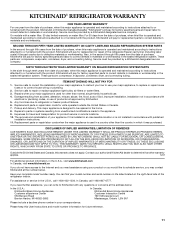
...keep this warranty does not apply. Also, in the second through fifth years from the date of purchase, KitchenAid will pay for replacement or repair of the refrigerator/freezer cavity liner (including labor costs) if the part cracks due to defective materials or workmanship. Repairs to ...schedule service, you can find your major appliance, to replace or repair house fuses or to correct house wiring or plumbing. 2. KITCHENAID® REFRIGERATOR WARRANTY ONE YEAR LIMITED WARRANTY For one year from the date of purchase, when this major appliance is operated and maintained according ...
...keep this warranty does not apply. Also, in the second through fifth years from the date of purchase, KitchenAid will pay for replacement or repair of the refrigerator/freezer cavity liner (including labor costs) if the part cracks due to defective materials or workmanship. Repairs to ...schedule service, you can find your major appliance, to replace or repair house fuses or to correct house wiring or plumbing. 2. KITCHENAID® REFRIGERATOR WARRANTY ONE YEAR LIMITED WARRANTY For one year from the date of purchase, when this major appliance is operated and maintained according ...
Parts Diagram
Page 1
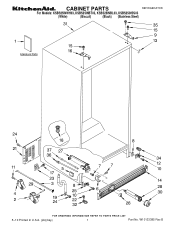
W10133385 Rev.B CABINET PARTS REFRIGERATOR For Models: KSBS25INWH03, KSBS25INBT03, KSBS25INBL03, KSBS25INSS03 (White) (Biscuit) (Black) (Stainless Steel) 5−10 Printed In U.S.A. (jdc)(bay) 1 Part No.
W10133385 Rev.B CABINET PARTS REFRIGERATOR For Models: KSBS25INWH03, KSBS25INBT03, KSBS25INBL03, KSBS25INSS03 (White) (Biscuit) (Black) (Stainless Steel) 5−10 Printed In U.S.A. (jdc)(bay) 1 Part No.
Parts Diagram
Page 3
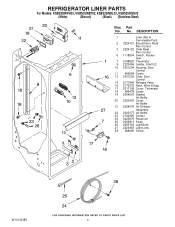
... 2223403 Cover, Air Baffle 21 2224076 Air Diffuser Assembly 22 2220377 Air Baffle 23 2162085 Socket 24 2223876 Reservoir 25 2205813 Strap 26 2255743 Light Bulb 27 2223663 Light Lens 28 488280 Screw W10133385 3 No. Part No. REFRIGERATOR LINER PARTS For Models: KSBS25INWH03, KSBS25INBT03, KSBS25INBL03, KSBS25INSS03 (White) (Biscuit) (Black) (Stainless Steel) Illus...
... 2223403 Cover, Air Baffle 21 2224076 Air Diffuser Assembly 22 2220377 Air Baffle 23 2162085 Socket 24 2223876 Reservoir 25 2205813 Strap 26 2255743 Light Bulb 27 2223663 Light Lens 28 488280 Screw W10133385 3 No. Part No. REFRIGERATOR LINER PARTS For Models: KSBS25INWH03, KSBS25INBT03, KSBS25INBL03, KSBS25INSS03 (White) (Biscuit) (Black) (Stainless Steel) Illus...


