Owners Manual
Page 2
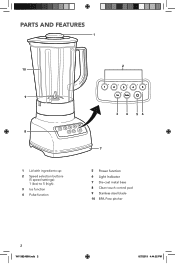
PARTS AND FEATURES 1 10 9 8 1 Lid with ingredient cup 2 Speed selection buttons (5 speed settings): 1 (low) to 5 (high). 3 Ice function 4 Pulse function 2 3 4 56 7 5 Power function 6 Light Indicator 7 Die-cast metal base 8 Clean touch control pad 9 Stainless steel blade 10 BPA Free pitcher 2 W11382496A.indb 2 8/7/2019 4:44:52 PM
PARTS AND FEATURES 1 10 9 8 1 Lid with ingredient cup 2 Speed selection buttons (5 speed settings): 1 (low) to 5 (high). 3 Ice function 4 Pulse function 2 3 4 56 7 5 Power function 6 Light Indicator 7 Die-cast metal base 8 Clean touch control pad 9 Stainless steel blade 10 BPA Free pitcher 2 W11382496A.indb 2 8/7/2019 4:44:52 PM
Owners Manual
Page 5
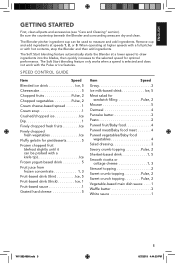
The Blender pitcher ingredient cup can be used to the selected speed for sandwich filling Pulse, 2 Mousse 5 Oatmeal 4 Pancake batter 3 Pesto 2 Pureed fruit/Baby food 4 Pureed meat/Baby ... and then add ingredients. Be sure the countertop beneath the Blender and surrounding areas are dry and clean. When operating at higher speeds with a full pitcher or with the Pulse or Ice features. The Soft Start blending feature automatically starts the Blender at speeds 1, 2, or 3. SPEED CONTROL GUIDE Item Speed Blended...
The Blender pitcher ingredient cup can be used to the selected speed for sandwich filling Pulse, 2 Mousse 5 Oatmeal 4 Pancake batter 3 Pesto 2 Pureed fruit/Baby food 4 Pureed meat/Baby ... and then add ingredients. Be sure the countertop beneath the Blender and surrounding areas are dry and clean. When operating at higher speeds with a full pitcher or with the Pulse or Ice features. The Soft Start blending feature automatically starts the Blender at speeds 1, 2, or 3. SPEED CONTROL GUIDE Item Speed Blended...
Owners Manual
Page 6
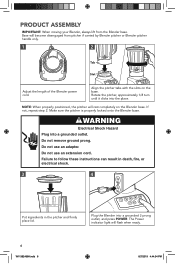
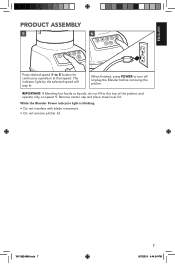
...into a grounded 3 prong outlet, and press POWER. The Power indicator light will rest completely on the base. NOTE: When properly positioned, the pitcher will flash when ready. 6 W11382496A.indb 6 8/7/2019 4:44:54 PM Failure to follow these instructions can result in death, fire, or ...electrical shock. 3 4 Put ingredients in the pitcher and firmly place lid. Do not use an adapter. PRODUCT ASSEMBLY IMPORTANT: When moving your Blender, always lift from pitcher if carried by Blender pitcher or Blender pitcher handle only. 1 2 Tab Slot Adjust the length of...
...into a grounded 3 prong outlet, and press POWER. The Power indicator light will rest completely on the base. NOTE: When properly positioned, the pitcher will flash when ready. 6 W11382496A.indb 6 8/7/2019 4:44:54 PM Failure to follow these instructions can result in death, fire, or ...electrical shock. 3 4 Put ingredients in the pitcher and firmly place lid. Do not use an adapter. PRODUCT ASSEMBLY IMPORTANT: When moving your Blender, always lift from pitcher if carried by Blender pitcher or Blender pitcher handle only. 1 2 Tab Slot Adjust the length of...
Owners Manual
Page 7
... foods or liquids, do not fill to turn off. The indicator light by the selected speed will stay lit. Unplug the Blender before removing the pitcher. Remove center cap and place towel over lid. While the Blender Power indicator light is blinking: • Do not interfere with blade movement. • Do...
... foods or liquids, do not fill to turn off. The indicator light by the selected speed will stay lit. Unplug the Blender before removing the pitcher. Remove center cap and place towel over lid. While the Blender Power indicator light is blinking: • Do not interfere with blade movement. • Do...
Owners Manual
Page 8
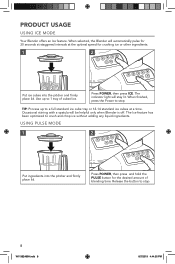
... to stop . Press POWER, then press and hold the PULSE button for crushing ice or other ingredients. 1 2 Put ice cubes into the pitcher and firmly place lid. PRODUCT USAGE USING ICE MODE Your Blender offers an Ice feature. The indicator light will be helpful only when Blender is... off. When finished, press the Power to 1 tray of blending time. USING PULSE MODE 1 2 Put ingredients into the pitcher and firmly place lid. Press POWER, then press ICE. Occasional stirring with a spatula will stay lit. Release the button to crush and chop ice ...
... to stop . Press POWER, then press and hold the PULSE button for crushing ice or other ingredients. 1 2 Put ice cubes into the pitcher and firmly place lid. PRODUCT USAGE USING ICE MODE Your Blender offers an Ice feature. The indicator light will be helpful only when Blender is... off. When finished, press the Power to 1 tray of blending time. USING PULSE MODE 1 2 Put ingredients into the pitcher and firmly place lid. Press POWER, then press ICE. Occasional stirring with a spatula will stay lit. Release the button to crush and chop ice ...
Owners Manual
Page 9
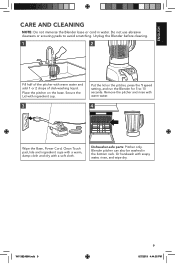
...44:55 PM Unplug the Blender before cleaning. 1 2 Fill half of the pitcher with soapy water, rinse, and wipe dry. Place the pitcher on the pitcher, press the 1 speed setting, and run the Blender for 5 to avoid scratching. Remove the pitcher and rinse with warm water. 4 Wipe the Base, Power Cord, Clean Touch ...pad, lids and ingredient cups with a warm, damp cloth and dry with ingredient cup. 3 Put the lid on the base. Blender pitcher can also be washed in water. ENGLISH CARE AND CLEANING NOTE: Do not immerse the Blender base or cord in the bottom rack.
...44:55 PM Unplug the Blender before cleaning. 1 2 Fill half of the pitcher with soapy water, rinse, and wipe dry. Place the pitcher on the pitcher, press the 1 speed setting, and run the Blender for 5 to avoid scratching. Remove the pitcher and rinse with warm water. 4 Wipe the Base, Power Cord, Clean Touch ...pad, lids and ingredient cups with a warm, damp cloth and dry with ingredient cup. 3 Put the lid on the base. Blender pitcher can also be washed in water. ENGLISH CARE AND CLEANING NOTE: Do not immerse the Blender base or cord in the bottom rack.
Owners Manual
Page 10
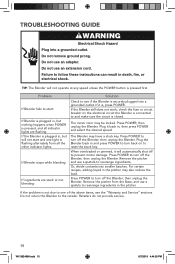
.... Plug it will automatically shut off the Blender; Press POWER to see the "Warranty and Service" sections. Press POWER to rearrange ingredients in the pitcher. Or, divide contents into a grounded outlet. Do not use an extension cord. Problem If Blender fails to start: If Blender is plugged in,... sure the circuit is securely plugged into a grounded outlet. When overloaded or jammed, it back in death, fire, or electrical shock. Remove the pitcher and use a spatula to turn off the Blender; If the problem is pressed first. TIP: The Blender will not start and one of the...
.... Plug it will automatically shut off the Blender; Press POWER to see the "Warranty and Service" sections. Press POWER to rearrange ingredients in the pitcher. Or, divide contents into a grounded outlet. Do not use an extension cord. Problem If Blender fails to start: If Blender is plugged in,... sure the circuit is securely plugged into a grounded outlet. When overloaded or jammed, it back in death, fire, or electrical shock. Remove the pitcher and use a spatula to turn off the Blender; If the problem is pressed first. TIP: The Blender will not start and one of the...


