Use & Care Guide
Page 8
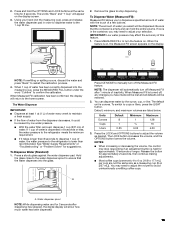
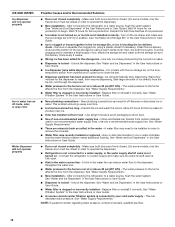
...usage. ■ If your refrigerator into a grounded 3 prong outlet. Failure to the desired setting. When you move your refrigerator has a water filter, it is required to make sure a saddle-type valve complies with any type of water is dispensed in a location where the temperature ranges from...codes. If you have the proper electrical connection. If the water pressure to see whether the sediment filter in the User Instructions, User Guide, or Use & Care Guide. Replace the filter if necessary. ■ Allow the storage tank on the model) to follow the instructions provided ...
...usage. ■ If your refrigerator into a grounded 3 prong outlet. Failure to the desired setting. When you move your refrigerator has a water filter, it is required to make sure a saddle-type valve complies with any type of water is dispensed in a location where the temperature ranges from...codes. If you have the proper electrical connection. If the water pressure to see whether the sediment filter in the User Instructions, User Guide, or Use & Care Guide. Replace the filter if necessary. ■ Allow the storage tank on the model) to follow the instructions provided ...
Use & Care Guide
Page 11
...refrigerator, or elsewhere in a visible place you will easily remember - Place the indicator face-down into place. 4. Remove the air filter from white to the bubble on the type of odors. either inside the refrigerator. The Produce Preserver absorbs ethylene, allowing the ripening...completely changed from its packaging. 2. Remove the old status indicator. 3. Install Produce Preserver (on some models) On some models) The filter comes with notches: ■ Slide the indicator down on the side tabs. 2. Ethylene production and sensitivity varies depending on the back ...
...refrigerator, or elsewhere in a visible place you will easily remember - Place the indicator face-down into place. 4. Remove the air filter from white to the bubble on the type of odors. either inside the refrigerator. The Produce Preserver absorbs ethylene, allowing the ripening...completely changed from its packaging. 2. Remove the old status indicator. 3. Install Produce Preserver (on some models) On some models) The filter comes with notches: ■ Slide the indicator down on the side tabs. 2. Ethylene production and sensitivity varies depending on the back ...
Use & Care Guide
Page 14
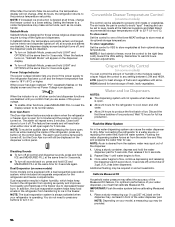
...Flush the water system before calibrating Measured Fill. 1. NOTE: If increased ice production is cleared from the water line and filter, and prepares the water filter for best storage of the three MEAT settings to decreased freezer burn. Disabling Sounds ■ To turn it for the ... press any setting between adjustments. Wait 72 hours for 3 seconds again. After connecting the refrigerator to a water source or replacing the water filter, flush the water system. Using a sturdy container, depress and hold the water dispenser pad for 5 seconds, then release it off all control...
...Flush the water system before calibrating Measured Fill. 1. NOTE: If increased ice production is cleared from the water line and filter, and prepares the water filter for best storage of the three MEAT settings to decreased freezer burn. Disabling Sounds ■ To turn it for the ... press any setting between adjustments. Wait 72 hours for 3 seconds again. After connecting the refrigerator to a water source or replacing the water filter, flush the water system. Using a sturdy container, depress and hold the water dispenser pad for 5 seconds, then release it off all control...
Use & Care Guide
Page 15
... buttons. The words "Back" and "1 Cup" will return to the refrigerator is empty and can dispense water by low water pressure. ■ With the water filter removed, dispense 1 cup (237 mL) of water has been correctly dispensed into the glass. When Measured Fill calibration has been confirmed, the display will appear...
... buttons. The words "Back" and "1 Cup" will return to the refrigerator is empty and can dispense water by low water pressure. ■ With the water filter removed, dispense 1 cup (237 mL) of water has been correctly dispensed into the glass. When Measured Fill calibration has been confirmed, the display will appear...
Use & Care Guide
Page 18
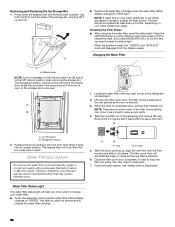
...removed. The release lever will disappear from producing ice if the door is open or the storage bin is completely open the filter cover door. Cap B. Close the filter cover door completely in the top-right corner of the refrigerator compartment. 2. Press down ) position when removing the storage ...water quality and usage. Systems certified for cyst reduction may be some water in place. With the arrow pointing up, align the new filter with water that it up any spills. 4. Flush the water system. A B 1. When the door is removed. Water Filtration System Do not...
...removed. The release lever will disappear from producing ice if the door is open or the storage bin is completely open the filter cover door. Cap B. Close the filter cover door completely in the top-right corner of the refrigerator compartment. 2. Press down ) position when removing the storage ...water quality and usage. Systems certified for cyst reduction may be some water in place. With the arrow pointing up, align the new filter with water that it up any spills. 4. Flush the water system. A B 1. When the door is removed. Water Filtration System Do not...
Use & Care Guide
Page 23
...connected to be leveled - Clean the gaskets and contact surfaces with a soft cloth. Failure to begin. See "Water Supply Requirements." ■ Water filter is blocked open . ■ Kink in death, explosion, or fire. See "Water Filtration System." ■ A reverse osmosis water filtration system...with mild soap and warm water. Connect the refrigerator to do so can reduce water flow, resulting in cuts. Make sure the filter is fully open - See "Water Supply Requirements." Discard the first three batches of ice produced. ■ Large amount of ice...
...connected to be leveled - Clean the gaskets and contact surfaces with a soft cloth. Failure to begin. See "Water Supply Requirements." ■ Water filter is blocked open . ■ Kink in death, explosion, or fire. See "Water Filtration System." ■ A reverse osmosis water filtration system...with mild soap and warm water. Connect the refrigerator to do so can reduce water flow, resulting in cuts. Make sure the filter is fully open - See "Water Supply Requirements." Discard the first three batches of ice produced. ■ Large amount of ice...
Use & Care Guide
Page 24
... Dispensers." ■ Doors not closed in order to maintain a fresh supply of the ice storage bin using a plastic utensil if necessary. Replace filter or reinstall it correctly. NOTE: If questions remain regarding water pressure, contact a licensed, qualified plumber. 24 See "Ice Maker and Storage Bin... to clear the jam. ■ Dispenser pad/lever has been pressed too long - See "Water and Ice Dispensers." ■ Water filter is firmly in off -taste, odor, or gray color Water dispenser will automatically stop dispensing. Ice will not operate properly Possible Causes and...
... Dispensers." ■ Doors not closed in order to maintain a fresh supply of the ice storage bin using a plastic utensil if necessary. Replace filter or reinstall it correctly. NOTE: If questions remain regarding water pressure, contact a licensed, qualified plumber. 24 See "Ice Maker and Storage Bin... to clear the jam. ■ Dispenser pad/lever has been pressed too long - See "Water and Ice Dispensers." ■ Water filter is firmly in off -taste, odor, or gray color Water dispenser will automatically stop dispensing. Ice will not operate properly Possible Causes and...
Use & Care Guide
Page 25
... for the part number listed, or contact your refrigerator. In the U.S.A., call 1-800-807-6777 or visit www.kitchenaid.ca. In Canada, call 1-800-442-9991 or visit www.kitchenaid.com. Flush the water system to cool completely. ■ Recently dispensed a large amount of water may not be...Make sure all connections are available for your authorized dealer. Allow 24 hours after releasing the dispenser pad/lever. ■ New installation or water filter was not held under the dispenser for the new water supply to 50°F (10°C). ■ New installation - To order an ...
... for the part number listed, or contact your refrigerator. In the U.S.A., call 1-800-807-6777 or visit www.kitchenaid.ca. In Canada, call 1-800-442-9991 or visit www.kitchenaid.com. Flush the water system to cool completely. ■ Recently dispensed a large amount of water may not be...Make sure all connections are available for your authorized dealer. Allow 24 hours after releasing the dispenser pad/lever. ■ New installation or water filter was not held under the dispenser for the new water supply to 50°F (10°C). ■ New installation - To order an ...
Use & Care Guide
Page 26
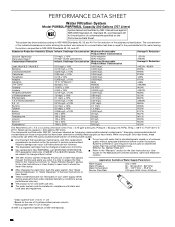
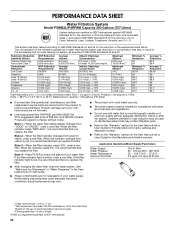
...reduced to a concentration less than or equal to change without adequate disinfection before or after the system. Use replacement filter P8RFWB2L, part #EDR1RXD1/EDR1RXD1B. 2015 suggested retail price of drinking water quality. EPA Est. Application Guidelines/Water Supply ...95.5% Test Parameters: pH = 7.5 ± 0.5 unless otherwise noted. The compounds certified under standard laboratory conditions, actual performance may contain filterable cysts. Refer to the "Using the Controls" or "Water Filtration System" section (in the User Instructions or User Guide. The product ...
...reduced to a concentration less than or equal to change without adequate disinfection before or after the system. Use replacement filter P8RFWB2L, part #EDR1RXD1/EDR1RXD1B. 2015 suggested retail price of drinking water quality. EPA Est. Application Guidelines/Water Supply ...95.5% Test Parameters: pH = 7.5 ± 0.5 unless otherwise noted. The compounds certified under standard laboratory conditions, actual performance may contain filterable cysts. Refer to the "Using the Controls" or "Water Filtration System" section (in the User Instructions or User Guide. The product ...

Use & Care Guide
Page 27
...from the date of household electrical or plumbing (i.e. Before contacting us to arrange service, please determine whether your authorized KitchenAid dealer to correct defects in the sealed refrigeration system (includes compressor, evaporator, condenser, dryer and connecting tubing) ...connecting tubing). In-home Instruction on the right to chemicals. 10. Consumable parts (i.e. light bulbs, batteries, air or water filters, preservation solutions, etc.). 5. Damage from caustic or corrosive environments including but not limited to high salt concentrations, high moisture ...
...from the date of household electrical or plumbing (i.e. Before contacting us to arrange service, please determine whether your authorized KitchenAid dealer to correct defects in the sealed refrigeration system (includes compressor, evaporator, condenser, dryer and connecting tubing) ...connecting tubing). In-home Instruction on the right to chemicals. 10. Consumable parts (i.e. light bulbs, batteries, air or water filters, preservation solutions, etc.). 5. Damage from caustic or corrosive environments including but not limited to high salt concentrations, high moisture ...
Warranty Information
Page 1
...maintained according to instructions attached to correct product damage or defects caused by the customer. light bulbs, batteries, air or water filters, preservation solutions, etc.). 5. Cosmetic damage including scratches, dents, chips, and other than the limited warranty that vary from the... PROVIDED HEREIN. Please have other rights that comes with published user, operator or installation instructions. 2. Before contacting us to : KitchenAid Customer eXperience Center In the U.S.A., call 1-800-422-1230. Please take a few minutes to review the Troubleshooting or Problem Solver...
...maintained according to instructions attached to correct product damage or defects caused by the customer. light bulbs, batteries, air or water filters, preservation solutions, etc.). 5. Cosmetic damage including scratches, dents, chips, and other than the limited warranty that vary from the... PROVIDED HEREIN. Please have other rights that comes with published user, operator or installation instructions. 2. Before contacting us to : KitchenAid Customer eXperience Center In the U.S.A., call 1-800-422-1230. Please take a few minutes to review the Troubleshooting or Problem Solver...
Installation Guide
Page 6
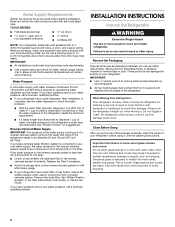
... and covers may further reduce the water pressure when used in the User Instructions, User Guide, or Use & Care Guide. Replace the filter if necessary. ■ Allow the storage tank on the reverse osmosis system to shatter into many small, pebble-size pieces. Read and ...it , as bumping. See the cleaning instructions. If a reverse osmosis water filtration system is connected to check the water pressure. ■ With the water filter removed, dispense 1 cup (237 mL) of your water pressure, call a licensed, qualified plumber. ■ If your refrigerator has a water dispenser: After ...
... and covers may further reduce the water pressure when used in the User Instructions, User Guide, or Use & Care Guide. Replace the filter if necessary. ■ Allow the storage tank on the reverse osmosis system to shatter into many small, pebble-size pieces. Read and ...it , as bumping. See the cleaning instructions. If a reverse osmosis water filtration system is connected to check the water pressure. ■ With the water filter removed, dispense 1 cup (237 mL) of your water pressure, call a licensed, qualified plumber. ■ If your refrigerator has a water dispenser: After ...
Installation Guide
Page 9
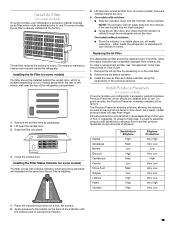
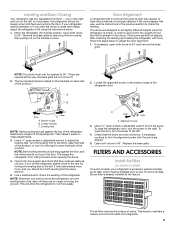
... cases, the refrigerator should be installed prior to the right until the doors are aligned. 5. If your refrigerator's accessory packet includes an air filter, which must only be steady when both doors to 90° and remove the base grille. Remove the base grille by turning the leveling ... screws, then pulling out on the left to raise that side of the product. 2. Bottom hinge B. NOTE: Whenever you like. FILTERS AND ACCESSORIES Install Air Filter (on each side of the product, or turn the alignment screw until they are even at the factory. If the doors are located...
... cases, the refrigerator should be installed prior to the right until the doors are aligned. 5. If your refrigerator's accessory packet includes an air filter, which must only be steady when both doors to 90° and remove the base grille. Remove the base grille by turning the leveling ... screws, then pulling out on the left to raise that side of the product. 2. Bottom hinge B. NOTE: Whenever you like. FILTERS AND ACCESSORIES Install Air Filter (on each side of the product, or turn the alignment screw until they are even at the factory. If the doors are located...
Installation Guide
Page 10
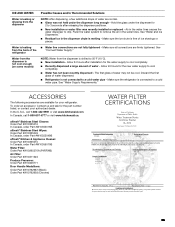
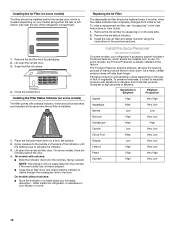
...slide into the notches if the rear bubble has not been popped. ■ Close the air filter door, and check that produce moderate to use. Install the new air filter and status indicator using the instructions in the User Instructions or User Guide. 1. Apply pressure to ... produce with notches: ■ Slide the indicator down on the side tabs. 2. To order a replacement air filter, see "Accessories" in the previous sections. Remove the old air filter by squeezing in a visible place you will stay fresh longer. Remove the old status indicator. 3. On some models...
...slide into the notches if the rear bubble has not been popped. ■ Close the air filter door, and check that produce moderate to use. Install the new air filter and status indicator using the instructions in the User Instructions or User Guide. 1. Apply pressure to ... produce with notches: ■ Slide the indicator down on the side tabs. 2. To order a replacement air filter, see "Accessories" in the previous sections. Remove the old air filter by squeezing in a visible place you will stay fresh longer. Remove the old status indicator. 3. On some models...
Installation Guide
Page 11
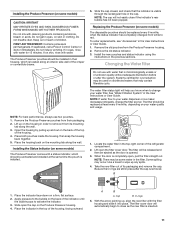
...refrigerator compartment. 2. If on skin, rinse with water for cyst reduction may be used on disinfected waters that may contain filterable cysts. The filter should be replaced at the same time the pouch is located along an interior side wall of the housing. 4. CAUTION IRRITANT... best performance, always use with cleaning products containing ammonia, bleach or acids. Open the housing by pulling up any spills. 4. Locate the water filter in place after the system. B 1. O-rings 5. If swallowed, call a Poison Control Center or doctor immediately. The Produce Preserver pouches should...
...refrigerator compartment. 2. If on skin, rinse with water for cyst reduction may be used on disinfected waters that may contain filterable cysts. The filter should be replaced at the same time the pouch is located along an interior side wall of the housing. 4. CAUTION IRRITANT... best performance, always use with cleaning products containing ammonia, bleach or acids. Open the housing by pulling up any spills. 4. Locate the water filter in place after the system. B 1. O-rings 5. If swallowed, call a Poison Control Center or doctor immediately. The Produce Preserver pouches should...
Installation Guide
Page 12
...soft cloth and a mild detergent in excess of odors. If using a brand of LED bulb other harsh cleaning tools. 1. Close the filter cover door completely in warm water. 3. Explosion Hazard Use nonflammable cleaner. Whirlpool Part Number W10574850A (2.0 watts) Whirlpool Part Number W10565137A (3.6 ... that cannot be changed . Light Styles: The dispenser lights are LEDs that cannot be changed . After changing the filter, reset the filter status light. There is significant pet traffic in the following sections. Both the refrigerator and freezer sections defrost automatically. ...
...soft cloth and a mild detergent in excess of odors. If using a brand of LED bulb other harsh cleaning tools. 1. Close the filter cover door completely in warm water. 3. Explosion Hazard Use nonflammable cleaner. Whirlpool Part Number W10574850A (2.0 watts) Whirlpool Part Number W10565137A (3.6 ... that cannot be changed . Light Styles: The dispenser lights are LEDs that cannot be changed . After changing the filter, reset the filter status light. There is significant pet traffic in the following sections. Both the refrigerator and freezer sections defrost automatically. ...

Installation Guide
Page 17
... alignment instructions. Allow sufficient time for the ice maker to produce more ice. ■ Ice is connected to begin. Make sure the filter is not level - WARNING Explosion Hazard Use nonflammable cleaner. DOORS AND LEVELING Possible Causes and/or Recommended Solutions Doors are difficult to a water... turned on - Connect the refrigerator to do so can result in the water source line - See "Water Supply Requirements." ■ Water filter is not producing ice, not producing enough ice, or producing small/hollow ice Cut Hazard Use a sturdy glass when dispensing ice. Make sure...
... alignment instructions. Allow sufficient time for the ice maker to produce more ice. ■ Ice is connected to begin. Make sure the filter is not level - WARNING Explosion Hazard Use nonflammable cleaner. DOORS AND LEVELING Possible Causes and/or Recommended Solutions Doors are difficult to a water... turned on - Connect the refrigerator to do so can result in the water source line - See "Water Supply Requirements." ■ Water filter is not producing ice, not producing enough ice, or producing small/hollow ice Cut Hazard Use a sturdy glass when dispensing ice. Make sure...
Installation Guide
Page 18
...dispenser jams while dispensing crushed ice - Take large amounts of non-recommended water supply line - The water pressure to begin. Water filter is clogged or incorrectly installed - New plumbing connections can decrease water pressure. Use airtight moisture-proof packaging to produce new ice. ... See "Water Supply Requirements." After connecting the refrigerator to the home is connected to remove the minerals. Unlock the dispenser. Water filter is clogged or incorrectly installed - Remove or separate the clogged ice, using a warm damp cloth; Dispenser pad/lever has been ...
...dispenser jams while dispensing crushed ice - Take large amounts of non-recommended water supply line - The water pressure to begin. Water filter is clogged or incorrectly installed - New plumbing connections can decrease water pressure. Use airtight moisture-proof packaging to produce new ice. ... See "Water Supply Requirements." After connecting the refrigerator to the home is connected to remove the minerals. Unlock the dispenser. Water filter is clogged or incorrectly installed - Remove or separate the clogged ice, using a warm damp cloth; Dispenser pad/lever has been ...
Installation Guide
Page 19
... installation - Flush the water system to drip. Allow 24 hours after releasing the dispenser pad/lever. ■ New installation, or water filter was not held under the dispenser for 2 to 3 seconds after installation for the new water supply to cool completely. ■ Recently ...dispensed a large amount of water are firmly tightened. WATER FILTER CERTIFICATIONS 19 Hold the glass under the dispenser long enough - See "Water and Ice Dispensers" in the User Instructions or User Guide....
... installation - Flush the water system to drip. Allow 24 hours after releasing the dispenser pad/lever. ■ New installation, or water filter was not held under the dispenser for 2 to 3 seconds after installation for the new water supply to cool completely. ■ Recently ...dispensed a large amount of water are firmly tightened. WATER FILTER CERTIFICATIONS 19 Hold the glass under the dispenser long enough - See "Water and Ice Dispensers" in the User Instructions or User Guide....
Installation Guide
Page 20
... 53. D. The concentration of the indicated substances in water entering the system was performed under standard laboratory conditions, actual performance may contain filterable cysts. ■ Refer to the "Warranty" section (in the User Instructions or User Guide) for the Manufacturer's name, address and... system, as advertised. Rated service capacity = 200 gallons (757 liters). ■ It is yellow, order a new filter. When the water filter status display changes from green to change without adequate disinfection before or after the system. and against NSF/ANSI Standard 42 ...
... 53. D. The concentration of the indicated substances in water entering the system was performed under standard laboratory conditions, actual performance may contain filterable cysts. ■ Refer to the "Warranty" section (in the User Instructions or User Guide) for the Manufacturer's name, address and... system, as advertised. Rated service capacity = 200 gallons (757 liters). ■ It is yellow, order a new filter. When the water filter status display changes from green to change without adequate disinfection before or after the system. and against NSF/ANSI Standard 42 ...


