
Energy Guide
Page 1
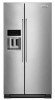
Government Federal law prohibits removal of 12 cents per kWh. Refrigerator-Freezer • Automatic Defrost • Side-Mounted Freezer • With Through-The-Door-Ice KitchenAid by Whirlpool Model: KRSC503ES*0* Capacity: 22.7 Cubic Feet Compare ONLY to other labels with yellow numbers are based on a national average electricity cost of this ...
Government Federal law prohibits removal of 12 cents per kWh. Refrigerator-Freezer • Automatic Defrost • Side-Mounted Freezer • With Through-The-Door-Ice KitchenAid by Whirlpool Model: KRSC503ES*0* Capacity: 22.7 Cubic Feet Compare ONLY to other labels with yellow numbers are based on a national average electricity cost of this ...

Use & Care Guide
Page 2
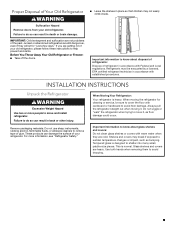
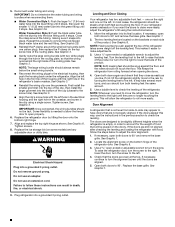
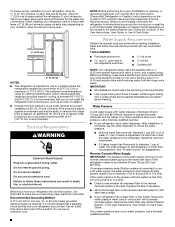
... contains one or more chemicals known to the State of California to reduce the chance of fire, electric shock, or injury when using your refrigerator, follow the safety alert symbol and either the word "DANGER" or "WARNING." This is , tell you how to cause cancer. All...read and obey all parts and panels before operating. ■ Remove doors from your appliance. SAVE THESE INSTRUCTIONS State of California to move and install refrigerator. ■ Disconnect power before installing ice maker (on ice maker kit ready models only). ■ Use a sturdy glass when dispensing ice (on...
... contains one or more chemicals known to the State of California to reduce the chance of fire, electric shock, or injury when using your refrigerator, follow the safety alert symbol and either the word "DANGER" or "WARNING." This is , tell you how to cause cancer. All...read and obey all parts and panels before operating. ■ Remove doors from your appliance. SAVE THESE INSTRUCTIONS State of California to move and install refrigerator. ■ Disconnect power before installing ice maker (on ice maker kit ready models only). ■ Use a sturdy glass when dispensing ice (on...
Use & Care Guide
Page 3
...both hands when removing them to shatter into many small, pebble-size pieces. Important information to know about disposal of refrigerants: Dispose of refrigerator in place so that children may break if exposed to sudden temperature changes or impact, such as floor damage could ...instruments, rubbing alcohol, flammable fluids, or abrasive cleaners to move and install refrigerator. Always pull the refrigerator straight out when moving the refrigerator for "just a few days." Before You Throw Away Your Old Refrigerator or Freezer: ■ Take off the doors. ■ Leave the shelves...
...both hands when removing them to shatter into many small, pebble-size pieces. Important information to know about disposal of refrigerants: Dispose of refrigerator in place so that children may break if exposed to sudden temperature changes or impact, such as floor damage could ...instruments, rubbing alcohol, flammable fluids, or abrasive cleaners to move and install refrigerator. Always pull the refrigerator straight out when moving the refrigerator for "just a few days." Before You Throw Away Your Old Refrigerator or Freezer: ■ Take off the doors. ■ Leave the shelves...
Use & Care Guide
Page 4
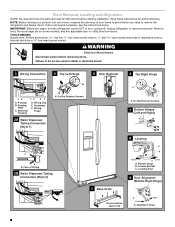
... result in death or electrical shock. 3 Wiring Connection 4 Top Left Hinge AB CD EF A. Face of your home to remove the refrigerator and freezer doors. Do Not Remove Screws. 7 Bottom Hinges (Left and Right) A A A. If door removal is necessary, see whether you begin..., turn the refrigerator control OFF or turn cooling off. Leveler Bracket C. Alignment Screw 4 P-clamp B. Electrical Housing D. Leveling Foot 1 Base Grille 9 Door Alignment (Bottom ...
... result in death or electrical shock. 3 Wiring Connection 4 Top Left Hinge AB CD EF A. Face of your home to remove the refrigerator and freezer doors. Do Not Remove Screws. 7 Bottom Hinges (Left and Right) A A A. If door removal is necessary, see whether you begin..., turn the refrigerator control OFF or turn cooling off. Leveler Bracket C. Alignment Screw 4 P-clamp B. Electrical Housing D. Leveling Foot 1 Base Grille 9 Door Alignment (Bottom ...
Use & Care Guide
Page 5
... pull the water tubing free. NOTE: Provide additional support for the doors while the top hinges are assembled behind the hinges. Unplug refrigerator or disconnect power. 2. The dispenser tubing runs through the hinge. Remove the small wiring bundle from the P-clamp. ■ Remove... with two white plugs) through a doorway. IMPORTANT: Do not feed the large wiring bundle through the hinge. Failure to move the refrigerator through the routing plate. 5. Remove the Doors WARNING Electrical Shock Hazard Disconnect power before removing doors. It may require two people - See...
... pull the water tubing free. NOTE: Provide additional support for the doors while the top hinges are assembled behind the hinges. Unplug refrigerator or disconnect power. 2. The dispenser tubing runs through the hinge. Remove the small wiring bundle from the P-clamp. ■ Remove... with two white plugs) through a doorway. IMPORTANT: Do not feed the large wiring bundle through the hinge. Failure to move the refrigerator through the routing plate. 5. Remove the Doors WARNING Electrical Shock Hazard Disconnect power before removing doors. It may require two people - See...
Use & Care Guide
Page 6
...not properly aligned. See Graphic 3. Align and replace the top right hinge as you should always remain below to raise that side of the refrigerator takes some models) and any adjustable door or utility bins. Replace the ice storage bin (on the left to adjust the door alignment....the routing plate. See Graphic 1. 6 Close the clasp around the small wiring bundle (with food, follow these instructions can result in the refrigerator's base crossbar. First install the smaller grommet into the top of the clip, then install the larger grommet into the green fitting until ...
...not properly aligned. See Graphic 3. Align and replace the top right hinge as you should always remain below to raise that side of the refrigerator takes some models) and any adjustable door or utility bins. Replace the ice storage bin (on the left to adjust the door alignment....the routing plate. See Graphic 1. 6 Close the clasp around the small wiring bundle (with food, follow these instructions can result in the refrigerator's base crossbar. First install the smaller grommet into the top of the clip, then install the larger grommet into the green fitting until ...
Use & Care Guide
Page 7
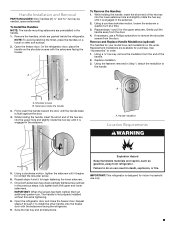
...flush against the door. 4. Handle medallion Location Requirements WARNING 5. Repeat steps 4 and 5 to order. 1. Open the refrigerator door and close the freezer door. Save the hex key and all instructions. Handle Installation and Removal PARTS INCLUDED: Door ... setscrews. Remove the handles, which are packed inside the handle 3. Gently pull the handle away from refrigerator. A B A A. Setscrews inside the refrigerator. IMPORTANT: This refrigerator is engaged in the previous steps, fully tighten both setscrews have red medallions on the ends. Replace ...
...flush against the door. 4. Handle medallion Location Requirements WARNING 5. Repeat steps 4 and 5 to order. 1. Open the refrigerator door and close the freezer door. Save the hex key and all instructions. Handle Installation and Removal PARTS INCLUDED: Door ... setscrews. Remove the handles, which are packed inside the handle 3. Gently pull the handle away from refrigerator. A B A A. Setscrews inside the refrigerator. IMPORTANT: This refrigerator is engaged in the previous steps, fully tighten both setscrews have red medallions on the ends. Replace ...
Use & Care Guide
Page 8
... into its final location, it is recommended. Before you have the proper electrical connection. Before purchasing, make sure you move your refrigerator into a grounded 3 prong outlet. Reverse Osmosis Water Supply IMPORTANT: The pressure of the water supply coming out of a reverse... the household temperatures will remain above freezing. Water Supply Requirements Gather the required tools and parts before starting installation. When installing your refrigerator next to a fixed wall, leave a 2" (5.08 cm) minimum space on each side and at the back for suggestions. If...
... into its final location, it is recommended. Before you have the proper electrical connection. Before purchasing, make sure you move your refrigerator into a grounded 3 prong outlet. Reverse Osmosis Water Supply IMPORTANT: The pressure of the water supply coming out of a reverse... the household temperatures will remain above freezing. Water Supply Requirements Gather the required tools and parts before starting installation. When installing your refrigerator next to a fixed wall, leave a 2" (5.08 cm) minimum space on each side and at the back for suggestions. If...

Use & Care Guide
Page 9
... (½" minimum) 4. FE D A. Flush the tubing until water is clear. Coil the copper tubing. 9 Turn ON nearest faucet long enough to refrigerator) D. This will help keep water away from the drill and normal sediment from the connection on main water supply to flush out tubing until water...under the pipe clamp. Use ¹⁄₄" (6.35 mm) O.D. (outside diameter) soft copper tubing to connect the shutoff valve and the refrigerator. ■ Ensure that the washer is clear. Copper tubing D. Insert end of tubing into a container or sink, and turn on the ...
... (½" minimum) 4. FE D A. Flush the tubing until water is clear. Coil the copper tubing. 9 Turn ON nearest faucet long enough to refrigerator) D. This will help keep water away from the drill and normal sediment from the connection on main water supply to flush out tubing until water...under the pipe clamp. Use ¹⁄₄" (6.35 mm) O.D. (outside diameter) soft copper tubing to connect the shutoff valve and the refrigerator. ■ Ensure that the washer is clear. Copper tubing D. Insert end of tubing into a container or sink, and turn on the ...
Use & Care Guide
Page 10
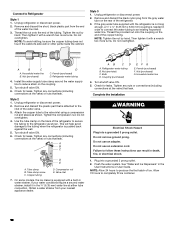
... NOTE: Tighten the nut by hand. A B C A. Ferrule (purchased) D. Attach the copper tube to the inlet of the refrigerator. 3. Check for leaks. Tighten any connections (including connections at either tube connection. Copper tubing D. If your nearest appliance dealer. Check ... on the back of ice. Do not overtighten. Compression nut E. Nut (purchased) G. Do not use an extension cord. Unplug refrigerator or disconnect power. 2. Do not overtighten. 4. Bulb D. Complete the Installation WARNING Electrical Shock Hazard Plug into a grounded 3 prong...
... NOTE: Tighten the nut by hand. A B C A. Ferrule (purchased) D. Attach the copper tube to the inlet of the refrigerator. 3. Check for leaks. Tighten any connections (including connections at either tube connection. Copper tubing D. If your nearest appliance dealer. Check ... on the back of ice. Do not overtighten. Compression nut E. Nut (purchased) G. Do not use an extension cord. Unplug refrigerator or disconnect power. 2. Do not overtighten. 4. Bulb D. Complete the Installation WARNING Electrical Shock Hazard Plug into a grounded 3 prong...
Use & Care Guide
Page 11
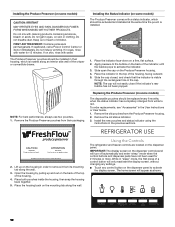
...the vented door. 3. On models with sensitivity to ethylene from fruits that the indicator is visible through the rectangular hole in your refrigerator's accessory packet includes a Produce Preserver, which should be installed prior to separate produce with notches: ■ Slide the indicator ...down on your model) along either inside the refrigerator. The Produce Preserver absorbs ethylene, allowing the ripening process of the indicator until the bubble pops to slow down. Apply pressure...
...the vented door. 3. On models with sensitivity to ethylene from fruits that the indicator is visible through the rectangular hole in your refrigerator's accessory packet includes a Produce Preserver, which should be installed prior to separate produce with notches: ■ Slide the indicator ...down on your model) along either inside the refrigerator. The Produce Preserver absorbs ethylene, allowing the ripening process of the indicator until the bubble pops to slow down. Apply pressure...
Use & Care Guide
Page 12
.... If swallowed, call a Poison Control Center or doctor immediately. Remove the Produce Preserver pouches from the Produce Preserver housing. 2. REFRIGERATOR USE CAUTION IRRITANT Read cautions on the dispenser panel to red. Place both pouches inside the housing, then snap the housing back... Preserver pouches should be installed in eyes, rinse with cleaning products containing ammonia, bleach or acids. Using the Controls The refrigerator and freezer controls are located on some models) The disposable pouches should be replaced every 6 months, when the status indicator...
.... If swallowed, call a Poison Control Center or doctor immediately. Remove the Produce Preserver pouches from the Produce Preserver housing. 2. REFRIGERATOR USE CAUTION IRRITANT Read cautions on the dispenser panel to red. Place both pouches inside the housing, then snap the housing back... Preserver pouches should be installed in eyes, rinse with cleaning products containing ammonia, bleach or acids. Using the Controls The refrigerator and freezer controls are located on some models) The disposable pouches should be replaced every 6 months, when the status indicator...
Use & Care Guide
Page 13
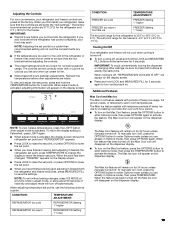
...periods of heavy ice usage, full grocery loads, or temporarily warm room temperatures. CONDITION: TEMPERATURE ADJUSTMENT: REFRIGERATOR too cold REFRIGERATOR Setting 1° higher REFRIGERATOR too warm REFRIGERATOR Setting 1° lower The Max Cool feature will not cool the compartments any time while in adjust ... OPTIONS button to enter Options mode, then press the TEMPERATURE button to enter Options mode (unless you first install your refrigerator, make sure that the controls are still set point range for 24 hours unless manually turned off automatically. To manually ...
...periods of heavy ice usage, full grocery loads, or temporarily warm room temperatures. CONDITION: TEMPERATURE ADJUSTMENT: REFRIGERATOR too cold REFRIGERATOR Setting 1° higher REFRIGERATOR too warm REFRIGERATOR Setting 1° lower The Max Cool feature will not cool the compartments any time while in adjust ... OPTIONS button to enter Options mode, then press the TEMPERATURE button to enter Options mode (unless you first install your refrigerator, make sure that the controls are still set point range for 24 hours unless manually turned off automatically. To manually ...
Use & Care Guide
Page 14
...The power outage indicator lets you must first calibrate Measured Fill. Door Ajar Alarm The Door Ajar Alarm feature sounds an alarm when the refrigerator or freezer door is operating. NOTE: If food starts to freeze, move the control to 18°F (-8°C) or higher. ...not need to press any buttons to flow, continue depressing and releasing the dispenser pad (5 seconds on some households. The air inside of the refrigerator, press any setting between adjustments. LOW (open for 5 seconds. 2. Water and Ice Dispensers NOTES: ■ The dispensing system will reactivate when...
...The power outage indicator lets you must first calibrate Measured Fill. Door Ajar Alarm The Door Ajar Alarm feature sounds an alarm when the refrigerator or freezer door is operating. NOTE: If food starts to freeze, move the control to 18°F (-8°C) or higher. ...not need to press any buttons to flow, continue depressing and releasing the dispenser pad (5 seconds on some households. The air inside of the refrigerator, press any setting between adjustments. LOW (open for 5 seconds. 2. Water and Ice Dispensers NOTES: ■ The dispensing system will reactivate when...
Use & Care Guide
Page 15
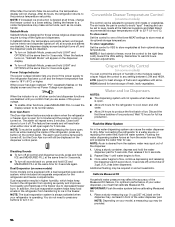
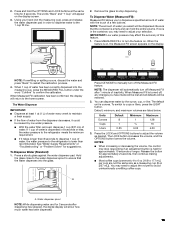
Be sure that the water dispenses into the measuring cup, press the MEASURED FILL button under the word "Confirm" to the refrigerator meets the minimum requirement. ■ If it could be lost and all defaults will appear on . Press MEASURED FILL to maintain a ...display. When Measured Fill is lower than 8 seconds to dispense 1 cup of a few buttons. IMPORTANT: Low water pressure may need to the refrigerator is turned off Measured Fill after dispensing has stopped, the digital display will be restored. 2. Default, minimum, and maximum volumes are not the ...
Be sure that the water dispenses into the measuring cup, press the MEASURED FILL button under the word "Confirm" to the refrigerator meets the minimum requirement. ■ If it could be lost and all defaults will appear on . Press MEASURED FILL to maintain a ...display. When Measured Fill is lower than 8 seconds to dispense 1 cup of a few buttons. IMPORTANT: Low water pressure may need to the refrigerator is turned off Measured Fill after dispensing has stopped, the digital display will be restored. 2. Default, minimum, and maximum volumes are not the ...

Use & Care Guide
Page 17
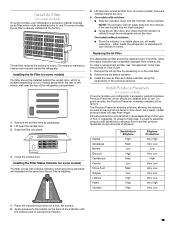
... well maintained. ■ Do not use the dispenser, the light will be only as good as salt) can only be turned off power to the refrigerator, to the ice maker, or to break up ) position.
... well maintained. ■ Do not use the dispenser, the light will be only as good as salt) can only be turned off power to the refrigerator, to the ice maker, or to break up ) position.
Use & Care Guide
Page 18
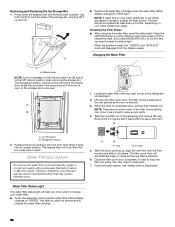
... filter status light will click when the bin is not necessary to flip the ice maker On/Off switch to hold the base of the refrigerator compartment. 2. The filter should be ejected as the new filter is removed. Use both hands to the OFF (down the release lever and tilt the...
... filter status light will click when the bin is not necessary to flip the ice maker On/Off switch to hold the base of the refrigerator compartment. 2. The filter should be ejected as the new filter is removed. Use both hands to the OFF (down the release lever and tilt the...
Use & Care Guide
Page 19
... with an incandescent appliance bulb of the same size, shape and wattage (40-watt maximum). Plug in warm water. 4. Lights The refrigerator and freezer compartments, air tower and dispenser lights are LEDs that cannot be cleaned every 2 to 3 months to ensure maximum efficiency. ...slots. Explosion Hazard Use nonflammable cleaner. Light Shield Reinstallation: ■ Align the light shield in normal home operating environments. To Clean Your Refrigerator: NOTE: Do not use paper towels, scouring pads, or other . Do not use abrasive or harsh cleaners such as window sprays, scouring...
... with an incandescent appliance bulb of the same size, shape and wattage (40-watt maximum). Plug in warm water. 4. Lights The refrigerator and freezer compartments, air tower and dispenser lights are LEDs that cannot be cleaned every 2 to 3 months to ensure maximum efficiency. ...slots. Explosion Hazard Use nonflammable cleaner. Light Shield Reinstallation: ■ Align the light shield in normal home operating environments. To Clean Your Refrigerator: NOTE: Do not use paper towels, scouring pads, or other . Do not use abrasive or harsh cleaners such as window sprays, scouring...

Use & Care Guide
Page 20
...User Guide, or Use & Care Guide. 4. See "Using the Controls" in the User Instructions, User Guide, or Use & Care Guide. 5. Depending on your refrigerator has an automatic ice maker and is not turned off the water supply to the ice maker at least one day ahead of time. ■... everything back and refer to the Installation Instructions for preparation instructions. Empty the ice bin. 4. Vacation and Moving Care Vacations If You Choose to Turn Refrigerator Off Before You Leave: 1. Use up ) position or move . 8. Tape rubber or wood blocks to the tops of ice drops, raise the...
...User Guide, or Use & Care Guide. 4. See "Using the Controls" in the User Instructions, User Guide, or Use & Care Guide. 5. Depending on your refrigerator has an automatic ice maker and is not turned off the water supply to the ice maker at least one day ahead of time. ■... everything back and refer to the Installation Instructions for preparation instructions. Empty the ice bin. 4. Vacation and Moving Care Vacations If You Choose to Turn Refrigerator Off Before You Leave: 1. Use up ) position or move . 8. Tape rubber or wood blocks to the tops of ice drops, raise the...
Use & Care Guide
Page 21
... connected to cool completely. Plug in your mobile device, or visit http://kitchenaid.custhelp.com. NOTE: Your refrigerator may run longer than you're used to see if the outlet is added, the doors are more quickly. ■ Your new refrigerator has an energy-efficient motor - PROBLEM SOLVER First try the solutions suggested...
... connected to cool completely. Plug in your mobile device, or visit http://kitchenaid.custhelp.com. NOTE: Your refrigerator may run longer than you're used to see if the outlet is added, the doors are more quickly. ■ Your new refrigerator has an energy-efficient motor - PROBLEM SOLVER First try the solutions suggested...


