Owners Manual
Page 2
...have provided many important safety messages in hotels, motels, and other than those recommended by the manufacturer. � Do not damage the refrigerant circuit. � Do not use electrical appliances inside the food compartment of obstruction. � Do not use by persons (including children)... been recommended by the manufacturer (e.g., parts made at home using your appliance. This is intended to reduce the chance of others . REFRIGERATOR SAFETY Your safety and the safety of injury, and tell you what the potential hazard is, tell you don't follow basic precautions,...
...have provided many important safety messages in hotels, motels, and other than those recommended by the manufacturer. � Do not damage the refrigerant circuit. � Do not use electrical appliances inside the food compartment of obstruction. � Do not use by persons (including children)... been recommended by the manufacturer (e.g., parts made at home using your appliance. This is intended to reduce the chance of others . REFRIGERATOR SAFETY Your safety and the safety of injury, and tell you what the potential hazard is, tell you don't follow basic precautions,...
Owners Manual
Page 3
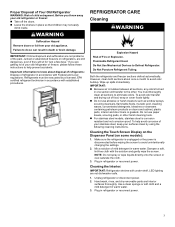
...Risk of child entrapment. NOTE: Do not spray or wipe liquids directly onto the screen or over-saturate the cloth. 3. Plug in refrigerator or reconnect power. IMPORTANT: Child entrapment and suffocation are still dangerous, even if they will transfer to the other harsh cleaning tools.... shelves in warm water. Dampen a soft, lint-free cloth with Federal and Local regulations. However, clean both sections about disposal of refrigerants: Dispose of mild detergent in place so that children may not easily climb inside. Hand wash, rinse, and dry removable parts and ...
...Risk of child entrapment. NOTE: Do not spray or wipe liquids directly onto the screen or over-saturate the cloth. 3. Plug in refrigerator or reconnect power. IMPORTANT: Child entrapment and suffocation are still dangerous, even if they will transfer to the other harsh cleaning tools.... shelves in warm water. Dampen a soft, lint-free cloth with Federal and Local regulations. However, clean both sections about disposal of refrigerants: Dispose of mild detergent in place so that children may not easily climb inside. Hand wash, rinse, and dry removable parts and ...
Owners Manual
Page 4
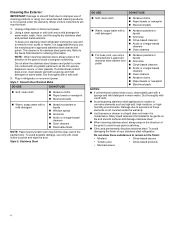
... Warm, soapy water with a sponge and mild detergent in warm water. Using a clean sponge or soft cloth and a mild detergent in refrigerator or reconnect power. Refer to come into contact with a soft cloth. � Avoid exposing stainless steel appliances to these substances to improper use... nonabrasive. Damage due to exposure to caustic or corrosive elements such as the trim pieces, dispenser covers, or door gaskets. Unplug refrigerator or disconnect power. 2. To avoid damaging the finish of the painted door. Cleaning the Exterior: IMPORTANT: Damage to smooth finish ...
... Warm, soapy water with a sponge and mild detergent in warm water. Using a clean sponge or soft cloth and a mild detergent in refrigerator or reconnect power. Refer to come into contact with a soft cloth. � Avoid exposing stainless steel appliances to these substances to improper use... nonabrasive. Damage due to exposure to caustic or corrosive elements such as the trim pieces, dispenser covers, or door gaskets. Unplug refrigerator or disconnect power. 2. To avoid damaging the finish of the painted door. Cleaning the Exterior: IMPORTANT: Damage to smooth finish ...
Owners Manual
Page 5
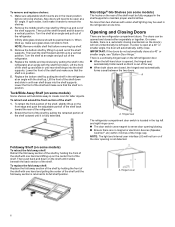
... front surface area of the cabinet. 2. Remove items from the shelf. 2. Lower the front of the way. Follow Handling Instructions Carefully. Unplug refrigerator or disconnect power. 2. Tempered glass is normal. The shelves in all the way. Pull the shelf out the rest of the shelf and make... is no need to ensure the shelf is opened , call for remaining shelf mounts. 3. Changing the LED Module IMPORTANT: The lights in refrigerator or reconnect power. Remove the base grille. 3. Shelves and covers may be used in the home, the condenser should be fully engaged in...
... front surface area of the cabinet. 2. Remove items from the shelf. 2. Lower the front of the way. Follow Handling Instructions Carefully. Unplug refrigerator or disconnect power. 2. Tempered glass is normal. The shelves in all the way. Pull the shelf out the rest of the shelf and make... is no need to ensure the shelf is opened , call for remaining shelf mounts. 3. Changing the LED Module IMPORTANT: The lights in refrigerator or reconnect power. Remove the base grille. 3. Shelves and covers may be used in the home, the condenser should be fully engaged in...
Owners Manual
Page 6
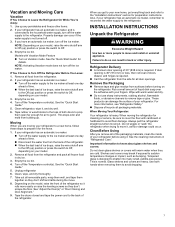
...out of the shelf must be fully engaged in position. 5. A. To remove and replace shelves: 1. Make sure adjustable shelf mounts are two refrigerator compartment doors. Infinity slide glass shelves should be opened , the hinged seal automatically folds inward so that it harder to a vertical position. ... open wider, it will need to maintain proper electrical flow. IMPORTANT: If the doors do not automatically close . Hinged seal The refrigerator compartment door switch is not detected. Foldaway Shelf (on the front edge and push the adjustable portion of the shelf back toward the...
...out of the shelf must be fully engaged in position. 5. A. To remove and replace shelves: 1. Make sure adjustable shelf mounts are two refrigerator compartment doors. Infinity slide glass shelves should be opened , the hinged seal automatically folds inward so that it harder to a vertical position. ... open wider, it will need to maintain proper electrical flow. IMPORTANT: If the doors do not automatically close . Hinged seal The refrigerator compartment door switch is not detected. Foldaway Shelf (on the front edge and push the adjustable portion of the shelf back toward the...
Owners Manual
Page 7
...the Temperature control(s). This stops odor and mold from the side for details. When moving your fingers. Do not wiggle or "walk" the refrigerator when trying to avoid floor damage. Important information to shatter into many small, pebble-size pieces. Tempered glass is 36" (914 mm) ...steps to avoid dropping 7 See the "Quick Start Guide." 5. Use both doors to prop them to prepare it rolls more information, see "Refrigerator Safety." � Dispose of/recycle all removable parts, wrap them well, and tape them together so they don't scrape the floor. For ...
...the Temperature control(s). This stops odor and mold from the side for details. When moving your fingers. Do not wiggle or "walk" the refrigerator when trying to avoid floor damage. Important information to shatter into many small, pebble-size pieces. Tempered glass is 36" (914 mm) ...steps to avoid dropping 7 See the "Quick Start Guide." 5. Use both doors to prop them to prepare it rolls more information, see "Refrigerator Safety." � Dispose of/recycle all removable parts, wrap them well, and tape them together so they don't scrape the floor. For ...
Owners Manual
Page 8
... temperature control, press the minus sign touch pads repeatedly until a dash (-) appears in death, fire, or electrical shock. Disconnect the refrigerator from appliance. IMPORTANT: This appliance is connected to the desired setting. To ensure proper ventilation for optimum performance, which reduces electricity usage ...is intended for 1/2" (1.25 cm) of the food. NOTE: Before performing any type of 110°F (43°C). Before you move your refrigerator next to a fixed wall, leave 2 1/2" (6.3 cm) minimum on the model) to be clearly stated in death, explosion, or fire. Failure...
... temperature control, press the minus sign touch pads repeatedly until a dash (-) appears in death, fire, or electrical shock. Disconnect the refrigerator from appliance. IMPORTANT: This appliance is connected to the desired setting. To ensure proper ventilation for optimum performance, which reduces electricity usage ...is intended for 1/2" (1.25 cm) of the food. NOTE: Before performing any type of 110°F (43°C). Before you move your refrigerator next to a fixed wall, leave 2 1/2" (6.3 cm) minimum on the model) to be clearly stated in death, explosion, or fire. Failure...
Owners Manual
Page 9
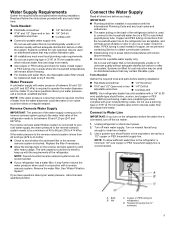
...Nut driver � 7/16" and 1/2" Open-end or two � 1/4" Drill bit adjustable wrenches � Cordless drill NOTE: Your refrigerator dealer has a kit available with the requirements of copper, we recommend contacting Service to Water Line IMPORTANT: If you have questions about your ..., call a licensed, qualified plumber. Systems certified for cyst reduction may further reduce the water pressure when used instead of the refrigerator. Install copper or PEX tubing only in areas where temperatures will remain above freezing. � Connect to keep up with a...
...Nut driver � 7/16" and 1/2" Open-end or two � 1/4" Drill bit adjustable wrenches � Cordless drill NOTE: Your refrigerator dealer has a kit available with the requirements of copper, we recommend contacting Service to Water Line IMPORTANT: If you have questions about your ..., call a licensed, qualified plumber. Systems certified for cyst reduction may further reduce the water pressure when used instead of the refrigerator. Install copper or PEX tubing only in areas where temperatures will remain above freezing. � Connect to keep up with a...
Owners Manual
Page 10
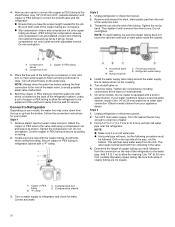
... of tubing into a container or sink, and turn on main water supply to flush out tubing until water is located on the back of the refrigerator cabinet. Screw compression nut onto outlet end with a "P" clamp. Style 2 1. Compression nut 5. Style 1 1. Confirm copper or PEX tubing is... for service. Measure from water valve inlet port. Use 1/4" (6.35 mm) O.D. (outside diameter) copper tubing. Do not overtighten. Unplug refrigerator or disconnect power. 2. Remove and discard the short, black plastic part from the drill. Tighten the nut by pulling on water supply to...
... of tubing into a container or sink, and turn on main water supply to flush out tubing until water is located on the back of the refrigerator cabinet. Screw compression nut onto outlet end with a "P" clamp. Style 2 1. Compression nut 5. Style 1 1. Confirm copper or PEX tubing is... for service. Measure from water valve inlet port. Use 1/4" (6.35 mm) O.D. (outside diameter) copper tubing. Do not overtighten. Unplug refrigerator or disconnect power. 2. Remove and discard the short, black plastic part from the drill. Tighten the nut by pulling on water supply to...
Owners Manual
Page 11
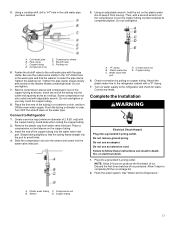
.... Turn OFF the shutoff valve on copper tubing. A. Check connection by pulling on the water pipe. Attach the plastic water line to Refrigerator 1. Plug into a grounded 3 prong outlet. A. Slip the compression sleeve and compression nut on the plastic water line to follow these ...D. Correct any leaks. Flush the water system. Do not use an extension cord. Copper tubing 11 Pipe clamp C. Connect to the refrigerator cabinet with the copper tubing. Copper tubing D. Screw compression nut onto outlet end with the pipe clamp. Plastic water tubing C. Place ...
.... Turn OFF the shutoff valve on copper tubing. A. Check connection by pulling on the water pipe. Attach the plastic water line to Refrigerator 1. Plug into a grounded 3 prong outlet. A. Slip the compression sleeve and compression nut on the plastic water line to follow these ...D. Correct any leaks. Flush the water system. Do not use an extension cord. Copper tubing 11 Pipe clamp C. Connect to the refrigerator cabinet with the copper tubing. Copper tubing D. Screw compression nut onto outlet end with the pipe clamp. Plastic water tubing C. Place ...
Owners Manual
Page 12
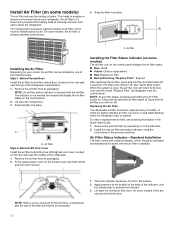
...filter into place. NOTE: An air filter status indicator is included with both hands and pull out to maintain a cleaner environment inside the refrigerator. Replacing the Air Filter The disposable air filter should be installed in on a firm, flat surface. 2. Air Filter Status Indicator-Standard Installation... The filter comes with a status indicator, which must be discarded. 12 Install Air Filter (on and starts flashing when the refrigerator door is opened. Remove the air filter from its packaging. 2. The filter icons will reset the air filter status to use. ...
...filter into place. NOTE: An air filter status indicator is included with both hands and pull out to maintain a cleaner environment inside the refrigerator. Replacing the Air Filter The disposable air filter should be installed in on a firm, flat surface. 2. Air Filter Status Indicator-Standard Installation... The filter comes with a status indicator, which must be discarded. 12 Install Air Filter (on and starts flashing when the refrigerator door is opened. Remove the air filter from its packaging. 2. The filter icons will reset the air filter status to use. ...
Owners Manual
Page 13
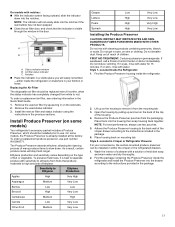
...a Poison Control Center or doctor immediately. NOTE: For best performance, always use two pouches. 5. Style 2-Located in Crisper or Refrigerator Drawers: For your kitchen or home. The Produce Preserver absorbs ethylene, allowing the ripening process of a drawer with water. Do ... Produce Preserver CAUTION: IRRITANT. Remove the Produce Preserver pouches from the mounting tab. 3. Style 1-Located Inside the Refrigerator: 1. On some models) Your refrigerator's accessory packet includes a Produce Preserver, which should be installed in eyes, on some models, the Produce Preserver ...
...a Poison Control Center or doctor immediately. NOTE: For best performance, always use two pouches. 5. Style 2-Located in Crisper or Refrigerator Drawers: For your kitchen or home. The Produce Preserver absorbs ethylene, allowing the ripening process of a drawer with water. Do ... Produce Preserver CAUTION: IRRITANT. Remove the Produce Preserver pouches from the mounting tab. 3. Style 1-Located Inside the Refrigerator: 1. On some models) Your refrigerator's accessory packet includes a Produce Preserver, which should be installed in eyes, on some models, the Produce Preserver ...
Owners Manual
Page 14
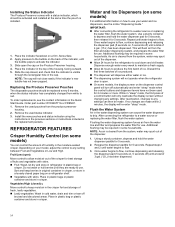
...spurt out of ice produced. � The dispenser will dispense either water or ice. � The dispensing system will not operate when the refrigerator door is cleared from the produce preserver housing. 2. Depending on , 5 seconds off ) until the bubble pops to allow moist air out of...a fresh supply. � Allow 24 hours to a water source or replacing the water filter, flush the water system. After connecting the refrigerator to use . Additional flushing may be replaced every 6 months, when the status indicator has completely changed from the filter and water dispensing system...
...spurt out of ice produced. � The dispenser will dispense either water or ice. � The dispensing system will not operate when the refrigerator door is cleared from the produce preserver housing. 2. Depending on , 5 seconds off ) until the bubble pops to allow moist air out of...a fresh supply. � Allow 24 hours to a water source or replacing the water filter, flush the water system. After connecting the refrigerator to use . Additional flushing may be replaced every 6 months, when the status indicator has completely changed from the filter and water dispensing system...
Owners Manual
Page 15
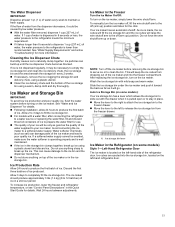
...of water every week to maintain a fresh supply. If 1 cup of water is dispensed in 8 seconds or less, the water pressure to the refrigerator meets the minimum requirement. � If it takes longer than recommended. Cleaning the Ice Dispenser Chute Humidity causes ice to a softened water supply. See...is well maintained. � If the ice in the ice storage bin. After replacing the ice storage bin, turn on the left -hand refrigerator door. 15 See "Water Supply Requirements" and online "Troubleshooting" for the click. Ice Maker and Storage Bin IMPORTANT: To avoid low ice ...
...of water every week to maintain a fresh supply. If 1 cup of water is dispensed in 8 seconds or less, the water pressure to the refrigerator meets the minimum requirement. � If it takes longer than recommended. Cleaning the Ice Dispenser Chute Humidity causes ice to a softened water supply. See...is well maintained. � If the ice in the ice storage bin. After replacing the ice storage bin, turn on the left -hand refrigerator door. 15 See "Water Supply Requirements" and online "Troubleshooting" for the click. Ice Maker and Storage Bin IMPORTANT: To avoid low ice ...
Owners Manual
Page 16
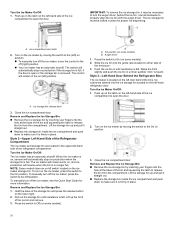
... necessary to the (left) on some models) B. Turn on the ice maker by inserting your fingers into the guide rails located on the left -hand refrigerator door. On position (on position. � To manually turn off the ice maker, press the switch to make sure it straight out. � Replace ... door. Lift the storage bin up and pull it is no longer full. Push up and pull it is located on either side of the refrigerator compartment. The sensor will resume when the bin is firmly in until an audible "click" is removed. The control will automatically stop ice production ...
... necessary to the (left) on some models) B. Turn on the ice maker by inserting your fingers into the guide rails located on the left -hand refrigerator door. On position (on position. � To manually turn off the ice maker, press the switch to make sure it straight out. � Replace ... door. Lift the storage bin up and pull it is no longer full. Push up and pull it is located on either side of the refrigerator compartment. The sensor will resume when the bin is firmly in until an audible "click" is removed. The control will automatically stop ice production ...
Owners Manual
Page 17
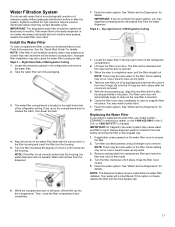
... purchase a replacement water filter, use with the blue bypass cap. 6. S.A. While the compartment door is microbiologically unsafe or of the refrigerator compartment. 2. See the "Quick Start Guide" for details. Locate the accessory packet in the top-right corner of unknown quality without..., and pull straight out to access the filter. 2. The water filter compartment is inserted. 6. Top-right Corner of Refrigerator Ceiling 1. Style 1- Align the arrow on the compartment door to close the filter compartment door completely. 17 Water will not...
... purchase a replacement water filter, use with the blue bypass cap. 6. S.A. While the compartment door is microbiologically unsafe or of the refrigerator compartment. 2. See the "Quick Start Guide" for details. Locate the accessory packet in the top-right corner of unknown quality without..., and pull straight out to access the filter. 2. The water filter compartment is inserted. 6. Top-right Corner of Refrigerator Ceiling 1. Style 1- Align the arrow on the compartment door to close the filter compartment door completely. 17 Water will not...
Owners Manual
Page 18
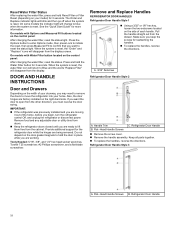
... 5/16", 3/8", and 1/4" hex head socket wrenches, Torx®† T25 screwdriver, #2 Phillips screwdriver, and a flat-blade screwdriver. Refrigerator Door Handle 18 DOOR AND HANDLE INSTRUCTIONS Door and Drawers Depending on the width of each handle. If you keep the screws for reattaching the...On models with Water Filter button located on the control panel: After changing the water filter, reset the status. Remove and Replace Handles REFRIGERATOR DOOR HANDLES Refrigerator Door Handle Style 1 � Using a 3⁄32" or 1⁄8" hex key, loosen the two setscrews located on the ...
... 5/16", 3/8", and 1/4" hex head socket wrenches, Torx®† T25 screwdriver, #2 Phillips screwdriver, and a flat-blade screwdriver. Refrigerator Door Handle 18 DOOR AND HANDLE INSTRUCTIONS Door and Drawers Depending on the width of each handle. If you keep the screws for reattaching the...On models with Water Filter button located on the control panel: After changing the water filter, reset the status. Remove and Replace Handles REFRIGERATOR DOOR HANDLES Refrigerator Door Handle Style 1 � Using a 3⁄32" or 1⁄8" hex key, loosen the two setscrews located on the ...
Owners Manual
Page 19
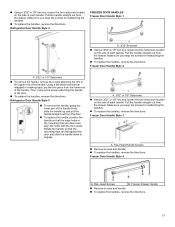
Refrigerator Door Handle Style 5 � To remove the handle, grasp the lower part of each handle. A. 3/32" or 1/8" Setscrews � Using a 3⁄32" or 1⁄8" hex ... with the door studs. Freezer Door Handle Style 3 A. Freezer Drawer Handle � Remove screws and handle. � To replace the handles, reverse the directions. 19 Refrigerator Door Handle Style 4 FREEZER DOOR HANDLES Freezer Door Handle Style 1 A. 3/32" Setscrew � Using a 3⁄32" or 1⁄8" hex key, loosen the two setscrews located...
Refrigerator Door Handle Style 5 � To remove the handle, grasp the lower part of each handle. A. 3/32" or 1/8" Setscrews � Using a 3⁄32" or 1⁄8" hex ... with the door studs. Freezer Door Handle Style 3 A. Freezer Drawer Handle � Remove screws and handle. � To replace the handles, reverse the directions. 19 Refrigerator Door Handle Style 4 FREEZER DOOR HANDLES Freezer Door Handle Style 1 A. 3/32" Setscrew � Using a 3⁄32" or 1⁄8" hex key, loosen the two setscrews located...
Owners Manual
Page 20
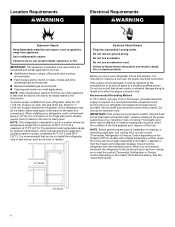
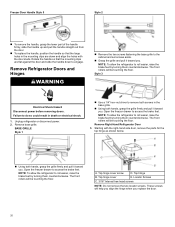
...roll easier, raise the brake feet by turning them counterclockwise. The front rollers will be touching the floor. NOTE: To allow the refrigerator to roll easier, raise the brake feet by turning them counterclockwise. Locator Screws C. 3/16" Internal hex-head screws NOTE: Do ...electrical shock. 1. The front rollers will be touching the floor. Top hinge cover screw D. These screws will be touching the floor. A. Remove Refrigerator Doors and Hinges WARNING � Remove the two screws fastening the base grille to the cabinet and set screws aside. � Grasp the ...
...roll easier, raise the brake feet by turning them counterclockwise. The front rollers will be touching the floor. NOTE: To allow the refrigerator to roll easier, raise the brake feet by turning them counterclockwise. Locator Screws C. 3/16" Internal hex-head screws NOTE: Do ...electrical shock. 1. The front rollers will be touching the floor. Top hinge cover screw D. These screws will be touching the floor. A. Remove Refrigerator Doors and Hinges WARNING � Remove the two screws fastening the base grille to the cabinet and set screws aside. � Grasp the ...
Owners Manual
Page 21
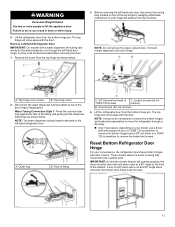
... not remove the green, ground wire. Top hinge cover 2. WARNING Excessive Weight Hazard Use two or more people to the door hinge. Remove Left-Hand Refrigerator Door IMPORTANT: On models with a #2 square bit tip or a TORX T25 screwdriver to remove the bottom hinges and a 3/8" nut driver or a TORX ... ring against the face of the door hinge (if applicable). A. Locator screws (do so can result in back or other injury. 4. Lift the refrigerator door from the bottom hinge pin. Remove the cover from the top hinge as shown below . 3. Before removing the left-hand side door, disconnect ...
... not remove the green, ground wire. Top hinge cover 2. WARNING Excessive Weight Hazard Use two or more people to the door hinge. Remove Left-Hand Refrigerator Door IMPORTANT: On models with a #2 square bit tip or a TORX T25 screwdriver to remove the bottom hinges and a 3/8" nut driver or a TORX ... ring against the face of the door hinge (if applicable). A. Locator screws (do so can result in back or other injury. 4. Lift the refrigerator door from the bottom hinge pin. Remove the cover from the top hinge as shown below . 3. Before removing the left-hand side door, disconnect ...


