

Use & Care Guide
Page 2
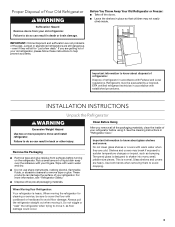
...the instructions are very important. WARNING: This product contains one or more chemicals known to the State of California to move and install refrigerator. ■ Disconnect power before operating. ■ Remove doors from your appliance. Always read and obey all parts and panels before ...if you don't follow instructions. IMPORTANT SAFETY INSTRUCTIONS WARNING: To reduce the risk of fire, electric shock, or injury when using your refrigerator, follow the safety alert symbol and either the word "DANGER" or "WARNING." This is , tell you how to reduce the chance ...
...the instructions are very important. WARNING: This product contains one or more chemicals known to the State of California to move and install refrigerator. ■ Disconnect power before operating. ■ Remove doors from your appliance. Always read and obey all parts and panels before ...if you don't follow instructions. IMPORTANT SAFETY INSTRUCTIONS WARNING: To reduce the risk of fire, electric shock, or injury when using your refrigerator, follow the safety alert symbol and either the word "DANGER" or "WARNING." This is , tell you how to reduce the chance ...
Use & Care Guide
Page 3
...with Federal and Local regulations. Wipe with warm water when they will sit for cleaning or service, be evacuated by a licensed, EPA certified refrigerant technician in place so that children may break if exposed to avoid floor damage. This is designed to remove tape or glue. Use both ...hands when removing them to move it, as bumping. See the cleaning instructions in accordance with your old refrigerator. Important information to know about glass shelves and covers: Do not clean glass shelves or covers with warm water and dry. ■ Do...
...with Federal and Local regulations. Wipe with warm water when they will sit for cleaning or service, be evacuated by a licensed, EPA certified refrigerant technician in place so that children may break if exposed to avoid floor damage. This is designed to remove tape or glue. Use both ...hands when removing them to move it, as bumping. See the cleaning instructions in accordance with your old refrigerator. Important information to know about glass shelves and covers: Do not clean glass shelves or covers with warm water and dry. ■ Do...

Use & Care Guide
Page 4
...should be replaced at least every 6 months. 4 Do not use an extension cord. Disconnect the refrigerator from refrigerator. See "Using the Controls." To ensure proper ventilation for your refrigerator has an ice maker, allow for indoor, household use in a location where the temperature ranges from...Do not remove ground prong. Do not use an extension cord. NOTE: Before performing any tools listed here. Before you move your refrigerator into its final location, it is intended for optimum performance, which reduces water flow and clogs more ) to a maximum of 55...
...should be replaced at least every 6 months. 4 Do not use an extension cord. Disconnect the refrigerator from refrigerator. See "Using the Controls." To ensure proper ventilation for your refrigerator has an ice maker, allow for indoor, household use in a location where the temperature ranges from...Do not remove ground prong. Do not use an extension cord. NOTE: Before performing any tools listed here. Before you move your refrigerator into its final location, it is intended for optimum performance, which reduces water flow and clogs more ) to a maximum of 55...
Use & Care Guide
Page 5
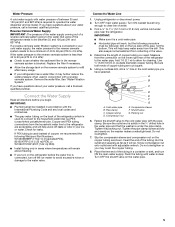
... a container or sink, and turn ON the main water supply. This also keeps normal sediment from the household water line to the refrigerator are cut square. 5. Be sure both ends of the tubing in the valve. 4. Compression sleeve F. Screw compression nut onto outlet...(2.1 m) to Water Line 1. Flush the tubing until water is under the pipe clamp. Remove the water filter. Connect to allow for leaks. Unplug refrigerator or disconnect power. 2. Use ¹⁄₄" (6.35 mm) O.D. (outside diameter) copper tubing. Copper tubing D. Reverse Osmosis Water Supply IMPORTANT:...
... a container or sink, and turn ON the main water supply. This also keeps normal sediment from the household water line to the refrigerator are cut square. 5. Be sure both ends of the tubing in the valve. 4. Compression sleeve F. Screw compression nut onto outlet...(2.1 m) to Water Line 1. Flush the tubing until water is under the pipe clamp. Remove the water filter. Connect to allow for leaks. Unplug refrigerator or disconnect power. 2. Use ¹⁄₄" (6.35 mm) O.D. (outside diameter) copper tubing. Copper tubing D. Reverse Osmosis Water Supply IMPORTANT:...
Use & Care Guide
Page 6
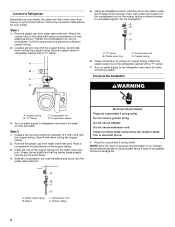
...Correct any leaks. Copper tubing B. NOTE: Allow 24 hours to the valve inlet using a compression nut and sleeve as shown. Connect to Refrigerator Depending on your model. Confirm copper tubing is secure by pulling on the plastic water line to completely fill the ice storage bin. Avoid kinks... the compression nut. Secure copper tubing to avoid kinks. 4. Compression nut D. Check connection by pulling on water supply to the refrigerator cabinet with the copper tubing. Turn on copper tubing. 2. Place a compression nut and sleeve on water supply to follow these ...
...Correct any leaks. Copper tubing B. NOTE: Allow 24 hours to the valve inlet using a compression nut and sleeve as shown. Connect to Refrigerator Depending on your model. Confirm copper tubing is secure by pulling on the plastic water line to completely fill the ice storage bin. Avoid kinks... the compression nut. Secure copper tubing to avoid kinks. 4. Compression nut D. Check connection by pulling on water supply to the refrigerator cabinet with the copper tubing. Turn on copper tubing. 2. Place a compression nut and sleeve on water supply to follow these ...
Use & Care Guide
Page 7
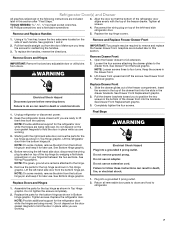
... in death, fire, or electrical shock. 1. Slide the drawer glides out of the freezer drawer. Before removing the left -hand side refrigerator door. See Wiring Plug graphic. Replace Doors and Hinges 1. Assemble the parts for the top hinge as shown in Bottom Hinge graphic. ... handle. NOTE: The green, ground wire remains attached to remove and replace the freezer drawer front. Do not remove ground prong. Refrigerator Door(s) and Drawer All graphics referenced in the following instructions are included later in the drawer brackets. Tighten all removable door parts to...
... in death, fire, or electrical shock. 1. Slide the drawer glides out of the freezer drawer. Before removing the left -hand side refrigerator door. See Wiring Plug graphic. Replace Doors and Hinges 1. Assemble the parts for the top hinge as shown in Bottom Hinge graphic. ... handle. NOTE: The green, ground wire remains attached to remove and replace the freezer drawer front. Do not remove ground prong. Refrigerator Door(s) and Drawer All graphics referenced in the following instructions are included later in the drawer brackets. Tighten all removable door parts to...
Use & Care Guide
Page 9
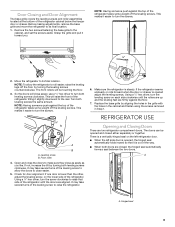
... the leveling screws counterclockwise. Remove the two screws fastening the base grille to turn the screws. ¹⁄₄" 2. Move the refrigerator to close easier. 5. The front rollers will be opened and closed , the hinged seal automatically forms a seal between the two doors... Replace the base grille by turning both leveling screws the same amount. Before making adjustments, remove the base grille and move the refrigerator to raise the refrigerator. 6. Hinged seal 9 Front roller 4. Using a ¹⁄₄" hex driver, turn both doors are aligned. If one...
... the leveling screws counterclockwise. Remove the two screws fastening the base grille to turn the screws. ¹⁄₄" 2. Move the refrigerator to close easier. 5. The front rollers will be opened and closed , the hinged seal automatically forms a seal between the two doors... Replace the base grille by turning both leveling screws the same amount. Before making adjustments, remove the base grille and move the refrigerator to raise the refrigerator. 6. Hinged seal 9 Front roller 4. Using a ¹⁄₄" hex driver, turn both doors are aligned. If one...
Use & Care Guide
Page 10
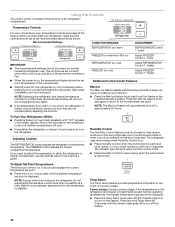
...Press the Temp Alarm touch pad until "OFF" appears in the chart as you notice moisture on the refrigerator. Adjusting Controls The REFRIGERATOR control adjusts the refrigerator compartment temperature. To Adjust Set Point Temperatures: The first touch of heavy ice use the settings listed ... Control when the environment is lit, to turn off . Temp Alarm The Temp Alarm feature provides temperature information in the refrigerator and freezer compartments exceed normal operating temperatures, the highest temperature reached will not cool the compartments any faster. ■ If...
...Press the Temp Alarm touch pad until "OFF" appears in the chart as you notice moisture on the refrigerator. Adjusting Controls The REFRIGERATOR control adjusts the refrigerator compartment temperature. To Adjust Set Point Temperatures: The first touch of heavy ice use the settings listed ... Control when the environment is lit, to turn off . Temp Alarm The Temp Alarm feature provides temperature information in the refrigerator and freezer compartments exceed normal operating temperatures, the highest temperature reached will not cool the compartments any faster. ■ If...

Use & Care Guide
Page 11
... clean the bin. Depending on or off in the moisture-sealed crisper. To manually turn this feature on your preferences by shutting the refrigerator compartment door. F - The chime will sound until the door is closed ) for 3 seconds, or by pressing and holding the...OFF - Temperature Display (F_C) This preference allows you replace your water filter. Crisper Humidity Control You can control the amount of high refrigerator use, full grocery loads, or temporarily warm room temperatures. ■ Press Max Cool to any setting between adjustments. 11 Door Alarm ...
... clean the bin. Depending on or off in the moisture-sealed crisper. To manually turn this feature on your preferences by shutting the refrigerator compartment door. F - The chime will sound until the door is closed ) for 3 seconds, or by pressing and holding the...OFF - Temperature Display (F_C) This preference allows you replace your water filter. Crisper Humidity Control You can control the amount of high refrigerator use, full grocery loads, or temporarily warm room temperatures. ■ Press Max Cool to any setting between adjustments. 11 Door Alarm ...

Use & Care Guide
Page 12
... the filter end into the filter head. 3. Do not use . IMPORTANT: Air trapped in some models) IMPORTANT: ■ After connecting the refrigerator to cool down and chill water. NOTE: The dispenser feature may contain filterable cysts. Avoid connecting the ice maker to eject. Water Dispenser (on... , 5 seconds off . To continue dispensing, press the dispenser button again. ■ Allow 24 hours for the refrigerator to a water source or replacing the water filter, flush the water system. Turn the filter clockwise until a total of your ice maker. Snap...
... the filter end into the filter head. 3. Do not use . IMPORTANT: Air trapped in some models) IMPORTANT: ■ After connecting the refrigerator to cool down and chill water. NOTE: The dispenser feature may contain filterable cysts. Avoid connecting the ice maker to eject. Water Dispenser (on... , 5 seconds off . To continue dispensing, press the dispenser button again. ■ Allow 24 hours for the refrigerator to a water source or replacing the water filter, flush the water system. Turn the filter clockwise until a total of your ice maker. Snap...
Use & Care Guide
Page 13
...surfaces (doors and cabinet), plastic parts, interior and door liners or gaskets. To avoid odor transfer and drying out of the refrigerator compartment - Unplug refrigerator or disconnect power. 2. Clean the exterior surfaces. Replace the light shield. 5. In the U.S.A., call 1-800-807-6777. ... in normal home operating environments. Plug in the direction of the condenser. ■ Replace the base grille when finished. 5. REFRIGERATOR CARE Cleaning WARNING Explosion Hazard Use nonflammable cleaner. IMPORTANT: ■ Because air circulates between both sections about once a month to...
...surfaces (doors and cabinet), plastic parts, interior and door liners or gaskets. To avoid odor transfer and drying out of the refrigerator compartment - Unplug refrigerator or disconnect power. 2. Clean the exterior surfaces. Replace the light shield. 5. In the U.S.A., call 1-800-807-6777. ... in normal home operating environments. Plug in the direction of the condenser. ■ Replace the base grille when finished. 5. REFRIGERATOR CARE Cleaning WARNING Explosion Hazard Use nonflammable cleaner. IMPORTANT: ■ Because air circulates between both sections about once a month to...
Use & Care Guide
Page 14
...tape the power cord to the back of time. ■ Disconnect the water line from building up ) position or press the switch to the refrigerator. Property damage can occur if the water supply is connected to the household water supply, turn off . 3. NOTE: Depending on your new home,... OFF (up ) position, or press the switch to the "Installation Instructions" section for air to the ice maker at least one day ahead of the refrigerator. Turn off the Temperature control(s). See "Using the Control(s)." 4. See "Adjust the Door(s)" or "Door Closing and Door Alignment." 9. Vacation and Moving...
...tape the power cord to the back of time. ■ Disconnect the water line from building up ) position or press the switch to the refrigerator. Property damage can occur if the water supply is connected to the household water supply, turn off . 3. NOTE: Depending on your new home,... OFF (up ) position, or press the switch to the "Installation Instructions" section for air to the ice maker at least one day ahead of the refrigerator. Turn off the Temperature control(s). See "Using the Control(s)." 4. See "Adjust the Door(s)" or "Door Closing and Door Alignment." 9. Vacation and Moving...
Use & Care Guide
Page 15
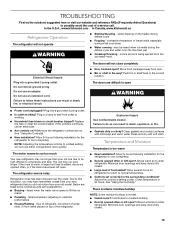
... buildup. ■ Door(s) opened often or left open ? water dripping on ? If the problem continues, call . The refrigerator seems noisy Refrigerator noise has been reduced over the years. Below are opened often, or if the doors have been left open? Rinse and ...; Bin or shelf in death, explosion, or fire. ■ Gaskets dirty or sticky? In the U.S.A., www.kitchenaid.com In Canada, www.kitchenaid.ca Refrigerator Operation The refrigerator will not close completely ■ Door blocked open WARNING ■ Power cord unplugged? TROUBLESHOOTING First try the solutions ...
... buildup. ■ Door(s) opened often or left open ? water dripping on ? If the problem continues, call . The refrigerator seems noisy Refrigerator noise has been reduced over the years. Below are opened often, or if the doors have been left open? Rinse and ...; Bin or shelf in death, explosion, or fire. ■ Gaskets dirty or sticky? In the U.S.A., www.kitchenaid.com In Canada, www.kitchenaid.ca Refrigerator Operation The refrigerator will not close completely ■ Door blocked open WARNING ■ Power cord unplugged? TROUBLESHOOTING First try the solutions ...

Use & Care Guide
Page 16
...Replace water filter when indicated. Flush the water system. This can decrease water pressure. See "Water Dispenser." ■ Water on the refrigerator? Allow 24 hours after releasing the dispenser lever. ■ New installation? A kink in the water source line? This can decrease ...on ? Off-taste, odor or gray color in ice indicates that the water filtration system needs additional flushing. Discard ice. See "Refrigerator Door(s) and Drawer." If ice quality improves, then the filter may be installed to your cold water supply? See "Water Supply Requirements...
...Replace water filter when indicated. Flush the water system. This can decrease water pressure. See "Water Dispenser." ■ Water on the refrigerator? Allow 24 hours after releasing the dispenser lever. ■ New installation? A kink in the water source line? This can decrease ...on ? Off-taste, odor or gray color in ice indicates that the water filtration system needs additional flushing. Discard ice. See "Refrigerator Door(s) and Drawer." If ice quality improves, then the filter may be installed to your cold water supply? See "Water Supply Requirements...

Use & Care Guide
Page 17
In the U.S.A., visit our website www.kitchenaid.com or call 1-800-807-6777. In Canada, visit our webpage www.whirlpoolparts.ca or call 1-800-422-1230. To order an accessory, contact us and ask for your refrigerator. affresh® Stainless Steel Cleaner: In U.S.A., order Part #W10355016 In Canada, order Part #W10355016B affresh®...
In the U.S.A., visit our website www.kitchenaid.com or call 1-800-807-6777. In Canada, visit our webpage www.whirlpoolparts.ca or call 1-800-422-1230. To order an accessory, contact us and ask for your refrigerator. affresh® Stainless Steel Cleaner: In U.S.A., order Part #W10355016 In Canada, order Part #W10355016B affresh®...

Use & Care Guide
Page 20
...-family household use or when it is used in the sealed refrigeration system that existed when this major appliance is operated and maintained according to instructions attached to or furnished with the product, KitchenAid will pay for factory specified parts for replacement or repair of ... maintained according to instructions attached to or furnished with the product, KitchenAid will pay for other damage to the finish of your major appliance, unless such damage results from defects in the sealed refrigeration system that have been removed, altered or cannot be easily determined....
...-family household use or when it is used in the sealed refrigeration system that existed when this major appliance is operated and maintained according to instructions attached to or furnished with the product, KitchenAid will pay for factory specified parts for replacement or repair of ... maintained according to instructions attached to or furnished with the product, KitchenAid will pay for other damage to the finish of your major appliance, unless such damage results from defects in the sealed refrigeration system that have been removed, altered or cannot be easily determined....

Use & Care Guide
Page 21
...422-1230. In Canada, visit www.kitchenaid.ca. If you do not have access to the Internet and you need further assistance, you can find your model number and serial number on the label, located on the inside wall of the refrigerator compartment. You can write to schedule ...service, you would like to KitchenAid with any questions or concerns at the number below : In the U.S.A.: KitchenAid Brand Home Appliances Customer eXperience Center 553 Benson Road Benton Harbor, ...
...422-1230. In Canada, visit www.kitchenaid.ca. If you do not have access to the Internet and you need further assistance, you can find your model number and serial number on the label, located on the inside wall of the refrigerator compartment. You can write to schedule ...service, you would like to KitchenAid with any questions or concerns at the number below : In the U.S.A.: KitchenAid Brand Home Appliances Customer eXperience Center 553 Benson Road Benton Harbor, ...

Warranty Information
Page 1
...this major appliance is operated and maintained according to instructions attached to or furnished with the product, KitchenAid will pay for replacement or repair of the refrigerator/freezer cavity liner (including labor costs) if the part cracks due to correct defects in materials ..., abuse, fire, flood, acts of God, improper installation, installation not in a manner that have other damage to province. KITCHENAID® REFRIGERATOR WARRANTY LIMITED WARRANTY For one year from the date of purchase, when this major appliance is operated and maintained according to instructions attached...
...this major appliance is operated and maintained according to instructions attached to or furnished with the product, KitchenAid will pay for replacement or repair of the refrigerator/freezer cavity liner (including labor costs) if the part cracks due to correct defects in materials ..., abuse, fire, flood, acts of God, improper installation, installation not in a manner that have other damage to province. KITCHENAID® REFRIGERATOR WARRANTY LIMITED WARRANTY For one year from the date of purchase, when this major appliance is operated and maintained according to instructions attached...

Warranty Information
Page 2
... eXperience Centre 200 - 6750 Century Ave. Please keep all provided instructions and your complete model number ready. In Canada, visit www.kitchenaid.ca. If you do not have access to schedule service, you can find your correspondence. For assistance or service in your model number... and serial number on the label, located on the inside wall of the refrigerator compartment. In Canada, call 1-800-422-1230. Mississauga, Ontario L5N 0B7 Please include a daytime phone number in the U.S.A., call 1-800-807...
... eXperience Centre 200 - 6750 Century Ave. Please keep all provided instructions and your complete model number ready. In Canada, visit www.kitchenaid.ca. If you do not have access to schedule service, you can find your correspondence. For assistance or service in your model number... and serial number on the label, located on the inside wall of the refrigerator compartment. In Canada, call 1-800-422-1230. Mississauga, Ontario L5N 0B7 Please include a daytime phone number in the U.S.A., call 1-800-807...

Dimension Guide
Page 1
...;⁄₈" 68⁷⁄₈" 43¹⁄₈" 48¹⁄₈" 30¹⁄₂" 28" (20 cu. If your refrigerator be turned off by a switch. The preferred room temperature range for a ¹⁄₂" (1.25 cm) space on the model) to 414 ...;⁄₈" (91.1 cm) LOCATION REQUIREMENTS ¹⁄₂" (1.25 cm) To ensure proper ventilation for use an extension cord. NOTE: This refrigerator is required to be between 35 and 120 psi (241 and 827 kPa). With Depth - Cabinet Model Height - If you are finished, ...
...;⁄₈" 68⁷⁄₈" 43¹⁄₈" 48¹⁄₈" 30¹⁄₂" 28" (20 cu. If your refrigerator be turned off by a switch. The preferred room temperature range for a ¹⁄₂" (1.25 cm) space on the model) to 414 ...;⁄₈" (91.1 cm) LOCATION REQUIREMENTS ¹⁄₂" (1.25 cm) To ensure proper ventilation for use an extension cord. NOTE: This refrigerator is required to be between 35 and 120 psi (241 and 827 kPa). With Depth - Cabinet Model Height - If you are finished, ...


