

Warranty Information
Page 1
..., alteration or modification of Whirlpool Corporation or Whirlpool Canada LP (hereafter "KitchenAid") will pay for factory specified replacement parts and repair labor for Factory Specified Replacement Parts and repair labor to : KitchenAid Customer eXperience Center In the U.S.A., call 1-800-807-6777. In the...you also may not apply to correct product damage or defects caused by our authorized KitchenAid Service Providers. Service or parts for appliances with the product, KitchenAid brand will pay for the following components to obtain service under these limitations and ...
..., alteration or modification of Whirlpool Corporation or Whirlpool Canada LP (hereafter "KitchenAid") will pay for factory specified replacement parts and repair labor for Factory Specified Replacement Parts and repair labor to : KitchenAid Customer eXperience Center In the U.S.A., call 1-800-807-6777. In the...you also may not apply to correct product damage or defects caused by our authorized KitchenAid Service Providers. Service or parts for appliances with the product, KitchenAid brand will pay for the following components to obtain service under these limitations and ...
Use & Care Guide
Page 3
Always read and obey all parts and panels before operating. ■ Remove doors from your old refrigerator. ■ Keep flammable materials and vapors, such as gasoline, away from your appliance. This ...
Always read and obey all parts and panels before operating. ■ Remove doors from your old refrigerator. ■ Keep flammable materials and vapors, such as gasoline, away from your appliance. This ...
Use & Care Guide
Page 8
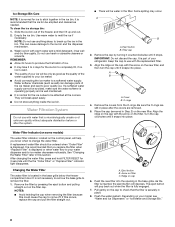
..., will help you replace the filter when "Replace Filter" is fully engaged. 7. It is recommended that the ice bin be water in place. 8. It is part of unknown quality without adequate disinfection before or after the covers are removed. 5. Filter cap 2. Align the ridge on the cap with the replacement filter... ice maker. ■ Avoid connecting the ice maker to your model, see "Water and Ice Dispensers" or "Ice Maker and Storage Bin." 8 This can damage parts of the freezer, and then lift up the ice in the ice bin.
..., will help you replace the filter when "Replace Filter" is fully engaged. 7. It is recommended that the ice bin be water in place. 8. It is part of unknown quality without adequate disinfection before or after the covers are removed. 5. Filter cap 2. Align the ridge on the cap with the replacement filter... ice maker. ■ Avoid connecting the ice maker to your model, see "Water and Ice Dispensers" or "Ice Maker and Storage Bin." 8 This can damage parts of the freezer, and then lift up the ice in the ice bin.
Use & Care Guide
Page 9
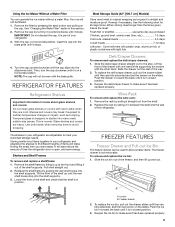
.... Pull shelf straight out. 2. Push the ice bin in closed position. 3. Remove the cap by pulling it is in toward the back until it is part of time the refrigerator door is airtight and moisture-proof. It is in between the shelf and the wall of the shelf up and out...
.... Pull shelf straight out. 2. Push the ice bin in closed position. 3. Remove the cap by pulling it is in toward the back until it is part of time the refrigerator door is airtight and moisture-proof. It is in between the shelf and the wall of the shelf up and out...
Use & Care Guide
Page 10
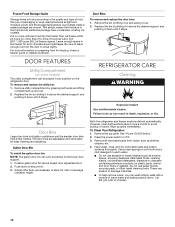
... and replace the door bins: 1. Door Bins Large door bins hold gallon containers and the smaller door bins hold 2-liter bottles. Remove all removable parts from inside a sealed package are adjustable and removable for air to the quality and type of food, the type of freezer space). Leave enough space... a month to 0.95 L] of odors. Gallon Door Bin To install the gallon door bin: NOTE: The gallon door bin can be placed on plastic parts, interior and door liners or gaskets. Both the refrigerator and freezer sections defrost automatically. Hand wash, rinse, and dry removable...
... and replace the door bins: 1. Door Bins Large door bins hold gallon containers and the smaller door bins hold 2-liter bottles. Remove all removable parts from inside a sealed package are adjustable and removable for air to the quality and type of food, the type of freezer space). Leave enough space... a month to 0.95 L] of odors. Gallon Door Bin To install the gallon door bin: NOTE: The gallon door bin can be placed on plastic parts, interior and door liners or gaskets. Both the refrigerator and freezer sections defrost automatically. Hand wash, rinse, and dry removable...
Use & Care Guide
Page 11
...depending on your refrigerator has an automatic ice maker, shut off cooling. Vacation Care Your refrigerator is opened, call for Stainless Steel parts only! By selecting this feature, the temperature set points remain unchanged, the ice maker will turn off the lights and ice maker..., use the manufacturer's approved Stainless Steel Cleaner and Polish. In Canada call 1-800-422-1230. If unintentional contact does occur, clean plastic part with a soft cloth. Clean the exterior surfaces. If the lights do not need to remove minor scuffs or marks, it , and dry...
...depending on your refrigerator has an automatic ice maker, shut off cooling. Vacation Care Your refrigerator is opened, call for Stainless Steel parts only! By selecting this feature, the temperature set points remain unchanged, the ice maker will turn off the lights and ice maker..., use the manufacturer's approved Stainless Steel Cleaner and Polish. In Canada call 1-800-422-1230. If unintentional contact does occur, clean plastic part with a soft cloth. Clean the exterior surfaces. If the lights do not need to remove minor scuffs or marks, it , and dry...
Use & Care Guide
Page 14
... of service. Mississauga, Ontario L5N 0B7 Please include a daytime phone number in this manual. If You Need Replacement Parts If you can write to KitchenAid Canada LP with any questions or concerns at : KitchenAid Brand Home Appliances Customer eXperience Center 553 Benson Road Benton Harbor, MI 49022-2692 Please include a daytime phone number...
... of service. Mississauga, Ontario L5N 0B7 Please include a daytime phone number in this manual. If You Need Replacement Parts If you can write to KitchenAid Canada LP with any questions or concerns at : KitchenAid Brand Home Appliances Customer eXperience Center 553 Benson Road Benton Harbor, MI 49022-2692 Please include a daytime phone number...
Use & Care Guide
Page 16
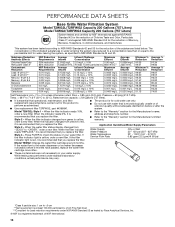
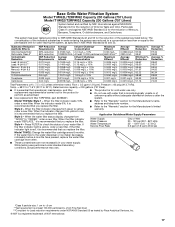
... 2 - When the water filter status display changes from green to the permissible limit for water leaving the system, as advertised. ■ Use replacement filter T2RFWG2, part #4396841. ■ The product is for cold water use only. ■ Do not use with water that is recommended that you replace the filter. ■...
... 2 - When the water filter status display changes from green to the permissible limit for water leaving the system, as advertised. ■ Use replacement filter T2RFWG2, part #4396841. ■ The product is for cold water use only. ■ Do not use with water that is recommended that you replace the filter. ■...
Use & Care Guide
Page 17
... noted. Model T1WG2L: Style 1 - Press FILTER to NSF/ANSI Standards 42 and 53 for water leaving the system, as advertised. ■ Use replacement filter T2RFWG2, part #4396841. ■ The product is for the product to yellow, order a new filter. When the indicator changes from yellow to Application Guidelines/Water Supply Parameters...
... noted. Model T1WG2L: Style 1 - Press FILTER to NSF/ANSI Standards 42 and 53 for water leaving the system, as advertised. ■ Use replacement filter T2RFWG2, part #4396841. ■ The product is for the product to yellow, order a new filter. When the indicator changes from yellow to Application Guidelines/Water Supply Parameters...

Use & Care Guide
Page 18
... of the appliance. 7. Food or medicine loss due to correct product damage or defects caused by our authorized KitchenAid Service Providers. Pick-up or delivery. Service or parts for warranty service to chemicals. 9. This warranty gives you specific legal rights, and you also may not apply...is intended for the remaining term of repair or replacement under this major appliance, you should ask KitchenAid or your appliance will pay for factory specified replacement parts and repair labor for service or repair of inaccessible appliances or built-in this major appliance other ...
... of the appliance. 7. Food or medicine loss due to correct product damage or defects caused by our authorized KitchenAid Service Providers. Pick-up or delivery. Service or parts for warranty service to chemicals. 9. This warranty gives you specific legal rights, and you also may not apply...is intended for the remaining term of repair or replacement under this major appliance, you should ask KitchenAid or your appliance will pay for factory specified replacement parts and repair labor for service or repair of inaccessible appliances or built-in this major appliance other ...

Installation Guide
Page 6
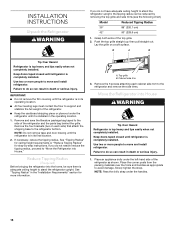
.... Compressor cover WARNING ■ A grounded 3 prong electrical outlet should permit door to make the panels. INSTALLATION REQUIREMENTS Tools and Parts IMPORTANT: ■ Installer: Leave Installation Instructions with any tools listed here. ■ Cordless drill ■ Torx®† T15...9632; Phillips screwdriver hex key ■ Small level and socket drivers ■ Appliance dolly ■ Tape measure ■ Utility knife Parts Needed ■ #8 x 3" (7.6 cm) wood screws (longer screws may be braced. Location Requirements The refrigerator can result in an...
.... Compressor cover WARNING ■ A grounded 3 prong electrical outlet should permit door to make the panels. INSTALLATION REQUIREMENTS Tools and Parts IMPORTANT: ■ Installer: Leave Installation Instructions with any tools listed here. ■ Cordless drill ■ Torx®† T15...9632; Phillips screwdriver hex key ■ Small level and socket drivers ■ Appliance dolly ■ Tape measure ■ Utility knife Parts Needed ■ #8 x 3" (7.6 cm) wood screws (longer screws may be braced. Location Requirements The refrigerator can result in an...
Installation Guide
Page 15
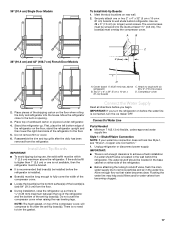
...6777. Two Door Bottom Mount Handle Kit Refrigerator and Side Trim Dimensions The width and height of a side panel are determined by calling KitchenAid Parts and Accessories at 1-800-442-9991. NOTES: ■ The dimensions shown are planning. Refrigerator A 2. Measure the distance from point... 2 1. Stainless Steel and Overlay Series Both 36" and 42" models have the same cabinet side trim All factory parts are available through your KitchenAid dealer or KitchenAid Parts and Accessories at 1-800-442-9991. Overlay Series Door Handle Kits The following handle style is 25" (63.5 cm...
...6777. Two Door Bottom Mount Handle Kit Refrigerator and Side Trim Dimensions The width and height of a side panel are determined by calling KitchenAid Parts and Accessories at 1-800-442-9991. NOTES: ■ The dimensions shown are planning. Refrigerator A 2. Measure the distance from point... 2 1. Stainless Steel and Overlay Series Both 36" and 42" models have the same cabinet side trim All factory parts are available through your KitchenAid dealer or KitchenAid Parts and Accessories at 1-800-442-9991. Overlay Series Door Handle Kits The following handle style is 25" (63.5 cm...
Installation Guide
Page 16
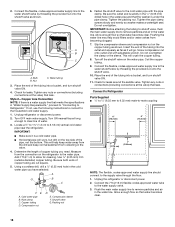
... to do so can result in death or serious injury. 1. NOTE: Pass the dolly strap under the left-hand side of the refrigerator and the parts bag behind the grille. See "Tipping Radius" in the operating location. 1. Remove the 6 screws attaching each side) that attach the shipping base to the refrigerator...
... to do so can result in death or serious injury. 1. NOTE: Pass the dolly strap under the left-hand side of the refrigerator and the parts bag behind the grille. See "Tipping Radius" in the operating location. 1. Remove the 6 screws attaching each side) that attach the shipping base to the refrigerator...
Installation Guide
Page 17
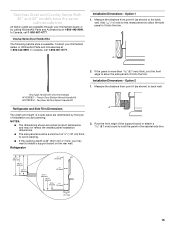
... on rear wall. 2. If the solid soffit is higher than 1" (2.5 cm) or one or two 2" x 4" x 32" (5 cm x 10 cm x 81 cm) boards to Water Line Parts Needed ■ Minimum 7 ft (2.13 m) flexible, codes-approved water supply line Style 1-Shutoff Valve Connection NOTE: If your water line connection does not look like...
... on rear wall. 2. If the solid soffit is higher than 1" (2.5 cm) or one or two 2" x 4" x 32" (5 cm x 10 cm x 81 cm) boards to Water Line Parts Needed ■ Minimum 7 ft (2.13 m) flexible, codes-approved water supply line Style 1-Shutoff Valve Connection NOTE: If your water line connection does not look like...
Installation Guide
Page 18
... on the refrigerator to the water pipe. Tighten any nuts or connections (including connections at the valve) that water becomes clear. 18 Connect to Refrigerator Parts Supplied to ¹⁄₄" (6.35 mm to 6.35 mm) male-to-male coupling 6" (15.2 cm) 6" (15.2 cm) 7" (17.78 cm) 1" (2.54 cm) NOTE: The...
... on the refrigerator to the water pipe. Tighten any nuts or connections (including connections at the valve) that water becomes clear. 18 Connect to Refrigerator Parts Supplied to ¹⁄₄" (6.35 mm to 6.35 mm) male-to-male coupling 6" (15.2 cm) 6" (15.2 cm) 7" (17.78 cm) 1" (2.54 cm) NOTE: The...
Installation Guide
Page 25
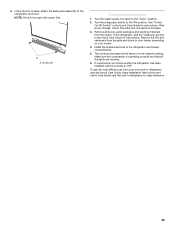
..." position. 2. Remove all the lights are preset at the factory to the midpoint setting. Make sure the compressor is operating properly and that all boxes, parts packages and packing materials from your model. 4. Using the two screws, attach the base grille assembly to OFF. NOTE: Drive in refrigerator, read the Use...
..." position. 2. Remove all the lights are preset at the factory to the midpoint setting. Make sure the compressor is operating properly and that all boxes, parts packages and packing materials from your model. 4. Using the two screws, attach the base grille assembly to OFF. NOTE: Drive in refrigerator, read the Use...


