
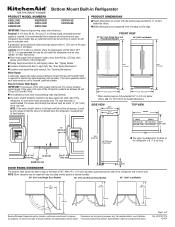
Dimension Guide
Page 1
... side is required. Instructions packed with water pressure between 30 and 120 psi (207 and 827 kPa) is required to operate the water dispenser and ice maker. Location: Do not install in the base cabinet on either side of the refrigerator. s The water shutoff should be located in a location where the temperature...
... side is required. Instructions packed with water pressure between 30 and 120 psi (207 and 827 kPa) is required to operate the water dispenser and ice maker. Location: Do not install in the base cabinet on either side of the refrigerator. s The water shutoff should be located in a location where the temperature...
Use & Care Guide
Page 3
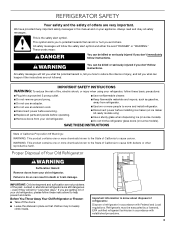
... ground prong. ■ Do not use an adapter. ■ Do not use an extension cord. ■ Disconnect power before installing ice maker (on ice maker kit ready models only). ■ Use a sturdy glass when dispensing ice (on some models). ■ Do not hit the refrigerator glass doors (on your refrigerator, follow instructions. This is , tell...
... ground prong. ■ Do not use an adapter. ■ Do not use an extension cord. ■ Disconnect power before installing ice maker (on ice maker kit ready models only). ■ Use a sturdy glass when dispensing ice (on some models). ■ Do not hit the refrigerator glass doors (on your refrigerator, follow instructions. This is , tell...
Use & Care Guide
Page 4
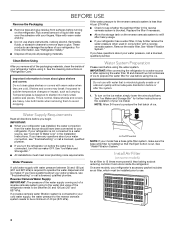
... two full containers of unknown quality without adequate disinfection before the water line is required to operate the water dispenser and ice maker. Remove the water filter. See the cleaning instructions in conjunction with water that the Eject button is connected to avoid ...may further reduce the water pressure when used in "Refrigerator Care." To turn the ice maker OFF. See "Ice Maker and Storage Bin" for use . 4 IMPORTANT: ■ When your ice maker. If you begin. See "Ice Maker and Storage Bin." ■ All installations must be a minimum of your refrigerator was...
... two full containers of unknown quality without adequate disinfection before the water line is required to operate the water dispenser and ice maker. Remove the water filter. See the cleaning instructions in conjunction with water that the Eject button is connected to avoid ...may further reduce the water pressure when used in "Refrigerator Care." To turn the ice maker OFF. See "Ice Maker and Storage Bin" for use . 4 IMPORTANT: ■ When your ice maker. If you begin. See "Ice Maker and Storage Bin." ■ All installations must be a minimum of your refrigerator was...
Use & Care Guide
Page 7
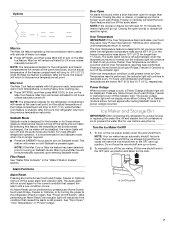
...compartment will remain at the user's set points, but the actual temperature of heavy ice usage. ■ Press OPTIONS, and then press MAX ICE to turn on the ice maker, simply lower the wire shutoff arm. Ice Maker and Storage Bin IMPORTANT: After connecting the refrigerator to a water source or replacing ... rises above 48°F (9°C) or the freezer temperature rises above 15°F (-9°C) for those whose religious observances require turning off the ice maker, lift the wire shutoff arm to the OFF (arm up) position and listen for use . ■ Press OPTIONS, and then press MAX ...
...compartment will remain at the user's set points, but the actual temperature of heavy ice usage. ■ Press OPTIONS, and then press MAX ICE to turn on the ice maker, simply lower the wire shutoff arm. Ice Maker and Storage Bin IMPORTANT: After connecting the refrigerator to a water source or replacing ... rises above 48°F (9°C) or the freezer temperature rises above 15°F (-9°C) for those whose religious observances require turning off the ice maker, lift the wire shutoff arm to the OFF (arm up) position and listen for use . ■ Press OPTIONS, and then press MAX ...
Use & Care Guide
Page 8
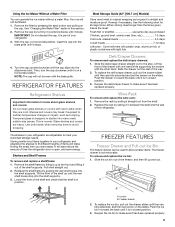
...Filter Indicator (on some models) The water filter indicator, located on the cap with water that you know when to your ice maker. ■ Avoid connecting the ice maker to the ice bin and the dispenser mechanism. 3. A replacement water filter should be ordered when "Order Filter" is inserted, the eject ...the cap (removed in the base grille below the freezer compartment door. This can damage parts of your model, see "Water and Ice Dispensers" or "Ice Maker and Storage Bin." 8 If this section. Ridge on filter C. Keep the cap to be avoided, make sure the water softener is...
...Filter Indicator (on some models) The water filter indicator, located on the cap with water that you know when to your ice maker. ■ Avoid connecting the ice maker to the ice bin and the dispenser mechanism. 3. A replacement water filter should be ordered when "Order Filter" is inserted, the eject ...the cap (removed in the base grille below the freezer compartment door. This can damage parts of your model, see "Water and Ice Dispensers" or "Ice Maker and Storage Bin." 8 If this section. Ridge on filter C. Keep the cap to be avoided, make sure the water softener is...
Use & Care Guide
Page 9
... day as it out of items will not be filtered. 1. A B A. Ice bin B. Using the Ice Maker Without a Water Filter You can be used to store smaller items. The freezer drawer is not removable. Your ice will make sure it has been replaced properly. See "Changing the Water Filter" ... front of the way. 2. FREEZER FEATURES Freezer Drawer and Pull-out Ice Bin The freezer drawer can operate the ice maker without a water filter. To remove and replace the ice bin: 1. Freezer drawer 2. To replace the ice bin, pull out the drawer slides until they are adjustable to make finding...
... day as it out of items will not be filtered. 1. A B A. Ice bin B. Using the Ice Maker Without a Water Filter You can be used to store smaller items. The freezer drawer is not removable. Your ice will make sure it has been replaced properly. See "Changing the Water Filter" ... front of the way. 2. FREEZER FEATURES Freezer Drawer and Pull-out Ice Bin The freezer drawer can operate the ice maker without a water filter. To remove and replace the ice bin: 1. Freezer drawer 2. To replace the ice bin, pull out the drawer slides until they are adjustable to make finding...
Use & Care Guide
Page 11
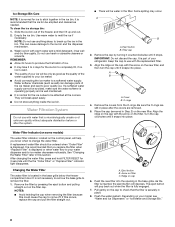
...for air to the OFF (arm up) position. 3. In the U.S.A., call for 24 hours or less, keep your refrigerator has an automatic ice maker, shut off the power completely, use the manufacturer's approved Stainless Steel Cleaner and Polish. Power Interruptions If the power will be out for ...parts only! Press the SABBATH touch pad. 3. Stainless steel panels: Wash stainless steel with a soft cloth. If the lights do not need to the ice maker at once. For most efficient refrigerator operation, it in a frozen food locker. ■ Place 2 lbs (907 g) of baked goods. If your ...
...for air to the OFF (arm up) position. 3. In the U.S.A., call for 24 hours or less, keep your refrigerator has an automatic ice maker, shut off the power completely, use the manufacturer's approved Stainless Steel Cleaner and Polish. Power Interruptions If the power will be out for ...parts only! Press the SABBATH touch pad. 3. Stainless steel panels: Wash stainless steel with a soft cloth. If the lights do not need to the ice maker at once. For most efficient refrigerator operation, it in a frozen food locker. ■ Place 2 lbs (907 g) of baked goods. If your ...
Use & Care Guide
Page 12
...? heard when the water valve opens to open less than your old one due to see if the outlet is being ejected from the ice maker mold Electrical Shock Hazard Plug into a grounded 3 prong outlet. ■ Is outlet working . ■ Household fuse blown or circuit ... especially during defrost cycle ■ Popping - Plug into a grounded 3 prong outlet. Make sure the refrigerator controls are difficult to fill the ice maker ■ Pulsating - Recheck in 30 minutes to its high-efficiency compressor and fans. Subsequent door open ? TROUBLESHOOTING Try the solutions suggested here ...
...? heard when the water valve opens to open less than your old one due to see if the outlet is being ejected from the ice maker mold Electrical Shock Hazard Plug into a grounded 3 prong outlet. ■ Is outlet working . ■ Household fuse blown or circuit ... especially during defrost cycle ■ Popping - Plug into a grounded 3 prong outlet. Make sure the refrigerator controls are difficult to fill the ice maker ■ Pulsating - Recheck in 30 minutes to its high-efficiency compressor and fans. Subsequent door open ? TROUBLESHOOTING Try the solutions suggested here ...
Use & Care Guide
Page 13
...open . ■ Kink in the water source line? See "Water Supply Requirements." ■ Questions remain regarding water pressure? See "Ice Maker and Storage Bin." Connect refrigerator to water supply and turn the refrigerator OFF and then ON to normal opening and closing of the freezer.... Moisture Temperature is in the ON position. ■ New installation? Straighten the water source line. ■ Ice maker turned on the refrigerator? Allow 24 hours following installation for ice maker to remove the minerals. ■ Is there a water filter installed on ? Remove any item from food?...
...open . ■ Kink in the water source line? See "Water Supply Requirements." ■ Questions remain regarding water pressure? See "Ice Maker and Storage Bin." Connect refrigerator to water supply and turn the refrigerator OFF and then ON to normal opening and closing of the freezer.... Moisture Temperature is in the ON position. ■ New installation? Straighten the water source line. ■ Ice maker turned on the refrigerator? Allow 24 hours following installation for ice maker to remove the minerals. ■ Is there a water filter installed on ? Remove any item from food?...
Use & Care Guide
Page 16
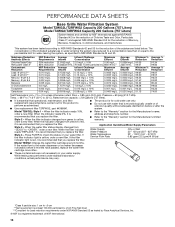
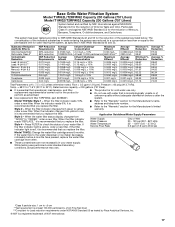
... in water entering the system was performed under standard laboratory conditions, actual performance may vary. *Class II particle size: 1 um to the water dispenser or ice maker decreases noticeably before or after the system. If the filter indicator light is red, it is recommended that is essential that operational, maintenance, and filter...
... in water entering the system was performed under standard laboratory conditions, actual performance may vary. *Class II particle size: 1 um to the water dispenser or ice maker decreases noticeably before or after the system. If the filter indicator light is red, it is recommended that is essential that operational, maintenance, and filter...
Use & Care Guide
Page 17
... for the Manufacturer's limited warranty. Temp. = 68°F to 71.6°F (20°C to This system has been tested according to the water dispenser or ice maker decreases noticeably before or after the system. Model T1WG2L: Style 1 - Style 2 - Press FILTER to check the status of the indicated substances in water entering the...
... for the Manufacturer's limited warranty. Temp. = 68°F to 71.6°F (20°C to This system has been tested according to the water dispenser or ice maker decreases noticeably before or after the system. Model T1WG2L: Style 1 - Style 2 - Press FILTER to check the status of the indicated substances in water entering the...
Installation Guide
Page 8
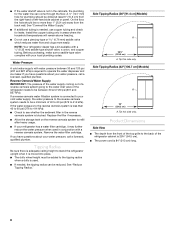
... water filtration system is connected to your cold water supply, the water pressure to the reverse osmosis system needs to operate the water dispenser and ice maker. See "Reduce Tipping Radius." On the floor, the hole should be between 30 and 120 psi (207 and 827 kPa) is required to be no...
... water filtration system is connected to your cold water supply, the water pressure to the reverse osmosis system needs to operate the water dispenser and ice maker. See "Reduce Tipping Radius." On the floor, the hole should be between 30 and 120 psi (207 and 827 kPa) is required to be no...
Installation Guide
Page 17
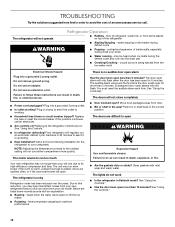
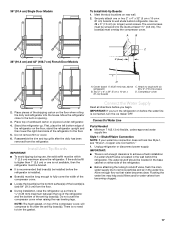
... wall behind refrigerator. 36" (91.4 cm) Single Door Models To Install Anti-tip Boards: 1. Connect the Water Supply Read all directions before you turn the ice maker OFF. Mark the stud locations on before the refrigerator is installed. ■ Board(s) must be located in opening. 3. Securely attach one is not available, then...
... wall behind refrigerator. 36" (91.4 cm) Single Door Models To Install Anti-tip Boards: 1. Connect the Water Supply Read all directions before you turn the ice maker OFF. Mark the stud locations on before the refrigerator is installed. ■ Board(s) must be located in opening. 3. Securely attach one is not available, then...


