
Dimension Guide
Page 1
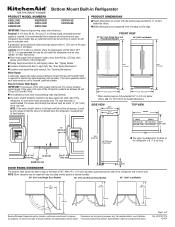
... accessible area. See "Tipping Radius." Water Supply: A cold water supply with product. s The water shutoff should permit door to improve Dimensions are for side tipping radius. NOTE: More clearance may be required if you have questions about your refrigerator be between the side of the.... Use an outlet that the tube is not kinked when the refrigerator is required to change materials and specifications without notice. See "Opening Dimensions." Allow 4¹⁄₂" (11.4 cm) minimum space between 30 and 120 psi (207 and 827 kPa). For complete details, ...
... accessible area. See "Tipping Radius." Water Supply: A cold water supply with product. s The water shutoff should permit door to improve Dimensions are for side tipping radius. NOTE: More clearance may be required if you have questions about your refrigerator be between the side of the.... Use an outlet that the tube is not kinked when the refrigerator is required to change materials and specifications without notice. See "Opening Dimensions." Allow 4¹⁄₂" (11.4 cm) minimum space between 30 and 120 psi (207 and 827 kPa). For complete details, ...
Dimension Guide
Page 2
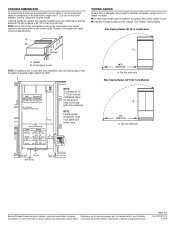
... the room. 90¹⁄₂" (229.9 cm) A. TIPPING RADIUS Be sure there is adequate ceiling height to change materials and specifications without notice. B Model Dimension B 36" (91.4 cm) 4" (10.2 cm) 42" (106.7 cm) 7¹⁄₂" (19 cm) 84" (213.4 cm) to bottom of the.... 1" 6" (2.54 cm) (15.2 cm) 24" (60.96 cm) min. 6" (15.2 cm) Because Whirlpool Corporation policy includes a continuous commitment to improve Dimensions are needed , the tipping radius can be added to the rear wall studs so that the gasket is necessary to be removed. Side Tipping Radius...
... the room. 90¹⁄₂" (229.9 cm) A. TIPPING RADIUS Be sure there is adequate ceiling height to change materials and specifications without notice. B Model Dimension B 36" (91.4 cm) 4" (10.2 cm) 42" (106.7 cm) 7¹⁄₂" (19 cm) 84" (213.4 cm) to bottom of the.... 1" 6" (2.54 cm) (15.2 cm) 24" (60.96 cm) min. 6" (15.2 cm) Because Whirlpool Corporation policy includes a continuous commitment to improve Dimensions are needed , the tipping radius can be added to the rear wall studs so that the gasket is necessary to be removed. Side Tipping Radius...

Installation Guide
Page 6
...driver ■ Adjustable wrenches (2) and ¹⁄₂" open fully. Tools Needed Gather the required tools and parts before starting installation. See "Opening Dimensions." IMPORTANT: ■ Observe all governing codes and ordinances. †®TORX is 84" (213.4 cm) from refrigerator. See "Door Swing... Dimensions." ■ Location must be removed. ■ Do not remove the foam gasket on top of the right side cabinets or end panel. ...
...driver ■ Adjustable wrenches (2) and ¹⁄₂" open fully. Tools Needed Gather the required tools and parts before starting installation. See "Opening Dimensions." IMPORTANT: ■ Observe all governing codes and ordinances. †®TORX is 84" (213.4 cm) from refrigerator. See "Door Swing... Dimensions." ■ Location must be removed. ■ Do not remove the foam gasket on top of the right side cabinets or end panel. ...
Installation Guide
Page 7
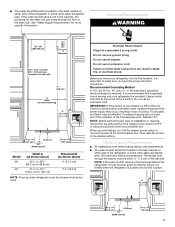
...nuisance tripping of the rear wall. The access hole through the floor or the back wall. Electrical Requirements WARNING 80" - 90" (203-229 cm) B Dimension 83¹⁄₂" (212.1 cm) min. 84³⁄₄" (215 cm) max. It is recommended that a separate circuit serving only your refrigerator... 35³⁄₄" (90.2 cm to 90.8 cm) 41¹⁄₂" to 41³⁄₄" (105.4 cm to 106 cm) Dimension B (as the room. NOTE: Before performing any type of it must be turned off by a switch. When you move your refrigerator be affected. Do...
...nuisance tripping of the rear wall. The access hole through the floor or the back wall. Electrical Requirements WARNING 80" - 90" (203-229 cm) B Dimension 83¹⁄₂" (212.1 cm) min. 84³⁄₄" (215 cm) max. It is recommended that a separate circuit serving only your refrigerator... 35³⁄₄" (90.2 cm to 90.8 cm) 41¹⁄₂" to 41³⁄₄" (105.4 cm to 106 cm) Dimension B (as the room. NOTE: Before performing any type of it must be turned off by a switch. When you move your refrigerator be affected. Do...
Installation Guide
Page 8
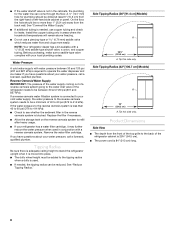
... Tipping Radius." Before purchasing, make sure a saddle-type valve complies with a ¹⁄₄" (6.35 mm) saddle-type shutoff valve, a union, and copper tubing. Product Dimensions Side View ■ The depth from the right-hand or left-hand side cabinet or panel. On the floor, the hole should be drilled at...
... Tipping Radius." Before purchasing, make sure a saddle-type valve complies with a ¹⁄₄" (6.35 mm) saddle-type shutoff valve, a union, and copper tubing. Product Dimensions Side View ■ The depth from the right-hand or left-hand side cabinet or panel. On the floor, the hole should be drilled at...

Installation Guide
Page 9
... (92.3 cm) *When leveling legs are fully extended to 1¹⁄₄" (3.2 cm) below rollers, add 1¹⁄₈" (2.9 cm) to the height dimensions. 42" (106.7 cm) Models 41¹⁄₄" (105 cm) 25³⁄₈" (64.5 cm) 9 A 23¹⁄₂" (59.7 cm...) Front View ■ Width dimensions were measured from trim edge to trim edge. ■ Height dimensions are shown with leveling legs extended ¹⁄₈" (3 mm) below the rollers. ■ Height...
... (92.3 cm) *When leveling legs are fully extended to 1¹⁄₄" (3.2 cm) below rollers, add 1¹⁄₈" (2.9 cm) to the height dimensions. 42" (106.7 cm) Models 41¹⁄₄" (105 cm) 25³⁄₈" (64.5 cm) 9 A 23¹⁄₂" (59.7 cm...) Front View ■ Width dimensions were measured from trim edge to trim edge. ■ Height dimensions are shown with leveling legs extended ¹⁄₈" (3 mm) below the rollers. ■ Height...

Installation Guide
Page 10
... location must permit the door to open to the height dimensions. More clearance may be required if you are fully extended to 1¹⁄₄" (3.2 cm) below rollers, add 1¹⁄₈" (2.9 cm) to a minimum of ...
... location must permit the door to open to the height dimensions. More clearance may be required if you are fully extended to 1¹⁄₄" (3.2 cm) below rollers, add 1¹⁄₈" (2.9 cm) to a minimum of ...

Installation Guide
Page 11
...bottom and side edges of the backer panel. If you use two 2" (5.08 cm) strips horizontally centered for added support. 11 Follow these panel dimension and placement instructions to be set in the following graphic: a decorative overlay panel, a ¹/₈" (3.18 mm) spacer panel or spacer strips... for both models. The custom panels must be sure that you may choose to work with one panel routed for the different dimensions. Overlay Series Custom Panels Custom overlay panels allow you to blend the exterior of your cabinet manufacturer may use custom handles for ...
...bottom and side edges of the backer panel. If you use two 2" (5.08 cm) strips horizontally centered for added support. 11 Follow these panel dimension and placement instructions to be set in the following graphic: a decorative overlay panel, a ¹/₈" (3.18 mm) spacer panel or spacer strips... for both models. The custom panels must be sure that you may choose to work with one panel routed for the different dimensions. Overlay Series Custom Panels Custom overlay panels allow you to blend the exterior of your cabinet manufacturer may use custom handles for ...

Installation Guide
Page 14
...(9.5 mm) 61/4" (15.9 cm) Bottom Offset 1/2" (1.27 cm) 195/8" (49.85 cm) 195/8" (49.85 cm) Exterior Panel extends above door. Offset dimension B. ¹ ₄" (6.25 mm) Backer panel C. ¹ ₈" (3.18 mm) Spacer panel D. ³ ₄" (1.92 cm) Decorative overlay panel ...) Offset all sides 3/16" (4.7 mm) Spacer Panels (all models) NOTE: Spacer panels must be sure that the custom overlay panels will fit properly. 14 Offset dimension B. ¹ ₄" (6.25 mm) Backer panel C. ¹ ₈" (3.18 mm) Spacer panel D. ³ ₄" (1.92 cm) Decorative overlay panel D C B ...
...(9.5 mm) 61/4" (15.9 cm) Bottom Offset 1/2" (1.27 cm) 195/8" (49.85 cm) 195/8" (49.85 cm) Exterior Panel extends above door. Offset dimension B. ¹ ₄" (6.25 mm) Backer panel C. ¹ ₈" (3.18 mm) Spacer panel D. ³ ₄" (1.92 cm) Decorative overlay panel ...) Offset all sides 3/16" (4.7 mm) Spacer Panels (all models) NOTE: Spacer panels must be sure that the custom overlay panels will fit properly. 14 Offset dimension B. ¹ ₄" (6.25 mm) Backer panel C. ¹ ₈" (3.18 mm) Spacer panel D. ³ ₄" (1.92 cm) Decorative overlay panel D C B ...
Installation Guide
Page 15
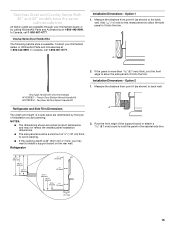
... distance from point A (as shown) to install a support board on the rear wall. Installation Dimensions - Rout the front edge of installation you may want to the back wall. Contact your KitchenAid dealer or by the type of the support board or attach a 8.7 mm) board to fit...to allow the side panel to back wall. Two Door Bottom Mount Handle Kit Refrigerator and Side Trim Dimensions The width and height of a side panel are determined by calling KitchenAid Parts and Accessories at 1-800-442-9991. Refrigerator A 2. Knurl grip handle with chrome endcaps W10782871 ...
... distance from point A (as shown) to install a support board on the rear wall. Installation Dimensions - Rout the front edge of installation you may want to the back wall. Contact your KitchenAid dealer or by the type of the support board or attach a 8.7 mm) board to fit...to allow the side panel to back wall. Two Door Bottom Mount Handle Kit Refrigerator and Side Trim Dimensions The width and height of a side panel are determined by calling KitchenAid Parts and Accessories at 1-800-442-9991. Refrigerator A 2. Knurl grip handle with chrome endcaps W10782871 ...


