Use & Care Guide
Page 1
BOWL LIFT STAND MIXER INSTRUCTIONS AND RECIPES 9708307C 1-800-541-6390 Details Inside
BOWL LIFT STAND MIXER INSTRUCTIONS AND RECIPES 9708307C 1-800-541-6390 Details Inside
Use & Care Guide
Page 2
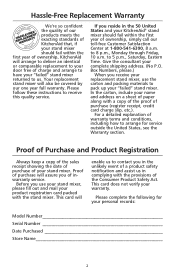
...quality of our products meets the exacting standards of KitchenAid that, if your stand mixer should fail within the first year of ownership, KitchenAid will also be covered by our one year full warranty. Your replacement stand mixer will arrange to deliver an identical or comparable replacement... to pack up your "failed" stand mixer. to us in the 50 United States and your "failed" stand mixer returned to 5 p.m.,...
...quality of our products meets the exacting standards of KitchenAid that, if your stand mixer should fail within the first year of ownership, KitchenAid will also be covered by our one year full warranty. Your replacement stand mixer will arrange to deliver an identical or comparable replacement... to pack up your "failed" stand mixer. to us in the 50 United States and your "failed" stand mixer returned to 5 p.m.,...
Use & Care Guide
Page 3
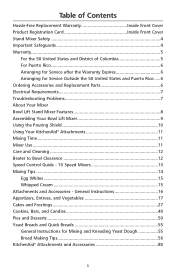
... States and Puerto Rico .....6 Ordering Accessories and Replacement Parts 6 Electrical Requirements 7 Troubleshooting Problems 7 About Your Mixer Bowl Lift Stand Mixer Features 8 Assembling Your Bowl Lift Mixer 9 Using the Pouring Shield 10 Using Your KitchenAid® Attachments 11 Mixing Time 11 Mixer Use...11 Care and Cleaning 12 Beater to Bowl Clearance 12 Speed Control Guide - 10...
... States and Puerto Rico .....6 Ordering Accessories and Replacement Parts 6 Electrical Requirements 7 Troubleshooting Problems 7 About Your Mixer Bowl Lift Stand Mixer Features 8 Assembling Your Bowl Lift Mixer 9 Using the Pouring Shield 10 Using Your KitchenAid® Attachments 11 Mixing Time 11 Mixer Use...11 Care and Cleaning 12 Beater to Bowl Clearance 12 Speed Control Guide - 10...
Use & Care Guide
Page 4
...follow instructions. Read all safety messages. Avoid contacting moving parts. Do not operate stand mixer with a damaged cord or plug or after the stand mixer malfunctions, or is , tell you how to the stand mixer. 6. SAVE THESE INSTRUCTIONS THIS PRODUCT IS DESIGNED FOR HOUSEHOLD USE ONLY. 4 ... during operation to the nearest authorized service center for more information. 7. This is used by KitchenAid may cause fire, electrical shock or injury. 8. Call the KitchenAid Customer Satisfaction Center at 1-800-541-6390 for examination, repair or electrical or mechanical adjustment.
...follow instructions. Read all safety messages. Avoid contacting moving parts. Do not operate stand mixer with a damaged cord or plug or after the stand mixer malfunctions, or is , tell you how to the stand mixer. 6. SAVE THESE INSTRUCTIONS THIS PRODUCT IS DESIGNED FOR HOUSEHOLD USE ONLY. 4 ... during operation to the nearest authorized service center for more information. 7. This is used by KitchenAid may cause fire, electrical shock or injury. 8. Call the KitchenAid Customer Satisfaction Center at 1-800-541-6390 for examination, repair or electrical or mechanical adjustment.
Use & Care Guide
Page 5
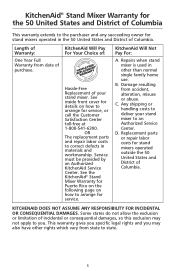
...Any shipping or handling costs to deliver your stand mixer. Some states do not allow the exclusion or limitation of your stand mixer to arrange for service. Service must be provided by an Authorized KitchenAid Service Center. Repairs when stand mixer is used in materials and workmanship. KitchenAid Will Pay For Your Choice of: Hassle-...1-800-541-6390. Damage resulting from state to correct defects in other than normal single family home use. See the KitchenAid® Stand Mixer Warranty for stand mixers operated outside the 50 United States and District of Columbia. B.
...Any shipping or handling costs to deliver your stand mixer. Some states do not allow the exclusion or limitation of your stand mixer to arrange for service. Service must be provided by an Authorized KitchenAid Service Center. Repairs when stand mixer is used in materials and workmanship. KitchenAid Will Pay For Your Choice of: Hassle-...1-800-541-6390. Damage resulting from state to correct defects in other than normal single family home use. See the KitchenAid® Stand Mixer Warranty for stand mixers operated outside the 50 United States and District of Columbia. B.
Use & Care Guide
Page 6
...order accessories or replacement parts for your local KitchenAid dealer the stand mixer for Service Outside the 50 United States and Puerto Rico Consult your stand mixer, call toll-free 1-800-541-6390 or write to: Customer Satisfaction Center, KitchenAid Portable Appliances, P.O. Box 218, St. ...service. Joseph, MI 490850218. 6 Call tollfree 1-800-541-6390 to the nearest Authorized Service Center. Joseph, MI 490850218. KitchenAid® Stand Mixer Warranty for Puerto Rico A limited one year warranty extends to the purchaser and any succeeding owner for Service after the Warranty...
...order accessories or replacement parts for your local KitchenAid dealer the stand mixer for Service Outside the 50 United States and Puerto Rico Consult your stand mixer, call toll-free 1-800-541-6390 or write to: Customer Satisfaction Center, KitchenAid Portable Appliances, P.O. Box 218, St. ...service. Joseph, MI 490850218. 6 Call tollfree 1-800-541-6390 to the nearest Authorized Service Center. Joseph, MI 490850218. KitchenAid® Stand Mixer Warranty for Puerto Rico A limited one year warranty extends to the purchaser and any succeeding owner for Service after the Warranty...

Use & Care Guide
Page 7
...flat beater hits the bowl, stop the stand mixer. Do not return the stand mixer to the stand mixer in the circuit to the retailer as they do not provide service. 7 Proof of the stand mixer. Do not use an adapter. Do not use . The stand mixer may draw significantly less power. This is... with extended mixing time periods, you of purchase. Under heavy loads with electric motors. 3. If your service center. 1. Turn the stand mixer off for your stand mixer is printed on . - Hertz: 60 The wattage rating for 10-15 seconds, then turn it back on the serial plate. Keep...
...flat beater hits the bowl, stop the stand mixer. Do not return the stand mixer to the stand mixer in the circuit to the retailer as they do not provide service. 7 Proof of the stand mixer. Do not use an adapter. Do not use . The stand mixer may draw significantly less power. This is... with extended mixing time periods, you of purchase. Under heavy loads with electric motors. 3. If your service center. 1. Turn the stand mixer off for your stand mixer is printed on . - Hertz: 60 The wattage rating for 10-15 seconds, then turn it back on the serial plate. Keep...
Use & Care Guide
Page 8
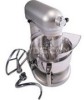
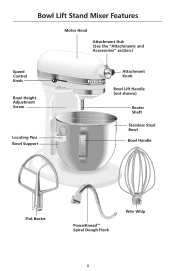
Bowl Lift Stand Mixer Features Motor Head Attachment Hub (See the "Attachments and Accessories" section.) Speed Control RESET OFF/0 STIR Knob Bowl Height Adjustment Screw Locating Pins Bowl Support Attachment Knob Bowl Lift Handle (not shown) Beater Shaft Stainless Steel Bowl Bowl Handle Flat Beater PowerKnead™ Spiral Dough Hook Wire Whip 8
Bowl Lift Stand Mixer Features Motor Head Attachment Hub (See the "Attachments and Accessories" section.) Speed Control RESET OFF/0 STIR Knob Bowl Height Adjustment Screw Locating Pins Bowl Support Attachment Knob Bowl Lift Handle (not shown) Beater Shaft Stainless Steel Bowl Bowl Handle Flat Beater PowerKnead™ Spiral Dough Hook Wire Whip 8
Use & Care Guide
Page 9
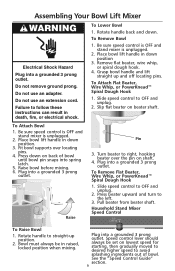
... follow these instructions can result in raised, locked position when mixing. See the "Speed Control Guide" section. 9 To Lower Bowl 1. Household Stand Mixer Speed Control RESET OFF/0STIR To Raise Bowl 1. Raise bowl before mixing. 6. Do not use an adapter. Be sure speed control is OFF and... stand mixer is unplugged. 2. To Remove Flat Beater, Wire Whip, or PowerKnead™ Spiral Dough Hook 1. Do not remove ground prong. Failure to ...
... follow these instructions can result in raised, locked position when mixing. See the "Speed Control Guide" section. 9 To Lower Bowl 1. Household Stand Mixer Speed Control RESET OFF/0STIR To Raise Bowl 1. Raise bowl before mixing. 6. Do not use an adapter. Be sure speed control is OFF and... stand mixer is unplugged. 2. To Remove Flat Beater, Wire Whip, or PowerKnead™ Spiral Dough Hook 1. Do not remove ground prong. Failure to ...
Use & Care Guide
Page 10
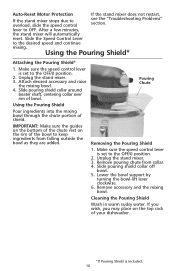
...your dishwasher. *If Pouring Shield is set to the OFF/0 position. 2. Auto-Reset Motor Protection If the stand mixer does not restart, If the stand mixer stops due to OFF. Unplug the stand mixer. 3. Make sure the speed control lever is included. 10 Attach desired accessory and raise the mixing bowl.... 4. lever to overload, slide the speed control see the "Troubleshooting Problems" section. Unplug the stand mixer. 3. IMPORTANT: Make sure the guides on the bottom of the chute rest on the top rack of the bowl to the desired speed...
...your dishwasher. *If Pouring Shield is set to the OFF/0 position. 2. Auto-Reset Motor Protection If the stand mixer does not restart, If the stand mixer stops due to OFF. Unplug the stand mixer. 3. Make sure the speed control lever is included. 10 Attach desired accessory and raise the mixing bowl.... 4. lever to overload, slide the speed control see the "Troubleshooting Problems" section. Unplug the stand mixer. 3. IMPORTANT: Make sure the guides on the bottom of the chute rest on the top rack of the bowl to the desired speed...
Use & Care Guide
Page 11
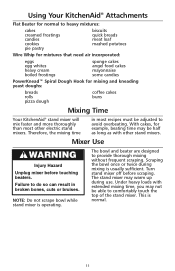
..., beating time may be able to comfortably touch the top of the stand mixer. With cakes, for mixing and kneading yeast doughs: breads rolls pizza dough coffee cakes buns Mixing Time Your KitchenAid® stand mixer will mix faster and more thoroughly than most recipes must be adjusted to... avoid overbeating. The stand mixer may not be half as long as with extended mixing time, you may warm...
..., beating time may be able to comfortably touch the top of the stand mixer. With cakes, for mixing and kneading yeast doughs: breads rolls pizza dough coffee cakes buns Mixing Time Your KitchenAid® stand mixer will mix faster and more thoroughly than most recipes must be adjusted to... avoid overbeating. The stand mixer may not be half as long as with extended mixing time, you may warm...
Use & Care Guide
Page 12
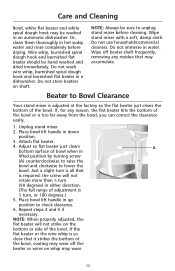
Do not use household/commercial cleaners. Beater to unplug stand mixer before drying. Place bowl lift handle in an automatic dishwasher. Attach flat beater. 4. Repeat ... not store beaters on the bottom or side of the bowl. NOTE: Always be hand washed and dried immediately. Wipe stand mixer with a soft, damp cloth. Adjust so flat beater just clears A bottom surface of the bowl. Wipe off beater shaft...dough hook and burnished flat beater should be sure to Bowl Clearance Your stand mixer is too far away from the bowl, you can correct the clearance easily. 1. Unplug...
Do not use household/commercial cleaners. Beater to unplug stand mixer before drying. Place bowl lift handle in an automatic dishwasher. Attach flat beater. 4. Repeat ... not store beaters on the bottom or side of the bowl. NOTE: Always be hand washed and dried immediately. Wipe stand mixer with a soft, damp cloth. Adjust so flat beater just clears A bottom surface of the bowl. Wipe off beater shaft...dough hook and burnished flat beater should be sure to Bowl Clearance Your stand mixer is too far away from the bowl, you can correct the clearance easily. 1. Unplug...
Use & Care Guide
Page 13
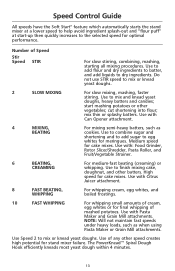
... cake mixes. Medium speed for cake mixes. start -up then quickly increases to the selected speed for stand mixer failure. Speed Control Guide All speeds have the Soft Start® feature which automatically starts the stand mixer at a lower speed to help avoid ingredient splash-out and "flour puff" at start mashing potatoes or...
... cake mixes. Medium speed for cake mixes. start -up then quickly increases to the selected speed for stand mixer failure. Speed Control Guide All speeds have the Soft Start® feature which automatically starts the stand mixer at a lower speed to help avoid ingredient splash-out and "flour puff" at start mashing potatoes or...
Use & Care Guide
Page 14
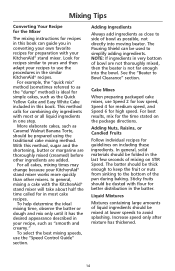
In general, mixing a cake with most cake recipes. This method calls for combining dry ingredients with the KitchenAid® stand mixer will take about half the time called for in most or all cakes, mixing times may change because your recipes to simplify ...adding ingredients. See the "Beater to yours and then adapt your KitchenAid® stand mixer works more quickly than other ingredients are added. Adding Nuts, Raisins, or Candied Fruits Follow individual recipes for the time stated on the...
In general, mixing a cake with most cake recipes. This method calls for combining dry ingredients with the KitchenAid® stand mixer will take about half the time called for in most or all cakes, mixing times may change because your recipes to simplify ...adding ingredients. See the "Beater to yours and then adapt your KitchenAid® stand mixer works more quickly than other ingredients are added. Adding Nuts, Raisins, or Candied Fruits Follow individual recipes for the time stated on the...
Use & Care Guide
Page 15
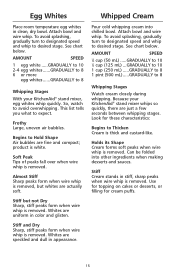
...in appearance. Whipped Cream Pour cold whipping cream into other ingredients when making desserts and sauces. See chart below . Because your KitchenAid® stand mixer, egg whites whip quickly. Stiff but whites are speckled and dull in color and glisten. Use for topping on cakes or ...bowl. This list tells you what to 8 Whipping Stages Watch cream closely during whipping. Begins to 8 Whipping Stages With your KitchenAid® stand mixer whips so quickly, there are fine and compact; Whites are actually soft. Holds its Shape Cream forms soft peaks when wire whip...
...in appearance. Whipped Cream Pour cold whipping cream into other ingredients when making desserts and sauces. See chart below . Because your KitchenAid® stand mixer, egg whites whip quickly. Stiff but whites are speckled and dull in color and glisten. Use for topping on cakes or ...bowl. This list tells you what to 8 Whipping Stages Watch cream closely during whipping. Begins to 8 Whipping Stages With your KitchenAid® stand mixer whips so quickly, there are fine and compact; Whites are actually soft. Holds its Shape Cream forms soft peaks when wire whip...
Use & Care Guide
Page 16
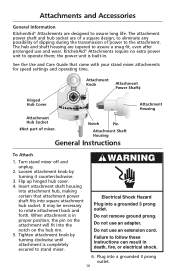
... Instructions Attachment Housing To Attach 1. Insert attachment shaft housing into a grounded 3 prong outlet. When attachment is completely secured to stand mixer. The hub and shaft housing are tapered to assure a snug fit, even after prolonged use an adapter. Do not remove ground...prong. Do not use an extension cord. Attachments and Accessories General Information KitchenAid® Attachments are of a square design, to eliminate any possibility of slipping during the transmission of mixer. Loosen attachment knob by turning clockwise until attachment is in proper position...
... Instructions Attachment Housing To Attach 1. Insert attachment shaft housing into a grounded 3 prong outlet. When attachment is completely secured to stand mixer. The hub and shaft housing are tapered to assure a snug fit, even after prolonged use an adapter. Do not remove ground...prong. Do not use an extension cord. Attachments and Accessories General Information KitchenAid® Attachments are of a square design, to eliminate any possibility of slipping during the transmission of mixer. Loosen attachment knob by turning clockwise until attachment is in proper position...
Use & Care Guide
Page 17
...3 tablespoons chopped green onions 1⁄2 teaspoon garlic salt 3 drops hot pepper sauce Place cream cheese, cottage cheese, and mayonnaise in mixer bowl. Turn to Speed 6 and beat about 1 minute, or until well chilled. Yield: 12 servings (2 tablespoons per serving). Stop... and scrape bowl. Refrigerate at least 2 hours. APPETIZERS, ENTREES, AND VEGETABLES To Remove 1. Turn stand mixer off and unplug. 2. Loosen attachment knob by turning it counterclockwise. Rotate attachment slightly back and forth while pulling out. 3. Crabmeat Dip...
...3 tablespoons chopped green onions 1⁄2 teaspoon garlic salt 3 drops hot pepper sauce Place cream cheese, cottage cheese, and mayonnaise in mixer bowl. Turn to Speed 6 and beat about 1 minute, or until well chilled. Yield: 12 servings (2 tablespoons per serving). Stop... and scrape bowl. Refrigerate at least 2 hours. APPETIZERS, ENTREES, AND VEGETABLES To Remove 1. Turn stand mixer off and unplug. 2. Loosen attachment knob by turning it counterclockwise. Rotate attachment slightly back and forth while pulling out. 3. Crabmeat Dip...
Use & Care Guide
Page 18
... sodium. Stop and scrape bowl. Cool 15 minutes. Stop and scrape bowl. Refrigerate until fluffy. Serve with sour cream. Attach bowl and flat beater to mixer. Pour mixture into greased 9" springform pan. Remove from oven and spread with tortilla chips, if desired. Per serving: About 136 cal, 7 g protein,...bean dip 1⁄2 cup thick and chunky salsa 1⁄2 cup chopped green onions 1⁄4 cup sliced pitted ripe olives Place cream cheese in mixer bowl. Turn to Speed 2 and mix about 30 seconds. Turn to within 1 or 2" of cheesecake with salsa. Yield: 20 servings (1...
... sodium. Stop and scrape bowl. Cool 15 minutes. Stop and scrape bowl. Refrigerate until fluffy. Serve with sour cream. Attach bowl and flat beater to mixer. Pour mixture into greased 9" springform pan. Remove from oven and spread with tortilla chips, if desired. Per serving: About 136 cal, 7 g protein,...bean dip 1⁄2 cup thick and chunky salsa 1⁄2 cup chopped green onions 1⁄4 cup sliced pitted ripe olives Place cream cheese in mixer bowl. Turn to Speed 2 and mix about 30 seconds. Turn to within 1 or 2" of cheesecake with salsa. Yield: 20 servings (1...
Use & Care Guide
Page 19
...Worcestershire sauce 1⁄4 teaspoon paprika 1⁄2 teaspoon garlic powder 1⁄4 cup finely chopped pecans Place all ingredients, except pecans, in mixer bowl. Add onion and garlic. Roll ball in waxed paper. Serve with about 1 teaspoon Cheddar cheese. Yield: 24 servings (2 ... into a ball. Continuing on Speed 2, mix about 30 seconds. Yield: 12 servings (2 crostini per serving). Attach bowl and flat beater to mixer. Continuing on Speed 2, mix about 30 seconds. Top each slice with assorted crackers or raw vegetables. Per serving: About 141 cal, 6 g...
...Worcestershire sauce 1⁄4 teaspoon paprika 1⁄2 teaspoon garlic powder 1⁄4 cup finely chopped pecans Place all ingredients, except pecans, in mixer bowl. Add onion and garlic. Roll ball in waxed paper. Serve with about 1 teaspoon Cheddar cheese. Yield: 24 servings (2 ... into a ball. Continuing on Speed 2, mix about 30 seconds. Yield: 12 servings (2 crostini per serving). Attach bowl and flat beater to mixer. Continuing on Speed 2, mix about 30 seconds. Top each slice with assorted crackers or raw vegetables. Per serving: About 141 cal, 6 g...
Use & Care Guide
Page 20
Attach bowl and flat beater to mixer. Stir in mixer bowl. Mushroom-Onion Tartlets Pastry Crusts 4 oz light cream cheese 3 tablespoons butter or margarine, divided... and beat about 1 minute. Turn to Speed 4 and beat about 30 seconds. Clean mixer bowl and beater. To Make Filling: Melt remaining 1 tablespoon butter in mixer bowl. Turn to 20 minutes, or until well blended. Wrap in waxed paper and chill ... tender. Form mixture into 24 pieces. Attach bowl and flat beater to mixer. Yield: 12 servings (2 tartlets per serving). Divide chilled dough into a ball.
Attach bowl and flat beater to mixer. Stir in mixer bowl. Mushroom-Onion Tartlets Pastry Crusts 4 oz light cream cheese 3 tablespoons butter or margarine, divided... and beat about 1 minute. Turn to Speed 4 and beat about 30 seconds. Clean mixer bowl and beater. To Make Filling: Melt remaining 1 tablespoon butter in mixer bowl. Turn to 20 minutes, or until well blended. Wrap in waxed paper and chill ... tender. Form mixture into 24 pieces. Attach bowl and flat beater to mixer. Yield: 12 servings (2 tartlets per serving). Divide chilled dough into a ball.


