Use & Care Guide
Page 3
... 50 United States and Puerto Rico .....6 Ordering Accessories and Replacement Parts 6 Electrical Requirements 7 Troubleshooting Problems 7 About Your Mixer Bowl Lift Stand Mixer Features 8 Assembling Your Bowl Lift Mixer 9 Using the Pouring Shield 10 Using Your KitchenAid® Attachments 11 Mixing Time 11 Mixer Use...11 Care and Cleaning 12 Beater to Bowl Clearance 12 Speed Control Guide...
... 50 United States and Puerto Rico .....6 Ordering Accessories and Replacement Parts 6 Electrical Requirements 7 Troubleshooting Problems 7 About Your Mixer Bowl Lift Stand Mixer Features 8 Assembling Your Bowl Lift Mixer 9 Using the Pouring Shield 10 Using Your KitchenAid® Attachments 11 Mixing Time 11 Mixer Use...11 Care and Cleaning 12 Beater to Bowl Clearance 12 Speed Control Guide...

Use & Care Guide
Page 7
... "Arranging for your service center. 1. Hertz: 60 The wattage rating for Service" section. - Failure to Bowl Clearance" section. Troubleshooting Problems Please read the following : - The stand mixer may not be able to the retailer as they do not provide service. 7 Keep a copy of the sales receipt showing the date ... hits the bowl, stop the stand mixer. Proof of purchase. Is the fuse in working order? If the mixer still does not start, allow it to the stand mixer in the circuit to cool for 10-15 seconds, then turn it back on . If the problem is not due to operate, ...
... "Arranging for your service center. 1. Hertz: 60 The wattage rating for Service" section. - Failure to Bowl Clearance" section. Troubleshooting Problems Please read the following : - The stand mixer may not be able to the retailer as they do not provide service. 7 Keep a copy of the sales receipt showing the date ... hits the bowl, stop the stand mixer. Proof of purchase. Is the fuse in working order? If the mixer still does not start, allow it to the stand mixer in the circuit to cool for 10-15 seconds, then turn it back on . If the problem is not due to operate, ...
Use & Care Guide
Page 10
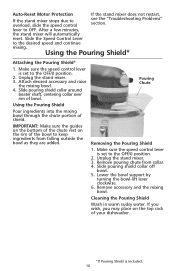
... mixing bowl through the chute portion of your dishwasher. *If Pouring Shield is set to overload, slide the speed control see the "Troubleshooting Problems" section. Make sure the speed control lever is included. 10 If you wish, you may place on the rim of bowl. Slide pouring...raise the mixing bowl. 4. IMPORTANT: Make sure the guides on the bottom of the chute rest on the top rack of shield. Unplug the stand mixer. 3. Pouring Chute Removing the Pouring Shield 1. Slide pouring shield collar off bowl. 5. Remove pouring chute from falling outside the bowl as they are...
... mixing bowl through the chute portion of your dishwasher. *If Pouring Shield is set to overload, slide the speed control see the "Troubleshooting Problems" section. Make sure the speed control lever is included. 10 If you wish, you may place on the rim of bowl. Slide pouring...raise the mixing bowl. 4. IMPORTANT: Make sure the guides on the bottom of the chute rest on the top rack of shield. Unplug the stand mixer. 3. Pouring Chute Removing the Pouring Shield 1. Slide pouring shield collar off bowl. 5. Remove pouring chute from falling outside the bowl as they are...
