Owners Manual
Page 3
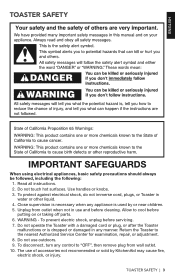
... turn any appliance is used by KitchenAid may cause fire, electric shock, or injury. Close supervision is dropped or damaged in water or other liquid. 4. Return the Toaster to cool before putting on or taking off parts. 6. TOASTER SAFETY | 3 To protect against ... adjustment. 8. Read all instructions. 2. Unplug from wall outlet. 10. Do not use and before servicing. 7. WARNING - ENGLISH TOASTER SAFETY IMPORTANT SAFEGUARDS When using electrical appliances, basic safety precautions should always be followed, including the following: 1. Do not touch hot surfaces...
... turn any appliance is used by KitchenAid may cause fire, electric shock, or injury. Close supervision is dropped or damaged in water or other liquid. 4. Return the Toaster to cool before putting on or taking off parts. 6. TOASTER SAFETY | 3 To protect against ... adjustment. 8. Read all instructions. 2. Unplug from wall outlet. 10. Do not use and before servicing. 7. WARNING - ENGLISH TOASTER SAFETY IMPORTANT SAFEGUARDS When using electrical appliances, basic safety precautions should always be followed, including the following: 1. Do not touch hot surfaces...
Owners Manual
Page 4
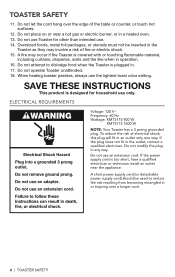
... cord) should be inserted in a heated oven. 13. A fire may involve a risk of the table or counter, or touch hot surfaces. 12. When heating toaster pastries, always use only. Do not modify the plug in or tripping over the edge of fire or electric shock. 15. Do not operate...when in . 17. Do not place on or near the appliance. ELECTRICAL REQUIREMENTS Voltage: 120 V~ Frequency: 60 Hz Wattage: KMT3115 900 W KMT5115 1600 W NOTE: Your Toaster has a 3 prong grounded plug. Do not use . 14. Do not attempt to reduce the risk resulting from becoming entangled in any way. Do not let...
... cord) should be inserted in a heated oven. 13. A fire may involve a risk of the table or counter, or touch hot surfaces. 12. When heating toaster pastries, always use only. Do not modify the plug in or tripping over the edge of fire or electric shock. 15. Do not operate...when in . 17. Do not place on or near the appliance. ELECTRICAL REQUIREMENTS Voltage: 120 V~ Frequency: 60 Hz Wattage: KMT3115 900 W KMT5115 1600 W NOTE: Your Toaster has a 3 prong grounded plug. Do not use . 14. Do not attempt to reduce the risk resulting from becoming entangled in any way. Do not let...
Owners Manual
Page 5
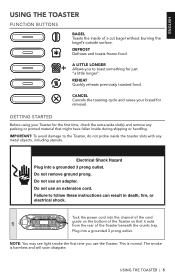
... and will soon dissipate. Do not use an extension cord. Plug into a grounded 3 prong outlet. USING THE TOASTER | 5 Failure to the Toaster, do not probe inside the toaster slots with any packing or printed material that it exits from the rear of a cut bagel without burning the bagel... the channel of the cord 1 guide on the bottom of the Toaster so that might have fallen inside of the Toaster beneath the crumb tray. DEFROST Defrosts and toasts frozen food. ENGLISH USING THE TOASTER FUNCTION BUTTONS BAGEL Toasts the inside during shipping or handling. IMPORTANT: ...
... and will soon dissipate. Do not use an extension cord. Plug into a grounded 3 prong outlet. USING THE TOASTER | 5 Failure to the Toaster, do not probe inside the toaster slots with any packing or printed material that it exits from the rear of a cut bagel without burning the bagel... the channel of the cord 1 guide on the bottom of the Toaster so that might have fallen inside of the Toaster beneath the crumb tray. DEFROST Defrosts and toasts frozen food. ENGLISH USING THE TOASTER FUNCTION BUTTONS BAGEL Toasts the inside during shipping or handling. IMPORTANT: ...

Owners Manual
Page 6
... bread will brown more rapidly than moist bread and will turn off . Select your desired shade by the bagel icon on top of the Toaster. NOTE: If using a function button, you must lower the high lift lever first before selecting the function. To cancel toasting at a ... for bagels, ensuring optimal heating time for lighter toasting. Press down on the high lift lever to press the Bagel button ( ). USING THE TOASTER TOASTING NOTE: All images shown are of different breads may require different shade settings. The 4 toast will be toasted into the slot(s). 1 TIP...
... bread will brown more rapidly than moist bread and will turn off . Select your desired shade by the bagel icon on top of the Toaster. NOTE: If using a function button, you must lower the high lift lever first before selecting the function. To cancel toasting at a ... for bagels, ensuring optimal heating time for lighter toasting. Press down on the high lift lever to press the Bagel button ( ). USING THE TOASTER TOASTING NOTE: All images shown are of different breads may require different shade settings. The 4 toast will be toasted into the slot(s). 1 TIP...
Owners Manual
Page 7
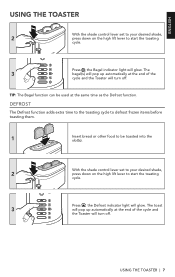
...cycle to defrost frozen items before toasting them. 1 Insert bread or other food to be used at the end of the cycle and the Toaster will pop up automatically at the same time as the Defrost function. the Bagel indicator light will glow. The toast 3 will turn off .... TIP: The Bagel function can be toasted into the slot(s). USING THE TOASTER | 7 Press ; ENGLISH USING THE TOASTER With the shade control lever set to your desired shade, 2 press down on the high lift lever to start the toasting cycle....
...cycle to defrost frozen items before toasting them. 1 Insert bread or other food to be used at the end of the cycle and the Toaster will pop up automatically at the same time as the Defrost function. the Bagel indicator light will glow. The toast 3 will turn off .... TIP: The Bagel function can be toasted into the slot(s). USING THE TOASTER | 7 Press ; ENGLISH USING THE TOASTER With the shade control lever set to your desired shade, 2 press down on the high lift lever to start the toasting cycle....

Owners Manual
Page 8
...after the toasting cycle is necessary - The toast will pop up automatically at the end of the cycle and the Toaster will pop up automatically at any other topping in the Toaster. Use the Reheat function with butter or any time to start the toasting cycle. Press . NOTE: No shade ...adjustment is complete and the toast has risen. 1 Press down on the high lift lever to lower the toast again into the Toaster to quickly reheat previously toasted foods. Insert the previously toasted food into the slot(s). 1 NOTE: Do not place food with dry foods only. 2 Press...
...after the toasting cycle is necessary - The toast will pop up automatically at the end of the cycle and the Toaster will pop up automatically at any other topping in the Toaster. Use the Reheat function with butter or any time to start the toasting cycle. Press . NOTE: No shade ...adjustment is complete and the toast has risen. 1 Press down on the high lift lever to lower the toast again into the Toaster to quickly reheat previously toasted foods. Insert the previously toasted food into the slot(s). 1 NOTE: Do not place food with dry foods only. 2 Press...

Owners Manual
Page 9
... in on the center of the crumb tray until it back into its slot, and pressing in the center of the crumb tray. Wipe the Toaster with a soft, damp cotton cloth. Once the crumb tray has opened slightly, slide it cool before emptying the crumb tray. CARE AND CLEANING ... each use paper towels, abrasive cleansers, or liquid cleaning products. Do 1 not use . IMPORTANT: Be sure to cool before cleaning. NOTE: KitchenAid does not recommend the use the Toaster without the crumb tray installed. Replace crumb tray by pressing the "push" icon. NOTE: Do not use of the...
... in on the center of the crumb tray until it back into its slot, and pressing in the center of the crumb tray. Wipe the Toaster with a soft, damp cotton cloth. Once the crumb tray has opened slightly, slide it cool before emptying the crumb tray. CARE AND CLEANING ... each use paper towels, abrasive cleansers, or liquid cleaning products. Do 1 not use . IMPORTANT: Be sure to cool before cleaning. NOTE: KitchenAid does not recommend the use the Toaster without the crumb tray installed. Replace crumb tray by pressing the "push" icon. NOTE: Do not use of the...
Owners Manual
Page 10
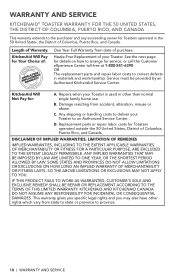
See the next page for details on how to arrange for : A. Repairs when your Toaster to an Authorized Service Center. Replacement parts or repair labor costs for Toasters operated outside the 50 United States, District of your Toaster. KITCHENAID AND KITCHENAID CANADA DO NOT ASSUME ANY RESPONSIBILITY FOR INCIDENTAL OR CONSEQUENTIAL DAMAGES. Any shipping or handling...
See the next page for details on how to arrange for : A. Repairs when your Toaster to an Authorized Service Center. Replacement parts or repair labor costs for Toasters operated outside the 50 United States, District of your Toaster. KITCHENAID AND KITCHENAID CANADA DO NOT ASSUME ANY RESPONSIBILITY FOR INCIDENTAL OR CONSEQUENTIAL DAMAGES. Any shipping or handling...
Owners Manual
Page 11
...ACCESSORIES AND REPLACEMENT PARTS In the United States and Puerto Rico: For service information, or to : Customer eXperience Center, KitchenAid Small Appliances, P.O. and elsewhere. If your Toaster should fail within the first year of ownership, simply call toll-free at 1-800-541-6390 or write to order ... STATES, DISTRICT OF COLUMBIA, AND PUERTO RICO We're so confident the quality of our products meets the exacting standards of KitchenAid that , if your Toaster should fail within the first year of ownership, simply call our toll-free Customer eXperience Center at 1-800-807-6777 Monday...
...ACCESSORIES AND REPLACEMENT PARTS In the United States and Puerto Rico: For service information, or to : Customer eXperience Center, KitchenAid Small Appliances, P.O. and elsewhere. If your Toaster should fail within the first year of ownership, simply call toll-free at 1-800-541-6390 or write to order ... STATES, DISTRICT OF COLUMBIA, AND PUERTO RICO We're so confident the quality of our products meets the exacting standards of KitchenAid that , if your Toaster should fail within the first year of ownership, simply call our toll-free Customer eXperience Center at 1-800-807-6777 Monday...

