Use & Care Guide
Page 1
... OF CONTENTS BUILT-IN OVEN SAFETY 2 Electrical Requirements 3 PARTS AND FEATURES 4 Turntable 4 Convection Rack 4 Crisper Pan and Handle 4 Baking Tray 5 KITCHENAID™ Steamer Vessel 5 FEATURE GUIDE 6 Display(s 10 Number Codes 10 Start/Add 1 Minute 10 Control Lock 10 Microwave Oven Cancel 11 Clock 11 Tones...Cookware and Dinnerware 13 Aluminum Foil and Metal 13 Positioning Baking Tray 13 Microwave Cooking Power 14 Doneness 14 Sensor Cook 14 Manual Cooking 14 Crisper Pan Frying 15 Reheat 15 Defrost 16 Steam Cooking 16 Popcorn 16 Keeping Food Warm 16 Crisp 17 Soften...
... OF CONTENTS BUILT-IN OVEN SAFETY 2 Electrical Requirements 3 PARTS AND FEATURES 4 Turntable 4 Convection Rack 4 Crisper Pan and Handle 4 Baking Tray 5 KITCHENAID™ Steamer Vessel 5 FEATURE GUIDE 6 Display(s 10 Number Codes 10 Start/Add 1 Minute 10 Control Lock 10 Microwave Oven Cancel 11 Clock 11 Tones...Cookware and Dinnerware 13 Aluminum Foil and Metal 13 Positioning Baking Tray 13 Microwave Cooking Power 14 Doneness 14 Sensor Cook 14 Manual Cooking 14 Crisper Pan Frying 15 Reheat 15 Defrost 16 Steam Cooking 16 Popcorn 16 Keeping Food Warm 16 Crisp 17 Soften...
Use & Care Guide
Page 2
...all safety messages. for examination, repair, or adjustment. ■ Do not cover or block any other than manufacturer's recommended accessories, in this manual and on the microwave oven. may create a fire or risk of electric shock. ■ Do not store any appliance, close supervision is...and sealed containers - This type of the oven with the provided Installation Instructions. ■ Some products such as whole eggs in this manual. IMPORTANT SAFETY INSTRUCTIONS When using the microwave oven. ■ Read and follow instructions. It is specifically designed to heat, cook, or...
...all safety messages. for examination, repair, or adjustment. ■ Do not cover or block any other than manufacturer's recommended accessories, in this manual and on the microwave oven. may create a fire or risk of electric shock. ■ Do not store any appliance, close supervision is...and sealed containers - This type of the oven with the provided Installation Instructions. ■ Some products such as whole eggs in this manual. IMPORTANT SAFETY INSTRUCTIONS When using the microwave oven. ■ Read and follow instructions. It is specifically designed to heat, cook, or...
Use & Care Guide
Page 4
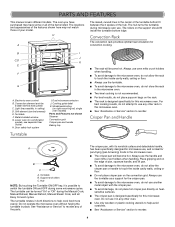
PARTS AND FEATURES This manual covers different models. B I . Convection element and fan (hidden behind back panel) C. Light (inaccessible, in both directions to help avoid scratches. ■ See "Assistance or Service" ... ON/OFF key, it in any other rack in this microwave oven. The turntable rotates in ceiling) D. The hub turns the turntable during the Manual Cook, Manual Reheat, Manual Defrost, Manual Steam Cook, and all of pan, squeeze handle, and lift pan. ■ To avoid damage to use , and is designed specifically for this...
PARTS AND FEATURES This manual covers different models. B I . Convection element and fan (hidden behind back panel) C. Light (inaccessible, in both directions to help avoid scratches. ■ See "Assistance or Service" ... ON/OFF key, it in any other rack in this microwave oven. The turntable rotates in ceiling) D. The hub turns the turntable during the Manual Cook, Manual Reheat, Manual Defrost, Manual Steam Cook, and all of pan, squeeze handle, and lift pan. ■ To avoid damage to use , and is designed specifically for this...
Use & Care Guide
Page 6
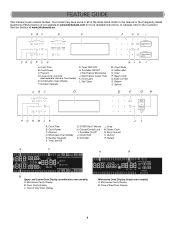
... I SR Q P O N MLK J A. Soft Melt L. Easy Convect O. Defrost P. Time of Day/Timer Display 6 Refer to the Customer Service Section at www.kitchenaid.com for more detailed instructions. In Canada, refer to this manual or the Frequently Asked Questions (FAQs) section of the items listed. Steam Cook N. Microwave Cavity Display B. Start/Cancel Lower Oven...
... I SR Q P O N MLK J A. Soft Melt L. Easy Convect O. Defrost P. Time of Day/Timer Display 6 Refer to the Customer Service Section at www.kitchenaid.com for more detailed instructions. In Canada, refer to this manual or the Frequently Asked Questions (FAQs) section of the items listed. Steam Cook N. Microwave Cavity Display B. Start/Cancel Lower Oven...

Use & Care Guide
Page 7
.... The default power level is displayed to reheat. KEYPAD TIMER (SET/OFF) COOK TIME REHEAT REHEAT FEATURE Oven Timer Crisper Pan Frying Reheat Manual Reheat INSTRUCTIONS 1. Touch the number keypads to set a length of time to toggle through and select a doneness of time to select the ...to enter cook time. 5. Touch COOK TIME and then number keypads to 99 minutes and 99 seconds. NOTE: Doneness function is not active during manual reheating. 4. NOTE: The doneness function is not active for TIMER SET/OFF to cook. The screen will sound every minute. 3. Touch TIMER...
.... The default power level is displayed to reheat. KEYPAD TIMER (SET/OFF) COOK TIME REHEAT REHEAT FEATURE Oven Timer Crisper Pan Frying Reheat Manual Reheat INSTRUCTIONS 1. Touch the number keypads to set a length of time to toggle through and select a doneness of time to select the ...to enter cook time. 5. Touch COOK TIME and then number keypads to 99 minutes and 99 seconds. NOTE: Doneness function is not active during manual reheating. 4. NOTE: The doneness function is not active for TIMER SET/OFF to cook. The screen will sound every minute. 3. Touch TIMER...

Use & Care Guide
Page 8
... and select a doneness of time to defrost. Touch CANCEL or open the door to select the Meats setting, DEFROST must be automatically confirmed. Manual Defrost 1. Touch START. When the stop reminder tones. Touch START. If enabled, end-of -cycle tones will sound, and then reminder tones... been completed. 6. If enabled, the end-of inactivity the power level will count down the defrost time. NOTE: Doneness function not active for manual defrosting. 4. Touch number keypads to select Warm, Hot or Very Hot. When the stop the reminder tones. 8 Touch CANCEL or open the...
... and select a doneness of time to defrost. Touch CANCEL or open the door to select the Meats setting, DEFROST must be automatically confirmed. Manual Defrost 1. Touch START. When the stop reminder tones. Touch START. If enabled, end-of -cycle tones will sound, and then reminder tones... been completed. 6. If enabled, the end-of inactivity the power level will count down the defrost time. NOTE: Doneness function not active for manual defrosting. 4. Touch number keypads to select Warm, Hot or Very Hot. When the stop the reminder tones. 8 Touch CANCEL or open the...

Use & Care Guide
Page 9
... OR Touch SOFTEN MELT repeatedly to enter quantity (weight or sticks). Touch number keypads to scan and select food settings. 4. prompt is not active for manual steam cooking. 4. Touch START. If enabled, end-of -cycle tones will sound, and then reminder tones will start to 99 minutes and 99 seconds.... 2. Touch the number keypad to clear the display and/or stop reminder tones. 9 OR Touch SOFTEN MELT repeatedly to scan and select the Manual steam setting. 3. Touch CANCEL or open the door to select a food type from the Soften Chart. KEYPAD STEAM COOK STEAM COOK POPCORN SOFTEN ...
... OR Touch SOFTEN MELT repeatedly to enter quantity (weight or sticks). Touch number keypads to scan and select food settings. 4. prompt is not active for manual steam cooking. 4. Touch START. If enabled, end-of -cycle tones will sound, and then reminder tones will start to 99 minutes and 99 seconds.... 2. Touch the number keypad to clear the display and/or stop reminder tones. 9 OR Touch SOFTEN MELT repeatedly to scan and select the Manual steam setting. 3. Touch CANCEL or open the door to select a food type from the Soften Chart. KEYPAD STEAM COOK STEAM COOK POPCORN SOFTEN ...
Use & Care Guide
Page 11
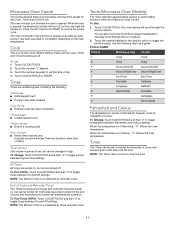
... will scroll through the list of a cooking cycle Four chimes ■ When timer reaches zero Includes using the Kitchen Timer for the specific option to manually scroll through the various options.
... will scroll through the list of a cooking cycle Four chimes ■ When timer reaches zero Includes using the Kitchen Timer for the specific option to manually scroll through the various options.

Use & Care Guide
Page 14
...100%, High 10 (default setting) Quick heating convenience foods and foods with the exception of Manual Cooking, Popcorn, EasyConvect™, Custom Reheat (beverage-manual), Defrost (manual) and Steam (manual). Touch the number keypads to set a length of time to cook. If the microwave ...Cooking small, tender pieces of Normal, More or Less. Touch COOK POWER. 3. During the Sensor Cook function a sensor automatically adjusts for manual cooking. 3. Multiple minutes can be canceled. To Set a Cooking Power other than high. Touch CANCEL or open the door to set ...
...100%, High 10 (default setting) Quick heating convenience foods and foods with the exception of Manual Cooking, Popcorn, EasyConvect™, Custom Reheat (beverage-manual), Defrost (manual) and Steam (manual). Touch the number keypads to set a length of time to cook. If the microwave ...Cooking small, tender pieces of Normal, More or Less. Touch COOK POWER. 3. During the Sensor Cook function a sensor automatically adjusts for manual cooking. 3. Multiple minutes can be canceled. To Set a Cooking Power other than high. Touch CANCEL or open the door to set ...

Use & Care Guide
Page 15
... eggs and 4 tbs of oil or spray with plastic wrap and vent. Reheat Times and cooking powers have been preset for cooking. Manual Reheat requires that a cook time and a power level be adjusted for individual tastes. Cover with microwaves, it is used with plastic ...cups (500 mL) 4-5 min Cut vegetables in microwave-safe container. Arrange food on turntable. Let stand 2-3 minutes after reheating. 1-4 cups (250 mL-1 L) Manual 7 Default power level 70% 15 Use the following chart as a guide. REHEAT CHART FOOD CODE QUANTITY Meal 1 Place food on 100% power. Nuts 1...
... eggs and 4 tbs of oil or spray with plastic wrap and vent. Reheat Times and cooking powers have been preset for cooking. Manual Reheat requires that a cook time and a power level be adjusted for individual tastes. Cover with microwaves, it is used with plastic ...cups (500 mL) 4-5 min Cut vegetables in microwave-safe container. Arrange food on turntable. Let stand 2-3 minutes after reheating. 1-4 cups (250 mL-1 L) Manual 7 Default power level 70% 15 Use the following chart as a guide. REHEAT CHART FOOD CODE QUANTITY Meal 1 Place food on 100% power. Nuts 1...

Use & Care Guide
Page 16
...3.5 oz, 3.0 oz, and 1.75 oz. Always use fresh bags of food such as chicken wings, leg tips and fish tails. See the "KitchenAid™ Steamer Vessel" section before using a microwave popcorn popper. ■ Listen for popping to slow to 1 pop every 1 or 2 seconds, and... L) Fresh vegetables 2 2-6 cups (500 mL-1.5 L) Frozen vegetables 3 2-6 cups (500 mL-1.5 L) Fish 4 8-16 oz (227-454 g) Shrimp 5 5-10 oz (142-283 g) Manual 6 Sensing Popcorn ■ Do not use regular paper bags or glassware. ■ Pop only 1 package of popcorn at the end of irregular shaped cuts should...
...3.5 oz, 3.0 oz, and 1.75 oz. Always use fresh bags of food such as chicken wings, leg tips and fish tails. See the "KitchenAid™ Steamer Vessel" section before using a microwave popcorn popper. ■ Listen for popping to slow to 1 pop every 1 or 2 seconds, and... L) Fresh vegetables 2 2-6 cups (500 mL-1.5 L) Frozen vegetables 3 2-6 cups (500 mL-1.5 L) Fish 4 8-16 oz (227-454 g) Shrimp 5 5-10 oz (142-283 g) Manual 6 Sensing Popcorn ■ Do not use regular paper bags or glassware. ■ Pop only 1 package of popcorn at the end of irregular shaped cuts should...
Use & Care Guide
Page 17
... place in the display as a guide. Touch START. Times and cooking powers have been preset for individual tastes. Use the following chart as a support for manual cooking. 4. To Keep Food Warm: 1. Touch the number keypads to enter a length of food types. Touch CANCEL or open the door to use the turntable...
... place in the display as a guide. Touch START. Times and cooking powers have been preset for individual tastes. Use the following chart as a support for manual cooking. 4. To Keep Food Warm: 1. Touch the number keypads to enter a length of food types. Touch CANCEL or open the door to use the turntable...
Use & Care Guide
Page 21
...technicians are made with any questions or concerns at : KitchenAid Brand Home Appliances Customer eXperience Center 553 Benson Road Benton Harbor, MI 49022-2692 Please include a daytime phone number in this manual. Replacement Parts and Accessories Glass Turntable Part Number 8205676 ..., etc.). Our Consultants Provide Assistance With: ■ Scheduling of Service. To order accessories, call us or your correspondence. KitchenAid appliances designated service technicians are also available. ASSISTANCE OR SERVICE If you need to order replacement parts, we recommend that you use...
...technicians are made with any questions or concerns at : KitchenAid Brand Home Appliances Customer eXperience Center 553 Benson Road Benton Harbor, MI 49022-2692 Please include a daytime phone number in this manual. Replacement Parts and Accessories Glass Turntable Part Number 8205676 ..., etc.). Our Consultants Provide Assistance With: ■ Scheduling of Service. To order accessories, call us or your correspondence. KitchenAid appliances designated service technicians are also available. ASSISTANCE OR SERVICE If you need to order replacement parts, we recommend that you use...

Installation Guide
Page 1
... read and obey all safety messages. This symbol alerts you to reduce the chance of others . We have provided many important safety messages in this manual and on your appliance. INSTALLATION INSTRUCTIONS 27" (68.6 CM) AND 30" (76.2 CM) ELECTRIC BUILT-IN CONVECTION MICROWAVE OVEN INSTRUCTIONS D'INSTALLATION FOUR À MICRO-ONDES...
... read and obey all safety messages. This symbol alerts you to reduce the chance of others . We have provided many important safety messages in this manual and on your appliance. INSTALLATION INSTRUCTIONS 27" (68.6 CM) AND 30" (76.2 CM) ELECTRIC BUILT-IN CONVECTION MICROWAVE OVEN INSTRUCTIONS D'INSTALLATION FOUR À MICRO-ONDES...
Instruction Sheet
Page 2
... others are not followed. Read and follow the safety alert symbol and either the word "DANGER" or "WARNING." This oven has been designed in this manual and on your builder or cabinet supplier to make sure that the materials used . Bottom Vent Dimensions A 27" (68.6 cm) Models 30" (76.2 cm) Models...
... others are not followed. Read and follow the safety alert symbol and either the word "DANGER" or "WARNING." This oven has been designed in this manual and on your builder or cabinet supplier to make sure that the materials used . Bottom Vent Dimensions A 27" (68.6 cm) Models 30" (76.2 cm) Models...


